CAMANGI Mangrove 7 User manual

F902

Table of Contents
Table of Contents
What’s in the Box? ................................................................................. 1
Your Device............................................................................................ 2
Installing Memory Card .......................................................................... 3
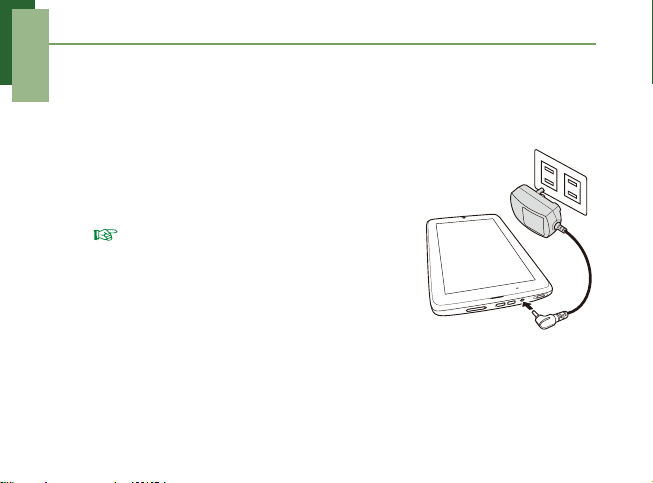
Charging Battery .................................................................................... 4
First Start Up .......................................................................................... 5
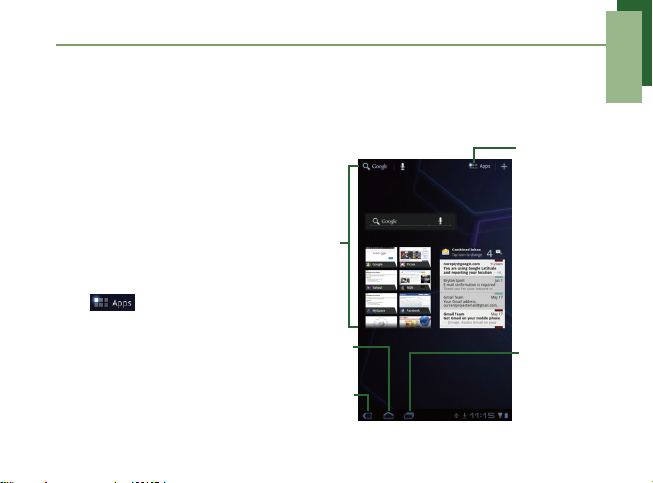
Home Screen ......................................................................................... 5
Setting up Wi-Fi...................................................................................... 6
Entering Information............................................................................... 7
Contacts ................................................................................................. 8
Setting up Email Account ....................................................................... 9
Sending and Receiving Emails .............................................................. 10
Using Browser........................................................................................ 12
Using Google Search ............................................................................. 13
Using Bluetooth...................................................................................... 14
Taking Photos and Videos ..................................................................... 15
Viewing Photos and Videos ................................................................... 17
Changing Basic Phone Settings............................................................. 19

Quick Start Guide
1
Congratulations on your purchase of this device. Quick Start Guide will help
you go through the basic features of your device.
What’s in the Box?
Your package comes with the following items. If any of them is missing,
please contact your retailer.
Micro USB cable AC Adapter
Tablet Headset Quick Start Guide
L
R

Quick Start Guide
2
Your Device
Front and Rear Views
Front
camera
Touch
screen
Light sensor Flash LED
Rear
camera
Microphone LED indicator

Quick Start Guide
3
Top and Bottom Views
Installing Memory Card
1. Open the card cover.
2. Insert microSD card with the gold contacts facing
down as shown on the illustration.
3. Close the card cover.
NOTE:
•To remove the memory card, push it down to eject it
from the slot.
microSD slot
cover DC jack
Volume
Headset
jack
Speaker
Power Micro USB
connector
HDMI connector
Speaker

Quick Start Guide
4
•Do not remove the memory card while the device is turned on. Sudden removal
of the memory card may cause data loss or unpredictable system hang up.
Charging Battery
1. Connect one end of the AC adapter to the
DC jack of the device.
2. Plug the other end of the AC adapter to the
wall outlet to start charging.
NOTE:
•The LED indicator lights green when the battery
is fully charged.
•Charging time using the AC adapter takes less
than 3 hours (power-off mode). Battery life may
vary depending on user usage.

Quick Start Guide
5
First Start Up
After installing the microSD card and charging the battery, the device is
ready to be turned on.
Home Screen
From the Home screen, you
can quickly access common
features, view notifications of
received emails, and check
battery and connection
status.
Tap to view the
applications and device
settings.
Launcher
icon
Tap to return
to the
previous
screen.
Widgets
Tap to return
to Home. Tap to view
the recent
applications.

Quick Start Guide
6
Setting up Wi-Fi
This device only uses Wi-Fi connection. You need to connect to a wireless
network before surfing the Internet or using the related applications that
require internet connection.
1. From the Home screen, tap > Settings.
2. Tap Wireless & networks.
3. Tap Wi-Fi to activate.
4. Tap Wi-Fi settings > Network notification to
start detecting networks.
5. Available networks are listed. Tap a network to
connect to or tap Add Wi-Fi network to
manually add a connection.
NOTE: Connecting to a secured network will
prompt for a password. Enter the password, then tap
Connect.

Quick Start Guide
7
Entering Information
Regardless of the application, you can enter information using the on-screen
keyboard.
To use the on-screen keyboard
1. Tap the input box to display the on-screen
keyboard.
NOTE:
•Tap the keys to enter characters.
•To toggle between upper and lower case letter
display, tap .
•To display the numeric and symbols keyboard, tap
.
2. Tap the keys on the keyboard to enter
characters.
NOTE: If word completion is activated, the
screen displays a list of suggested words as you type
the characters. Tap a match to insert it.

Quick Start Guide
8
Contacts
Contacts lets you store names, phone numbers, email addresses, and other
information.
To add a Contact
1. From the Home screen, tap >
Contacts.
2. Tap > New.
3. Enter contact information such as name,
phone number, email address, etc.
4. Tap to save the contact.
To import contacts
1. On Home screen, tap > Contacts.
2. Tap > Import/Export.
3. Select Import from storage.

Quick Start Guide
9
4. Select vCard files to import and tap OK.
Setting up Email Account
1. From the Home screen, tap > Email.
2. Enter your Email address and Password.
3. Tap Next.
The device will automatically retrieve email
settings.
4. Set the account options and tap Next.
5. Enter Name and Account display name.
6. Tap Next.
Once the account set up is completed, the
device will automatically retrieve your emails.

Quick Start Guide
10
Sending and Receiving Emails
Composing and sending emails
1. From the Home screen, tap > Email,
then tap an email account.
2. Tap .
3. In the To field, enter the recipient’s email
address.
4. Enter the Subject.
5. Compose your email.
6. Tap .
Adding attachments to emails
1. Tap .
2. Select items to attach.

Quick Start Guide
11
Receiving emails
Emails are automatically received in the Inbox folder when the device
connects to a network.
1. From the Home screen, tap > Email, then tap an email account.
2. Tap .

Quick Start Guide
12
Using Browser
To open a web page
1. From the Home screen, tap
> Browser.
2. Tap the address bar.
3. Type the URL. As you type, a list of
URL suggestions appears on the
screen.
4. Tap a match item in the list.
Tap to access more functions.
Swipe
your
finger up
or down
to scroll
the page.

Quick Start Guide
13
Using Google Search
From the Home Screen, you can search information on your device and on
the web with Google Search right away.
1. From the Home screen, tap > Google Search or tap Google
Search widget.
2. Enter the text you are searching in the Search box.
3. As you type, matching items on your device and suggestions from
Google web search are added to the list of previously chosen search
results.Tap a match item in the list.
4. If what you are searching is not in the list, tap Go. The Browser opens,
displaying results of a Google search on the web.

Quick Start Guide
14
Using Bluetooth
1. From the Home screen, tap > Settings > Wireless & networks.
2. Tap Bluetooth check box to activate the
Bluetooth function.
3. To search for a new device, tap Bluetooth
settings > Find nearby devices > Scan for
devices.
4. Tap a detected device.
5. Enter the PIN to start pairing, then tap OK.
NOTE:
•The PIN of the device must be the same PIN on the
other bluetooth device.
•On some devices, tap Pair to start pairing.
6. The paired bluetooth device name is
displayed.

Quick Start Guide
15
Taking Photos and Videos
This device is equipped with rear and front cameras to take photos and
videos. By default, your device uses the rear camera to take photos or
record videos.
To take a photo
1. From the Home screen, tap > Camera.
To switch to front camera, tap .
2. Aim the device at the subject.
Tap / to zoom in/out on the
subject.
3. Tap to take the shot.
To focus on the image before
taking the shot, tap and hold .
The focus frame turns green to
indicate that the focus is set.

Quick Start Guide
16
To record video
1. From the Home screen, tap > Camera.
2. Tap to switch to camcorder mode.
To switch to front camera, tap .
3. Aim the device at the subject.
4. Tap to start recording.
5. Tap to stop recording.
NOTE: To adjust the camera/camcorder settings, see the User Manual.

Quick Start Guide
17
Viewing Photos and Videos
To view photos
1. From the Home screen, tap > Gallery.
2. Tap the desired folder to view images in thumbnails.
3. Tap an image to view.
4. Swipe your finger to the left/right
to view the previous/next image.
• To play slideshow, tap .
• To share the photo via
Twidroyd, Picasa, Bluetooth,
Gmail, or Email, tap .
•To delete the photo, tap and
tap Confirm Delete.
• To edit the photo, tap to show more options.

Quick Start Guide
18
To play back videos
1. From the Home screen, tap > Gallery.
2. Tap the desired folder to view video clips in thumbnails.
3. Tap the video to play.
4. Tap the video control buttons (on
the bottom of the screen) to
rewind/pause/fast forward the
video clip.
Table of contents
Other CAMANGI Tablet manuals