Cambridge Temperature Concepts DuoFertility User manual

3
DuoFerti
l
ity
Quick Start Guide
& User Manual
Simple Convenient Natural
This product
is not for
contraceptive
use
A safe and natural
alternative to fertility
treatments

A message from the team
Thank you for choosing to use DuoFertility to help you conceive. Please read this
guide carefully before using the product.
We are committed to making this journey as natural and simple as possible for you.
The DuoFertility system provides you with an easy way of keeping track of your
body basal temperature, which is a clinically proven method of monitoring your
fertility. DuoFertility uses the latest technology to identify the days in the month
you are most likely to get pregnant. It has been designed to t into any lifestyle, so
you can use the product with condence, without any disruption to your daily life.
If you would like further advice on how to use DuoFertility, please do let us know.
Our customer care team are happy to answer any queries that you may have about
using the product, and our in-house team of dedicated fertility experts are available
to answer any fertility-related queries. Any technical terms are explained in the
Glossary (pages 33-34).
We hope that you enjoy using DuoFertility, and that it helps you to take control of
your fertility.
Best wishes from the team at
DuoFertility

General product information
Quick Start Guide 1
Contents of the DuoFertility box 2
How DuoFertility can help you 2
How DuoFertility works 3
The science behind DuoFertility 4
Getting the most out of DuoFertility 5
Understanding your menstrual cycle and ovulation 6
Indications for use 8
Warnings and precautions 8
A step-by-step guide to using DuoFertility
How to use the sensor 10
Where to place the sensor 10
How to apply the sensor 10
When to wear the sensor 11
How to use the adhesives 12
How to wear the adhesive 12
How to change the adhesive 12
What to do if you experience skin irritation 12
Icons 13
Essential icons 13
Additional icons 14
How to use the software 15
Installing the software 15
Using the software 16
Data display 17
Entering information onto the software 17
Leaving notes on the software 18
Transferring your data to the DuoFertility centre 18
Synchronisation with the DuoFertility centre 19
Printing o your fertility chart 19
Saving a copy of your fertility chart 19
DuoFertility updates 19
The reader 20
How to use the reader 21
How to switch the reader ON and OFF 21
How to select an icon 21
How to cancel an icon 22
Entering information onto the reader 22
Transferring data from the sensor 23
How do I transfer the data? 23
How long does it take to transfer the data? 24
How often should I transfer the data? 24
Reading your fertility status 25
Displaying your fertility status on the reader 25
Displaying your fertility status on a computer 26
Troubleshooting 27
Contents

Additional information
Looking after the DuoFertility product 29
Cleaning the sensor and reader 30
What to do if you lose the sensor 30
What to do if you lose the reader 30
Frequently asked questions about DuoFertility 31
Glossary 34
Careline 36
Name and address of manufacturer 37
The “use of measurement data” 38
Limitations of information from Fertility Experts 38

1
Quick Start Guide
Basic functions
To switch on the reader, hold the central button (for approximately 1 second) until
the reader beeps. The DuoFertility icon will ash white. The reader also switches on
when connected to your computer.
The reader turns itself o automatically; after about a minute, the reader icons will
not be lit, indicating that the reader is o.
Getting started
You can start to use DuoFertility at any point during your cycle. To set up your
monitor ready for use:
1. Connect your reader to your computer using the USB cable provided
2. Download the relevant software from the launch window
3. Launch the software
4. Follow the on-screen instructions for the initial welcome process
You are now ready to start monitoring your cycle:
1. Use one of the adhesives provided to start wearing the sensor under one of
your arms. Make sure that you position the sensor so the side with the large,
blue circle is facing your skin. Remember to wear the sensor while you are
sleeping.
2. After a couple of days, transfer the data from the sensor to your reader. To
do this:
o Turn on your reader by pressing the central button
o Press the central button a second time. You should see a yellow light
moving backwards and forwards on the light scale
o Whilst the yellow light is moving, position the sensor over the central
button. The reader should ‘recognise’ the sensor and a green light should
appear on the left hand side of the light scale. During the download it will
move slowly to the right hand side.
o The reader will signal a successful download by sounding a low beep,
followed by a high beep, and the green‘today’arrow should light up in green.
After you have been using DuoFertility for approximately one cycle, your fertility
status should start to be displayed on the reader light scale after the download and
on the software graph on your computer.
It is important for you to read the rest of the User Manual to learn about how to use
the product in greater detail.

2
Contents of the DuoFertility box
How DuoFertility can help you
DuoFertility is a sophisticated fertility monitor. It predicts when you are most likely to
be fertile by automatically taking continuous measurements of your temperature. This
allows DuoFertility to build up a detailed picture of your cycle and identify your most
fertile days. After transferring this data from your sensor, your reader will display a simple
summary of your fertility status which you can use to plan intercourse for the best time
of the month.
DuoFertility may increase your chances of getting pregnant by helping you to:
• Plan intercourse for when you are most likely to conceive
• Understand your fertility by viewing a detailed picture of your menstrual cycles
The DuoFertility box should contain:
1. The DuoFertility reader
2. The DuoFertility sensor
3. A pack of 40 adhesives
4. A USB cable
5. Quick Start Guide & User Manual
6. A small travel bag
If any of these are missing, please call the
DuoFertility careline.

3
How DuoFertility works
DuoFertility consists of a sensor and a hand-held reader. The sensor takes over 2,500
measurements of your temperature every 24 hours. This allows it to detect the small
jump in temperature which occurs when you ovulate, and to identify when you will
be most likely to conceive, giving you time to plan ahead.
When you transfer data from your sensor to the reader, the reader displays your
fertility status for the week ahead.You can then plug your reader into your computer
to see your data in more detail. This automatically transfers your data to our support
centre, which allows our fertility experts to analyse your cycle and inform you of any
irregularities. It also allows us to monitor the performance of your product and send
you the latest product updates.

4
The science behind DuoFertility
When ovulation occurs, there is a small increase in your body basal temperature
(BBT) as seen in Figure 1. BBT is the lowest temperature your body reaches – your
body usually reaches this temperature during deep sleep and your temperature
increases again when you wake up. The change in body basal temperature before
and after ovulation usually ranges from 0.3oC to 1.5oC, although this may vary.
The technology behind DuoFertility records skin temperature measurements and
uses this to estimate your body basal temperature; this allows it to identify the small
rise in body basal temperature and to estimate when you have ovulated. DuoFertility
works out when you are sleeping most deeply, so there are no disruptions to your
temperature measurements from late nights, early mornings, or interrupted sleep.
Of the 2,500 temperature points collected, only the best quality measurements are
used.
The most fertile days of the menstrual cycle usually include the day of ovulation and
the days preceding and following ovulation. Therefore, accurately identifying your
ovulation is key to maximise your chances of conception by helping you to plan
intercourse for when you are most likely to conceive.
Figure 1: Variations in body basal
temperature during the cycle (each
dot represents BBT at a given day of
the cycle). There is a small increase in
BBT on the day of ovulation.

5
Getting the most out of DuoFertility
There are a number of things you can do to get the most out of DuoFertility and
maximise your chances of getting pregnant.
Regularly plug the reader into a computer with an Internet
connection
While it is possible to check your fertility status using just your reader, we strongly
recommend that you regularly plug your reader into your computer and open
your temperature chart while you are connected to the internet. This is because
we regularly release automatic updates to ensure that DuoFertility becomes more
attuned to your body as time goes on, helping to maximise your chances of getting
pregnant. Regularly plugging in your reader will also allow our experts to check
for irregularities in your data and monitor the performance of your reader and
sensor. In addition, all of your data will be encrypted and saved so that none of
your data will be lost if you happen to lose your reader. The battery in the reader is
also charged while the reader is connected to a computer. For further information,
please read page 18.
Record each day of your menstruation on the day that it occurs
In order to ensure that the fertility predictions that you receive are as accurate as
possible, we strongly recommend that you record each day that you have your
period either on the reader or on the software. It is very important that you record
menstruation as soon as possible after it occurs - ideally, you should record each
day of menstruation on the day that it occurs, or, at the very latest, within 2 to 3
days of it occurring.
Inform us of your fertility history
It is very important for you to ll in the fertility information during the welcome
process so that we can personalise your product. It is particularly important for
you to record your previous cycle dates from before you started using DuoFertility.
We also encourage you to keep us updated about any changes in treatment or
medication that you undergo while you are using DuoFertility.

6
Understanding your menstrual cycle and ovulation
The menstrual cycle is the process during which your body prepares for pregnancy.
As you approach ovulation each month, your uterus becomes more welcoming to
sperm, allowing them to survive longer and swim to the egg, which increases your
chances of getting pregnant.
Each menstrual cycle begins on the rst day of your period and ends on the day
before your next period. The menstrual cycle is composed of three dierent phases
and lasts 28 days on average, in which case ovulation is expected to occur between
day 11 and day 16. However, it is not unusual to have cycles which are as short as 20
days or as long as 60 days.
Ovulation is a key event in the menstrual cycle. During the follicular phase, one of
the follicles which are contained by the ovaries reaches complete maturity and one
egg/ovule is released. This is triggered by a surge in luteinising hormone (LH).
After ovulation, the released egg travels along the Fallopian tubes, where
fertilisation by sperm can occur. The ruptured follicle left behind after ovulation
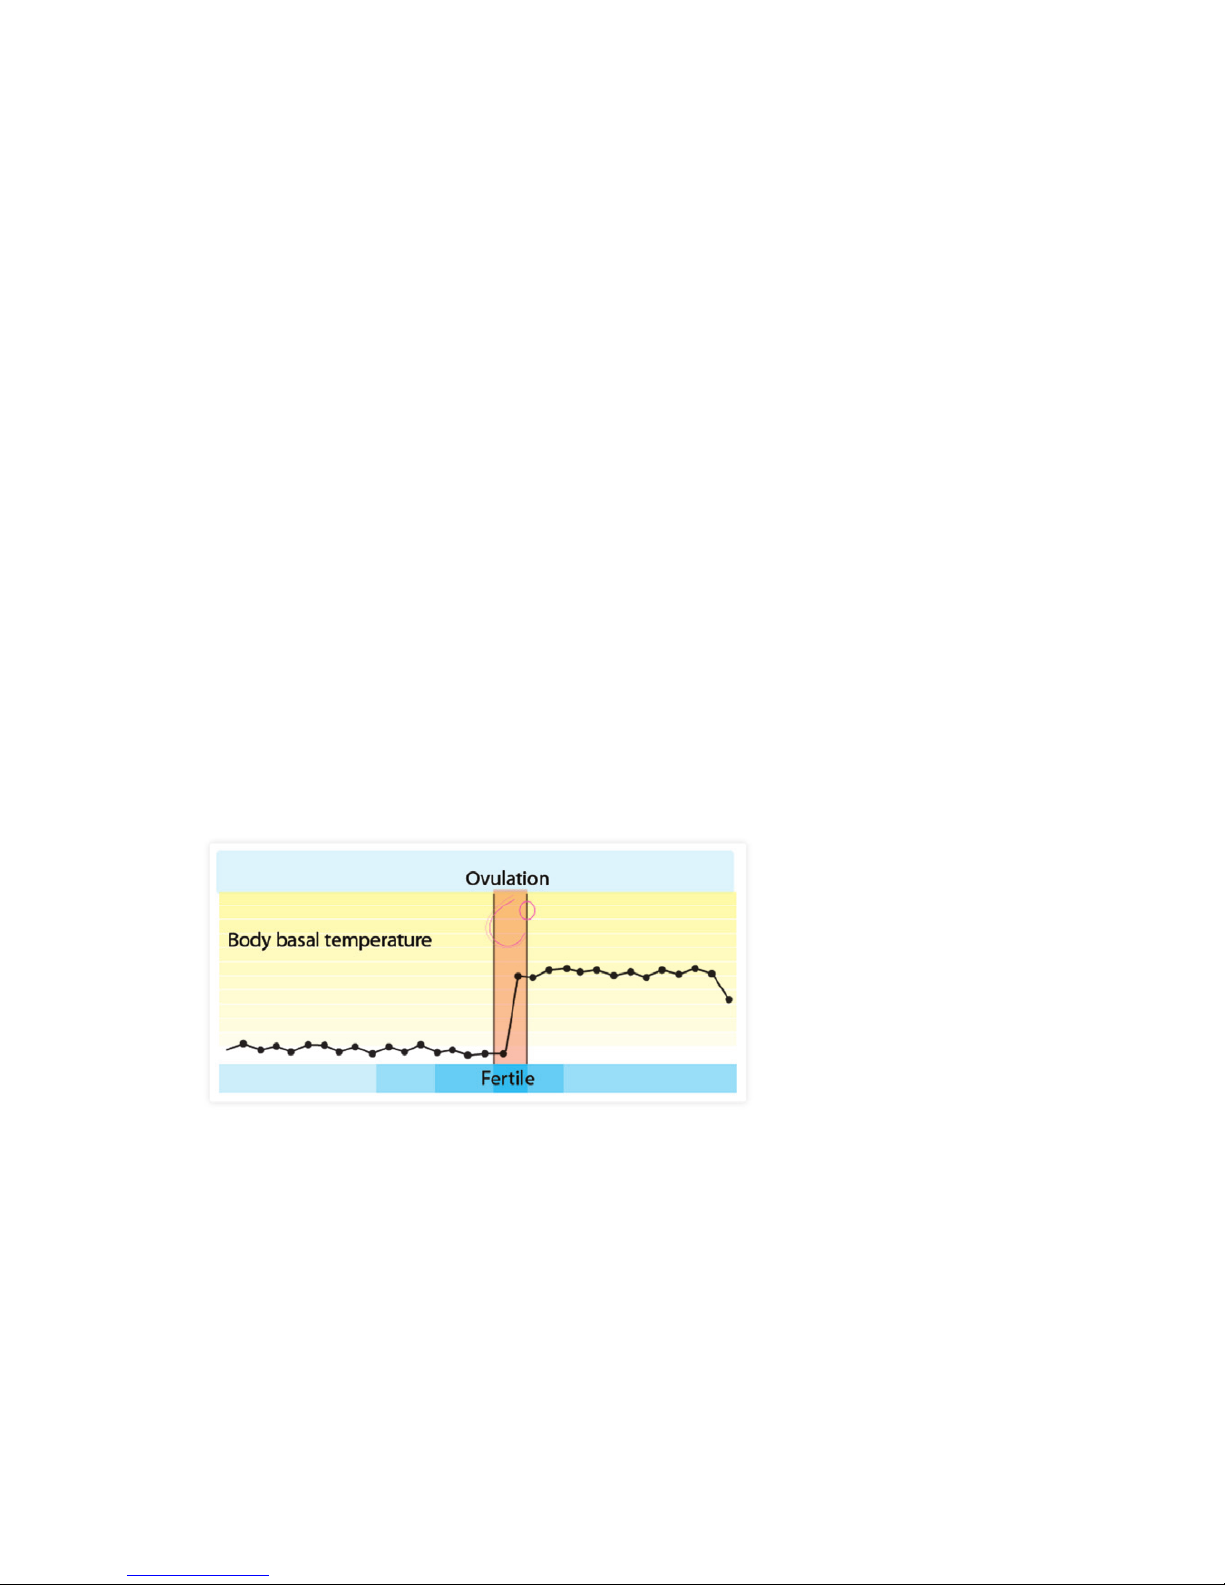
forms the corpus luteum which secretes progesterone, the hormone responsible for
the rise in body basal temperature (BBT) that signals ovulation. It also suppresses
the ripening of further follicles, induces closing of the cervix and the thickening of
cervical mucus. The corpus luteum then disappears with the onset of menstruation.
The lifespan of the released egg is only 24-48 hours. Therefore, for fertilisation to
occur, sperm must either be already present in the female reproductive tract, or
intercourse must take place soon after ovulation. Sperm can survive for 3 to 5 days
in the vaginal environment if the right kind of cervical mucus is present. This is
why the few days before and after ovulation are when you are most likely to get
pregnant, with the peak time being the day of ovulation.
When you ovulate, the vaginal environment becomes more welcoming and friendly
to sperm, making this the most fertile time of your cycle and therefore the best time
to try for a baby. Cervical mucus becomes less acidic and more elastic and the cervix
moves from a low, rm, dry and closed position to being soft, high and open. All
these changes facilitate the passage of sperm to the uterus and the Fallopian tubes.
This is therefore the best time of the month to try for a baby.

7
Figure 2: Phases of the menstrual cycle

8
Indications for use
The DuoFertility Monitor is intended for measuring, and recording basal body
temperature (BBT) as an aid in ovulation prediction to aid in conception (not to be
used for contraception).
Warnings and Precautions
THIS PRODUCT IS NOT FOR CONRACEPTIVE USE
If you have been actively using DuoFertility and having regular intercourse during
your predicted fertile days for six months without managing to conceive, please
contact your doctor for further advice if you have not previously done so.
DuoFertility is suitable for women with a wide range of conditions, such as hormonal
disorders (including polycystic ovarian syndrome) and irregular menstrual cycles.
DuoFertility is suitable for women who are currently undergoing some fertility
treatment such as Clomifene citrate, Metformin, Tamoxifene and Progesterone
supplementation. DuoFertility is also suitable for women who have had fertility
treatments and assisted reproductive techniques in the past such as IVF.
If you are taking fertility treatment, it is important to make the support team aware
of this by recording this on the software or contacting us, as the monitor will need
to be updated to take this into account.
Certain medical conditions and medications can adversely aect the performance
of DuoFertility. The monitor may not be able to predict your fertile days if you are
receiving hormonal injections to induce ovulation as this event is not controlled
by your cycle. DuoFertility will not be able to help women who are suering from
anovulation because of menopause, have both Fallopian tubes blocked, or whose
partners are infertile.
The device is intended to give an indication of the user’s body basal temperature.
The device is not intended for use as a thermometer. Temperature measurement is
accurate to 0.05 degrees Celsius.
The use of DuoFertility may cause irritation to the skin from wearing the adhesive
(see page 12). If irritation persists, please discontinue use and contact your doctor.
Also, please report this to the support team.

9
Before using the DuoFertility monitor, it is important that
you read the instructions in detail.
The DuoFertility monitor complies with the safety
regulations for the protection against Electrical Shock.
Cambridge Temperature Concepts recognises its
responsibilities and obligations under current National and
European legislation and regulations and is committed to
compliance with the European Union Directives on Waste
Electrical and Electronic Equipment (WEEE).
As part of our responsibility towards caring for the
environment, Cambridge Temperature Concepts oers all
customers of DuoFertility the option of disposing of their
DuoFertility Reader and Sensor on their behalf. Please do
not discard of your product along with normal household
waste. Please contact us if you wish to return your unwanted
DuoFertility equipment for appropriate disposal.
DuoFertility complies with the European Directives
regarding consumer safety, health or environmental
requirements and is approved for sale within the EU. The
audits are performed by SGS United Kingdom Ltd.
This device has been tested and found to conform with
the limits for a class B digital device pursuant to part 15
of the FCC rules. These limits are designed to provide
reasonable protection against harmful interference in
a residential installation. Operation is subject to the
following 2 conditions: 1. This device may not cause harmful
interference; and 2. This device must accept any interference
received, including interference that may cause undesired
operation.
NOTE: THE MANUFACTURER IS NOT RESPONSIBLE FOR ANY
INTERFERENCE CAUSED BY UNAUTHORIZED MODIFICATION
TO THIS EQUIPMENT. SUCH MODIFICATION COULD VOID
THE USER’S AUTHORITY TO OPERATE THE EQUIPMENT.
0120
FCC ID:
WWO-CTCDFR

10
How to use the sensor
Where to place the sensor
The sensor must be worn in an area with good blood circulation.
We suggest using the adhesives which are provided to keep the
sensor in place under the arm, as this is a convenient place to
wear the sensor.
You can wear the adhesive either underneath or away from
your bra strap. This should not aect the results as long as you
are consistent in where you position the sensor. You should try
to nd the position that is most comfortable for you. After you
have removed the sensor, please try to replace the sensor in the
same position in which you were previously wearing it.
Unless you have reached the beginning of a new cycle (i.e. your
period has started), we do not recommend that you change the arm under which
you are wearing the sensor. This is because the blood ow might be slightly dierent
on each side, and this could aect the quality of the temperature readings. If, for any
reason, you have to change side, we suggest that you record this directly in the
notes sections of your software. The correct time to change side is on the rst day of
your period, as this marks the beginning of a new cycle. This allows the skin on each
side to breathe for a cycle, and will also reduce the chances of any skin irritation.
How to apply the sensor
It is very important for you to wear the sensor the right way round, otherwise it will
not be able to take accurate measurements of your temperature.
The side of the sensor that goes next to your skin has a large blue circle which covers
most of the sensor (Figure 1). The outward side of the sensor has four smaller circles
(Figure 2). Position the sensor so that the skin side is facing down.
Figure 1: Skin side
of the sensor
Figure 2: Outward
side of the sensor

11
When to wear the sensor
We recommend that you wear the sensor continuously
- this ensures that the maximum number of readings is
taken, resulting in greater accuracy. One of the advantages
of DuoFertility is that you do not have to wake up early
every day to take your temperature - the sensor does all
the work for you.
The sensor is fully waterproof, so you can wear it in the
shower. Occasionally, however, you may not want to wear
the sensor, for example, when wearing a bikini. If you
remove the sensor during the day, it is very important that
you remember to put it back on when you go to bed so that
data is collected every night.
Please note that the sensor must be worn for at least two hours
whilst sleeping in order to calculate a temperature reading.

12
How to use the adhesives
We have provided you with 40 adhesive patches to use. The adhesives provided are 3M™
products that are specially designed for continuous use. This will allow you to wear the
DuoFertility sensor continuously and record good quality data so that DuoFertility can
indicate your fertility accurately.
How to wear the adhesive
The adhesives are sticky on both sides.
To use the adhesive, remove the white, non-
shiny liner (10) and place the sensor on the adhesive (11) so that the side of the sensor
that should be against your skin is stuck to the adhesive. Next, remove the transparent
liner (13) and stick the adhesive, together with the sensor, to your body (14). It is
important that your skin is healthy and not irritated.
How to change the adhesive
After removing the adhesive, we recommend that you leave the sensor o for a few
hours, making sure that you replace it before you go to sleep. This allows your skin
to breathe and reduces the risk of skin irritation.
What to do if you experience skin irritation
If you experience skin irritation, please contact us.
We would recommend the following to help:
• Remove the sensor when you are in the shower, and only replace it in the evening
before going to bed
• Ensure that you have no deodorant/moisturiser where the sensor is
Prolonged skin irritation may aect your temperature readings, so it is important
to alleviate any causes of skin irritation. If the irritation persists, please discontinue
use and contact your doctor.

13
Icons
DuoFertility can identify when you are most fertile solely by using the temperature
data which is recorded by the sensor. However, there are a number of additional
pieces of information which you can enter to increase the accuracy of predictions.
We highly recommend that you enter the “essential icons” listed below to improve
the accuracy of prediction. The “additional icons” are not essential for you to enter;
however, any extra information may be helpful in rening the identication of your
fertile window.
TIP:
You can record any information directly on the software (see page 17) or on the
reader if you are away from your computer.
Essential icons
“DuoFertility” icon (Reader)
This icon will ash white when the reader is turned on. The icon will start
to ash yellow once data transfer from the sensor has started and turns
blue while the software is running.
“Intercourse” icon
You should use this icon to enter in each time that you have intercourse.
“Menstruation” icon
You should use this icon to enter in the level of menstrual ow on each
day of your period. On the reader, the lights for spotting are pink and the
lights for menstruation are red.
“Cancel” icon
You can select the “cancel” icon to delete information that you have
recorded in the current session whilst using the reader or within the tab
section of the software (see page 14 & 18 for details).
“Battery” icon (Reader)
If the reader needs recharging, the battery symbol will ash red. To charge
the battery, plug the reader into the USB port of a computer that is turned
on. The battery icon should turn solid yellow and the battery will start
recharging immediately. When the battery is fully charged, the battery
light will turn green; you can then unplug the reader. Unlike mobile
phones, the number of bars in the battery icon does not increase as the
reader is charged; the icon simply changes colour.

14
“Connect to your computer” icon (Reader)
When the reader is plugged into a computer, this icon will normally turn
green. If an error occurs, the “connect” icon will ash blue. In this case,
please plug the reader into a computer and run the software. When the
software is running, this icon will turn solid blue. If the “connect” icon
continues to ash blue, contact the DuoFertility careline.
Additional icons
“Illness” icon
If you are feeling unwell, select this icon.
“Disturbed sleep” icon
Use this icon if your sleep has been disturbed more than your usual night’s
sleep.
“Cervical mucus” icon
Select this icon to record variations in the stretchiness of cervical mucus
during your cycle.
“Ovulation pain” icon
If you experience ovulation pain, select this icon.
“Star” icons
The star icons can be used to enter additional user-dened fertility clues
such as libido, breast tenderness and medication.
“LH test” icon
This icon is a software-only icon, and can be used to record results from
LH test strips. You may record either a negative, unclear or positive result.

15
How to use the software
To view your fertility chart and enter information, you can plug the reader into your
computer and run the DuoFertility software. It is very important for you to plug your
reader into your computer and run the software at least once a week.
Plugging the reader into a computer allows you to:
• View the changes in your temperature plotted on a graph since you have
started using the product
• View all the information which you have entered into the reader on specic
days
• Enter in notes for specic days
• Add information retrospectively
• Print o and save your temperature chart
Installing the software
Connect your reader to your computer using the USB cable provided. An autorun
prompt should appear.
The rst time you launch DuoFertility, you will be directed to http://support.
duofertility.com where you can download the latest version of the DuoFertility
software for Windows 7/Vista/XP/2000 and MacOS 10.4 or higher. You can also
access the latest version of the DuoFertility User Manual from this site.
To install DuoFertility for Windows,
you should run the setup program
downloaded from the support website:

16
To install DuoFertility for Mac,
you should open the disk image
downloaded from the support website,
and drag the DuoFertility application
into your Applications folder:
NOTE: You only need to follow the instructions above when you are installing
the software for the rst time. Once the software has been installed onto your
computer, launching DuoFertility from the autorun prompt will take you directly
to your fertility chart. You may also run the DuoFertility software directly from the
Start Menu on Windows or the Applications folder on the Mac.
Using the software
The rst time you run the DuoFertility software, there is a short welcome process
which introduces you to DuoFertility, activates your sensor, and asks some simple
questions about your fertility history. Once you have answered these questions,
you will be shown your fertility chart.
On your fertility chart, temperature is displayed along the vertical axis, and dates
are displayed along the horizontal axis. Your fertile days will be highlighted in
green, and ovulation will be estimated retrospectively by a red line. The rows
at the top and bottom of the chart represent all the extra information you
have entered into the reader e.g. period dates, intercourse etc. You can view
and edit any information which you entered previously, and enter information
retrospectively.
Table of contents