CANchecked VADpro VAD28 User manual

Quick Start Guide
VAD28 / VAD32 (OBD)
What’s Included In Your Kit
• Display including vent frame
• Connecon cable with pre-installed plugs
• MicroSD card (installed)
• MicroSD to SD Card Adapter
• Oponal an-Glare Screen Protector x 2
• Micro USB to USB A cable
Installaon Guide
The installaon guide can be
found on your device’s product
page at vadpro.com or by
scanning and downloading the
PDF using the QR code here:
Get excited, your VADpro is here!
Developed by a small group passionate car enthusiasts, your VADpro is a powerful device that will give you full access
to your vehicle’s data. Please make sure to read this quick start guide completely. If you require further assistance in
seng up your device, please reach out to us at: support@vadpro.com
Your Data, The Way You Want It.
VADpro has access to 64 of your vehicle’s sensors and can display your data across ten dierent pages. Use the touch
screen to navigate between each page and choose which sensor you want to display. To get you started quickly, your
VADpro comes pre-loaded with six example pages.
Need more customizaon? You can personalize your pages by changing the graphics, colours, sensors and widgets
and build your own views using the CANchecked DSS soware included with your device. For more informaon on
personalizing, customizing, and saving your dashboards, please refer to vadpro.com/documentaon.

Seng Up Your Display
VADpro uses an engine code specic TRX le to decode your ECU data, in conjuncon with ten widget les
or widget pack, to congure how your data is displayed on your device. This data can be displayed in three
dierent formats and two languages based on your preference:
Step 1: Load your vehicle specic TRX le on to the VADpro
When boong the unit for the rst me, the screen will display the inial setup page aer the splash screen. This is
where you will need to load your vehicle’s specic TRX le.
Our library of supported vehicles is growing, however if your car’s motor code does not show up on the list, press the
“support data” buon to generate the car’s support data. Take a photo / make a note of the number generated and
send an email to support@vadpro.com Our team of engineers will be able to work with you to get you a working
TRX le within one to three business days.
Step 2: Load the widget pack
Pull down from the main screen to reveal the Setup and DTC buons and navigate:
Setup > (scroll down) Pages > Widget Pack > Load the widget pack Imperial, Hybrid or Metric that corresponds with
the TRX le you loaded in Step 1.
i. Press “Scan Motor Code” to idenfy your vehicle’s unique
four leer motor code. We will use “DLRA” as an example.
ii. Make a note of the rst three leers of the motor code. In
this example “DLR”
iii. The le name contains “U-” followed by the rst three
leers of your motor code, and the widget pack you will
be using: I for Imperial, M for Metric, H for Hybrid, G for
German.
iv. In this example, a customer in the USA with imperial units
would select the le: U-DLR-I.trx. A european customer
would select le: U-DLR-M.trx
Type Pressure Speed Temperature Wideband Language
Imperial PSI mph °F AFR English
Metric BAR kmh °C λ English
Hybrid PSI kmh °C AFR English
German BAR kmh °C λ German

1. Swipe the screen to the le to reach the next page
2. Swipe the screen to the right to reach the previous page
3. Pull the screen down to show the Pull down menu with Setup and DTC buons.
4. Slide the screen up to show the Pull up menu with log buon and brightness slider, and shortcut
buon if enabled.
5. Tap a widget to change the sensor. Some pages may have widgets stacked on top of each other. Eg.
The circled widget is a numerical widget displayed on top of a graphical widget. Tap once to select
the graphical widget and tap again to select the numerical widget.
Screen Operaon
Step 2 : Load the widget pack (connued)
Note: Loading these widget packs will restore all 10 pages to the factory pre-loaded example pages. For more
informaon on personalizing, customizing, and saving your dashboards, please refer to vadpro.com/documentaon.

VADpro Menus
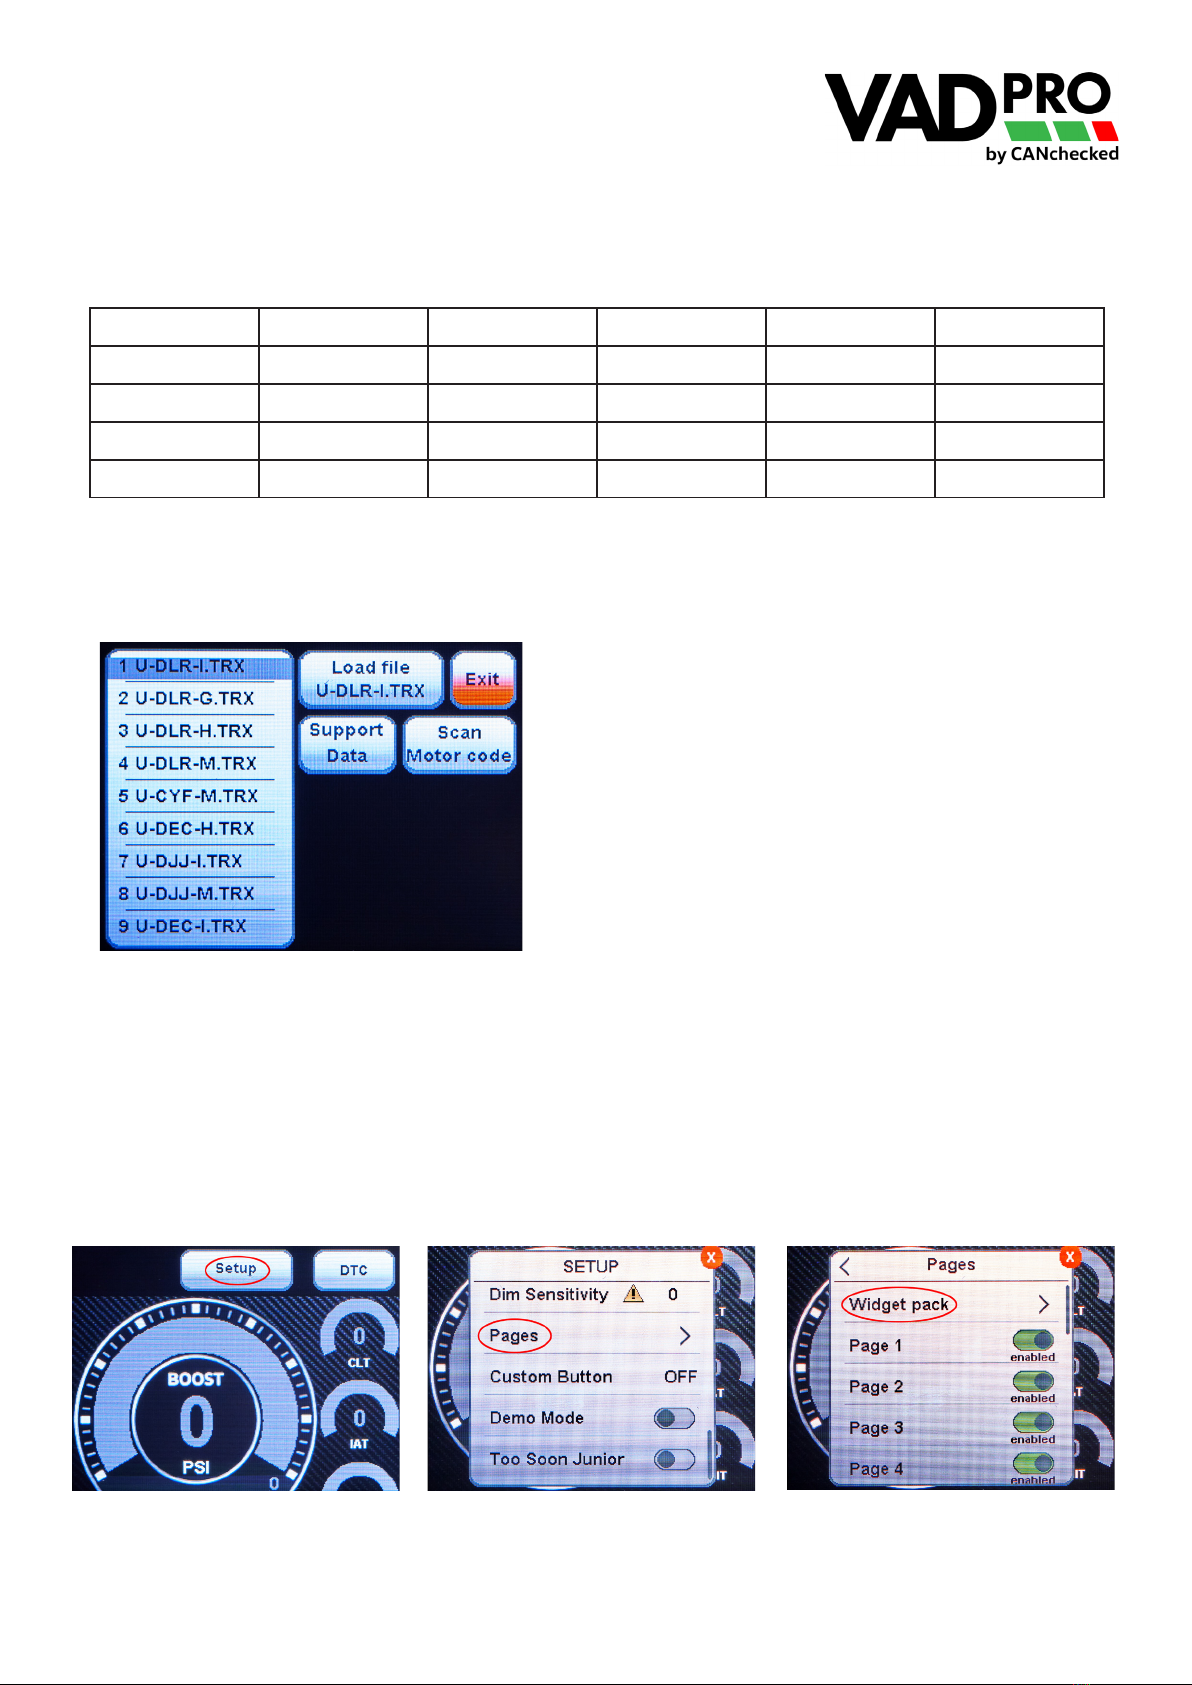
Pulling down anywhere on the screen will reveal the “Setup” and “DTC” buons. The “DTC” menu allows you to
Scan and clear fault codes for the four main systems of your vehicle. ECU, Gearbox, Brake, and Haldex. Future
developments will allow you to scan and view all error codes. Pressing the “Setup” buon will show the following
menu items, note, depending on your vehicle, you might see some menu items locked out.
Menu Item Usage Descripon
Popup Toggle the switch to enable or disable
popup warnings.
Tap to cycle the minimum me period
that the popup appears from the last
trigger.
Pre-set minimum and maximum values are set for each sensor in
the DSS soware. These values can also be set to your preference
with the DSS soware.
The popup feature will display a big warning noce on your VADpro
for easy viewing while driving.
Logging Toggle the switch on to begin logging
the data on the current page view.
Toggle the switch o to stop logging.
Each me you toggle the switch it will automacally save a log le
to the removable Micro SD card. Files are numbered sequenally
from 1 to 255.
Note: For quick access to start and stop logging you can also use
the shortcut buon by pulling up anywhere on the screen.
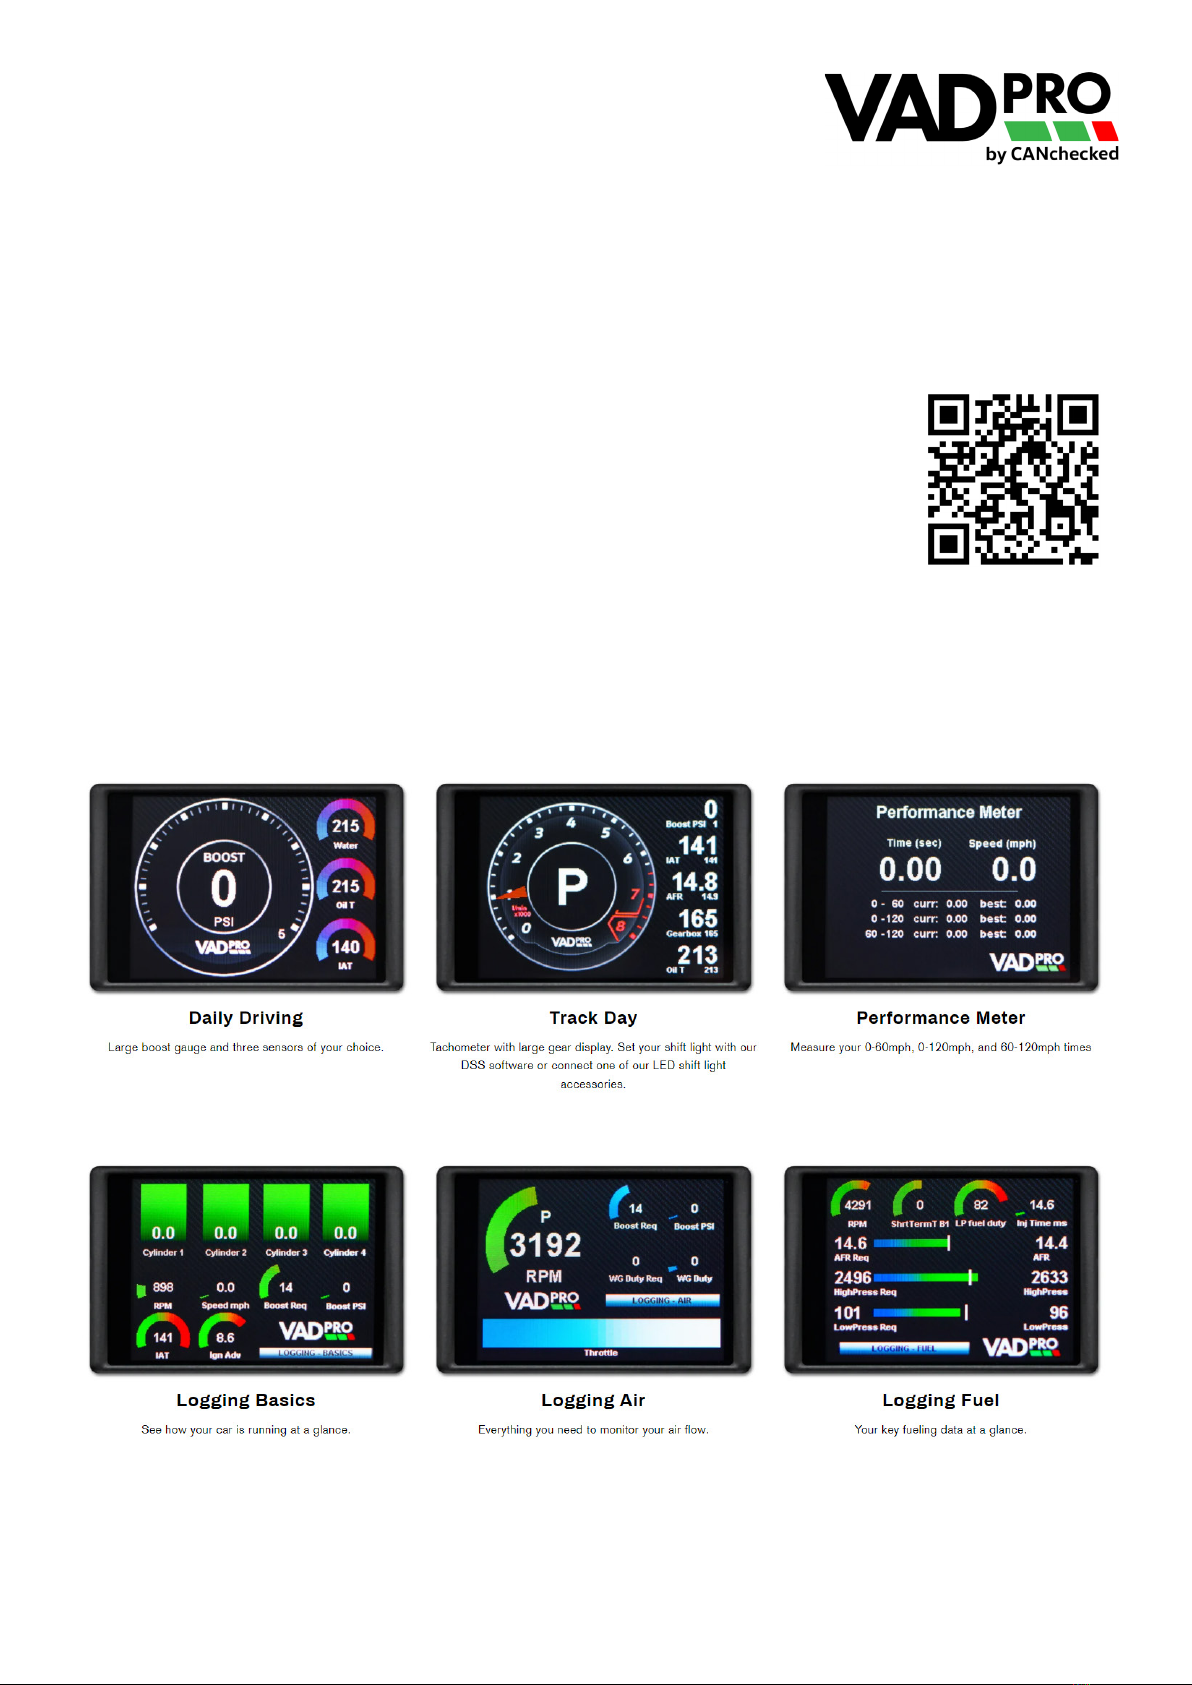
Can Bus Tap to select / reselect the TRX le for
your vehicle.
For VAD28 / VAD32 units based on UDS and TP2.0, Can Speed,
Term Filter opons are locked out. These sengs are for
Standalone ECU conguraon.
Sensor Init Locked menu items Not required for eding. This is data used for future
troubleshoong if required
License Tap to show This is where you will nd your VADpro’s serial number. Future
rmware versions will allow you to unlock addional funconality
and features.
Refresh Locked Refresh rate
Gears Tap to select and use number pad for
entry
Your VADpro can display your current gear selecon. On Automac
/ DSG vehicles this seng does not need to be adjusted.
Manual vehicles need to input the RPM/Speed Rao for each
corresponding gear in order for it to display correctly.
Splash Screen Tap to cycle Shows the me that the splash screen will appear aer boot up.
Turning it to OFF will allow your unit to boot to your dashboard
within one second.
Start Page Tap to cycle Number indicates which page your unit will boot to on a power
cycle. 0 - 10 or last used.
Shi Light Tap to cycle colors. Use the numpad to
input the RPM
For use with the external add-on Universal shi light kit.
Dim Sensivity Tap to cycle in 10 unit increments If you see a yellow exclamaon icon, auto dim is not available. For
UDS rmware only. The higher the number, the more your VADpro
will dim in conjuncon with your car’s instrument cluster. All cars
can also use the brightness slider on the lower pull up menu.
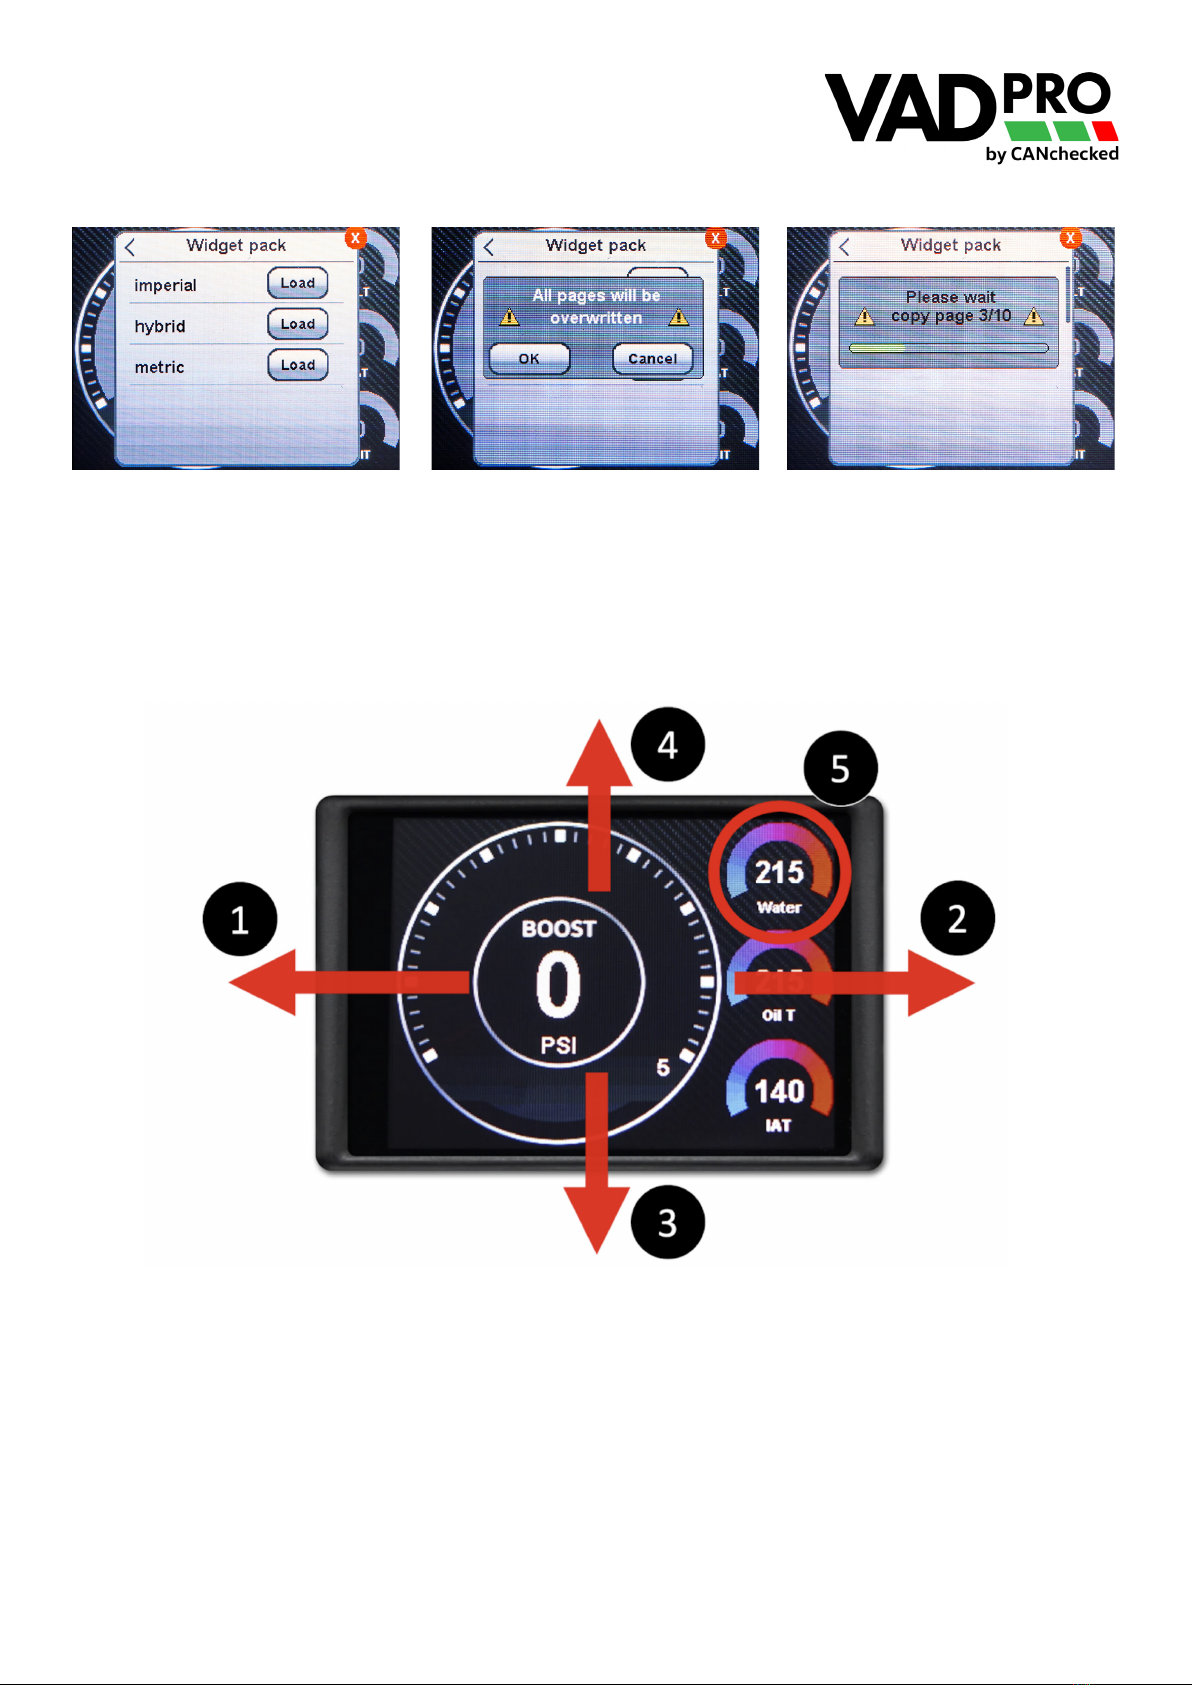
Pages Tap to toggle Use the widget pack submenu to view and loads widget packs.
Show or hide pages you need or don’t need from your VADpro
Custom Buon Tap to cycle This controls the funcon of the lower right buon of the Pull Up
menu. This currently turns the backlight of the VADpro o. In the
future other opons might be added to this buon.
Demo Mode Tap to toggle Tap to turn on or o demo mode. Demo mode is automacally
turned o aer a power cycle.
Too Soon
Junior
Tap to toggle Do you live your life a quarter mile at a me? Toggle this and mash
your gas pedal for a fun lile easter egg. Once it appears it will
toggle back o
This manual suits for next models
1
Other CANchecked Automobile Accessories manuals