Cando 67-0027BLK User manual

REF 67-0027BLK
Knee Scooter
User Manual
Handgrip
Hand Brake
Handle Height
Adjustment Knob Knee Pad
Knee Pad
Locking Lever
Brake
Basket
Steering Column
Locking Lever
CAUTION: Please read before use.
The CanDo®Knee Scooter is a medical device designed for individuals with lower leg injuries. It is not
a toy or recreational scooter. Please read these important cautions before using your Knee Scooter:
• DO NOT use if you have difculty with balance.
• DO NOT use to assist with standing from a seated position.
• DO NOT use on stairs, steps, moving walkways, escalators, or in the bath/shower.
• DO NOT use over curbs, uneven ground, drops, or barriers.
• DO NOT use to go faster than a slow walking pace when using inside or outside.
• DO NOT turn the unit sharply while in motion.
• DO NOT turn at speeds over 1 mile per hour; always have one foot on the ground.
• DO NOT stand or sit on the unit.
• DO NOT use on soft or uneven terrain.
• DO NOT use on areas with a slight incline (over 15 degrees).
Consult your physician before using.
You should consult with your doctor/medical practitioner if you have any health concerns before using
the CanDo®Knee Scooter.
Maximum user weight: 350 lbs. / 159 kg
Note: Read all instructions before using the knee scooter.

Operating the Knee Scooter
Assembly Instructions
Step 1: Unpack your Knee Scooter
NOTE: No tools are required
• Put together the knee scooter on a
at, stable surface
• Remove knee scooter parts from box
• Check all the parts are included
(knee scooter base, knee pad, basket)
Step 2: Secure the Steering Column into a Vertical Position
1. Push the steering column lock to the side (g. 1 and 2) then move the steering column down over the steering column lock (g 3).
Release your hold on the steering column lock to secure the steering column (g 4) in place.
2. Lift up the steering column lock vertically (g 5) then press down on the steering column lock handle to lock the steering column
in place (g 6).
The CanDo®Knee Scooter is a mobility solution that offers
superior strength and comfort to individuals with an injury
below the knee, and helps them regain their independence.
It helps keep the body in balance with support from both the
scooter and non-injured leg, and evenly distributes weight for
a more comfortable ride. The scooter has a cushioned knee
pad, ensuring no pressure is placed on the injured leg.
Experience effortless turns and smooth, secure stops with
this device’s simple steering capabilities and integrated
brakes. Take control of your journey in complete safety!
• The injured leg should rest in the center of the knee pad
and cover the full length of the knee pad.
• With the injured leg on the knee pad, stand straight and
adjust the knee pad and handlebar height as necessary.
• Start out with small steps, using your non-injured leg to
move yourself forward on the scooter. Focus on keeping
the non-injured leg as close as possible to the knee pad to
maintain your balance.
Basket
Knee Scooter Base
Knee Pad
gure 1
gure 2
gure 3
gure 4
gure 5
gure 6

Step 3: Install the Knee Pad for LEFT or RIGHT leg
1. For Left Leg injuries, insert the knee pad post into the holder
on the frame so the “L” label on the underside of the pad is
facing the front. When viewed from behind, the knee pad will
be offset towards the right (g 7).
For Right Leg injuries, insert the knee pad post into the
holder on the frame so the “R” label on the underside of the
pad is facing the front. When viewed from behind, the knee
pad will be offset towards the left (g 8).
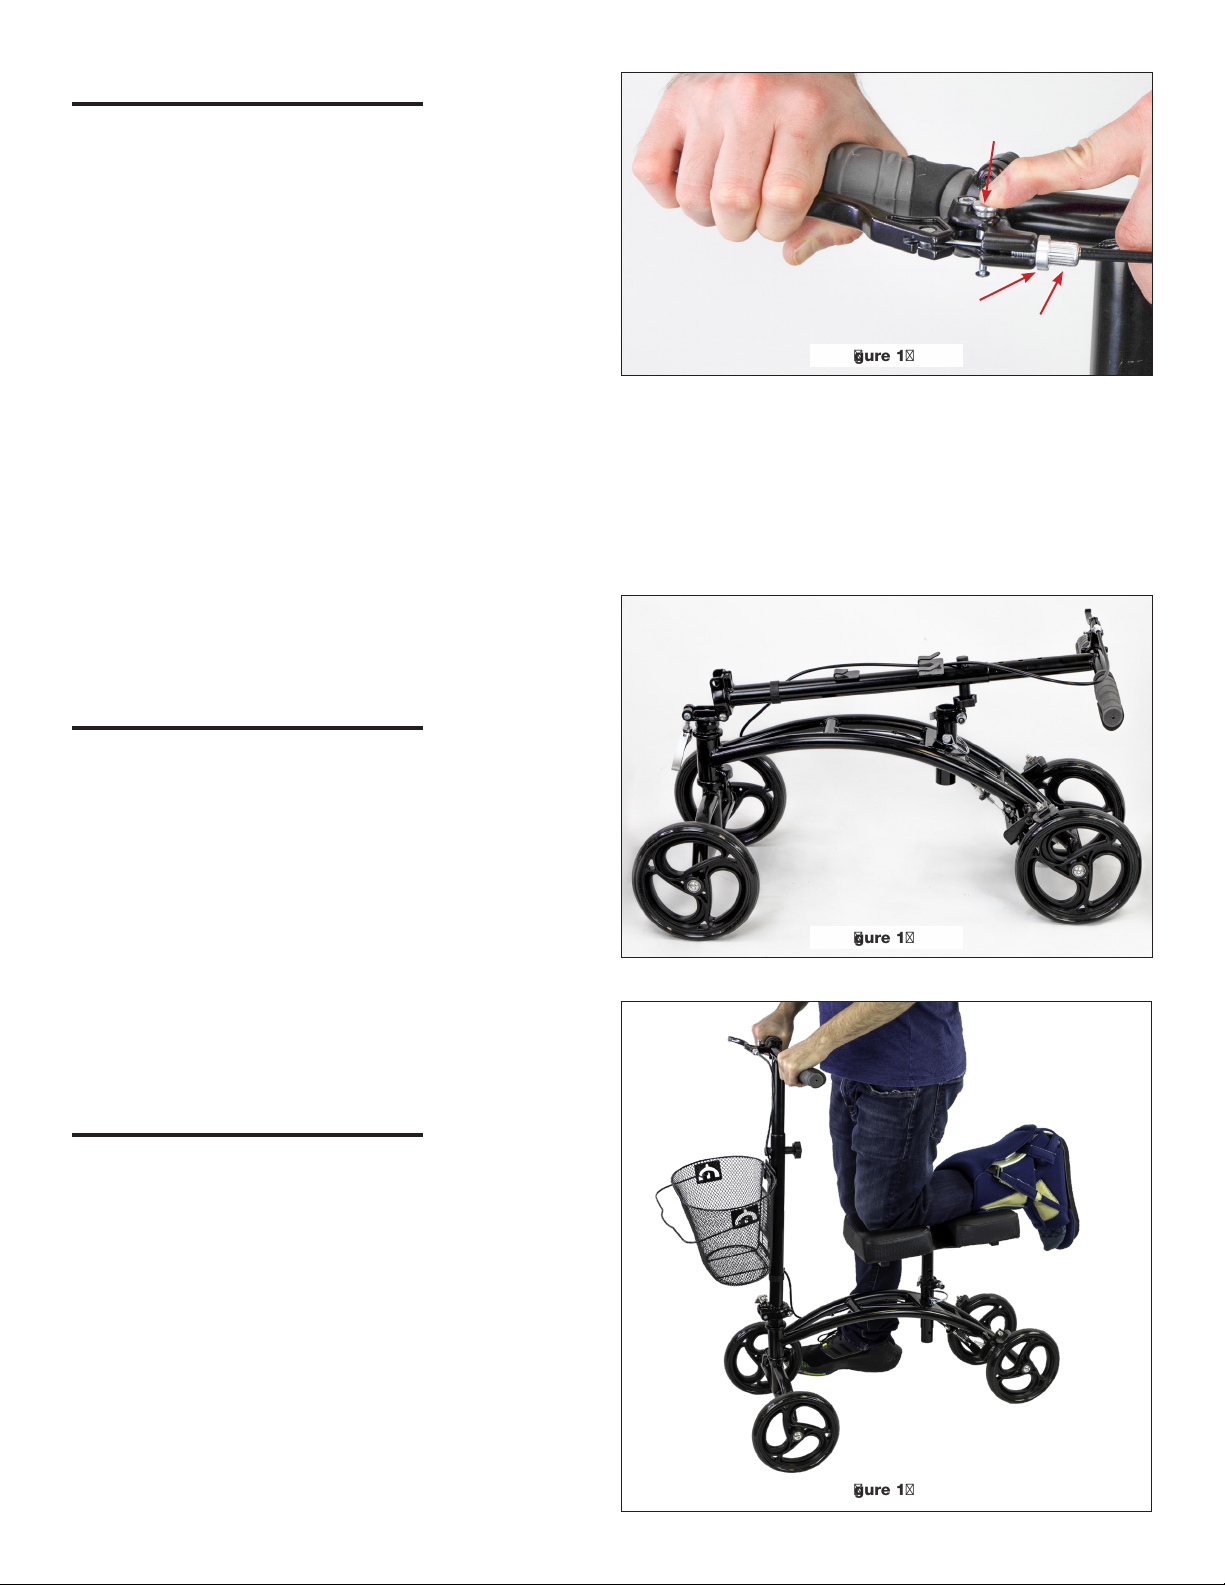
2. Determine your knee pad height. This should be set at a level
that allows you to stand upright with your knee centered on
the pad and your weight comfortably balanced.
3. Secure pad in place by inserting the locking pin through the
hole of the knee pad post holder and the knee pad post at
your desired height. Secure the pin by moving the locking pin
hook into place over the locking pin (g. 9).
4. Push down on the knee pad locking lever to lock knee pad
into place (g 10).
Step 5: Install Wire Basket
1. Attach the basket handle to the wire basket by holding the handle outside the basket and sliding it into the top of the semi-circle
cutout on the basket. Then, feed the hook of the handle through the middle basket hole to secure in place (g 13 + 14).
2. Align the basket over the vertical brackets on the steering column. Slide basket down over the brackets to secure in place (g 15).
L
This end facing front
for LEFT side injuries
R
This end facing front
for RIGHT side injuries
NOTE: Adjust Pad Height
Lift up and loosen the knee pad locking lever and remove the locking pin (g 9). Move the knee pad post up or down to the desired
height and re-secure the knee pad in place by inserting the locking pin through the knee pad post holder and the knee pad post.
Lock the knee pad in place by pushing down on the knee pad locking lever (g 10).
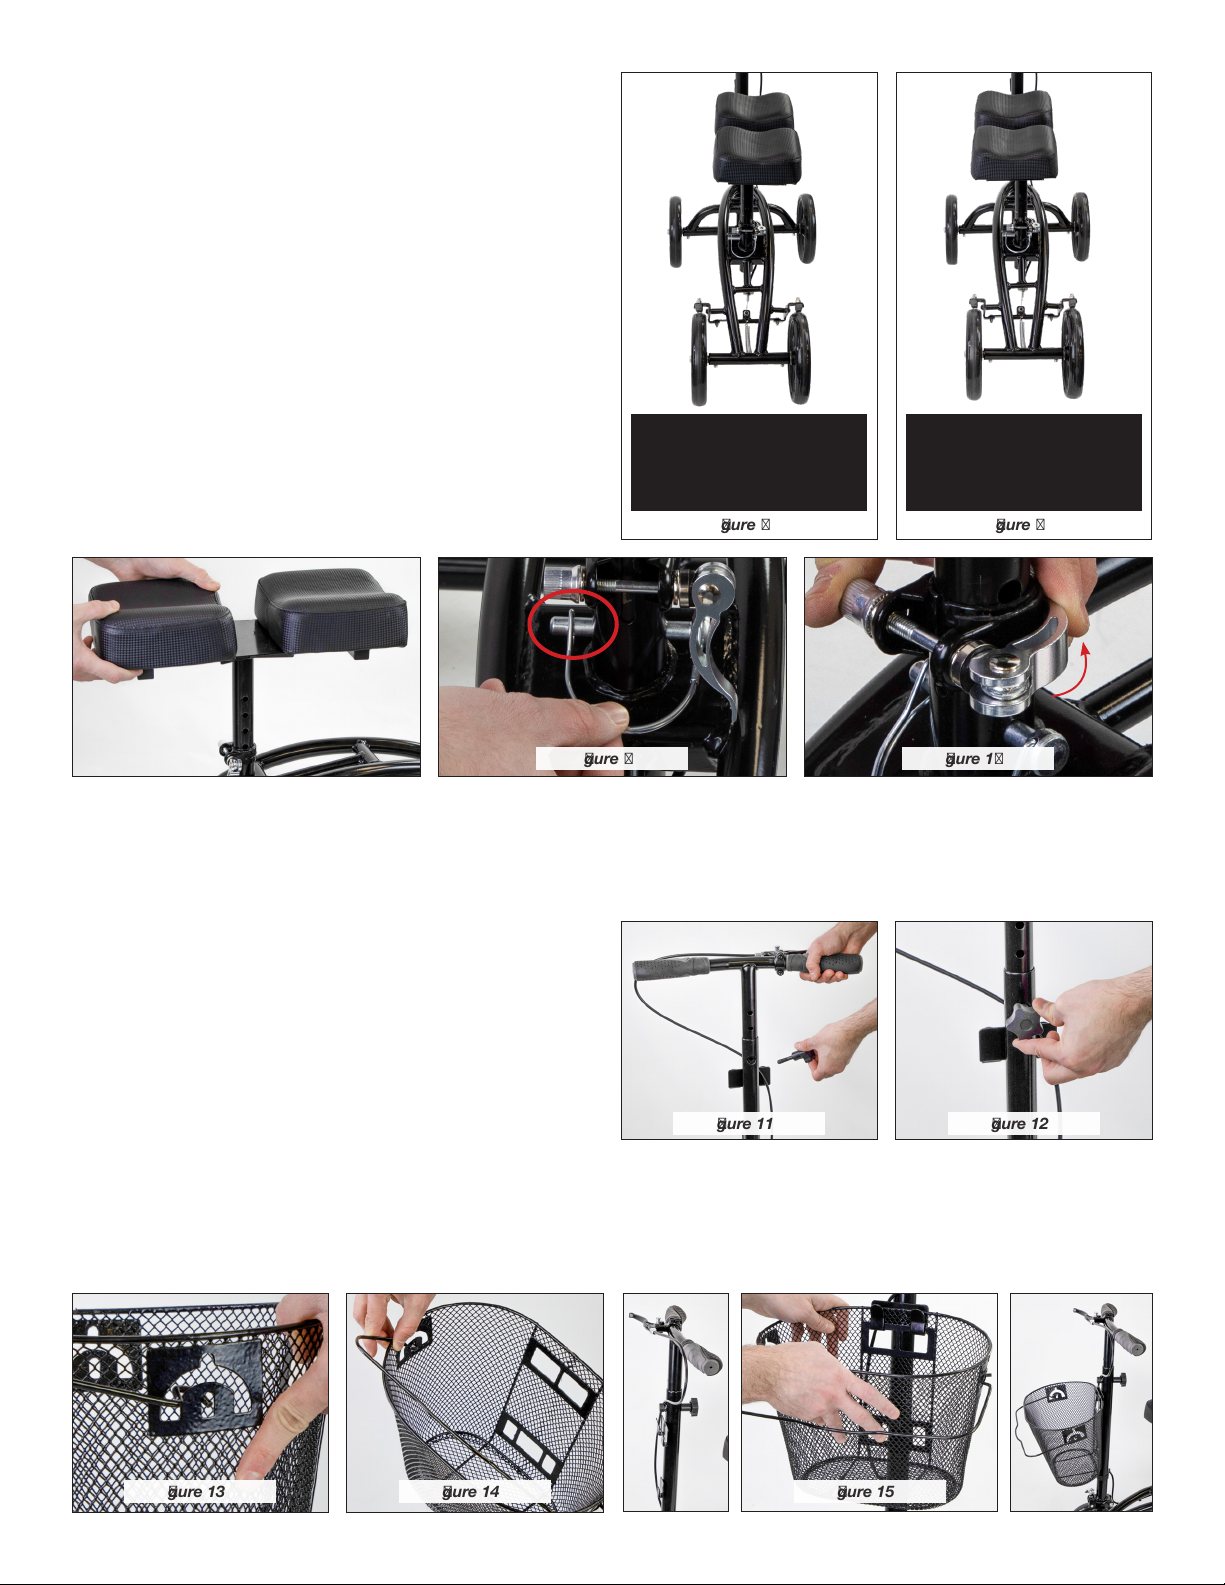
Step 4: Determine Handlebar Height
1. Turn the handle height adjustment knob on the steering
column counter clockwise until it can be removed.
2. Raise or lower the handlebar until it is lined up with the
steering column hole at your desired height (g 11).
3. Place the handle height adjustment knob back through
the hole and turn it clockwise until it is tight to secure the
handlebar (g 12).
gure 7
gure 8
gure 9
gure 10
gure 11
gure 12
gure 13
gure 14
gure 15

Using the Hand Brake
If the braking system is not working properly, DO NOT use the
CanDo®Knee Scooter.
1. Squeeze the hand brake towards the handle bar to use the
brake. This functions just like a brake on a bicycle.
2. Lock the brake in place by squeezing the hand brake and
pushing down on the spring-loaded brake lock button on top
of the hand brake at the same time (g 16). When you
remove your hands, the button should remain down and
locked in place.
3. Release the brake lock by re-squeezing the hand brake. The
braking button should pop up, releasing the locked brakes.
NOTE: Adjust the Braking Strength
• Locate the brake adjustment knob on the hand brake (g. 16). Turn the knob counterclockwise to increase the braking strength.
Turn the knob clockwise to decrease the braking strength. Keep the brake adjustment nut tight against the hand brake.
• Repeat these adjustments on the other end of the braking system (by the wheels) if further adjustment is needed.
• As the brake adjustment knob and brake adjustment nut get closer together, the braking strength will decrease. As the brake
adjustment knob and brake adjuster nut get farther away from each other, the braking strength will increase.
gure 16
Brake Lock
Brake Adjustment Nut
Brake Adjustment Knob
To Fold Steering Column
1. Pull back the steering column lock handle to loosen it (g 6).
Then, pull down the steering column lock vertically.
2. Push the steering column lock to the side (g. 1 and 2).
Then, pull and unfold back the steering column (g. 17).
gure 17
How to use Knee Scooter
• Always engage the hand brake lock before getting on or off
the knee scooter (g. 16).
• Grasp the handlebar grip and rest the knee of your injured leg
on the center of the knee pad. Balance your weight between
the knee rest and your uninjured leg. (g. 18)
• Squeeze the hand brake to release the hand brake lock and
use your uninjured leg to push the knee scooter forward using
controlled steps.
• Keep your body weight centered over the knee pad as
you move. Never go faster than a slow walking pace
(about 3 miles per hour).
gure 18

©2023 FEI, all rights reserved. CanDo is a trademark of Goldberg. rev0423
Safety and Maintenance
Safety Instructions
• Take slow, controlled strides and make turns slowly when using your knee scooter.
• Be aware of changing surfaces. Moving between hard oors and carpeting can affect your balance.
• Be especially aware of inclines and go very slowly. The rear wheels may slide on carpeted or slick, inclined surfaces even
when the brakes are fully engaged.
• Navigate surface changes by allowing the front wheels to roll over the surface change one wheel at a time.
• Avoid any area that will compromise your balance or control.
• Use caution when approaching uneven terrain like pavement gaps, doorway thresholds and door mats.
• Avoid uneven surfaces like gravel, grass or loose dirt, which can compromise your balance and stability.
• DO NOT reach across the handlebar or drastically shift your weight on the unit. Be sure to keep your weight centered over
the knee post at all times.
• DO NOT use in extremely wet conditions.
Safety Check List
• Make sure all adjustment knobs are tight before use.
• Test the hand brake and parking brake. The rear wheels should not rotate when the hand brake is fully engaged.
The hand brake should apply increasing resistance as the handle is squeezed.
• Test the steering by turning the handlebar to the left and right, and check that the wheels are turning in correct
alignment with the steering.
Cleaning and Maintenance
The knee scooter is a medical equipment device and needs regular maintenance.
• Keep the knee scooter stored indoors to avoid moisture and rust.
• Clean the knee scooter surfaces and wheels with a mild cleaning solution and damp cloth.
DO NOT use a water hose or power sprayer to clean the knee scooter.
• Check tires routinely for damage.
• Check the knee rest pad for cushion deterioration.
• Make sure all nuts and bolts are tight.
Table of contents