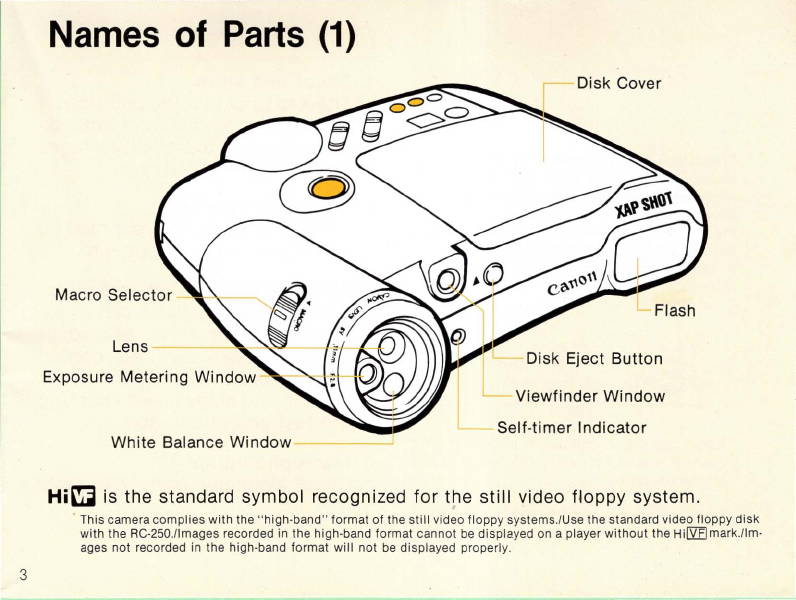
Canon XapShot RC-250 User manual

Hi~
Canon STILL VIDEO
CA
MERA
~C·250
XAP~I-I(]T
RC-250
\!b::::::E::,
-;;-
_---.:
H:i9~hh--Band
Hi~
~
Q
DREC
©©©
.
r;:I
:--..l........~
Instructions

2
Thank you for purchasing the Canon Still
Video Camera "Xap
Shot"
RC-250
,
an
en-
tirely new camera that takes pictures,dis-
plays them and erases them
as
you wish.
Please
read
these
instructions
carefully
before using the camera and keep them in
a readily accessible place
for
future
reference.
Keep the front and back pages of
this
manual opened
for
easy reference to the
camera's parts.
* This product is sold under the name "
Q-Plt
RC
-
250
" in Japan.
Main Features
1.
Shoot and show
The Xap Shot records pictures on
a video floppy
disk
and immedi-
ately displays top-quality images
on a
TV
screen easily.
2. High
disk
capacity
Fifty pictures can
be
recorded on
a two-inch video floppy
disk
.
3.
Shooting and editing versatility
During shooting, disks can
be
ex-
changed at anytime. Erased
or
skipped tracks can be recorded
over for maximum disk use. Track
erasing and skip I insert shooting
are fast and simple too.
4.
Macrophotography
Shoot,close-ups from
12
in. away.

3
Names of Parts
(1)
Macro Selector
Lens
White Balance Window
Hi~
is the standard symbol recognized
for
tr e
still
video floppy system.
. This camera complies
with
the
"high·band"
format
of
the still video floppy systems.lUse the standard video floppy
disk
with the RC-250.llmages recorded in the high-band format cannot
be
displayed on a player
without
the Hi[2£Jmark.llm-
ages not recorded in the high-band format
will
not be displayed properly.

4
System
Components
You need a battery
pack
BP-4P
or
a
battery
charger
BA-24P
plus
an AC
coupler
AV-C25
to
take
pictures
and
display
them.
To TV terminal
CD
RC-250
®
Wrist
Strap WS-C25
@
Soft
Case SC-C25
@
Battery
Charger
BA-24P
@
Battery
Pack BP-4P
@ AC
Coupler
AV-C25
(j)
Mini Plug-Pin Cable KE-M2P
@ Pin Cable KE-PIN
@ Video
Floppy
Disk
VF-50
*
Items
@
through
@ are
sold
separately.

Table of Contents
Main Features .
.......................
.
....
..
....
.
...
.
....
... ...
2
Names of Parts
.........................................
....
3,
46
System Components .
.....
.........
.....................
.. .. ..
. . 4
Precautions . . . . . . . . . . . . . . . . . . . . . . . . . . . . . . . . . . . . . . . . . . . . . . . . . . . . 6
Video Floppy Disks
.....
..................
.
.....................
8
1.
Power Source .
..............................................
10
2.
Display Panel ..
...............
....
...
.
......................
14
3.
Inserting a Video Floppy Disk .
......................
.
.......
. . 16
4.
Taking Pictures
.....
.
..............
..
.......................
17
(1)
Regular
Shooting
..................
...
...
.
...
.
...
....
.
....
..
.
.. ..
18
(2)
Skip/Insert
Shooting
...
..
......
. .
...
.....
..
..
...
:
...
..
..
.
..
. . .
...
22
(3)
Flash Photography
..
....
.
..
.
................
.
.................
...
24
(4)
Shooting
Backlit
Subjects
.....
...
...
.......
. . . . .
.......
.
.........
26
(5)
Macrophotography
......
..
........
.
.......
.
..
. . .
.......
.
....
.
....
27
(6)
Self·timer
Photography
..
. .
.........
...
..
.
..............
.
....
.
....
28
5. Viewing Pictures
.....
..
...
.
..
.....
. .
..........
.....
........
.
29
(1)
Connecting
the
Camera
to
a TV .
..
. .
.....
.....
.................
..
. 30
(2)
Viewing Pictures
..
..
.
..............
..
.
..
.....
...
.
..
.....
..
. . .
...
. 33
6.
Erasing Pictures .
............................................
36
7.
Troubleshooting Chart
.......................................
37
8. Specifications. . . . . .
..
...........
..
...............
.....
......
40
5

6
Precautions
• This camera is not waterproof. If you
splash water on it
or
expose it
to
sea
breezes, wipe it
thoroughly
with a
clean dry cloth.
•
Do
not leave the camera
in
direct sun-
light, or other places where the tem-
perature can get extremely hot, such
as
the trunk
or
rear
window
shelf
of
a
car.
• Avoid using
or
storing
the camera in
places
where
dust
or
sand can
damage it.
• Never attempt
to
disassemble the
camera.
• Always use a
soft
cloth
to
clean the
camera.
• Handle the camera very carefully.
Do
not subject it
to
unnecessary
shock
that may damage the camera.
If you do not plan to use the camera
for
a while, remove the battery pack
and store it in a well-ventilated, cool,
and dry place.
Be
sure
to
charge the
Battery Pack BP-4P at least once
ev-
er six
months
.
i>
0,
>;;;
;
~::::
:
'
<
•.
.
..
~f""':--;";";";""""':'

• Video floppy disk precautions
• Keep the
disk
in
its
case when not in
use.
•
Do
not leave a
disk
loaded in the
camera
for
a long time.
• If the
dustproof
shutter
opens
by
ac-
cident, close it immediately. Never
touch the
disk
inside.
•
Do
not put video
floppy
disks
near a
motor,
or
electronic
devices which
generate strong magnetic fields.
•
Do
not leave
disks
in
direct
sunlight,
in a car trunk
or
other
places where
the temperature
or
humidity
can
be-
come very high.
• Keep
disks
away from
dust
or
dirt.
•
Do
not bend
or
drop
disks
. Protect
them from strong vibration
or
shocks.
7

8
Video Floppy Disks
(1)
What
is
a video floppy disk?
A video floppy
disk
is a two-inch floppy
disk which conforms
to
worldwide stan-
dards. One disk has
50
recording tracks,
and the
RC-250
records one picture in
each track. Tracks are numbered from 1
to
50.
Picture 3 Picture 2 Picture 1

Use the Canon Video Floppy Disk VF-50
with the RC-250.
0 Canon
VI
DEO
FL
OPPY
DISK
VF·50
¢ @
mO
I I
(2)
Erasure Prevention Tab
• The recorded video floppy disk can
be
used
to
record new images over and over again
after
erasing old ones. However, by break-
ing the erasure prevention tab, the record-
ed
images
cannot
be erased.
• Break
off
the tab
to
prevent accidental
erasure.
• If a
disk
without
an
erasure prevention tab
is covered by the seal
included
or
thin
cel·
lophane tape at
the
tab portion,
it
can
be
used again
for
recording
or
erasure.
Seal Placement Area
Put a seal
or
cellophane tape
_
{(
inside
this
area only.
~
.
Erasure Prevention Tab
9

1.
Power Source
10
The
RC
-
250
can
be
powered
by
either the
Battery Pack
BP-4P
for great mobility, or
connection
to
a wall
outlet
for
shooting
or viewing pictures at home.

(1)
Battery Pack Bp·4P
Install
the
battery
as
shown
below.
1.
Set the main
switch
to
LOCK.
2.
Remove the battery
cover.
3. Insert a fully·charged
battery in the direc·
tion
of
the arrow.
4. Replace the battery
cover.
• A new, fully·charged battery takes
approximately
800
shots
without
flash
use,
or
200 -300
shots
if
flash
is
used
for
about one in every
four
photos.
• Pictures can be viewed on a TV screen
for
10-15
minutes
.
(Based on Canon's Standard Test Method)
• Battery
life
reduces in low temperatures.
• We recommend
that
you always have a spare
batter
y handy when operating the camera in
low temperatures
or
if
taking many flash photos.
11

12
Battery Pack Bp·4P Precautions
• The battery must always
be
fully
charged
before use.
Be
sure to read the handling in·
structions
for the battery and the battery
charger.
Be
sure to charge the Battery Pack BP-4P
with the Canon Battery Charger BA-24P (or
BC-24P)
.
• Set the main switch to LOCK before remov-
ing the battery from the camera.
• If you do not plan
to
use the battery, store
it in a dry, dark and cool place.
Do
not for-
get to charge the battery at least once
ev-
ery six months.
• If the battery is damaged and battery fluid
(electrolyte) should come in contact
with
your clothing
or
skin, wash it
off
immedi-
ately with plenty of water. If the fluid con-
tacts
eyes
or
mouth,
wash
it
out
immediately with plenty
of
water and se.e
a physician.
• Carefully observe the following precautions
to avoid danger:
• Never connect (short out) the positive (+ )
and negative (- ) terminals.
• Never attempt to disassemble the battery.
• Never dispose the battery in
an
open fire.
• Always keep the battery
out
of
the reach
of
children.
• Observe the following precautions to avoid
damage
or
deterioration of battery.
•
Do
not drop the battery.
• The battery pack
BP-4P
is to
be
used only
with the
RC-250
.
Do
not use it
with
other
equipment.
• Refrain from using the battery in extreme
temperatures below 23°F
or
above 104°F
(-5°C
or
above
+40°C)

(2)
Power from a Wall Outlet
------------------------------~-
Connect the camera, the battery charger, and the AC
coupler
as
shown below:
To Wall
Outlet
~
-________
~
~~
Battery
Charger BA-24P
To Battery
Compartment
~
~
000
~
...
~
C
Coupler
"'0
f)
tJ
==
AV-C25
~~
c---
To
Coupler
ro
~
r
~
_
terminal
~
0 ' >
"
~
~
* See the Battery Charger and AC
Coupler
manuals
for
its
connection
.
* See page
30
about
connection
to
TV
units
for
viewing
or
erasing
pictures
.
* The
coupler
terminal on BA-24P
only
accepts
the AV-C25.
Other
attachments
ma
y create
a fire hazard.
13

14
2.
Display Panel
The display panel indicates necessary information for recording,viewing and
erasing pictures.
Self-timer
MOde
~
Low Battery \
Warning
\\
:
~-----------------
g~cr'
sc=''-l
_-l
\ \
'\"""
\
____
~
\
---_
~
\L
contjn
~ o",-ShO
\
Mode
- - Single-shot Mode
Track No. and
Warnings

Warnings in the Display Panel
00
:
(00
blinking) A video
floppy
disk
is
not
loaded.
Pr : (Pr blinking) The erasure prevention tab is broken (ap-
pears
only
in recording
or
erasing modes).
50
:
(50
blinking) All tracks have been recorded (appears
only
in recording mode). This warning appears whenever the
50th track is recorded even
if
other
tracks
may
be
un-
used. See page
22
about recording
pictures
on skipped
or
erased tracks.
g :
(g
flashing) The battery
power
is low.
Lb:
(g
and Lb flashing) Replace the battery immediately.
The camera will not
function.
Er : (Er flashing) Errorexists. Press the
shutter
button
or
reo
move and
re-
insert the video
floppy
disk. If
Er
still
flash-
es, try anotherdisk. If the camera
still
does not
function
normally,
consult
your
dealer
or
nearest Canon Service
Facility. 15

16
3.
Inserting a Video Floppy Disk
1.
Press the disk eject
button to open the
disk cover.
2. Insert a video flop·
py
disk
as
shown
below.
* Disks
will
not go in any
other positi
oo.
Do
not force
them in.
3. Close the disk
cover securely.
* Press the
disk
eject
button
to remove the disk. The
disk
will
pop
out
slightly
as the
disk
cover opens.
* When exchanging disks, be
careful not
to
expose
them
to
water,
dust
,
dirt
,
etc
.

4.
Taking
Pictures
17

18
(1)
Regular Shooting
1.
Set the main switch
to
REC.
• The first usable track number appears
in the display panel. It increases as
you take pictures.
• Good pictures require that the lens
be
clean at all times. Wipe it
with
a lens •
cleaning paper before taking pictures.
2.
Press the shooting mode
selector and set the desired
mode.
• The mode
indicator
in the display
panel changes from S to Cand C to 0
each time you press the
shooting
mode selector.

Mode
Description
Display'
panel
Takes one
picture
0
Single-shot each
time
you
press the
shutter
button
.
Takes approximate-
Jcontinuous- Iy 3
pictures
per
ClJ
second
while
the
shot
shutter
button
is
pressed.'
•
Shutter
release is
delayed
for
about
~
Self-
timer
10
seconds
to
put
yourself
in the
picture.
* Display
indication
when the new
video
floppy
disk
is inserted.
**
The
continuous
shooting
speed
decreases when taking flash photos.
3.
Look through the viewfinder
and compose the picture.
The
shooting
distance
range is from
3.3ft11 m
to
00
(infinity). Unless taking
Macro photos,
kee
~
least 3.3ft/1 m
away from
the
subject
for
sharp
focus
.
The camera has a built-in dioptric adjust-
ment ring. If you are near- or far-sighted,
turn the
adjustment
ring
until
you see
the image clearly. 19

20
4.
Press the shutter button half·
way. If the red light does not
blink
in
the viewfinder, the
camera is ready. Press the
shutter button completely to
take a picture.
* A small
click
will sound when you
press the
shutter
button
halfway in-
dicating that the
motor
has started
..
Press the button
completely
to
take
the picture. A "cl i
ck
-
click
" sound will
be
heard
as
the
shutter
is released.
5.
If
the red light blinks slowly
(2
times per second) when you
press the shutter button half·
way, switch to flash photogra-
phy. (See page
24)
- D - -
Red
light
* The
red
light blin1ks ast
(8
times
per
second) in the
following
condit
ions:
• A disk
is
hot loaded.
• D
isk
is full.
• Disk with a broken erasu
re
preventi
on
tab loaded.
• The main swi
lch
is
at PLAY.
• The battery warning appears in the
disp
l
ay
panel.
Other manuals for XapShot RC-250
1
Table of contents
Other Canon Camcorder manuals

Canon
Canon VIXIA HF R400 User manual

Canon
Canon XA25 User manual

Canon
Canon G 35 Hi User manual

Canon
Canon 4316B001 User manual

Canon
Canon VIXIA HF S11 User manual

Canon
Canon XF300 User manual

Canon
Canon LEGRIA HFM307 User manual

Canon
Canon 2691B001 User manual

Canon
Canon SCOOPIC 16- M Assembly instructions

Canon
Canon ES8400V User manual

Canon
Canon XF400 User manual

Canon
Canon MVX30 User manual

Canon
Canon ZR400 User manual

Canon
Canon UC-V30 Hi User manual

Canon
Canon VIXIA HR10 User manual

Canon
Canon LEGRIA FS405 User manual

Canon
Canon Legria mini User manual

Canon
Canon MD255 User manual

Canon
Canon Vixia HF R800 User manual

Canon
Canon HV30E User manual