Copyright ã 2022 Meko Outdoors Incorporated. U.S.A. All rights reserved.
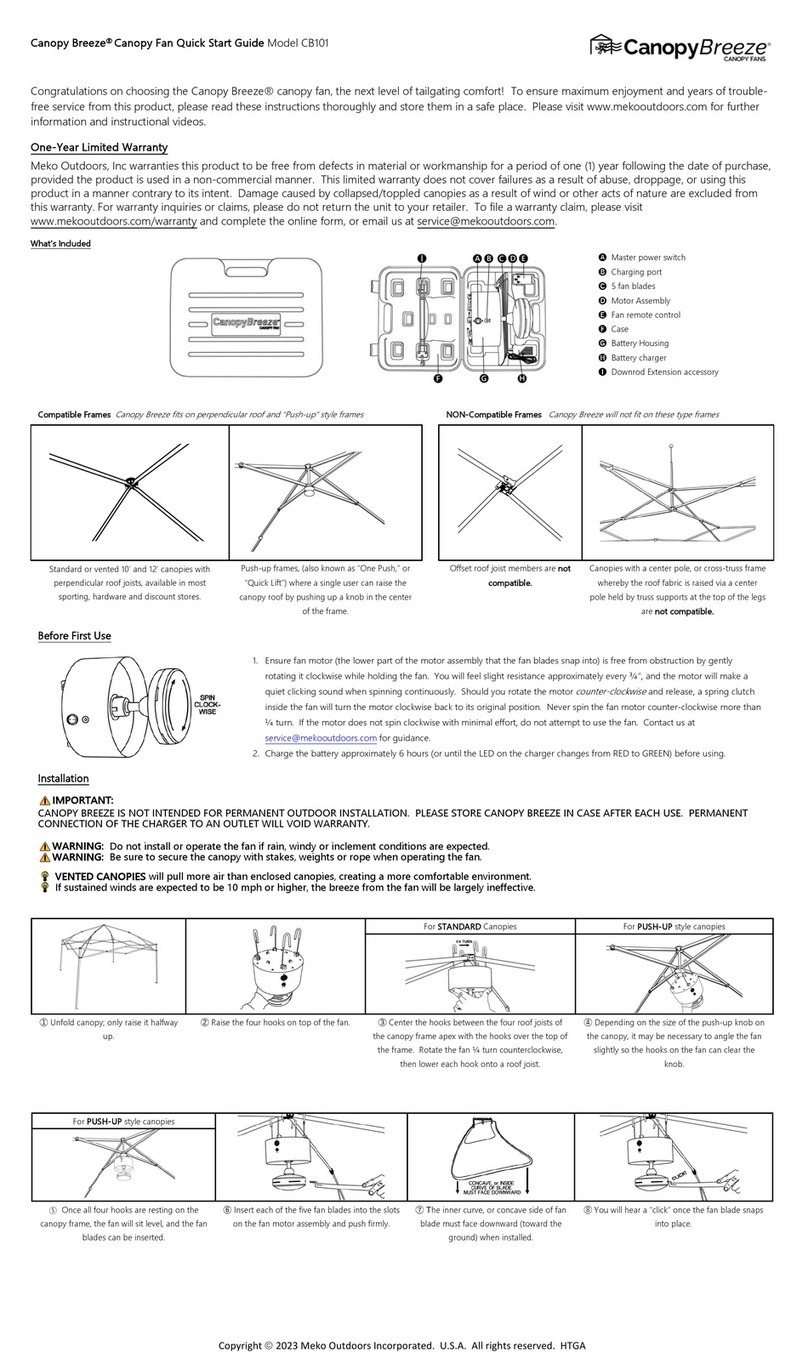
⑦ Once all the fan blades are in place, turn the Master
Power Switch to the “ON” position
BEFORE
raising the
canopy. It will be hard to reach otherwise.
⑧ Stake the canopy legs securely, place the fabric top
on the canopy, and raise it to full height.
⑨ Remove the clear plastic tab from the back of the remote
and discard before use. You can now operate the fan using
the remote control.
Uninstalling Canopy Breeze®
1. Turn the fan off using the remote.
2. Lower the canopy back to the half-height position.
3. Flip the Master Power Switch to the “OFF” position.
4. Remove the fan blades. While holding the motor assembly, grasp the front of the blade firmly. Slightly wiggle the blade from side to side while
pulling until the blade slides out. If the blades still won’t release, remove the fan from the canopy frame and place it upside down on a firm
surface, such as a table, to remove the blades. Note that the blades will become easier to remove over time.
5. Lift the fan unit up over the canopy frame and rotate clockwise ¼ turn to remove.
6. Lower the hooks and snap them back into their cradles on the top of the battery housing.
7. Place all components back into the case and locks clasps securely.
8.
⚠"#$Please be sure Master Power Switch is in the “OFF” position when storing the fan. If not, the remote could inadvertently start the motor
and cause damage to the fan and or case.
Center Hoop for Hook Mounting
Your fan comes with a hoop on the top for installation on a hook. This will allow for use in other
applications in addition to canopies. Please use extreme care when hook mounting.
1. We recommend a hook that is #10 size or bigger, and must support at least 10 lbs.
2. If hanging from a ceiling or gazebo, please be sure the hook is attached directly into the
wooden frame or stud under drywall. Do not use hooks that are mounted only in
drywall, even if using a drywall anchor.
3. Allow a minimum of 7.5’ of clearance between the fan blades and ground, or 6” higher
than the tallest occupant.
4. Once the fan is placed on the hook, secure it with a zip or wire tie for extra safety.
Charging and Battery Care
!"#$%&'()(*+,R/4=,57>835E7,0812,65.<C>0,;108,087,2C66417<,>835E75A,
1. Before first use, the battery must be charged at least 12 hours.
2. Plug the charger into a standard 120 Volt 60 Hz electrical outlet. While charging, the LED in the charger will illuminate red. When charging is
complete, it will illuminate green.
3. Typical recharge time after use is 5 hours from 10% battery charge.
4.
NOTE:
The fan will run indefinitely while the charger is connected to power.
5.
Battery disposal.
This product uses a Lithium-ion rechargeable and recyclable battery. When the battery will no longer hold a charge, it should
be removed from the fan and recycled. It should not be incinerated or composted. Contact your local recycling center for information on where
to dispose of it properly. In the event the battery in your fan needs replacing, please contact us at service@mekooutdoors.com for instructions
and pricing.
6.
Battery Tips.
The powerful lithium-ion battery included with your fan is by far its most expensive component. Maximize the life of your battery
with these handy tips:
a. Try to avoid “deep discharge” by not letting the battery drain completely.
b. It’s best to store the fan in an environment of 80°F or cooler. Try not to leave the fan in a hot car for an extended period of time.
c. Once the charger illuminates green, unplug it. The battery will discharge approximately 5% over the next several days, and you can
“top it off” the day before its next use.
d. When storing the fan for long periods of time, only charge the battery to 30-50%. Try to avoid storing the battery at 100% charge for
an extended period as this will shorten battery life.
e. When using the fan regularly, it is OK to run it for a short period of time, then recharge the battery back to full. Lithium-ion batteries
do not have “battery memory,” so partial discharge/recharge will not harm them.
Troubleshooting
If after installation the fan will not operate, try one of the following:
1. Was the fan fully charged before first use, with the LED on the charger illuminating green?
2. Was the Master Power switch on the fan body moved to the ON position before raising the canopy to full height?
3. Was the clear plastic battery safety tab removed from the back of the remote?
4. Does the LED on the front of the remote light up red when any buttons on the remote are pushed?
If all the above steps have been taken, and the fan still will not operate, please contact us at service@mekooutdoors.com for further assistance.
For questions and further information, please visit our website, www.mekooutdoors.com or email us at service@mekooutdoors.com.


