Cantatis Ultimate Audio Overture 192 User manual

High Performance 24-bit 192kHz Audio Output Interface
Windows Vista
User Guide
Version 1 1
August 20th, 2009
www cantatis com

Cantatis Overture 192 Windows Vista User Guide
© Cantatis, 2009 Page 2 of 35
Contents
1 Introduction........................................................................3
1.1
Key Features ................................................................................................ 3
1.2
Product Tour ................................................................................................ 4
2 Installation..........................................................................5
2.1
ystem Recommendation........................................................................... 5
2.1.1 Windows PC ...................................................................................................................5
2.1.2 Other ystems................................................................................................................5
2.2
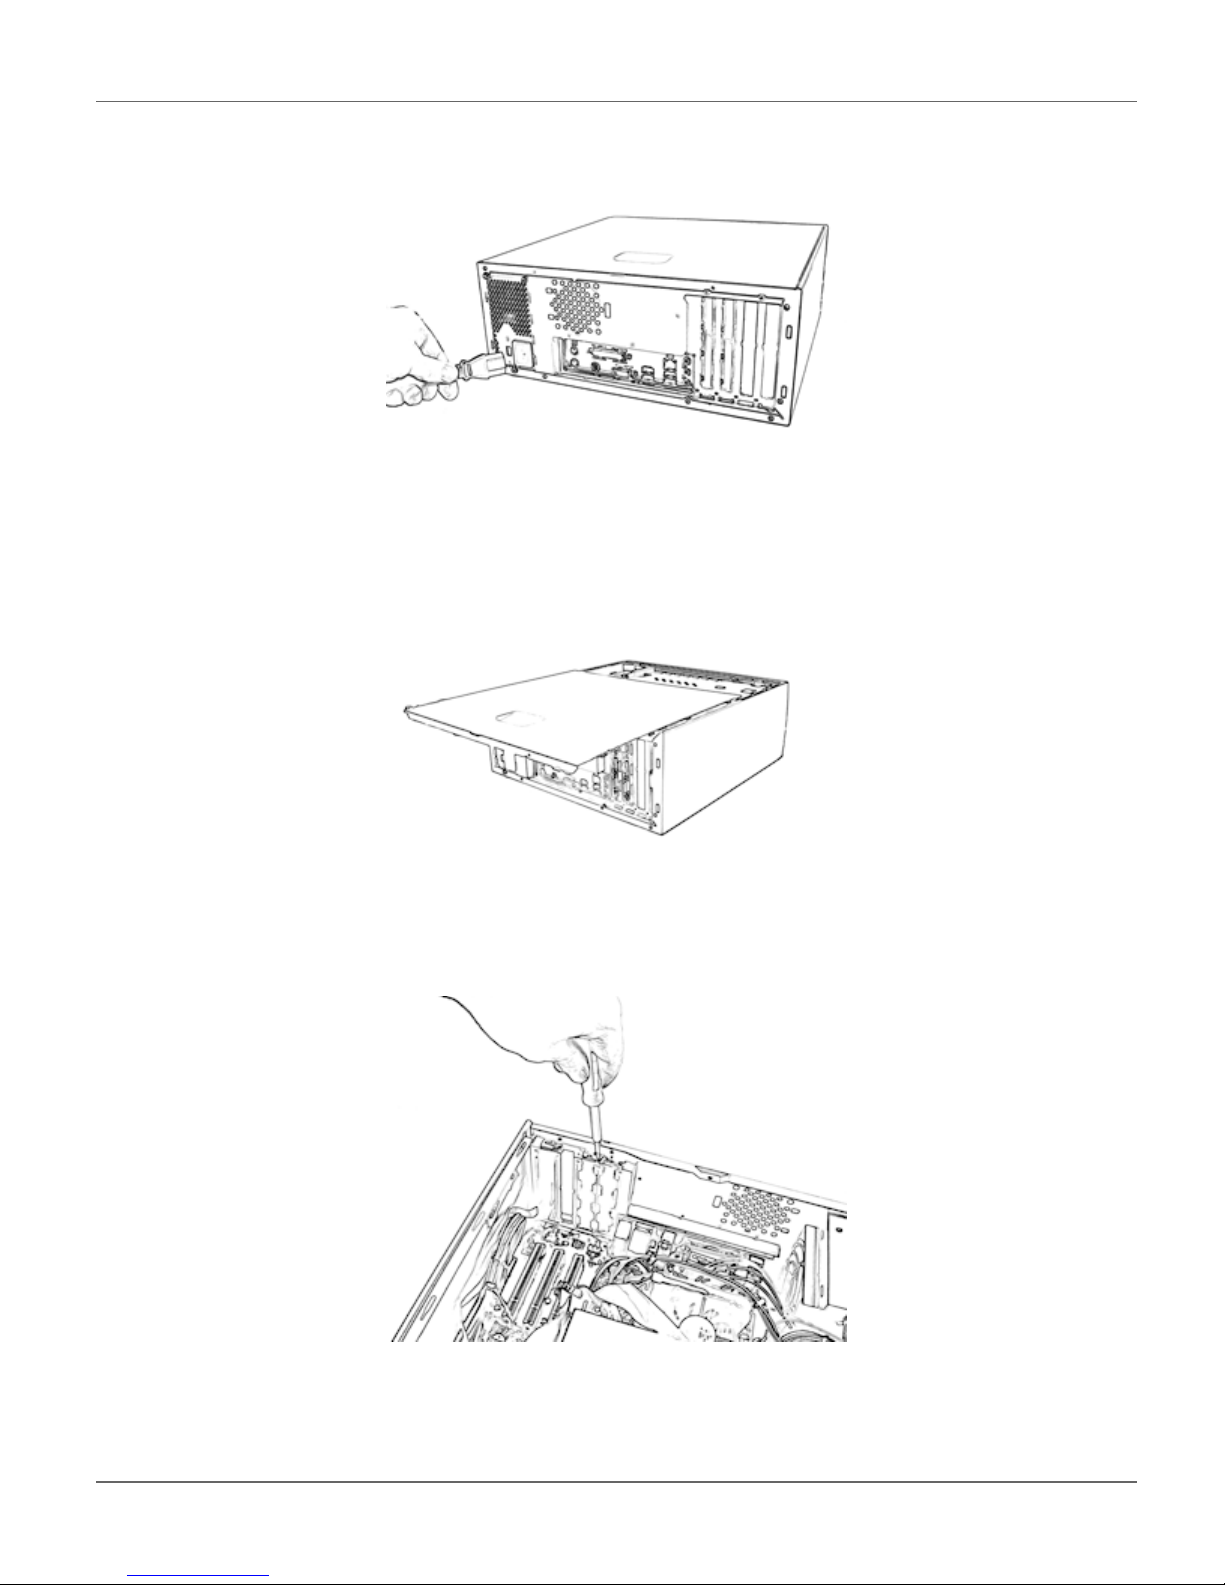
Hardware Installation .................................................................................. 5
2.3
oftware Installation.................................................................................... 8
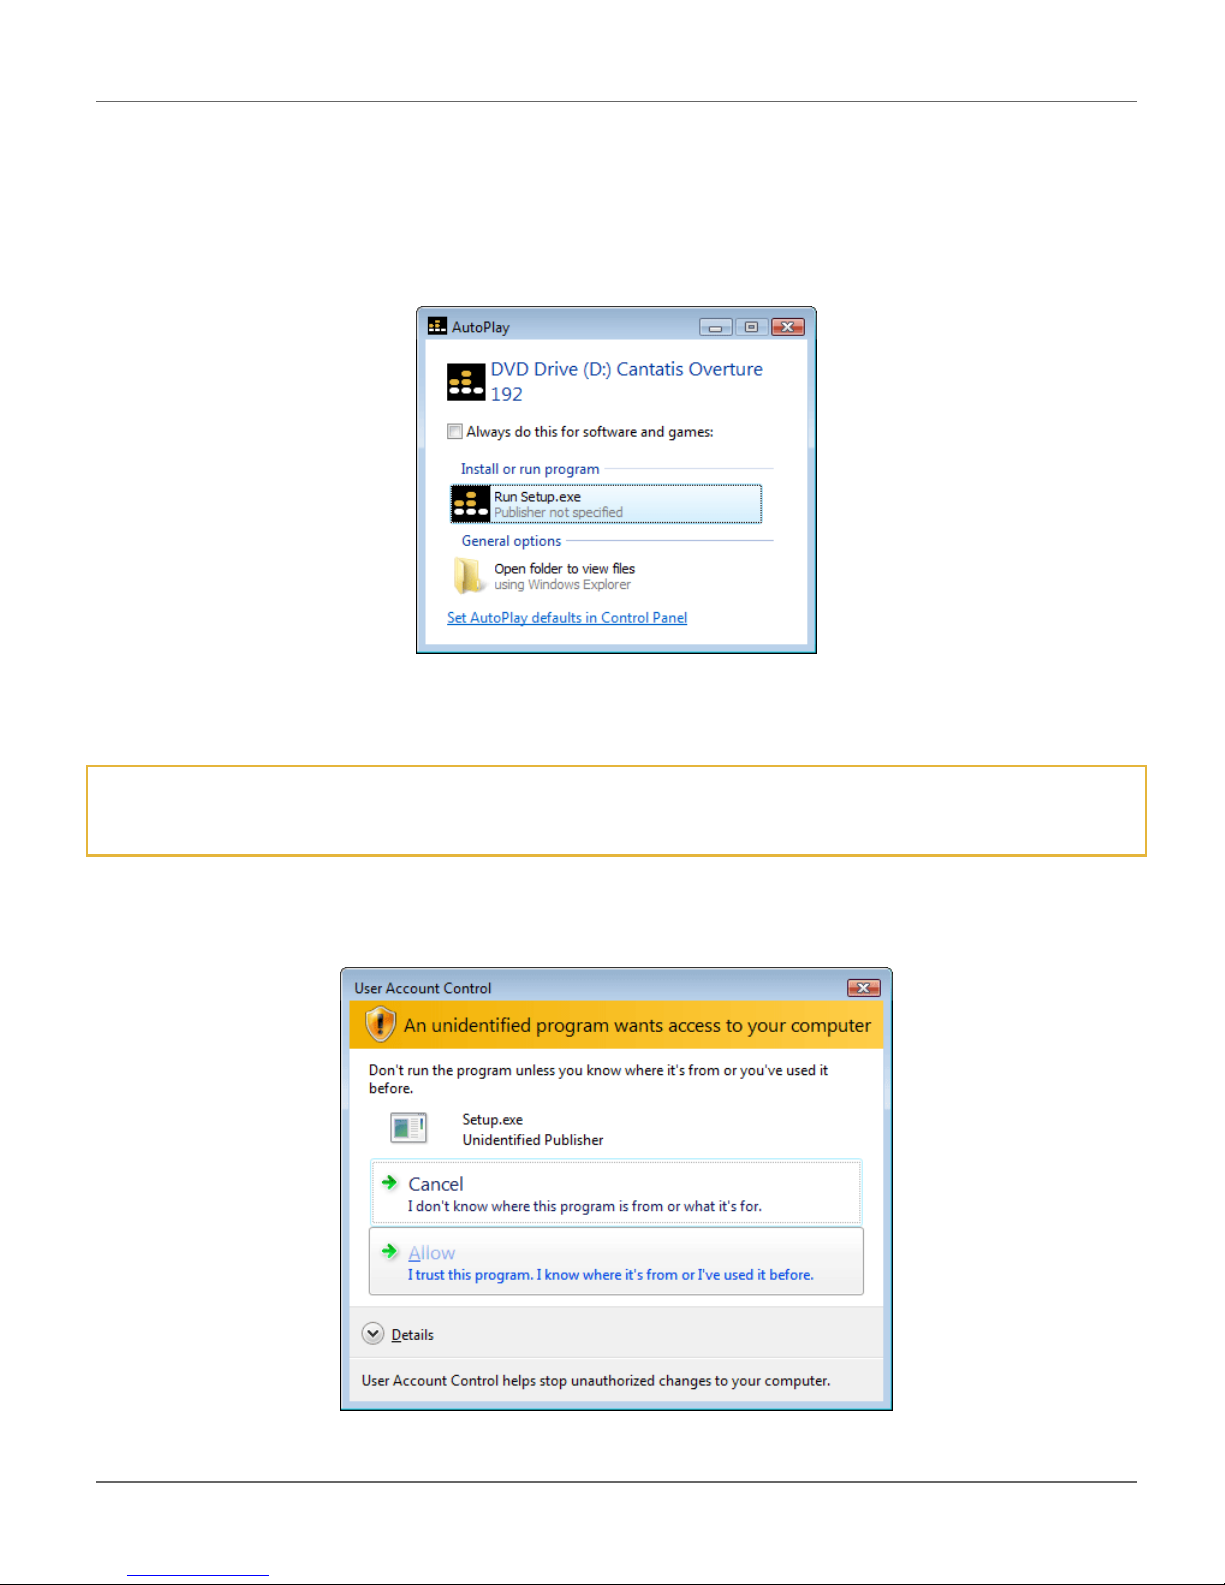
2.3.1 Windows Vista................................................................................................................8
2.3.2 Older Versions of Windows ........................................................................................15
3 Windows Vista ound ystem........................................15
3.1
Background................................................................................................ 15
3.2
Windows Vista ound Panel..................................................................... 16
4 Overture 192 Control Application...................................18
4.1
Fundamentals ............................................................................................ 18
4.2
tarting Up ................................................................................................. 18
4.3
ystem Tray Icon....................................................................................... 20
4.4
Popup Menu ............................................................................................... 20
4.4.1 how / Hide Overture Control .....................................................................................21
4.4.2 tart with Windows......................................................................................................21
4.4.3 Exit ................................................................................................................................21
4.5
Panels......................................................................................................... 21
4.5.1 ample Rate Panel.......................................................................................................22
4.5.2 Levels Panel .................................................................................................................26
4.5.3 Control Panel................................................................................................................29
4.5.4 Help Panel.....................................................................................................................31
4.6
Uninstalling................................................................................................ 32
5 Making the Most of the Overture 192 .............................33
5.1
Cables......................................................................................................... 33
5.2
Music Player Applications ........................................................................ 33
5.3
A IO Compatibility .................................................................................... 33
6 Notes.................................................................................35

Cantatis Overture 192 Windows Vista User Guide
© Cantatis, 2009 Page 3 of 35
1 Introduction
Many thanks for your purchase of the Cantatis Overture 192 High Performance 24-bit 192kHz
Audio Output Interface
This product is one of the very highest quality audio output interfaces available, allowing your
computer to become one of the best pieces of reference Hi-Fi in your home To achieve this, we
have used some state-of-the-art components and advanced designs, based on many years
experience in the audio field, to create a soundcard that delivers exceptional audio performance
Throughout the design of the Overture 192 we have endeavoured to reduce the usual
complexities and instead focus on quality of performance and ease of use We believe that
everything should be simple to install, simple to configure and simple to operate, allowing you to
focus on the reason for purchasing this product – the audio performance
Sounds too good to be true? Well trust your ears, you’ll be pleasantly surprised
1.1 Key Features
The Overture 192 is the first computer audio product available with Texas Instruments Burr
Brown PCM1794 Digital to Audio Converters (DACs) operating in “dual mono mode” – giving
Industry leading performance, ideal for Hi-Fi purists, home studios, professional and broadcast
applications
The Burr Brown DACs and audiophile op-amps throughout give stereo analogue outputs on
studio grade gold RCA connectors at up to 192kHz sample rate in fantastic detail and audio
clarity
The card also provides digital AES/EBU (S/PDIF) on both optical (TOSLINK) and co-axial (RCA)
outputs at up to 192kHz to match pro-audio systems The sample rate is software selectable to
consumer standards including 44 1kHz, 48kHz, 96kHz and 192kHz thereby giving certainty of
system compatibility
The Overture 192 also provides a specialist headphone amplifier circuit designed to suit the
widest range of headphone types (30Ω to 600Ω) giving distortion and noise free listening via a
3 5mm jack socket and pin header for internal PC connection to a front panel headphone socket
The Overture 192 is PCI v2 2 compliant and comes with WDM drivers for Microsoft Windows®
98SE, 2000, XP and Vista The drivers may function in other operating systems – see our
website for additional details
The Windows drivers are ASIO 2 0 compatible, allowing use with suitable software
A simple, intuitive control application avoids additional digital processing in the signal path for the
ultimate ease of use

Cantatis Overture 192 Windows Vista User Guide
© Cantatis, 2009 Page 4 of 35
1.2 Product Tour
C
B
E
D
G
F
A
A. Analogue Left / Right RCA Connectors
Analogue audio is provided via these studio grade gold RCA connectors at 2 3V rms for
connection to an external audio amplifier or AV system Make sure that you use high
quality audio cables to preserve the exceptional audio quality from the Overture 192, such
as those available from our website (www cantatis com)
B. 3.5mm Headphone ocket
Connect your headphones directly to the Overture 192 to listen to music via the high
quality on-board headphone amplifier If your headphones have a ¼” jack rather than a
3 5mm jack then you can purchase an adapter from our website (www cantatis com)
C. Front Panel Audio (FPA) Connector
If your computer has a front panel headphones socket then you can attach the internal
cable to this connector so that you can plug your headphones into the front of your
computer rather than the headphone socket on the Overture 192 card
D. Optical /PDIF Connector
Digital S/PDIF audio is provided via this optical connector for connection to a digital
amplifier or AV system Cables are available from our website (www cantatis com)

Cantatis Overture 192 Windows Vista User Guide
© Cantatis, 2009 Page 5 of 35
E. Electrical /PDIF Connector
Digital S/PDIF audio is also provided via this RCA connector for connection to a digital
amplifier or AV system Cables are available from our website (www cantatis com)
F. PCI Connector
The PCI connector is the interface that the Overture 192 uses to communicate with your
computer This must be plugged into a suitable free PCI slot inside your computer (see
section 2 2 below)
G. Expansion Ports
The three expansion ports are provided for connection to other Cantatis products Please
visit our website (www cantatis com) for information about new products and offers
2 Installation
2.1 ystem Recommendation
2.1.1 Windows PC
It is recommended that your Windows PC has at least the following specification although there
are no restrictions during the installation process
• Intel Pentium III, AMD or compatible CPU
• At least 256Mbytes of RAM
• One available PCI slot
• CDROM drive
• Microsoft Windows® 98SE, 2000, XP or Vista
Note that there is a separate Windows XP User Guide to make installation and use
straightforward for Windows XP users. If you are using Windows XP then please see the
Cantatis Overture 192 Windows XP User Guide.
2.1.2 Other ystems
Check the Cantatis website (www cantatis com) for updates on how to use your Overture 192 on
systems that are not running Microsoft Windows
2.2 Hardware Installation
The following instructions describe a typical installation in a standard personal computer Your
experience of installing the Overture 192 might vary slightly from these instructions but the
general process should be the same

Cantatis Overture 192 Windows Vista User Guide
© Cantatis, 2009 Page 6 of 35
1 Switch off your computer and remove the power cable from your computer power supply
2 Remove the cover from your system following the instructions provided when you purchased
your computer, so that you have access to the inside of the computer and the PCI slots
3 Identify the first available PCI slot in your system and if there is a blanking plate present in the
slot then remove it using a suitable screwdriver

Cantatis Overture 192 Windows Vista User Guide
© Cantatis, 2009 Page 7 of 35
4 Remove all four of the nuts from both audio connectors on the Overture 192 Audio Interface
card
5 Insert the Overture 192 card into the PCI slot carefully and push the card firmly until it is
seated securely, then screw the Overture 192 bracket to the chassis of your computer
6 Screw the washers and four nuts back onto the audio connectors at the rear of your computer
being careful not to over-tighten

Cantatis Overture 192 Windows Vista User Guide
© Cantatis, 2009 Page 8 of 35
7 If your computer has a front panel headphone socket then unplug the front panel audio cable
from your motherboard and plug it onto the connector marked FPA on the Overture 192 card
(check left and right are the correct way round and ground is connected)
L
G
R
8 Replace the cover on your system, reconnect it to the mains power and switch it on When the
computer has started up then log on as usual
2.3 oftware Installation
2.3.1 Windows Vista
When you log on to Windows Vista, you may see the Found New Hardware wizard:
If this window appears then do not attempt to install the software using the wizard The software
must be installed from the CD that was provided with your Overture 192 so click on “Cancel”

Cantatis Overture 192 Windows Vista User Guide
© Cantatis, 2009 Page 9 of 35
Insert the Overture 192 software CD into the CD drive of your computer and wait for the
installation program to start (if it doesn’t start automatically then run the Setup exe program on
the CD manually)
When you insert the Overture 192 installation CD, Windows Vista might display the following
window:
If this window does appear then you should click on “Run Setup exe” to proceed with the
installation
Tip: If you always want AutoPlay CDs to run on your computer automatically then you can tick
the “Always do this for software and games” box before clicking on “Run Setup exe” and this
AutoPlay panel will not appear again
Windows Vista contains more security features than Windows XP so after running the AutoPlay
CD you might see the following window:
You should simply click on “Allow” to proceed with the installation

Cantatis Overture 192 Windows Vista User Guide
© Cantatis, 2009 Page 10 of 35
The Overture 192 Control Application Installer will then start:
Click on “Next >” to start the installation
You will then be asked to confirm or modify the location to install the application and whether you
want to install the software for everyone that uses your computer or just you:
It is normal just to leave these at the suggested settings but you can modify them if you want to
Then just click “Next >” to start and you will see the progress of the installation

Cantatis Overture 192 Windows Vista User Guide
© Cantatis, 2009 Page 11 of 35
When the Overture 192 Control Application has been installed you will see the following window:
When you click on “Close” to close this window the Overture 192 Driver Installer will start
automatically using the InstallShield Wizard (this provides protection for your installation and
ensures that the driver software can be uninstalled cleanly should you wish to do so in future):

Cantatis Overture 192 Windows Vista User Guide
© Cantatis, 2009 Page 12 of 35
When the InstallShield Wizard has finished its preparations then the driver installer will start:
Click on “Next >” to start installing the Overture 192 driver
A license agreement window will be displayed that shows the license that is granted for you to
use the driver software Read the text then select the “I Agree” option and then click on “Next >”
to continue
You will then be asked to confirm that you wish to install the driver:
Make sure the “Cantatis Overture 192 Audio Driver V1 00” item is ticked and then click on
“Next >” to continue

Cantatis Overture 192 Windows Vista User Guide
© Cantatis, 2009 Page 13 of 35
You will then be asked to make a final confirmation that you want to install the driver:
If you want to review any of the previous windows to check your settings then you can use the
“< Back” button, otherwise click on “Next >” to proceed with the installation
The Overture 192 driver will then be installed
During the driver installation you might see the following window:
This is normal with drivers that have not been created by Microsoft so there is no need to worry
as we have tested the Overture 192 drivers thoroughly Just click on “Install this driver software
anyway” to proceed with the installation

Cantatis Overture 192 Windows Vista User Guide
© Cantatis, 2009 Page 14 of 35
When the driver installation process has finished you will see the following window:
The text should appear as above, stating that the items that failed to install were “None”
i.e. there were no components that failed to install.
If anything other than “None” is shown then you should contact our support team via the
Cantatis website (www.cantatis.com).
Click on “Next >” and you will be prompted to restart your computer:
Remove the Overture 192 installation CD from your CD drive and then click on “Finish” to restart
your computer so that that the driver starts up properly and is ready to use

Cantatis Overture 192 Windows Vista User Guide
© Cantatis, 2009 Page 15 of 35
2.3.2 Older Versions of Windows
Installing the software on older versions of Microsoft Windows should be very similar to the
process described above for Windows Vista
Note that there is a separate User Guide for Windows XP that describes the installation process
on Windows XP in detail
If you have any problems with your installation then please contact our support team via the
Cantatis website (www cantatis com)
3 Windows Vista ound ystem
3.1 Background
When Microsoft created Windows Vista the sound system architecture was completely
redesigned and no longer works in the same way as previous versions of the Windows operating
system such as Windows XP
Note that in this section we discuss the “sample rate”, which is partly what determines the
“quality” of the sound, the higher the sample rate the better the quality Sample rate is normally
measured in “kHz” (pronounced “kilo-hertz”) which means “thousands of samples per second”
e g 96kHz means 96 thousand samples per second A “sample” is a “snapshot” of audio taken at
a particular instant of time so the more samples there are the more of the original sound can be
reproduced
In previous versions of Windows, when a sound file was played then Windows attempted to play
the sound at the sample rate of the audio data in the file If the sound card driver did not support
that sample rate then Windows would up-sample or down-sample to match the sample rate
supported by the driver
This had some drawbacks In particular, if a sound was played at a low sample rate e g 22kHz,
and then a sound with a much higher sample rate e g 96kHz was played at the same time then
the Windows mixer would down-sample the higher sample rate sound to the lower rate, thereby
degrading the quality of the sound output for the higher sample rate file
In Windows Vista, Microsoft decided that the user (and only the user) should be in full control of
both the current audio output device and the sample rate that is used at all times
So, for example, if the user sets the sample rate to 96kHz then all sounds that are played are up-
sampled or down-sampled to 96kHz, regardless of the sample rate set in the file This gives the
user the flexibility to set the sample rate that is suitable for their system and to rely on all sound to
be reproduced at the level of quality they have selected

Cantatis Overture 192 Windows Vista User Guide
© Cantatis, 2009 Page 16 of 35
3.2 Windows Vista ound Panel
At the heart of the new Windows Vista sound system is the Sound Panel, which can be accessed
easily from the popup menu on the “speaker” icon in the system tray:
By selecting the “Playback Devices” menu option you can display the playback devices in the
Sound panel:
Note that the Cantatis Overture 192 Audio Controller device is described as “Digital Output
Device (SPDIF)” This is because the Overture 192 combines analogue and digital outputs into
one device that provides fantastic audio quality on both analogue and digital outputs at the same
time and it is therefore classed as a digital output

Cantatis Overture 192 Windows Vista User Guide
© Cantatis, 2009 Page 17 of 35
By selecting the Cantatis Overture 192 Audio Controller device and clicking on “Properties” (or by
simply double-clicking on the device icon) you can display the properties of the Overture 192
device:
Most of the functionality provided in this panel can be left unchanged but if you change the
sample rate that the Overture 192 is set to then you must always come back to this panel and
select the “Advanced” tab so that you can set the same sample rate for Windows Vista to use:

Cantatis Overture 192 Windows Vista User Guide
© Cantatis, 2009 Page 18 of 35
The sample rate is set using the drop down menu for the Default Format and then you should
click on “OK” or “Apply” to set the sample rate you have selected
Tip: You must always make sure that the sample rate set in the Windows Vista ound
panel is exactly the same as the sample rate that is set in the Overture 192 Control
Application or you may find that you can’t hear any sound. Don’t worry though; the
Overture 192 Control Application will help you to do this at the appropriate time.
4 Overture 192 Control Application
4.1 Fundamentals
When we designed the Overture 192 Audio Output Interface one of the fundamental objectives
was to keep it simple to install and simple to use
So, no bundles of cables hanging out of the back of your computer and no complicated control
applications with volume controls, graphic equalisers and dynamic effects that can all be
achieved by using the operating system and applications on your computer anyway
Instead, the Overture 192 Control Application simply focuses on the essentials
4.2 tarting Up
After you have logged onto your PC you will find a shortcut to the Overture 192 Control
Application on your desktop, which you can double click to start the application:
Tip: If you don’t want the Overture 192 shortcut on your desktop then it is safe to delete it

Cantatis Overture 192 Windows Vista User Guide
© Cantatis, 2009 Page 19 of 35
You will also find the Overture 192 Control Application in the “Cantatis” group in the
“All Programs” menu in your Start menu:
When the application starts up you will see the following window:
This window is used to control the Overture 192 Audio Output Interface

Cantatis Overture 192 Windows Vista User Guide
© Cantatis, 2009 Page 20 of 35
Tip: You can click on the “www cantatis com” link at any time to go directly to the Cantatis
website to find out about all of the latest products and offers or to get help and support
4.3 ystem Tray Icon
When the Overture 192 Control Application starts up it also places an icon in the Windows
system tray:
Tip: By clicking on this icon with the left button of your mouse you can hide or show the Overture
192 Control Application window
4.4 Popup Menu
The system tray icon also has a popup menu, which you can see when you click on the icon with
the right button of your mouse:
This popup menu is also available by clicking with the right mouse button on the Overture 192
Control Application window:
Other manuals for Overture 192
1
Table of contents
Other Cantatis Ultimate Audio Accessories manuals