Canusa warrants that the product conforms
to its chemical and physical description
and is appropriate for the use stated on the
installation guide when used in compliance
with Canusa’s written instructions. Since
many installation factors are beyond
our control, the user shall determine the
suitability of the products for the intended
use and assume all risks and liabilities in
connection therewith. Canusa’s liability is
stated in the standard terms and conditions
of sale. Canusa makes no other warranty
either expressed or implied. All information
contained in this installation guide is to be
used as a guide and is subject to change
without notice. This installation guide
supersedes all previous installation guides
on this product. E&OE
Canusa-CPS
A division of Shawcor Ltd.
Head Office
25 Bethridge Road
Toronto, ON, Canada M9W 1M7
Tel: +1 416 743 7111
Fax: +1 416 743 5927
Canada
Dome Tower St. 2200,
333-7th Avenue SW
Calgary, AB, Canada T2P 2Z1
Tel: +1 403 218 8207
Fax: +1 403 264 3649
Americas
5875 N. Sam Houston Pkwy W.,
Suite 200
Houston, TX, USA 77086
Tel: +1 281 886 2350
Fax: +1 281 886 2353
Middle East
ADPC - Mussafah Port,
P.O. Box 2621
Abu Dhabi, UAE
Tel: +971 2 496 3500
Fax: +971 2 496 3501
Europe, Africa & Russia
Dellaertweg 9-E, Gebouw
“Le Carrefour”
2316 WZ Leiden,
The Netherlands (NL)
Tel: +31 71 80 802 70
Fax: +31 71 80 802 71
Asia-Pacific
101 Thomson Road,
#11-03 United Square
307591 Singapore
Tel: +65 6749 8918
Fax: +65 6749 8919
Quality Management system
registered to ISO 9001
Part No. 99060-262
IG_Atomizer_rev015
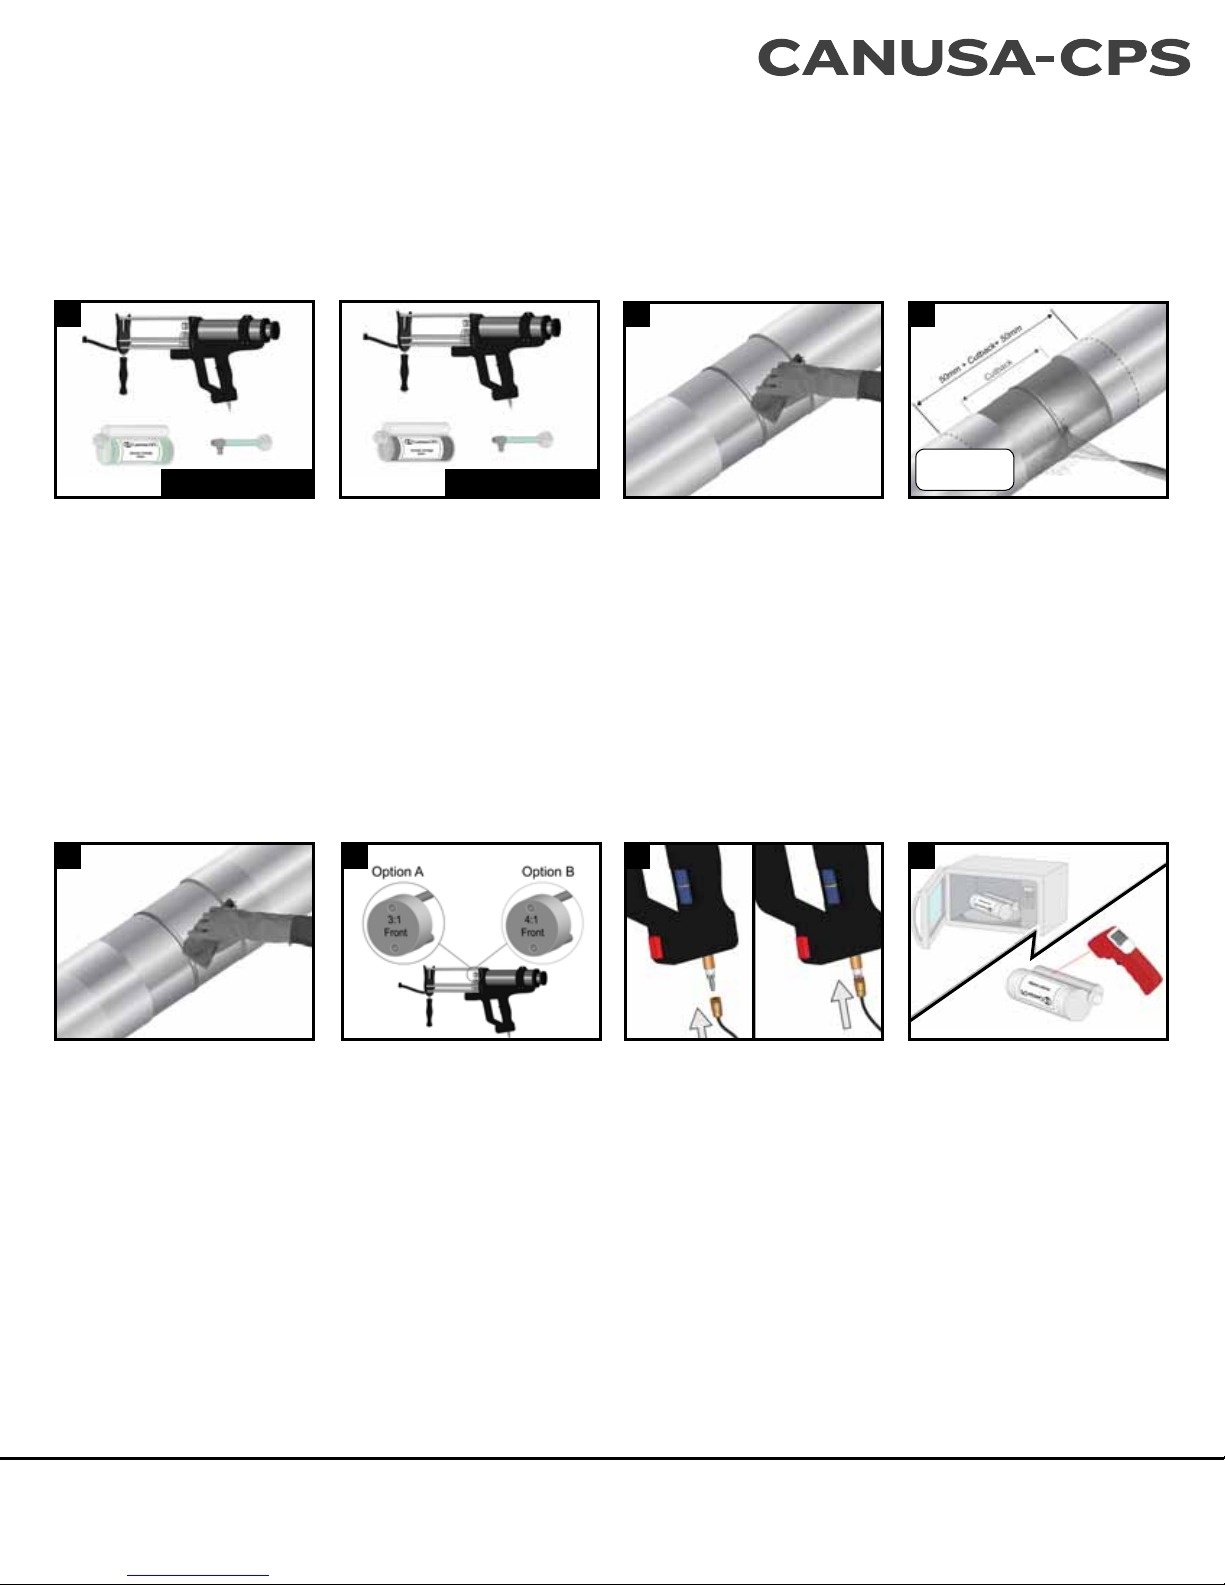
Adjust the atomizing air pressure dial
to #3 +/- 1. This setting may vary
depending on the temperature of the
product and input air pressure.
Note: When spraying with a right-angled
mixing tip, increased air pressure may be
required.
12
11
Adjust the fluid control dial to a setting
of #3 +/- 1 by scrolling up or down. The
dial is located on the side of the gun
handle, behind the trigger. This setting
regulates the speed/pressure of the two
pistons. This setting mayvary depending
on temperature of product and input air
supply pressure.
Adjust Fluid Control Dial Adjust Air Pressure Dial
10
Slide the cartridge into the Atomizer gun
with the Base side of the cartridge (large
end) down first. The two ejector plates
of the gun should match the piston seal
area of the cartridge. Once the cartridge
is placed securely into the gun chamber,
attach the quick lock air hose to the
mixing tip nozzle end by ‘snapping’ it in
place.
Insert Cartridge &
Attach Air Connector
Install Mixing Tip
9
Hold the cartridge with end cap fac-
ing up. Remove the cartridge end cap
by unscrewing (counter-clockwise) and
pulling up. Fit the mixing tip end over
the cartridge outlet and screw the mix-
ing tip cap to securely lock the cartridge
and mixing tip together. Mixing tips are
intended for one time use only.
Lightly Shake Cartridge
8
Once heated, the viscosity of the cure
side will be very low. Holding the base
side of the cartridge, shake the cartridge
up and down and side to side to lightly
redistribute the pigment colour in the
cure side of the cartridge.
Storage & Safety Guidelines
To ensure maximum performance, store
Canusa products in a dry, ventilated area.
Keep products sealed in original cartons
and avoid exposure to direct sunlight, rain,
snow, dust or other adverse environmental
elements. Avoid prolonged storage at
temperatures above 40°C (104°F) or
below 5°C (41°F). Product installation
should be done in accordance with local
health and safety regulations.
Appropriate PPE should be worn in compli-
ance with the requirements of the material
Safety Data Sheet and local health and
safety regulations and should include the
use of a full face shield.
These installation instructions are
intended as a guide for standard products.
Consult your Canusa
representative for specific projects or
unique applications.
Purge cartridge and mixing tip nozzle
by pulling the trigger long enough to
just fill the static mixing tip chamber
with material. The Atomizer Gun is now
ready for spraying. Release trigger half-
way to stop the fluid ejector pistons.
Release the trigger completely to stop
the atomizing air (stop spraying) or when
cartridge is empty.
13
Purge Cartridge
& Spray Surface
14
Press the red button to retreat fluid
ejector pistons. Remove atomizing
air hose from mixing tip and remove
cartridge.
Remove Used Cartridges