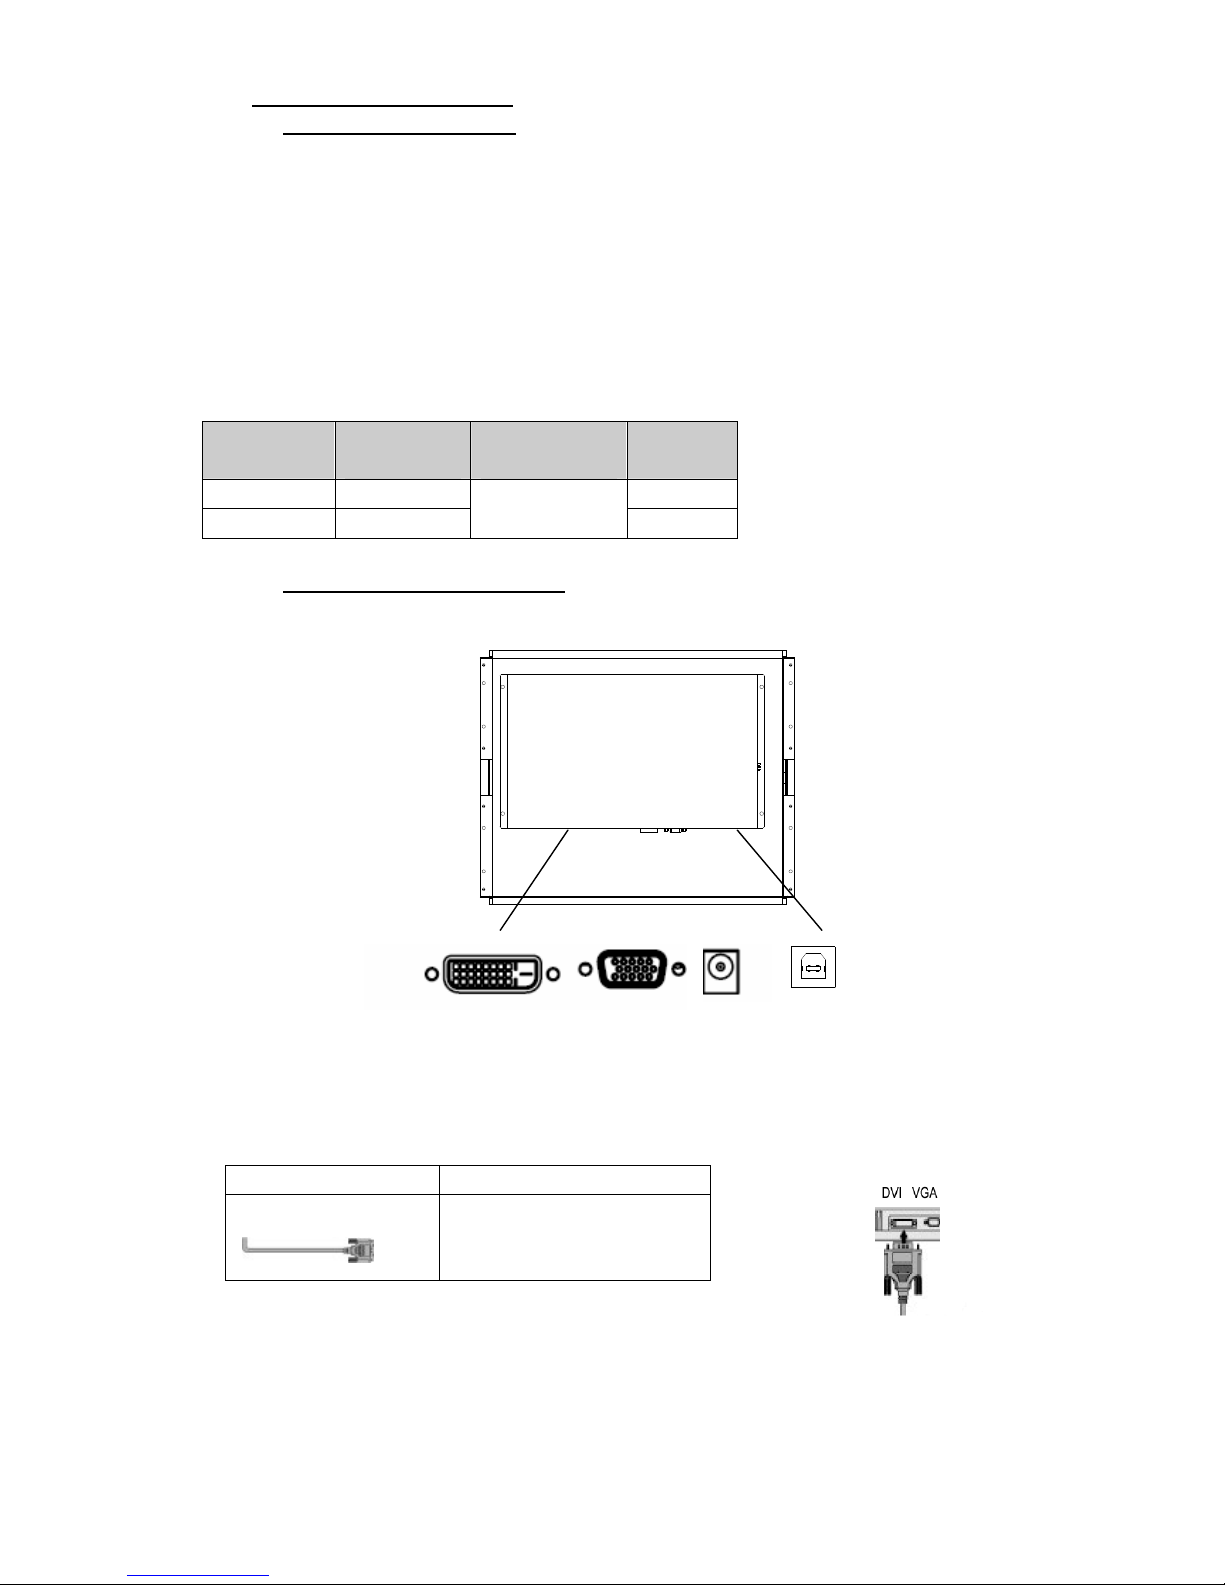
Canvys DCT08D00893BE User manual

User Manual DCT08D00893BE
Industrial Monitor
8” Color LCD
Code No.: CL0883BR
Part Num er: DCT08D00893BE
REV: A0
0600883705

2
TABLE OF CONTENTS
1. SAFETY SYMBOLS & PRECAUTIONS ........................................................ 3
1.1. Safety Sym ols .............................................................................. 3
1.2. Pprecautions.................................................................................. 3
2. INTRODUCTION ..................................................................................... 6
2.1. Features ........................................................................................ 6
2.2. Package Contents .......................................................................... 6
3. CABLE CONNECTION .............................................................................. 7
3.1. Before Connecting ......................................................................... 7
3.2. Connecting the Ca les ................................................................... 7
4. INSTALLING THE DRIVER SOFTWARE..................................................... 8
5. ADJUSTMENT ......................................................................................... 9
5.1 How to Use OSD Menu .................................................................... 9
5.2 OSD MENU Adjustments and Settings ........................................... 10
5.3 Screen Adjustment ...................................................................... 10
6. TROUBLESHOOTING ............................................................................. 12
7. CLEANING............................................................................................ 13
8. SPECIFICATION ................................................................................... 14
8.1 Touchmonitor Specification.......................................................... 14
8.2 D-Su 15pin Connector ................................................................ 14
8.3 DVI-D Connector.......................................................................... 14
8.4 Preset Timing .............................................................................. 14
9. GUARANTEE EXCLUSION .................... Fehler! Textmarke nicht definiert.5
10. VENDOR ............................................. Fehler! Textmarke nicht definiert.5

3
1. SAFETY SYMBOLS & PRECAUTIONS
1.1. Safety Symbols
This manual uses the safety symbols below. They denote c itical info mation. Please ead
them ca efully.
WARNING
Failu e to abide by the info mation in a WARNING may esult in se ious inju y
and can be life th eatening.
CAUTION
Failu e to abide by the info mation in a CAUTION may esult in mode ate inju y
and/o p ope ty o p oduct damage.
Ale t elect ical haza d.
Indicates a p ohibited action.
Indicates to g ound fo safety.
1.2. P ecautions
To ensu e pe sonal safety and p ope maintenance, please ead this section and the caution
statements on the unit
WARNING
If the unit egins to emit smoke, smells like something is urning, or makes
strange noises, disconnect all power connections immediately and contact your
dealer for advice.
Attempting to use a malfunctioning unit may esult in fi e, elect ic shock, o equipment
damage.
Do not open the ca inet or modify the unit.
Opening the cabinet o modifying the unit may esult in fi e, elect ic shock, o bu n.
Refer all servicing to qualified service personnel.
Do not attempt to se vice this p oduct you self as opening o emoving cove s may esult in
fi e, elect ic shock, o equipment damage.
Keep small o jects or liquids away from the unit.
Small objects accidentally falling th ough the ventilation slots into the cabinet
o spillage into the cabinet may esult in fi e, elect ic shock, o equipment
damage. If an object o liquid falls/spills into the cabinet, unplug the unit
immediately. Have the unit checked by a qualified se vice enginee befo e
using it again.
Set up the unit in an appropriate location.
Not doing so may esult in fi e, elect ic shock, o equipment damage.
-
Do not place the unit outdoo s.
-
Do not install the unit in t anspo tation systems (ship, ai c aft, t ains,
automobiles, etc.)
-
Do not place the unit in a dusty o humid envi onment.
-
Do not place the unit in a location whe e the steam comes di ectly on the sc een.
-
Do not place the unit nea heat gene ating devices o a humidifie .
-
Do not place the unit in an inflammable gas envi onment.

4
To avoid danger of suffocation, keep the plastic packing ags away from a ies
and children.
Use the enclosed power cord and connect to the standard power outlet of your
country.
Be su e to emain within the ated voltage of the powe co d. Not doing so may esult in fi e
o elect ic shock.
To disconnect the power cord, grasp the plug firmly and pull.
Tugging on the co d may damage and esult in fi e o elect ic shock.
The equipment must e connected to a grounded main outlet.
Not doing so may esult in fi e o elect ic shock.
Use the correct voltage.
- The unit is designed fo use with a specific voltage only. Connection to anothe voltage
than specified in this Use ’s Manual may cause fi e, elect ic shock, o equipment damage.
- Do not ove load you powe ci cuit, as this may esult in fi e o elect ic shock.
Handle the power cord with care.
- The unit is designed fo use with a specific voltage only. Connection to
anothe voltage than specified in this Use ’s Manual may cause fi e,
elect ic shock, o equipment damage.
- Do not ove load you powe ci cuit, as this may esult in fi e o elect ic shock.
Never touch the plug and power cord if it egins to thunder.
Touching them may esult in elect ic shock.
Do not touch a damaged LCD panel directly with are hands.
The liquid c ystal that may leak f om the panel is poisonous if it ente s the eyes o
mouth. If any pa t of the skin o body comes in di ect contact with the panel, please wash
tho oughly. If some physical symptoms esult, please consult you docto .
Follow local regulation or laws for safe disposal.

5
CAUTION
Handle with care when carrying the unit.
Disconnect the powe co d and signal cables and emove the optional unit. Moving the unit
with the co d o the option attached is dange ous. It may esult in inju y.
When handling the unit, grip the ottom of the unit firmly with oth
hands ensuring the panel faces outward efore lifting.
D opping the unit may esult in inju y o equipment damage.
Do not lock the ventilation slots on the ca inet.
- Do not place any objects on the ventilation slots.
- Do not install the unit in a closed space.
- Do not use the unit laid down o upside down.
- Blocking the ventilation slots p events p ope ai flow and may esult in fi e, elect ic shock,
o equipment damage.
Do not touch the plug with wet hands.
Doing so may esult in elect ic shock.
Use an easily accessi le power outlet.
This will ensu e that you can disconnect the powe quickly in case of a p oblem.
Periodically clean the area around the plug.
Dust, wate , o oil on the plug may esult in fi e.
Unplug the unit efore cleaning it.
Cleaning the unit while it is plugged into a powe outlet may esult in elect ic shock.
If you plan to leave the unit unused for an extended period, disconnect the power
cord from the wall socket after turning off the power switch for the safety and the
power conservation.
LCD PANEL
When the monito is cold and b ought into a oom o the oom tempe atu e goes up quickly,
dew condensation may occu inside and outside the monito . In that case, do not tu n the
monito on and wait until dew condensation disappea s, othe wise it may cause some
damages to it.
In o de to supp ess the luminosity change by long-te m use and to maintain the stable
luminosity, please use the monito with the lowe b ightness.
The sc een may have defective pixels. These pixels may appea as slightly light o da k a ea
on the sc een. This is due to the cha acte istics of the panel itself, and not the p oduct.
The backlight of the LCD panel has a fixed life span. When the sc een becomes da k o
begins to flicke , please contact you deale .
Do not p ess on the panel o edge of the f ame st ongly, as this may esult in damage to the
sc een. The e will be p ints left on the sc een if the p essed image is da k o black. If
p essu e is epeatedly applied to the sc een, it may dete io ate o damage you LCD panel.
Leave the sc een white to dec ease the p ints.
Do not sc atch o p ess on the panel with any sha p objects, such as a pencil o pen as this
may esult in damage to the panel. Do not attempt to b ush with tissues as this may sc atch
the LCD panel.
When the sc een image is changed afte displaying the same image fo extended pe iods of
time, an afte image may appea . Use the sc een save o time to avoid displaying the same
image fo extended pe iods of time.

6
2. INTRODUCTION
Thank you ve y much fo choosing this monito .
2.1. Featu es
- VGA analog input
- DVI digital input compliant
- Resolutions up to 800×600
- Powe management system confo ms to VESA DPMS standa d.
- Suppo ts DDC1/2B fo Plug & Play compatibility.
- Advanced On Sc een Display (OSD) cont ol fo pictu e quality adjustment
2.2. Package Contents
Please contact you local deale fo assistance if any of the listed items a e missing o
damaged.
- LCD Monito
- DVI Cable
- Use Manual
- CD d ive
- Powe cable
- Powe adapte
Note: Please etain the packing mate ials fo futu e t ansfe ence.

7
3. CABLE CONNECTION
3.1. Befo e Connecting
Befo e connecting you monito to the compute , change the display sc een settings
(Resolution and f equency) in acco dance with the cha ts below.
Note:
- The lowe display modes like 640x 480, automatically enla ge to the maximum display
mode (800x600), and some lines of the cha acte s may become fuzzy.
- When you compute and display suppo t VESA DDC, the suitable esolution and the
ef esh ate a e set by just plugging you display into the compute without any manual
settings.
The monito suppo ts the following esolutions.
Resolution
Refresh
rate
Dot
Frequency
Remark
640 x 480 60Hz VGA
800 x 600 60Hz
108MHz
(Max.) VESA
3.2. Connecting the Cables
Note: Be su e that the powe switches of both the compute and the monito a e OFF.
DVI D-sub DC IN USB
1 . Plug the DVI signal cable into the connecto at the ea of the monito and the othe end
of the cable into the connecto on the PC. Afte connecting, secu e the connection with
the sc ew-in fastene s.
2. Plug the VGA signal cable into the connecto at the ea of the monito and the othe end
of the cable into the connecto on the PC. Afte connecting, secu e the connection with the
sc ew-in fastene s.
Signal Cable Connecto of Compute
DVI Signal Cable
DVI

8
3. Connect end of the touchsc een USB cable to the ea side of the compute and the othe
end to the monito .
4. Plug the powe co d into the powe connecto on the ea of the monito . Then, plug the
othe end of the co d into a powe outlet.
4. INSTALLING THE DRIVER SOFTWARE
D ive s a e located on the enclosed CD-ROM fo the following ope ating systems:
• Windows XP
• Windows 2000
• Windows Me
• Windows 98
• Windows 95
• Windows NT 4.0
The touchmonito is Plug-and-Play compliant. Info mation on the video capabilities of
touchmonito is sent to video display adapte when Windows sta ts. If Windows detects
touchmonito , follow the inst uctions on the sc een to install a gene ic Plug-and-Play
monito .
Refe to the app op iate section fo d ive installation inst uctions.
Installing the USB Touch Driver for Windows XP, Windows 2000, Me, 95/98 and
NT 4.0
1. Inse t the CD-ROM in compute ’s CD-ROM d ive.
If Windows 98, Windows Me o Windows 2000 Windows XP sta ts the Add New Ha dwa e
Wiza d.
2. Choose Next. Select “Sea ch fo the best d ive fo you device (Recommended)” and
choose Next.
3. When a list of sea ch locations is displayed, place a checkma k on “Specify a location” and
use Browse to select the suitable di ecto y on the CD-ROM.
4. Choose Next. Once the USB touchsc een d ive has been detected, choose Next again.
5. You will see seve al files being copied. Inse t you Windows 98 CD if p ompted. Choose
Finish.
Signal Cable Connecto of
Compute
D-sub Signal Cable
D-Sub 15pin

9
If Windows 98, Windows Me o Windows 2000 does not sta t the Add New Ha dwa e Wiza d.
NOTE: Fo Windows 2000 you must have administ ato access ights to install the d ive .
1. Put the CD into CD_ROM.
2. Choose the icon of TOUCHSCREEN d ive .
3. Choose ope ation system fo USB, eg. Window xp_X86.
4. Select SETUP.exe ,then un to install.
5. Select NEXT acco ding to the p ompt till installation finished.
5. ADJUSTMENT
This touchmonito will not likely equi e adjustment. Va iations in video output and
application may equi e adjustments to the touchmonito to optimize the quality of the
display.
Fo best pe fo mance, the touchmonito should be ope ating in native esolution 800 x 600.
Use the Display cont ol panel in Windows to choose 800 x 600 esolution. Ope ating in othe
esolutions will deg ade video pe fo mance.
All cont ol adjustments a e automatically memo ized.
5.1 How to Use OSD Menu
6
1 2 3 4 5
1. Entering the OSD Menu
P ess the MENU Button once to display the OSD Menu.
2. Making Adjustments and Settings
a. Select the desi ed sub menu icon using the Cont ol buttons and p ess the MENU button.
The sub menu appea s.
b. Use the Cont ol buttons to select the desi ed setting icon and p ess the MENU button. The
setting menu appea s.
c. Use the Cont ol buttons to make all equi ed adjustments and p ess the MENU button to
save the settings.
(1) Auto Button
(2) Cont ol Button (Inc easing)
(3) Cont ol Button (Reduce)
(4) Menu/Ente Button
(5) Powe On//Off Button
(6) Powe Indicato
Powe Indicato
G een Ope ation
O ange
Closed
Off Powe Off

10
3. Exiting the OSD MENU
- To etu n to the main menu, select the <Retu n> icon and p ess the MENU button.
- To exit the OSD menu, select <Exit> icon .
5.2 OSD MENU Adjustments and Settings
The following table shows all adjustment and setting menus.
Main Menu Su Menu Reference
Cont ast Set Sc een Cont ast
B ightness Set backlight B ightness
Colo Setting Colo Temp Select colo tempe atu e 9300º K,
6500º K and Use colo , and set use
colo tempe atu e
Auto Adjust
H-position
V-position
Clock
Image Setting
Phase
Gamma 1
Gamma 2
Gamma 3
Gamma 4
LUT Setting
Gamma 5
Select display GAMMA
OSD H-pos. Set ho izontal position of OSD Menu
OSD V-pos. Set ve tical position of OSD Menu
OSD Setting
OSD Time Set display time of OSD Menu
Signal Sou ce Select input signal
Sha pness Select the sha pness of image
Reset Reset to the default value
Othe s
Mode Monito mode
5.3 Sc een Adjustment
Sc een adjustments fo the monito should be used in supp essing sc een flicke ing and also
fo adjusting the sc een to its p ope position. The e is only one co ect position fo each
display mode. It is also ecommended to use the OSD Menu function when fi st installing the
display o wheneve changing the system.
Note: Allow the monito to stabilize fo at least 20 minutes befo e making image
adjustments.
Adjustment Procedure
1. Adjust y <Auto Adjust> menu in the OSD Menu.
To automatically adjust the clock, phase, sc een position and esolution.
Note:
The Auto sizing function is intended fo use on the compute unning Windows. It may not
wo k p ope ly when the compute is unning on MS-DOS (Not windows) o the backg ound
colo fo the "wall pape " o "desktop" patte n is set to black.
If the app op iate sc een cannot be made by using the Auto adjustment button, adjust the
sc een th ough the following p ocedu es.

11
2. Adjust y using <Image Setting> menu in the OSD Menu.
(1) Vertical ars appear on the screen
→ Use the <Clock> adjustment.
Select the <Clock> and eliminate the ve tical ba s by using the UP and Down of the Cont ol
buttons.
Do not continuously p ess the Cont ol buttons, as the adjustment value will change quickly
and make it difficult to locate the most suitable adjustment point. If the ho izontal flicke ing,
blu o ba s appea , p oceed to <Phase> adjustment as follows.
(2) Horizontal ars appear on the screen.
→ Use the <Phase> adjustment.
Select the <Phase> and eliminate the ho izontal flicke ing, blu ing o ba s by using the
Right and Left buttons.
Note: Ho izontal ba s may not completely disappea f om the sc een depending on the
compute .
(3) The screen position is incorrect.
→ Use the <Position> adjustment.
The <Position> adjustment moves the image to the co ect position. Select <Position> and
adjust the position by using the Up and Down buttons.
If ve tical ba s of disto tion appea afte finishing the <Position> adjustment, etu n to
<Clock> adjustment and epeat the p eviously explained adjustment p ocedu e. (Clock →
Phase → Position)

12
6. TROUBLESHOOTING
If a p oblem pe sists even afte applying the suggested emedies, contact a deale .
Pro lems Points to check with Possi le Solutions
1. No picture
Indicato status: Off
Check that the powe co d is co ectly connected. If the
p oblem pe sists, tu n off the monito powe fo a few
minutes, then tu n it back on and t y again.
- when the signal is not inputted co ectly, even if the monito
functions p ope ly.
- When the image is displayed co ectly afte a sho t time,
the e is no p oblem with the monito . (Some PCs do not
output the signal soon afte powe ing on.)
Check that the signal cable is p ope ly connected to the PC o
g aphics boa d.
Indicato status: G een Check the "B ightness" setting.
2. Display position is
incorrect.
Adjust the image position using the <Position>. If the
p oblem pe sists, use the g aphics boa d's utility softwa e to
change the display position if available.
3. Vertical ars of
distortion appear.
Dec ease the ho izontal ba s using the <Clock>.
4. Horizontal ars of
distortion appear.
Dec ease the ho izontal ba s using the <Phase>.
5. The screen is too right
or too dark.
Adjust the <B ightness> (The backlight of the monito has a
fixed life span. When the sc een becomes da k o begins to
flicke , please contact you deale .)
6. Afterimages appear. - Do you use the sc een save o time when displaying the
same image fo extended pe iods of time?
- Afte images a e pa ticula to monito s. Avoid displaying the
same image fo extended pe iods of time.
7. The screen has
defective pixels (e.g.
slightly light or dark).
This is due to the cha acte istics of the panel itself, and not
the p oduct.
8. Touch doesn’t work. Make su e the touch cable is secu ely attached at both ends.

13
7. CLEANING
Pe iodic cleaning is ecommended to keep the monito looking new and to p olong its
ope ation lifetime.
Note: Neve use thinne , benzene, alcohol (ethanol, methanol, o isop opyl alcohol),
ab asive cleane s, o othe st ong solvents, as these may cause damage to the cabinet o
LCD panel.
Ca inet
To emove stains, wipe the cabinet with a soft, lightly moistened cloth using a mild
dete gent. Do not sp ay wax o cleane di ectly into the cabinet. (Fo details, efe to the
manual of the PC.)
LCD Panel
The LCD su face can be cleaned with a soft cloth, such as cotton o lens pape .
If necessa y, stubbo n stains can be emoved by moistening pa t of a cloth with wate to
enhance its cleaning powe .

14
8. SPECIFICATION
8.1 Touchmonito Specification
Display characteristics
Size: 8.4″ active display
Native esolution: 800 x600
Pixel pitch: 0.213 mm
Viewing angle: 120°(H)/100°(V)
B ightness: 250 cd/m2 Typ.
Cont ast atio: 400:1Typ.
Response time: 30 ms Typ.
External connections
DVI Signal DVI-D
Analog Video Input: 15 pin D-sub
Touchsc een Inte face: USB
8.2 D-Sub 15pin Connecto
Pin Signal Pin
Signal Pin
Signal
1 Red video 6 Red g ound 11 G ound Sho ted
2 G een video 7 G een g ound 12 Data (SDA)
3 Blue video 8 Blue g ound 13 H. Sync
4 G ound 9 No pin 14 V. Sync
5 No pin 10 G ound Sho ted 15 Clock (SCL)
8.3 DVI-D Connecto
Pin Signal Pin Signal Pin Signal
1 TMDS Data 2- 9 TMDS Data 1- 17 TMDS Data 0-
2 TMDS Data 2+ 10 TMDS Data 1+ 18 TMDS Data 0+
3 TMDS Data 2/4
Shield
11 TMDS Data 1/3
Shield
19 TMDS Data 0/5
Shield
4 NC* 12 NC* 20 NC*
5 NC* 13 NC* 21 NC*
6 DDC Clock (SCL) 14 +5V Powe 22 TMDS Clock shield
7 DDC Data (SDA) 15 G ound (Fo +5V) 23 TMDS Clock+
8 NC 16 Hot Plug Detect 24 TMDS Clock-
8.4 P eset Timing
Signal
Polarity Frequency
Timing
Dot
Clock
MHz H V FH
(kHz) FV (Hz)
VGA 640×480 25.2 - - 31.5 60.0
VESA 800×600 40.0 + + 37.9 60.3

15
9. caveat empto / Gua antee exclusion
Claims fo defects do not exist in the following cases:
- natu al wea and tea , and any damage, e o s, educed output o changes in the condition
o function of ou p oducts that a e due to exte nal facto s (e.g. blows, knocks, vib ations,
wate , fi e), o due to imp ope sto age, handling, assembly o any othe imp ope use, o
due to ext eme climatic conditions, o to pa ticula eception o ope ating conditions at the
location whe e the item is used;
- defects due to const uctional e o s o mate ial defects, insofa as the custome has
p esc ibed the const uction o the mate ial;
- bu n-in on the LCD panel caused by pe manent display and spots fo ming on the LCD
panel
10.Vendo :
Europe: Headquarter (North America):
Canvys Canvys
A Division of Richa dson Elect onics GmbH A Division of Richa dson Elect onics GmbH
Raiffeisenst aße 5 40W267 Keslinge Road
D-78166 Donaueschingen PO Box 393
LaFox IL 60147-0393 USA
Inte net: www.canvys.com
Tel.: +49 (0) 771 83 00 – 0
Fax.: +49 (0) 771 83 00 – 80
VAT-No.: DE128240232
WEE-Reg.-N .: DE64678500
Table of contents
Other Canvys Industrial Monitor manuals