Caple CM210SS User manual

Instruction manual for combination microwave
Model code: CM210SS
Contact Caple on 0117 938 7420 or for spare parts www.caple.co.uk


EN
1
TABLE OF CONTENTS PAGE
1 - Warnings for Microwave Ovens 4
Food preparation 4
Pots and pans 4
Microwave power and duration 4
Packaging 4
Beverages 4
Foods for newborns 5
Foods with skin or peel 5
Drying foods 5
Oil 6
Causes of damage 6
First use 8
Assembling and disassembling the at grill 8
Respect for the environment 9
2 - The Control Panel 10
Keypad 10
3 - General Oven Information 11
Error codes 11
Beeps 11
Default Settings
11
F Failure Number Codes 11
Preheat 11
Timer 11
Preheating the Oven 12
Operational Suggestions 12
Operation with microwaves 12
Oven Condensation and Temperature 12
High Altitude Baking 12
4 - General Oven Tips 12
5 - Getting Started 13
Instructions for initial switch-on 13
6 - User Settings 14
Language 14
Temperature & Weight 14
Time 14
Date 15
Brightness 15
Volume 15
TABLE OF CONTENTS PAGE
7 - System Setting 16
Event Log 16
Demo 16
8 - Starting Your Oven 17
Switching the oven on and off 17
Cooking Mode Tables 18
9 - Traditional Cooking 19
Changing the cooking mode 19
Changing temperature 19
Pre-heating phase 19
10 - Time Oven Mode Operation 20
Cook Time 20
Stop Time 20
11 - Microwave Cooking 21
Defrost by time Function 21
Defrost by weight Function 21
Microwave Function 21
Microwave + Grill Function 22
Microwave + Fan heat Function 22
Changing Watts Power 23
Changing Time 23
Changing Temperature 23
Changing Weight 23
12 - Using Oven Lights 24
13 - Recipes 25
14 - For the Installer 27
Electrical Hook-Up 28
15 - Solving Traditional Baking Problems 29
16 - Troubleshooting 30
17 - Assistance or Service 31
Service Data Record 31

EN
2
Dear Customer,
We would like to thank you and congratulate you on your
choice.
This new product has been carefully designed and built using
top quality materials, and meticulously tested to ensure that it
meets all your culinary requirements.
Please read and observe these simple instructions, which will
enable you to achieve excellent results from the very first time
you use it. This state-of-the-art appliance comes to you with our
very best wishes.
THIS PRODUCT IS DESIGNED FOR DOMESTIC USE. THE
MANUFACTURER DECLINES ALL RESPONSIBILITY FOR
PERSONAL INJURY OR PROPERTY DAMAGE DERIVING FROM
INCORRECT INSTALLATION OR IMPROPER, ERRONEOUS OR
UNSUITABLE USE.
THE APPLIANCE MUST NOT BE USED BY PEOPLE (INCLUDING
CHILDREN) WITH PHYSICAL, SENSORIAL OR MENTAL
IMPAIRMENTS, OR BY PEOPLE WITHOUT THE NECESSARY
EXPERIENCEORKNOWLEDGE,UNLESSTHEYARESUPERVISED
OR INSTRUCTED IN THE USE OF THE APPLIANCE BY A PERSON
RESPONSIBLE FOR THEIR SAFETY.
CHILDREN MUST BE SUPERVISED TO ENSURE THAT THEY DO
NOT PLAY WITH THE APPLIANCE. DO NOT PLACE ALUMINIUM
FOIL, POTS OR SIMILAR OBJECTS IN CONTACT WITH THE BASE
INSIDE THE OVEN FOR COOKING. THE HEATING ACTION
OF THE LOWER HEATING ELEMENT CAUSES OVERHEATING
OF THE LOWER PART OF THE OVEN CAUSING DAMAGE
AND SERIOUS CONSEQUENCES (RISK OF FIRE) EVEN TO THE
COUNTER UNDER THE OVEN.
THE APPLIANCE GETS VERY HOT DURING USE.
WARNING: DON’T TOUCH THE HEATING ELEMENTS INSIDE
THE OVEN.
ATTENTION
•If the door or the gasket seals of the door are damaged,
the oven may not be used until it is repaired by a qualified
service engineer.
•It is dangerous for anyone other than a qualified service
engineer to perform any maintenance or repairs that
involve the removal of any cover that protects against
exposure to microwaves;
•Liquids or other foods must not be heated in air-tight
containers because they could explode;
•Children may not use the oven without supervision until
they have been adequately instructed in its safe use and
understand the dangers of using it incorrectly;
•Only use untensils that are appropriate for microwave
ovens;
•When heating food in plastic or paper containers, check
the oven frequently because of the risks of fire;
ATTENTION
•If you see smoke coming out, turn off the appliance or
remove its plug and keep the door closed to extinguish
any ames;
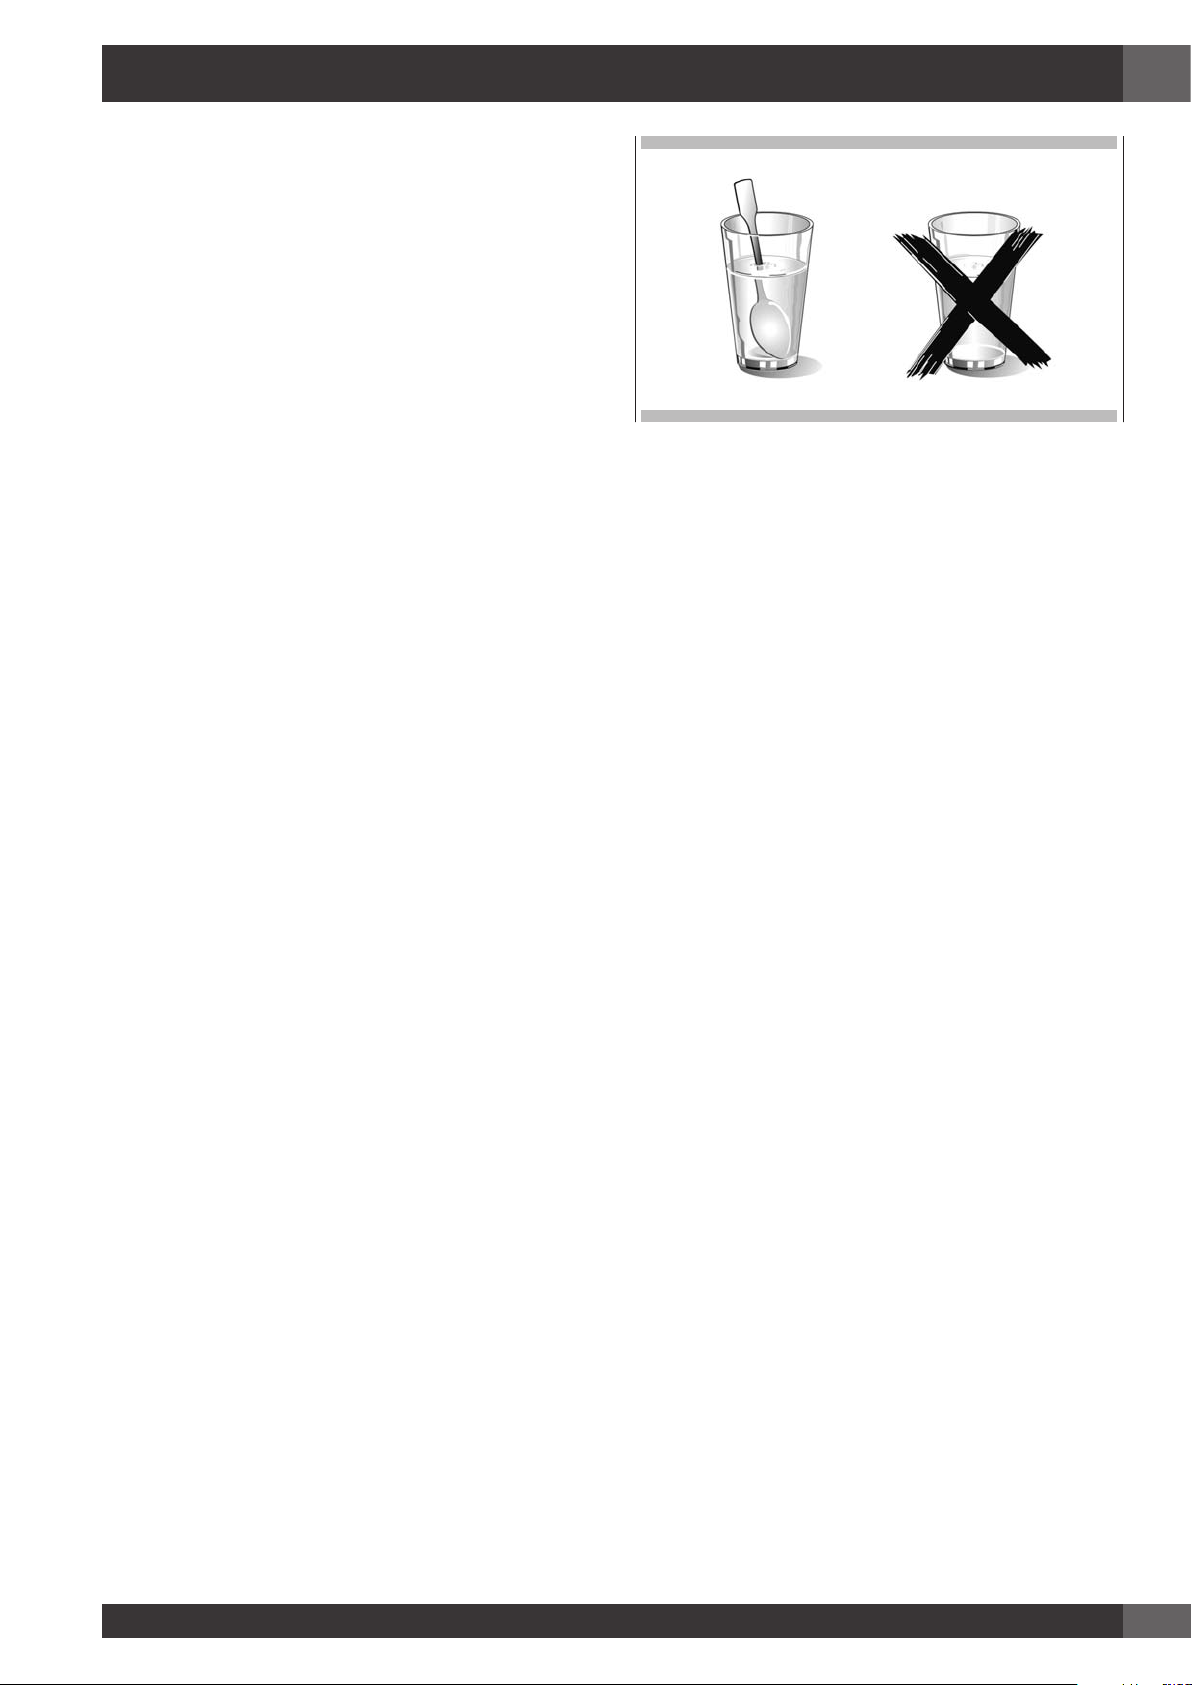
•Heating beverages in the microwave oven can cause
a delayed boil-over, so be careful when handling the
container;
•The contents of baby bottles and baby food in jars must be
mixed or shaken and their temperature must be checked
before feeding to avoid scalding;
•Eggs in the shell and whole hardboiled eggs must not be
heated in microwave ovens because they could explode
even after the end of heating in the microwave;
•A detailed explanation for cleaning the gasket seals of the
doors of the cavity and adjacent parts;
•The oven must be cleaned periodically and all food
residues must be removed;
•Failure to keep the oven clean could cause deterioration of
the surfaces that could reduce the life of the appliance and
cause dangerous conditions;
•Do not use rough abrasives or sharp metal scrapers to
clean the glass door of the oven because they could
scratch the surface and cause the glass to shatter.
•Do not use steam cleaners to clean the appliance.
IMPORTANT INSTRUCTIONS
AND SAFETY WARNINGS
Read carefully and keep for future use

EN
3
1 - Warnings for Microwave Ovens
Food preparation
Danger of fire!
Only use the microwave function for the preparation of food
to be eaten.
Any other uses can be dangerous or cause damage.
For example, heated slippers or pillows filled with grain or
cereals can catch fire even after several hours.
Pots and pans
Danger of injury!
Porcelain and ceramic crockery can have small holes in the
handles and cover.
There can be cavities hidden behind these holes. If water gets
into these cavities, the crockery could break.
Do not use crockery that is unsuitable for microwave ovens.
Danger of burns!
The heat of the food can heat the dish. Always use a pot holder
to remove dishes and accessories from the cooking chamber.
Microwave power and duration
Danger of fire!
Never set values that are too high for the microwave power or
the cooking time. The food could catch fire and damage the
appliance. Follow the rules in these instructions.
Packaging
Danger of fire!
Never heat food in thermal packaging.
Food in containers made of plastic, paper or other inammable
materials must be watched constantly.
Danger of burns!
Air-tight packaging can explode. Follow the instructions shown
on the package. Always use a pot holder to remove dishes.
Beverages
Danger of burns!
When heating liquids, boiling can be delayed.
This means that the boiling temperature has been reached
without forming the typical little steam bubbles. Even a slight
knock can cause the sudden overow of liquid or sprays.
When heating liquids, always put a spoon in the container to
avoid delayed boiling.
Danger of explosion!
Never heat beverages or other types of food in covered
containers.
Never heat alcoholic beverages excessively.
Foods for newborns
Danger of burns!
Never heat baby foods in a covered container. Always remove
the cover or nipple.
When finished heating, always carefully shake or mix so that
the heat is evenly distributed.
Test the temperature before giving the food to the baby.
Foods with skin or peel
Danger of burns!
Never cook eggs in the shell. Never heat hard-boiled eggs
because they could explode even after the microwave is turned
off. This also goes for molluscs and crustaceans.
In the case of fried eggs, first pierce the yolk.
In the case of foods with a hard peel or skin like apples,
tomatoes, potatoes or sausage, the peel or skin could explode.
Pierce the peel or skin before cooking.
Drying foods
Danger of fire!
Never dry food in the microwave.
Foods with low water content
Danger of fire!
Never defrost or heat foods with low water content, like bread,
for too long or at an excessive power.
Oil
Danger of fire!
Never use the microwave to heat just oil.
Causes of damage
Juice leaking from fruit
When preparing sweets containing very juicy fruit, do not
overfill the baking dish. Fruit juices that overow the baking
dish can leave indelible stains.

EN
4
Technical breakdown
Never use enamelled baking dishes in the microwave because
it could cause a technical breakdown.
Cooling with the door of the appliance open
The cooking chamber must only be cooled with the door closed.
Check that nothing is stuck on the door of the appliance.
Even if the door is only ajar, nearby cabinets can be damaged
over time.
Very dirty gasket seal
If the gasket seal is very dirty, the door of the appliance does
not close correctly during operation. The surfaces of nearby
cabinets can be damaged.
Always keep the gasket seal clean.
Using the door of the appliance as a support surface
Do not rest or lean on the open door of the appliance and do
not put dishware or accessories on it.
Using the microwave without food in the chamber
Only turn on the microwave after you have put the food in
the cooking chamber. Without food inside, the appliance can
become overloaded. The only exception allowed are brief tests
of dishware (in this regard, see the warnings about pots and
pans).
Moist foods
Do not leave moist foods in the cooking chamber for extended
periods of time.
IMPORTANT
The oven’s Rating label is even accessible when the
appliance is installed. This Rating label, which is
visible when you open the door, shows all the
information you will need when requesting replacement
parts for the appliance.
Rating label

EN
5
IMPORTANT
As a safety precaution, before cleaning the oven, always disconnect the plug from the outlet or remove the appliance’s
power cord. In addition, avoid using acid or alkaline substances such as lemon, vinegar, salt, tomatoes, etc. Avoid using
products containing chlorine, acids or abrasives, especially for cleaning the painted walls.
First use
The oven should be thoroughly cleaned with soap and water and carefully rinsed.
Heat the oven for about 30 minutes at the maximum temperature; this eliminates all the residual manufacturing oils that could cause
unpleasant odours during cooking. Use the circular plus fan function without accessories in the oven. Before using the accessories
for the first time, clean them carefully with a very hot alkaline washing solution and a soft cloth.
Assembling and disassembling the flat grill
To remove the at grill, pull the grill towards you until it stops and then lift, by pulling upwards, until it comes completely out.
To put the at grill back in, insert it at a 45-degree angle and then position it horizontally and push it all the way in to the end of
the grill track.
If the at grill has a drip-pan (tray), to remove it, lift slightly and slide it towards you. To reinsert it, slide it back until it is correctly
seated.

EN
6
Respect for the environment
The documentation for this appliance is printed on paper
bleached without chlorine or recycled paper to contribute to
protecting the environment. The packaging was designed
to prevent damage to the environment; they are ecological
products that can be recovered or recycled.
Recycling the packing saves raw materials and reduces the
volume of industrial and domestic waste.
THE PACKING MATERIAL is 100% recyclable and marked
with the recycling symbol. Dispose of in conformity with local
law. The packing material (plastic bags, polystyrene parts,
etc.) must be kept out of the reach of children because it is
potentially dangerous.
THIS APPLIANCE is marked in conformity with European
Directive 2002/96/EC, Waste Electrical and Electronic
Equipment (WEEE). By making sure that this product is disposed
of correctly, the user contributes to preventing potential negative
consequences for the environment and health.
THE SYMBOL on the product or accompanying documentation
indicates that this product must not be treated
as domestic waste but must be delivered to a suitable collection
point for the recycling of electrical and
electronic equipment.
DISPOSAL MUST BE MADE in conformity with local laws on
waste disposal.
FOR ADDITIONAL INFORMATION about the treatment,
recovery and recycling of this product, contact the local office
of competence, the domestic waste collection service or the
store where the product was purchased.
BEFORE SCRAPPING, make it unusable by cutting the electrical
cord.

EN
7
2 - The Control Panel
Keypad
To operate the key, press gently. The keypad will not work if
more than one key is pressed at the same time.
Movement arrows
Return to previous display page. Keep
pressed to return to Home page
Switches the oven on and off.
Confirms the settings and starts cooking
operations. When pressed during a
cooking operation, the function is placed in
pause. Press again to restart.
To set the timer.
Enter the functions menu during cooking.
Switches the inner oven light on and off.
Your appliance could vary slightly compared to the illustrations below.
A- Keypad
B- Display screen
PM
FRIDAY 11/20/2015
04:26
BA

EN
8
3 - General Oven Information
Error codes
This code appears in the event of the electronic control
indicating a fault. When the error appears, the current function
is blocked. If the type of error is related to a safety function,
the oven becomes unusable and every time a start attempt is
made, the same error appears (in which case call Caple
service), while if the error relates to a minor fault, after being
restarted the oven can be used for the functions that do not
involve the faulty part (e.g. a heating element).
Beeps
Confirms that the command has been received after a key has
been pressed.
It also indicates that a time function has been completed (e.g.
Timer or Timed Cooking). During the execution of a recipe,
an acoustic signal warns the user that the oven is waiting for
operation by the user (e.g. insert the dish or turn it over). Beeps
also signal an oven fault.
Default Settings
The cooking modes automatically select a suitable temperature
when the cooking mode is selected, these can be changed
when a different one is needed.
F Failure Number Codes
These codes are displayed when the electronic control detects
a problem in the oven or in the electronics.
The error code is recorded in the Error Log in the Setup menu.
This error can be communicated to the service technician so
he/she can understand the possible cause of the problem in
advance.
Preheat
Whenever a cooking mode is set and the oven is heating,
the preheating starts, during this period, the instantaneous
temperature is displayed together with the thermometer icon.
As soon as the 100% is reached, the control sounds an “end of
preheat” tone and the current temperature value disappears.
Timer
WARNING
The timer on your oven does not turn the appliance on or off,
its only purpose is to alert you through the buzzer. When
you want to turn off the oven automatically, use the end-of-
cooking or delayed cooking function.
NOTE: Pressing the OFF button does not reset or stop the timer.
1. Press the button and set the desired time using the
arrows and confirm with the button . To switch
the selection between hours and minutes use the arrows
.
2. The time can be set from 1 minute to 12 hours and 59
minutes and, when set, the remaining time is always visible
in the bottom status bar until the time expires or is reset.
3. To change or cancel the time set, you must reset the timer
by pressing and holding the button for a few seconds.
4. Timer format is usually HR:MIN, switching into MIN:SEC
during the last minute.
5. When the time expires, the display shows 00:00 and the
buzzer will sound for one minute or until the button is
pressed.
Before using your oven for the first time remove all packing and foreign materials from the oven(s). Any material of this sort left inside
may melt or burn when the appliance is used.

EN
9
4 - General Oven Tips
Preheating the Oven
•Selecting a higher temperature does not shorten the preheat
time.
•Preheating is necessary for good results when baking cakes,
cookies, pastry and breads.
•Preheating will help to sear roasts and seal in meat juices.
•Place oven racks in their proper position before preheating.
•During preheating, the selected cooking temperature is
always displayed.
•A beep will confirm that the oven is preheated and the
“detected temperature” will turn off.
Operational Suggestions
•Do not set pans on the open oven door.
•Use the interior oven lights to view the food through the oven
door window rather than opening the door frequently.
Operation with microwaves
The microwaves are transformed into heat inside foods. The
microwave oven can be used by itself or in combination
with other types of heating. This section contains information
about the dishware and instructions for setting
the microwave oven.
WARNINGS FOR DISHWARE
Suitable dishware
You can use heat-resistant dishware made of glass, glass
ceramic, porcelain, ceramic or refractory plastics. These
materials are permeable to microwaves.
It is also possible to use normal plates. In this way, it won’t be
necessary to transfer the food.
Dishware with gold or silver decorations can only be used if the
manufacture guarantees that they can be used in microwave
ovens.
Remember that, when using the oven in microwave mode, the
dish must be placed on the rotating plate.
When using the oven in combination mode, it is preferable to
place the dish to be cooked on the low, round grill, supported
so that it is centred on the rotating plate.
Unsuitable dishware
Metal dishware cannot be used.
Metal is not permeable to microwaves. Food in metal containers
will remain cold.
Warning! Metal components, such as spoons in glasses, must
stay at least 2 cm from the walls of the oven and the inside of
the door. In fact, sparks could seriously damage the inside of
the glass door.
Warning! The at grill must be removed when using the
microwave and combined modes. Use it only with traditional
oven functions.
Testing dishware
Never turn on the microwave oven before you have put in the
food.
The only exception allowed is testing dishware.
If you are unsure if your dishware can be used in the
microwave oven, we recommend performing the following
test:
place the empty pot in the appliance for ½ - 1 minute at the
maximum power. Check the temperature. The pot must be
cold or slightly warm. If it is hot or there are sparks, the pot is
not suitable.
Oven Condensation and Temperature
•It is normal for a certain amount of moisture to evaporate
from the food during any cooking process. The amount
depends on the moisture content of the food. The moisture
may condense on any surface cooler than the inside of the
oven, such as the control panel.
•Your new oven has an electronic temperature sensor that
allows maintaining an accurate temperature.
High Altitude Baking
•When cooking at high altitude, recipes and cooking time
will vary from the standard.

EN
10
5 - Getting Started
Instructions for initial switch-on
Once the oven has been connected to the power supply for
the first time, the control automatically prepares for setting a
number of user settings, which remain stored in case of any
subsequent switch-on.
NOTE: Both at the first and subsequent connections to the
power supply, the door lock mechanism performs a
calibration run – in this phase, always keep the door
closed.
•Language
•Temperature & Weight
•Time
•Date
Refer to the USER SETTING paragraph for setting instructions.
After making the user settings, the control moves automatically
to the “Standby” display page.

EN
11
6 - User Settings
With the oven on, select the icon and confirm with the
key to enter the SETTINGS menu. This menu permits
personalizing the settings of your oven. To make access, no
active cooking or any set time functions must be in progress.
NOTE: The Setting menù can never be set if any time function
is already set: first delete all the active time functions.
1. Press the keys to select the sub menu and confirm by
means of the key.
2. Use this menu to change the following settings:
Press the keys or to select the setting or change
a sub menu from among the six available ones and confirm
by means of the key.
12
yk
abc
SETUP
LANGUAGE
Language
Press the arrow key to select a language from among
those available, and confirm with the key.
Temperature & Weight
Press the arrow key and to select one of the two
temperature options “°C/°F” or weight options Kg/ib and
confirm with the key.
°F
°C
lb
Kg
Time
Press the arrow key to select the time format between the
options “12h AM/PM or 24h” and confirm with the key.
Subsequently, set the time using the arrows and confirm
with the key.

EN
12
Date
Press the arrow key to select the date format from among
the options “D.M.Y. – Y.M.D. – M.D.Y.” and confirm with the
key. Subsequently set the value using the arrows and
confirm with the key.
Brightness
Press the arrow key to choose which luminosity setting
to change between ON or STANDBY, then by means of the
arrows select the required degree of luminosity and
confirm with the key.
Volume
Press the arrow key to select the required degree of
luminosity and confirm with the key .

EN
13
7 - System Setting
With the oven on, select the icon and confirm with the
key to enter the SETTINGS menu. This menu permits setting
a number of parameters or special functions. It also permits
accessing the error events list.
1. Press the keys to select the sub menu and confirm with
the key.
2. Use this menu to change the following settings:
Press the keys to select the item to be set or to be
displayed from among the three available ones and confirm
with the key.
Event Log
The menu permits checking any recorded errors. These codes
can be notified to the after-sales service.
Demo
The purpose of this function is to set the DEMO mode, which
makes the oven useless for cooking but automatically performs
a demonstration of functions.
1. Press the keys to select the item ON.
2. Confirm with the key.
3. Press the key.
After about 30 seconds, the oven starts to operate in this mode.
To temporarily stop the DEMO function, simply keep any key
pressed for a few seconds until the oven switches to standby.
To start it again, press the key.
To disable the function, enter the DEMO display page and set
OFF. Confirm using the key.
NOTE: Once set, the function remains enabled even if the oven
is disconnected from the power mains.

EN
14
8 - Starting Your Oven
Multifunction Oven
Traditional Cooking
FAN HEAT
FAN HEAT & GRILL
TURBO GRILL
GRILL
Microwave Cooking
DEFROST BY TIME
DEFROST BY WEIGHT
MICROWAVE COOKING
MICROWAVE AND GRILL
MICROWAVE AND FAN HEAT
1. Select the icon and press the key Select the
appropriate cooking mode according to the food to be
cooked using the arrows and confirm with the key .
2. On this display page, it is still possible to change the
cooking mode by using the keys.
3. If the proposed temperature is correct, confirm with the
key to start cooking, otherwise, if the key is not pressed
within 10 seconds, the oven switches to automatic mode
and the cooking mode icon becomes animated.
Switching the oven on and off
IMPORTANT
•The key does not stop the function.
•After switching off the oven, the cooling fan could continue to operate until the inner parts of the oven have cooled down.
Press to switch the oven on and press again to switch it off. The oven returns to standby mode.

EN
15
Cooking Mode Tables
Traditional Cooking
COOKING MODE ICON TEMPERATURE
Min. Preset Max.
FAN HEAT 50° C 165° C 230° C
FAN HEAT & GRILL 50° C 210° C 230° C
TURBO GRILL 50° C 165° C 230° C
GRILL 50° C 230° C 230° C
Microwave Cooking
COOKING MODE ICON SET WEIGHT WATT TEMPERATURE
Min. Preset Max. Min. Preset Max. Min. Preset Max.
DEFROST BY TIME 150 W
DEFROST BY
WEIGHT
Bread 100 g 500 g 600 g 150 W
Vegetable 100 g 500 g 1000 g 150 W
Meat 100 g 500 g 1500 g 150 W
Fish 100 g 500 g 800 g 150 W
MICROWAVE
COOKING 150 W 900 W 900 W
MICROWAVE AND
GRILL
150W 150 W 200° C
300W 300 W
450W 450 W
MICROWAVE AND
FAN HEAT
150W 150 W 50° C 100° C 200° C
300W 300 W
450W 450 W

EN
16
9 - Traditional Cooking
Changing the cooking mode
1. During untimed cooking, a cooking pause can be set by
pressing the key.
All the settings of the suspended cooking operation remain
stored and can be reactivated by pressing the same key
again.
2. To change the cooking mode while the oven is working,
press the key and then the
To change the cooking mode while the oven is working,
, key.
At this point, another cooking mode can be selected from
among those available in the group by means of the arrows
.
Changing temperature
IMPORTANT
•At the end of a function, the display screen shows the
residual compartment heat temperature from the standby
page.
1. From the cooking mode preview display page, the
temperature can be changed by means of the arrows
subsequently confirming by means of the key.
2. Once cooking has started, the temperature can in any case
be changed, at any time, by means of the arrows .
Pre-heating phase
While the oven is in pre-heating phase, the instantaneous
temperature is displayed underneath the cooking mode icon.
Just as soon as the set temperature is reached, an acoustic
signal is heard and the instantaneous temperature indication
disappears.
FAN HEAT
FAN HEAT

EN
17
10 - Time Oven Mode Operation
Be sure that the time-of-day clock is displaying the correct time.
The timed mode turns off the oven at the end of the cook time.
CAUTION
Never leave food in the oven for more than one hour before
and after cooking. This could deteriorate the properties of
the food itself.
NOTE: The maximum cooking time that can be set is 12 h.
Cook Time
Use the “Cook Time” function to operate the oven for a
determinate period of time. The oven starts immediately and
switches off automatically once the time has expired.
To Set a Timed Mode
1. Select the cooking mode and temperature.
2. There are two ways to set the function.
a) Select to set the duration and press .
b) Select to set the stop time and press .
3. After selecting one of the two above options, set the time by
means of the arrows and confirm with the key.
4. After pressing the key, cooking starts and the time
cooking information is shown on the display page.
•Cooking mode
•Temperature
•Cooking time
•End of cooking time
5 After cooking, the oven switches off and an acoustic signal
warns that cooking has terminated.
To change the cooking time when the oven is already operating,
simply press the e key and enter the new cooking time
before pressing the key again.
Stop Time
Use the “Stop Time” function to delay the start of timed
cooking. Enter the cooking stop time and the oven will
automatically calculate the start time. The oven switches on
and off automatically.
To Delay the Start of a Timed Mode
1 First of all set the required timed cooking as indicated in the
“COOK TIME” paragraph.
2 Select to set the stop time and press .
3 Set the cooking stop time by means the arrows and
confirm by means of the key.
4 After pressing the key, the function positions in standby
and the postponed cooking details are shown on the screen.
•Cooking mode
•Temperature
•Cooking stop time
•Cooking start time
After cooking, the oven switches off and an acoustic signal
warns that cooking has terminated.
To change the cooking time and stop time when the oven is
already operating, simply press the key and enter the new
cooking time or cooking stop time and press the key again.
FAN HEAT
FAN HEAT

EN
18
11 - Microwave Cooking
NOTE: it is essential to carefully read the instructions and
warnings to ensure correct use.
ATTENTION
Microwave functions will not start until the door has been
closed. If the door is opened while the oven is on, the oven
will go into pause mode and the message “DOOR OPEN”
will appear on the display.
To restart the function, the door needs to be closed.
The function can be paused at any time using the key,
when it is pressed again the function restarts .
Defrost by time Function
Select the timed thawing icon using the arrows and press the
key , then set the thawing time using the arrows and .
To start the function press the key .
Once the function has been started, a countdown will be
shown on the display. The time can be changed at any time
using the arrows and .
When thawing is complete, the message “DEFROSTING
FINISHED” will appear on the display.
Defrost by weight Function
Select the weight thawing icon using the arrows and press the
key .
Select the type of meal using the arrows and , then set the
weight using the arrows and , finally start thawing using
the key .
Following are types of meals and relative weights that can be
set:
MEAL
MIN
Weight (g)
MAX
Weight (g)
Bread Pizza Pasta Dishes 100 600
Vegetables 100 1000
Meat 100 1500
Seafood 100 800
The thawing time is calculated completely automatically and
without needing to set any time parameters, based on the set
type of meal and weight.
When thawing is complete, the message DEFROSTING
FINISHED will appear on the display.
Microwave Function
Select the Microwave function icon using the arrows and press
the key .
If you wish to start the function immediately with a preset time
of 30 sec and a preset output of 900W, press the key .
Table of contents
Languages:
Other Caple Microwave Oven manuals