manuals.online logo
Brands
  1. Home
  2. •
  3. Brands
  4. •
  5. Capresso
  6. •
  7. Kitchen Appliance
  8. •
  9. Capresso froth PLUS 204 User manual

Capresso froth PLUS 204 User manual

Automatic Milk Frother
PLUS
froth
Model #204
Patented Frothing Technology
• Operating
nstructions
• Warranty
™
Visit www.capresso.com
for fun and delicious milk frother recipes.
Read all instructions before operating the appliance.
IMPORTANT SAFEG ARDS
When using electrical appliances, basic safety precautions should always be followed,
including the following:
• Read all instructions.
• After having the packaging removed, check that the appliance is intact. f in doubt do not use the
appliance and contact your sales agent.
• The parts of the packaging, plastic bags etc. must not be left within the reach of children as they
are potential sources of danger.
• DO NOT touch hot surfaces. Use handles or knobs.
• To protect against fire, electric shock and personal injury do not immerse cord, plugs, or appliance
in water or other liquid.
• Never immerse the base in water or any other liquid for cleaning.
• The appliance is not intended for use by persons (including children) with reduced physical,
sensory or mental capabilities, or lack of experience and knowledge, unless they have been
given supervision or instruction.
• Close supervision is necessary when any appliance is used by or near children.
• Unplug from outlet when not in use and before cleaning. Allow to cool before putting on or taking
off parts, and before cleaning the appliance.
• DO NOT operate any appliance with a damaged cord or plug or if the appliance has been
damaged in any manner. Return the appliance to the nearest shop for examination or repair or
send back to company.
• The use of accessory attachments not recommended by the appliance manufacturer may result in
fire, electric shock or personal injury.
• DO NOT use outdoors.
• DO NOT let cord hang over edge of table or counter, or touch hot surfaces.
• DO NOT place on or near a hot gas or electric burner, or in a heated oven.
• Always attach plug to appliance first, then plug cord into the wall outlet.
• To disconnect, turn the power switch off, then remove plug from wall outlet.
• DO NOT use appliance for other than intended use.
• Use extreme caution when disposing hot steam.
• The milk pitcher is not suited for microwave use.
• Only the supplied milk pitcher can be placed on heating platform of the base.
• DO NOT use a cracked pitcher or a pitcher having a loose or weakened handle.
SAVE THESE INSTR CTIONS
FOR HO SEHOLD SE ONLY.
2.
SPECIAL CORD SET INSTR CTIONS
Regarding your Cord Set:
A. A short power-supply cord (or detachable power-supply cord) is
provided to reduce risks resulting from becoming entangled in or tripping
over a longer cord.
B. Longer detachable power-supply cords or extension cords are
available and may be used if care is exercised in their use.
C. f a long detachable power-supply cord or extension cord is used, (1)
the marked electrical rating of the detachable power-supply cord or
extension cord should be at least as great as the electrical rating of
the appliance, (2) if the appliance is of the grounded type, the extension
cord should be a grounding type 3-wire cord, and (3) the longer cord
should be arranged so that it will not drape over the counter top or
table top where it can be pulled on by children or tripped over.
Notice: This appliance has a 3-prong grounded plug. To reduce the risk
of electrical shock, this plug will fit in an outlet only one way. f the plug
does not fit in the outlet, contact a qualified electrician. DO NOT modify
the plug in any way.
CA TION:
This appliance is for household use. Any servicing other than cleaning
and user maintenance should be performed by an authorized service
representative.
• Do not immerse base in water or try to disassemble.
• To reduce the risk of fire or electric shock, do not remove the base.
No user serviceable parts inside.
• Repair should be done by authorized service personnel only.
• Check voltage to be sure that the voltage indicated on the name plate
agrees with your voltage.
• Keep your hands and the cord away from hot parts of the appliance
during operation.
• Never clean with scouring powders or hard implements.
WELCOME AND THANK YO
Thank you for choosing the Capresso froth PLUS™. This compact and space
saving item froths and heats your milk completely and automatically. t is
easy to use, easy to clean. Use it for hot chocolate, frothed milk and iced
cappuccinos. Use the second heat setting to serve hot chocolate at the
right temperature for small children. Please read all of the instructions in
this booklet before operating your new machine. Understanding and
complying with these instructions is essential to ensure that the machine
is utilized without risk and to ensure safety during operation and
maintenance.
3.
HOW TO REACH J RA CAPRESSO
Should you require further information or if particular problems occur
that are not covered in this manual, please
• CALL our toll free HELP L NE: 1-800-767-3554 Monday -Thursday
8AM to 9PM, Friday 8AM to 8PM and Saturday 9AM to 5PM
Eastern Standard Time.
• FAX us at 1-201-767-9684
• E-MA L us at contact@jura-capresso.com
• V S T our website at www.capresso.com
• WR TE to Jura Capresso nc., Customer Service, P.O. Box 775,
Closter, NJ 07624
Lid
Disk
Milk Pitcher
Fill Markings
––––, MAX, M N
Base
Operating
Buttons
(from left to right:
cold, hot, warm)
Fig. 1
Fig. 1a Frothing Disk Heating Disk
4.
sing the froth PL S™
The froth PLUS™Automatic Milk Frother comes equipped with a milk
pitcher with lid, two frothing disks, one heating disk and the base unit.
One of the disks is installed inside the milk pitcher. The other disk and
the heating disk are stored underneath the base of the appliance.
Before First se
Clean the milk pitcher and the disks under running warm water. Make
sure the underside of the milk pitcher is completely dry.
CA TION:
Maximum Capacity - FROTHING: never fill more than 8 oz.
(see MAX marking inside milk pitcher)
Maximum Capacity - HEATING: never fill more than 12 oz.
(see "––––" marking inside milk pitcher)
sing the Frothing Disk
Never fill more than 8 oz. of milk or chocolate milk
into the milk pitcher ("MAX" marking); otherwise, hot
milk could spill over the milk pitcher onto the heating
platform. This may damage the interior parts of the
machine.
sing the Heating Disk:
Never fill more than 12 oz. of milk or chocolate milk into
the milk pitcher ("––––" marking).
Heating Disk
Frothing Disk (spoked)
Snaps into bottom
of Frothing Cup for
frothing milk.
Stores underneath
power base.
Heating Disk (smooth)
Snaps into bottom of
Frothing Cup for heating
milk.
Stores underneath
power base.
Frothing Disk
5.
Hot Frothing and Heating Milk
Good for hot beverages such as cappuccinos, lattes, hot chocolate, milk
steamers.
1. Plug in appliance.
2. Remove lid from milk pitcher. (A)
3. Place one of the frothing disks or the heating disk into the bottom of
the milk pitcher. Ensure the disk is completely snapped in. (B)
4. Make sure underside of the milk pitcher is dry.
5. Pour fresh cold milk into the milk pitcher (C) and replace lid. (D)
6. Place pitcher on heating platform. (E)
7. For frothing and heating push the middle button (hot) or right button
(warm). (F)
8. The button illuminates and the frothing/heating action starts
automatically.
9. When the milk has reached the maximum temperature, the appliance
will automatically shut off. The indicator light turns off and the
frothing action stops.
CA TION: The milk pitcher is now very warm; the bottom of the pitcher
is hot. Only place the milk pitcher on a heat resistant surface.
10. Let the warm, frothed milk sit for a few seconds.
11. Pour the warm milk into your cup and spoon the froth on top.
12. Always unplug from outlet when not in use and before cleaning.
Allow to cool before putting on or taking off parts, and before
cleaning the appliance
Making Milk Froth
A B C
D E F
cold hot warm
6.
Cold Frothing and Mixing Milk
Good for cold beverages such as iced cappuccinos, iced fruit lattes,
cold malts, mixing chocolate milk.
Follow steps 1 through 6 above in “Frothing and Heating Milk”
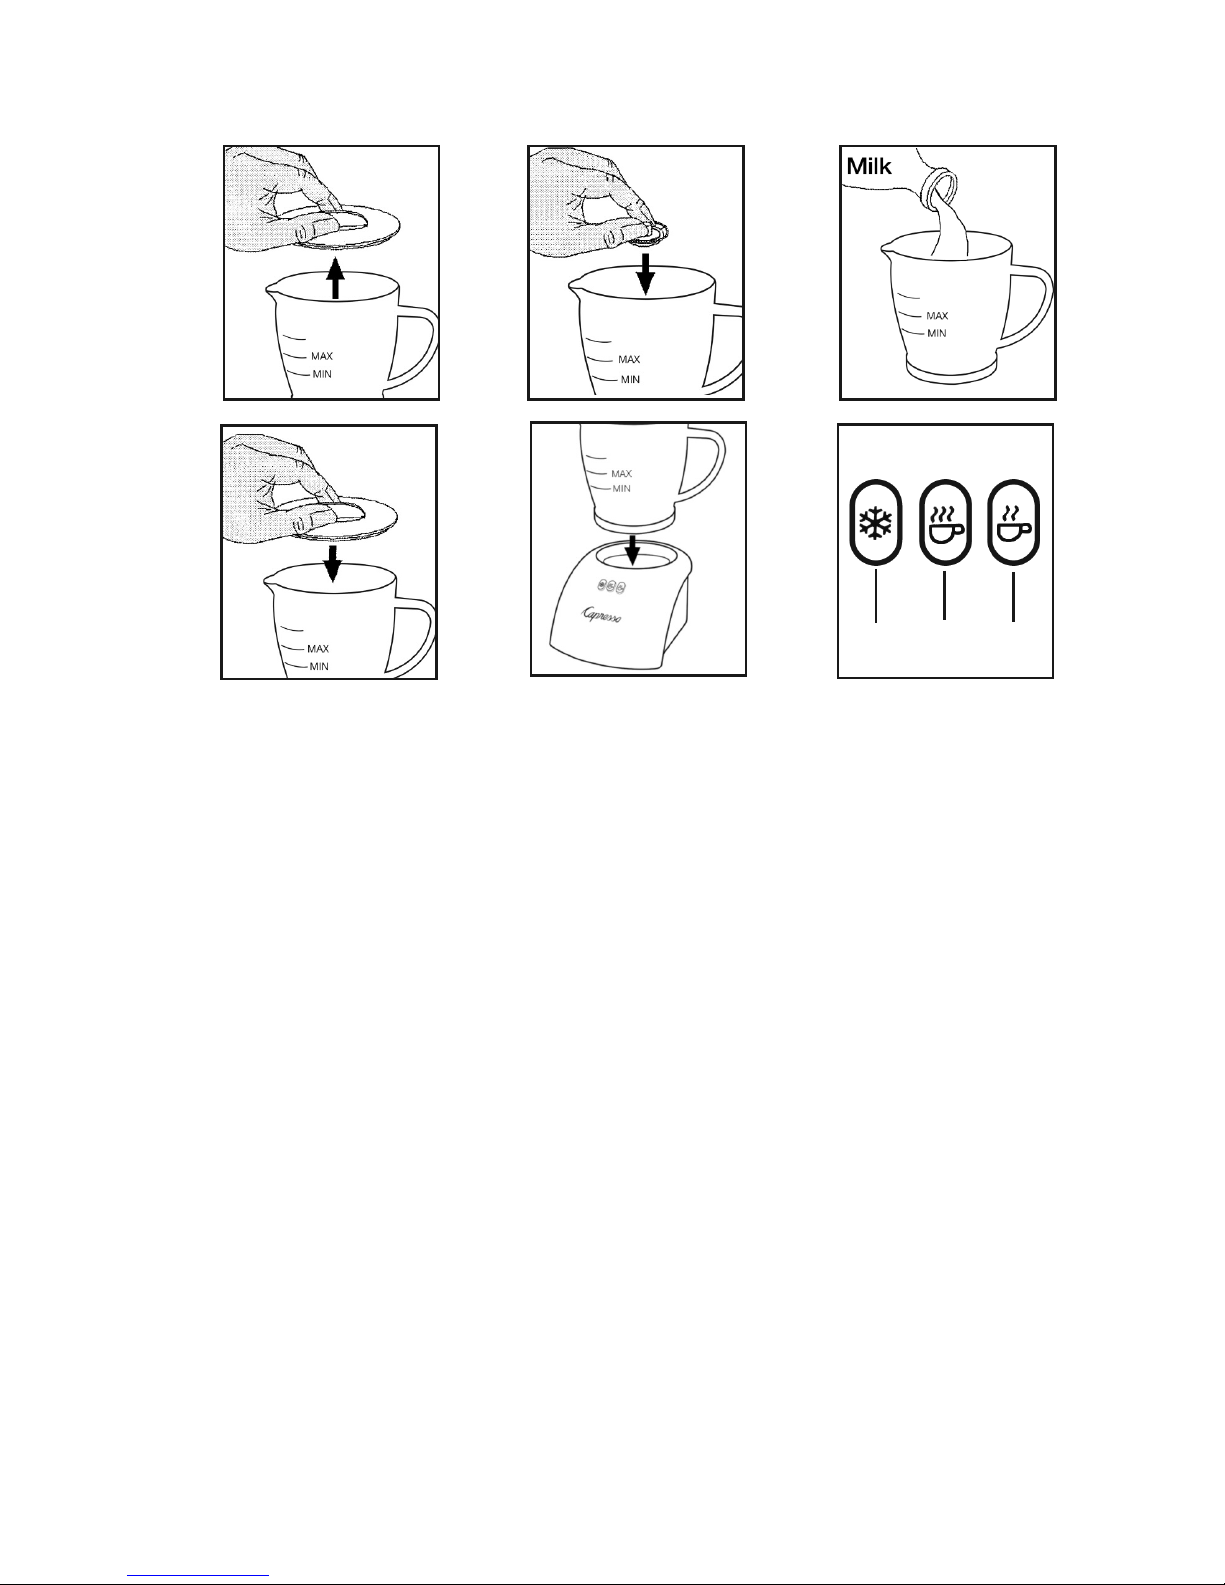
1. For cold frothing or cold mixing (incorporating chocolate syrup into
milk, mixing malt powder, etc) push the left button (cold). (F)
2. The button lights and the frothing/mixing action starts automatically.
3. After a few minutes, the appliance will automatically shut off. The
indicator light turns off and frothing stops. Alternatively, you can
press the cold button again to stop frothing or mixing at any time.
4. Pour milk into cup and spoon froth on top.
5. Always unplug from outlet when not in use and before cleaning.
Please note:
• When you remove the milk pitcher from the appliance during operation,
the item will automatically shut off. When replacing the pitcher, you
need to push one of the three buttons to start it again.
• f the heating plate or the bottom of the milk pitcher is still hot, the
appliance may not turn on. n this case, remove the milk pitcher. Cool
it down by running it under cold water. Make sure the underside
bottom is dry and start over.
CA TION: Do not place the milk pitcher in the microwave oven or on
any other heating surface.
Types of Milk
All kinds of milk can be used with this appliance (Whole, 2%, 1%, skim,
soy milk, almond milk, rice milk). Skim milk will produce the thickest,
most stable froth. Soy milk will produce froth with somewhat larger
bubbles, but the froth is not as stable.
Cleaning
1. Unplug the item and let it cool down.
2. Remove the frothing disk or the heating disk from the milk pitcher.
Clean under running warm water.
3. The milk pitcher and lid are dishwasher safe (top-rack).
4. Wipe the heating plate with a moist cloth.
5. Discoloration of the heating plate may occur if milk spills onto the
heating plate. Scrub lightly with baking soda.
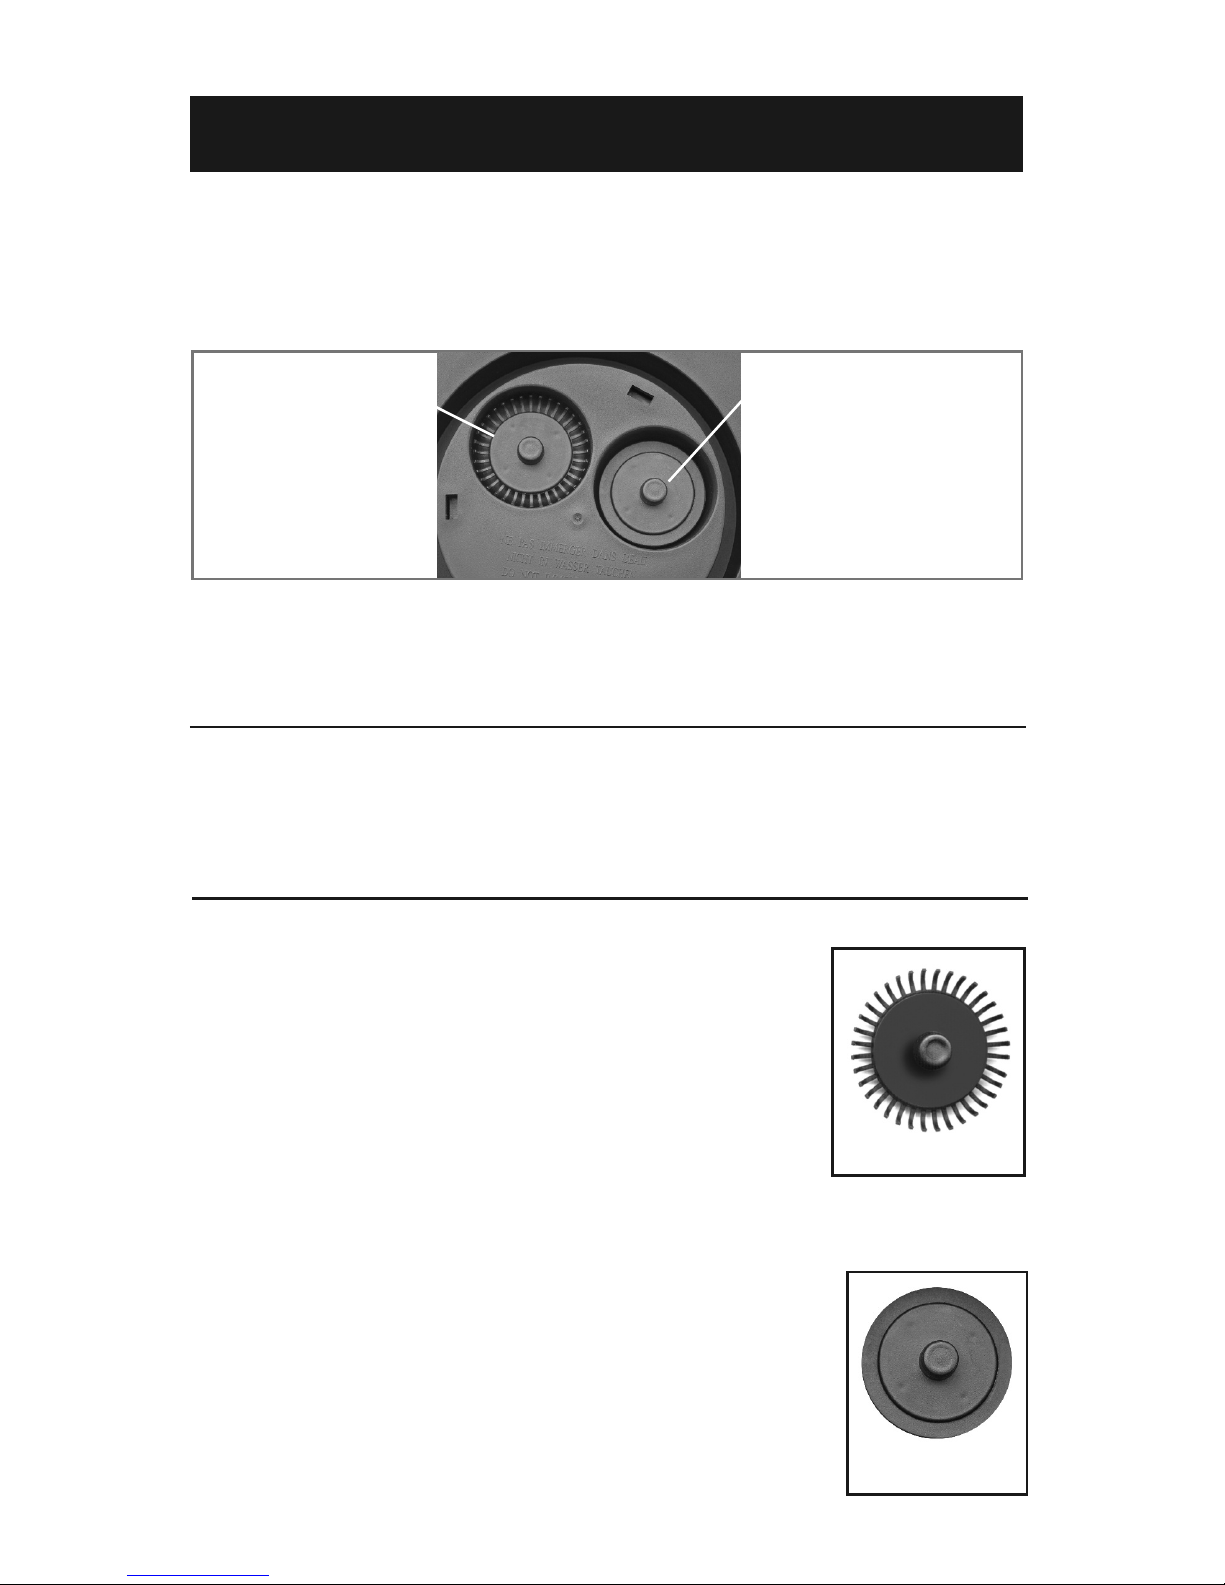
Froth / Heating Disk Storage
One disk can be kept inside the milk pitcher. The two other disks can be
stored underneath the base of the appliance.
Additional Milk Pitcher and Disks
Order an additional milk pitcher or disks by calling our Customer Service
Hotline at: 1-800-767-3554 or by visiting www.capresso.com.
7.
LIMITED WARRANTY
This warranty covers your Capresso machine Model # 204. This warranty
is in effect for one year from the date of the first consumer purchase and
is limited to the United States of America. This warranty covers all defects
in materials or workmanship (parts and labor). Jura Capresso will repair or
replace your machine within one year from the date of the first consumer
purchase. Jura Capresso will pay for the repair or replacement and the
freight back to your destination within the United States.
The warranty does not cover:
• Any machine not distributed by Jura Capresso within the United States.
• Any machine not purchased from an Authorized Jura Capresso Dealer.
• Commercial use of the machine.
• Damage caused by accident, abuse, negligence, misuse, improper
operation or failure to follow instructions contained in this manual.
• Any service or alteration performed by an unauthorized person, company
or association.
• Any used machines bought at auctions and unauthorized websites.
Other limitations and exclusions:
Any implied warranties including fitness for use and merchantability are
limited in duration to the period of the express warranty set forth above
and no person is authorized to assume for Jura Capresso any other
liability in connection with the sale of the machine.
Jura Capresso expressly disclaims liability for incidental and consequential
damages caused by the machine. The terms "incidental damages"
refers to the loss of the original purchaser’s time, loss of the use of the
machine or other costs relating to the care and custody of the machine.
The term "consequential damages" refers to the cost of repairing or
replacing other property which is damaged when this machine does not
work properly. The remedies provided under this warranty are exclusive
and in lieu of all others. This warranty gives you specific legal rights, and
you may also have other rights which vary from state to state.
Jura Capresso Inc.
81 Ruckman Road, PO Box 775
Closter, NJ 07624
Tel: 800-767-3554
Fax: 201-767-9684
Email: contact@jura-capresso.com
Website: www.capresso.com
8.
9090911

Other Capresso Kitchen Appliance manuals

Capresso froth PRO 202 User manual

Capresso

Capresso froth PRO 202 User manual

Capresso EspressoPRO 112 User manual

Capresso

Capresso EspressoPRO 112 User manual

Capresso froth Plus 204 User manual

Capresso

Capresso froth Plus 204 User manual

Capresso iced tea Select 623.02 User manual

Capresso

Capresso iced tea Select 623.02 User manual

Capresso 624 User manual

Capresso

Capresso 624 User manual

Capresso FrothSelect 209.05 User manual

Capresso

Capresso FrothSelect 209.05 User manual

Capresso Froth PRO 202 User manual

Capresso

Capresso Froth PRO 202 User manual

Capresso 11870 BISTRO User manual

Capresso

Capresso 11870 BISTRO User manual

Capresso 207 User manual

Capresso

Capresso 207 User manual

Popular Kitchen Appliance manuals by other brands

Beem SA4.5.1 manual

Beem

Beem SA4.5.1 manual

Philips Verismo CA6500/65 manual

Philips

Philips Verismo CA6500/65 manual

Berkel B9-SLC Owner's/operator's manual

Berkel

Berkel B9-SLC Owner's/operator's manual

EdgeStar TWR125SS owner's manual

EdgeStar

EdgeStar TWR125SS owner's manual

Premium PP1200 use and care manual

Premium

Premium PP1200 use and care manual

Electrolux EKM 90310 X Instruction booklet

Electrolux

Electrolux EKM 90310 X Instruction booklet

Avallon AWC242TDZRH user guide

Avallon

Avallon AWC242TDZRH user guide

Create CREPE MAKER manual

Create

Create CREPE MAKER manual

Pantelligent The Pan troubleshooting manual

Pantelligent

Pantelligent The Pan troubleshooting manual

Taurus LiquaFruits Pro manual

Taurus

Taurus LiquaFruits Pro manual

Home Touch PerfectSteam PS-250-CA Instruction manual and  warranty information

Home Touch

Home Touch PerfectSteam PS-250-CA Instruction manual and warranty information

Graef EVO operating instructions

Graef

Graef EVO operating instructions

Bartscher A120.571 instruction manual

Bartscher

Bartscher A120.571 instruction manual

Bartscher 200065 quick start guide

Bartscher

Bartscher 200065 quick start guide

Salter ek1179 manual

Salter

Salter ek1179 manual

Philips HD3198 user manual

Philips

Philips HD3198 user manual

Hallde RG-400 User instructions

Hallde

Hallde RG-400 User instructions

Crown ECX-16 Installation & operation manual

Crown

Crown ECX-16 Installation & operation manual

manuals.online logo
manuals.online logoBrands
  • About & Mission
  • Contact us
  • Privacy Policy
  • Terms and Conditions

Copyright 2025 Manuals.Online. All Rights Reserved.