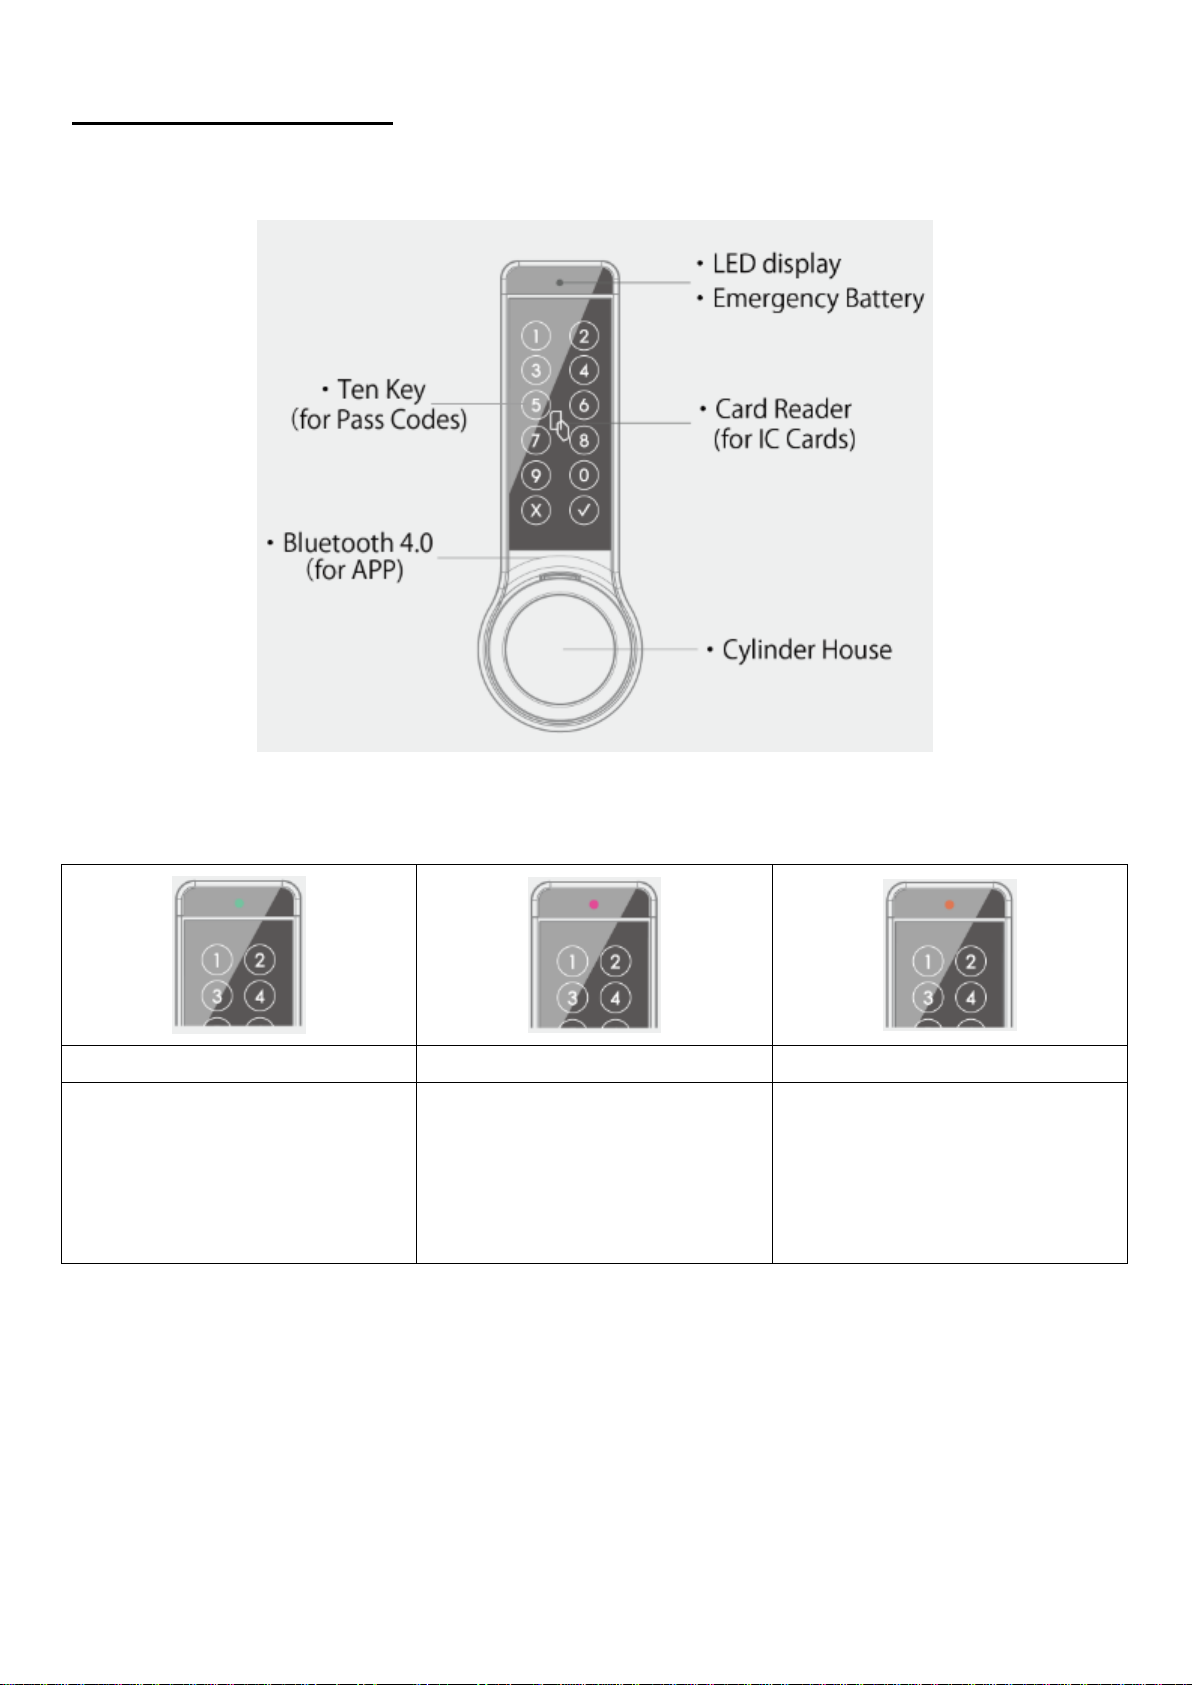
CARD Smart-Ashley YDL100SF Instruction Manual

1
INSTRUCTIONS for USERS –Smart-Ashley (YDL100SF)
Contents
・・・・・・・・・・・・・・・・・・
1
1. SPECIFICATIONS
・・・・・・・・・・・・・・・・・・
2
2. AUTHENTICATIONS
・・・・・・・・・・・・・・・・・・
4
3. ALERT
・・・・・・・・・・・・・・・・・・
4
4. HOW TO ACCESS DOOR
A. by Pass Codes
・・・・・・・・・・・・・・・・・・
5
B. by IC Cards
・・・・・・・・・・・・・・・・・・
6
C. by Smartphones
C1. by D-Key
・・・・・・・・・・・・・・・・・・
7
C2. by I-Key
・・・・・・・・・・・・・・・・・・
8
C3. by Shaking
・・・・・・・・・・・・・・・・・・
14
C4- by Smartphone’s fingerprint authentication
・・・・
15
5. Other Settings
・・・・・・・・・・・・・・・・・・
16

2
1. SPECIFICATIONS
LED display
Green
Red
Orange
Stand-by for registration
Door Access Granted
Door Access Denied
Door Locked
Alarm –Battery’s Flat
Alarm –Break-In
Error –Multiple Registration
Advice –Battery’s Low
(Please renew the batteries)
When you renew the batteries…
1. Take all the existing batteries out
2. Press the switch A or B for 2 seconds
3. Install 4 specified batteries (should be the same manufacturer’s new batteries)

3
Switch A
Press Once –to Connect to APP
Press Long –to Change Pass Code
Switch B
Press Once –to Unauthorize IC Cards
Press Long –to Authorize IC Cards
DIP Switch
#
Item
ON
OFF
1
Side of door’s opening
Right
Left
2
Single/double thumbturn lock
Double
Single
3
(When #2 is ON)
This one is Master/slave?
Slave
Master
4
Works with the device other
than Smart-Ashley?
Yes
No
Switch A or B
Press 2 seconds –to Renew Batteries
Switch A & B
Press 5 seconds –to Initialize all the configurations

4
2. AUTHENTICATIONS
A) By Pass Codes
1 User Pass Code (4-16 digits)
1 One Time Pass Code
B) By IC Cards –Max 200pcs
Felica Cards
Mifare Cards
C) By Smartphone APP
D-Key –Max 200 smartphones
I-Key –Unlimited smartphones
3. ALERT
①Initial pass code is all the same. Please change first. Your routinely renewing this pass code is
strongly recommended or someone may attempt stealing it.
②Please do not wet the devices or it may malfunction.
③Switches should not be pressed in extraordinary ways, including by sharp edges, or it may malfunction.
④When you leave, please confirm that your door is successfully closed. No one else can be responsible for
this.
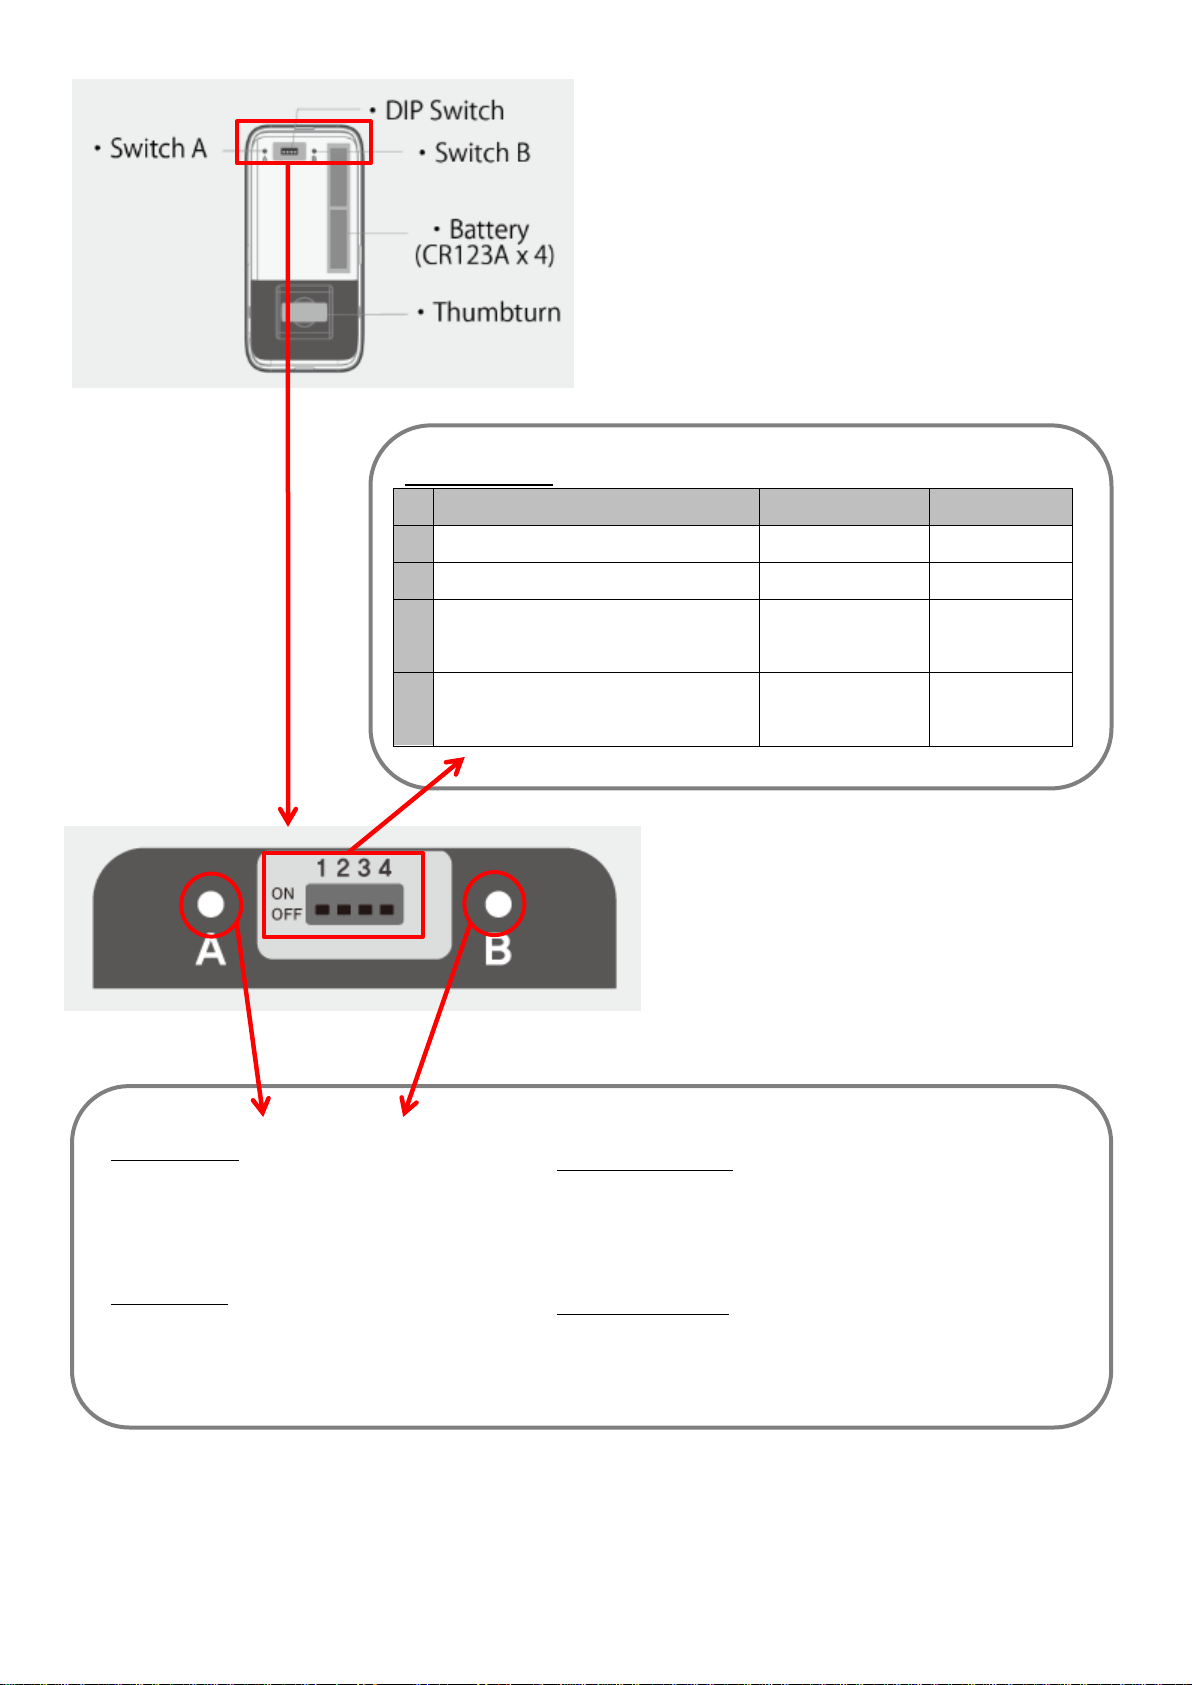
⑤Please install batteries in correct way. Wrong installation including placing batteries in wrong sides
shall cause any malfunction or breakdown.
⑥The above batteries must be 4 lithium batteries (CR123A) or it may not work as expected.
⑦Do not apply water, benzene nor alcohol. Or it may malfunction, catch fire, or you may get shocked.
⑧When you are advised to renew the batteries, please change all of them to the new ones as soon as
possible or you may only use your metal cylinder key once it stops working.
<Conditions>
-Bluetooth 4.0
-Later than iOS8/Android 4.3.1
-Key –Internet access required

5
4. HOW TO
A: PASS CODE
A1: Door Access by Pass Code
Note: Initial pass code is ‘0000’that is identical to all the other devices. Please change this
first.
A2: Change Pass Code
Unlock the door first and…
Note: 4-16 digits available
A3: Establish One-Time Pass Code
Unlock the door first and…
Note1: 4-16 digits available
Note2: Door access will be granted only once.
Note 3: To UNABLE this pass code before its usage, go through the above steps from 1 to 3
and leave it for 5 seconds. Then, this one-time pass code will be deleted from this device.

6
B: IC CARDS
B1: Door Access by IC Cards
B2: IC Cards Registration
Unlock the door first and…
B3: Unable IC Cards (Delete Registration)
Unlock the door first and…

7
C: SMARTPHONES
C: Download free APP on smartphones
C1a: D-Key - Registration
1
2
3
Turn the thumbturn and
UNLOCK the door.
Press A
4
5
6
Enter the pass code.
(Initial pass code is ‘0000’)
7
8
9
Bluetooth must be switched ON.

8
C1b: D-Key –Door Access
1
2
3
4
C1c: D-Key –Disabling (Delete Registration)
1
2
3
Turn the thumbturn and
UNLOCK the door.
Press A
4
5
6
Enter the pass code.
(Initial pass code is ‘0000’)
7
8
9

9
C2a: I-Key –Membership Registration (free)
1
2
3
4
5
6
Internet connection is
ALSO REQUIRED

10
C2b: I-Key –Manager’s Registration
1
2
3
Decide who manages
the door access.
and…
Turn the thumbturn and
UNLOCK the door.
Press A
4
5
6
Enter the pass code.
(Initial pass code is ‘0000’)
7
8
9

11
C2c: I-Key –Issue I-Key (Issue access authorization)
1
2
3
4
5
6
If you do not want to limit the term of authorization…
1
2
On I-Key receiver’s APP, below I-Key will appear.

12
C2d: I-Key –Door Access
1
2
3
4
Once the authorized term is over and if this I-Key is used, the message below will come up.
C2e: I-Key –Delete I-Key at Receiver’s APP
1
2
3
4
5
On Manager’s APP, user’s information will be automatically deleted as below.

13
C2e: I-Key –Delete I-Key at Manager’s APP
1
2
3
4
5
6
C2f: I-Key –Control Access Records
1
2
3
(Latest 1,000 records)
To limit the term to search records
To save the records
Touch
Touch

14
C3: Door Access by Shaking Smartphone
Accessible either by D-Key or by I-Key
1
2
3
Close APP and let it run
on the background.
4
5
6
Shake your smartphone
in front of the panel.

15
C4: Door Access through Smartphone’s Fingerprint Authentication
Accessible either by D-Key or by I-Key
1
2
3
Register your fingerprint
on your smartphone.
4
5
6
Do ‘Touch ID’
By D-Key
1
2
3
4
By I-Key
1
2
3
4
5

16
5. Other Settings
1
2
3
Turn the thumbturn and
UNLOCK the door.
Press A
4
5
6
Enter the pass code.
(Initial pass code is ‘0000’)
Auto-Lock
Lock Manually
1
2
3
Door LOCKED
Volume Settings
1
2
Table of contents
Popular Lock manuals by other brands

SICK
SICK i15 Lock operating instructions

COMPX
COMPX Timberline CB-290 instruction sheet

Command access
Command access VLP-UL-M-KIT Insert Instructions

Oxford
Oxford LIDLOCK User Information Sheet

Sargent and Greenleaf
Sargent and Greenleaf V Series Getting started guide

HES
HES 8500 series installation instructions