Care Quip HF0020 User manual

HF0020 Knee Walker
USER MANUAL
Care Quip Pty Ltd
5 Millennium Court Silverwater NSW 2128
www.carequip.com.au

| User Manual - HF0020 Knee Walker
2
Welcome
Congratulations on choosing to buy a quality Care Quip mobility product. All Care Quip products are
manufactured to the highest standards of performance and safety.
As part of our philosophy of customer service and satisfaction, Care Quip products are backed
by a comprehensive one year warranty. We hope you will enjoy using your Knee Walker.
SYMBOLS
!DANGER A message regarding possible risk of a serious accident
!
WARNING A message regarding possible risk of injury
!
CAUTION A message regarding possible technical damage
NOTE Important information about the product
IMPORTANT: Do not use your Knee Walker until this manual has been read and understood
!Warning
• Always contact your healthcare professional or therapist before using to determine proper adjustment and usage.
• As with any new physical activity, instruction, practice, and common sense are necessary for successful use of the
knee walker. Practice turns slowly until you get the “feel” of your unit and feel confident using the walker.
• Reckless usage of this product includes, but is not limited to scooting too fast.
• Be sure that the knee platform height adjustment screw is tightened and fully engaged before each use.
• Be sure steering mast clamp and height adjustment screw are tightened and fully engaged before each use.
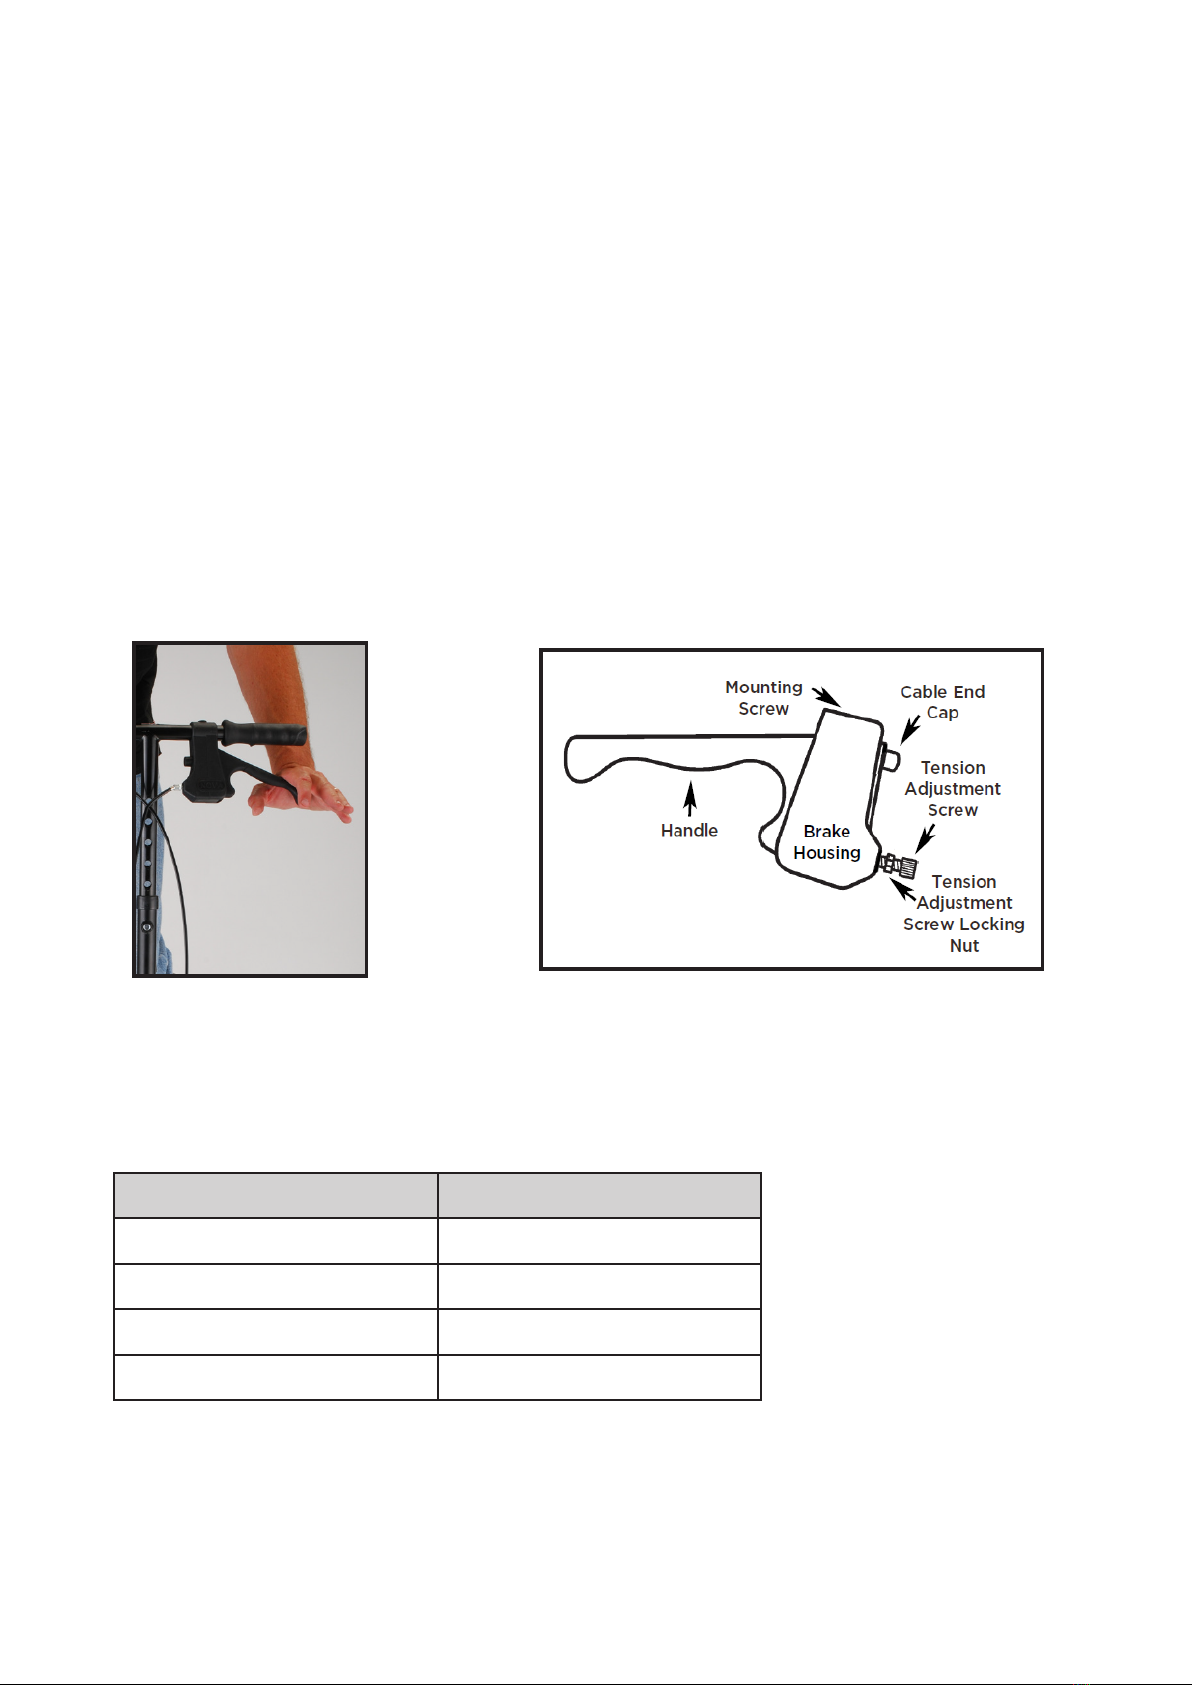
• Be sure hand brakes are fully operational and engage the rear wheels when the handles are squeezed.
• Be sure you are on a level surface and not on any incline when you mount or dismount. The hand brake is designed
to maintain a stopped stance and is not intended to be used for stopping the unit while you are moving. Use of the
hand brake while in motion may cause an abrupt stop. Your uninjured foot should be used to propel and to stop the
unit.
• Do not operate the the knee walker on or near stairs or escalators, over bumps, on hills, or while using mind-altering
drugs or alcohol, or while suering from dizziness.
• This unit is intended for use with a person properly in place on the knee platform. Do not sit or stand on the knee
platform, or use the knee walker to pull yourself up from a seated or other position. The knee rest is not designed
for sitting or supporting full body weight.
• Use caution when moving from carpeted to hard surface floors and on any rough surfaces or when changing levels
(for example, moving from a curb to the street and back onto the sidewalk).
• Do not attempt to reach objects if you are kneeling on the knee rest.
• Do not hang anything from the frame of your unit. Items should be placed in the basket designed for your walker.
• The above situations will cause a change of weight distribution and may cause the unit to tip, resulting in injury
or damage. Always use extreme caution when reaching for any object. Severe injury or death may result if user
insructions, maintenance, instructions and product warnings are not followed.

V2.2 | 3
Steering Column Assembly
• Carefully remove from the shipping box; remove all
packing materials and locate the tools and hardware
pictured in image 1.
• The steering mast will be separated from the unit for
transport and will need to be attached to the frame
before using the knee walker. Use the included tools
and parts to complete this step.
• Push the mast hand clamp to the right so that the pin
is flush with the side of the mast platform (see image
2).
• Place the mast onto the platform and slide the clamp
to the left so that the pin engages into the hole on
the mast (see image 3).
• While holding the mast with one hand, insert the
mast attachment screw into the hole located on
the rear of the mast platform until the threads are
exposed on the opposite side (see image 4).
• Place the locking washer and the nut onto the screw
and hand tighten (see image 5).
• Use the Allen and flat wrenches to tighten the screw.
Test the mast to make sure it can fold down with a
small amount of resistance and holds the mast firm
when in the engaged position. Adjust the tightness of
the screw, if necessary.
• Swing the mast hand clamp upward and push the
clamp arm down to secure the mast to the frame. (see
image 6)
Assembly Instructions
Included Items
Allen wrench, flat wrench, mast attachment screw, locking washer, nut.
Image 1
Image 2 Image 3 Image 4 Image 5 Image 6

| User Manual - HF0020 Knee Walker
4
Mast Hand Clamp Adjustment
• The hand clamp located at the base of the steering
column should secure the mast tightly to the frame
so that there is no looseness. The following steps
(if necessary) will allow you to adjust the tightness
of the clamp if you find that it is either is too hard to
push down or too loose to hold the mast securely.
• Place the clamp in the downward position.
• Push upward on the clamp until the nut is between
the two sides of the mast platform (see image 7).
• Turn counter clockwise to loosen the tension on the
clamp or turn clockwise to tighten the tension on the
clamp.
To Lower the Steering Column
(for transport)
• Pull the clamp arm up to release the clamp and push
the clamp arm forward.
• Slide the clamp to the right so that the pin
disengages from the mast platform.
• Gently guide the steering column downward and
position below the seat.
Steering Mast Height Adjustment
• Remove the triangular adjustment knob by turning
counter clockwise.
• Adjust the handles to the desired height.
• Insert the screw into the hole on the mast and tighten
until secure.
Adjusting the Knee Platform
• The Care Quip Knee Walker can be used for right
or left leg injuries. The oset position of the seat
provides better stability and increased foot clearance
for pushing forward. When standing behind the
scooter, the knee platform should be oset on the
side of the non-injured leg (see image 8).
• Remove the height adjustment screw from the frame
and then remove the knee pad from it’s upside down
shipped position.
• Insert the knee post into the frame (see image 9).
• Adjust kneepad to the desired height and insert the
screw through the frame and into the post and hand
tighten (see image 10).
Image 7 Image 8 Image 9 Image 10

V2.2 | 5
• To control speed - Simply squeeze the handle towards you.
• To lock wheels - Push the handle downward until it clicks into the locked position (see image 11).
Brake Adjustment Instructions
Brake Adjustments
If you find it dicult to squeeze/lock the brake handle or that the brake shoe is not engaging the wheel then you may
need to adjust the brake (see image 12).
To release tension (make it easier to squeeze or lock) be
sure the brake is in the unlocked position. Turn the brake
adjustment screw counter clockwise until the desired
tension is achieved. Test after each 1/2 turn. The brake
should lock the wheel when in the locked position. Screw
the locking nut against the brake casing to secure your
desired setting (see image 12).
To increase tension (make the brake engage sooner)
turn the adjustment screw clockwise until the desired
tension is achieved. Test after each 1/2 turn. The brake
should lock the wheel when in the locked position. Screw
the locking nut against the brake casing to secure your
desired setting.
Specifications
Description Value
Weight Capacity 130kg
Weight 12kg
Approximate User Height 150cm - 190cm
Handle Height Adjustment 79cm - 99cm
Image 11 Image 12

| User Manual - HF0020 Knee Walker
6
Routine Maintenance Procedures Before Each Use
• Turn the mast left and right to insure that the mast restrictor engages and prevents the mast from turning 360 degrees.
• Examine welds for metal fatigue.
• Examine wheel spokes for any damage such as cracking.
• Examine brake pad for excessive wear and replace, if necessary.
• Examine the tension of the mast swivel screw. The screw should be secure but not over tightened to allow the mast to
swiveldownward with minimal resistance.
• Test the hand brake to make sure the brake pad engages and stops the unit, adjust if necessary.
• Check wheel axle bolts to ensure they are secure.
• Check wheels for excessive wear and replace or rotate them, as needed.
Warranty
Care Quip stands firm on our commitment to providing the highest quality products, as well as exceptional service.
This product was built to precise standards and thoroughly inspected prior to shipment. This warranty represents
our confidence in the materials and workmanship of our product. Care Quip extends this warranty only to the original
purchaser of this product. The warranty does not extend to any subsequent purchaser or owner. The warranty is void upon
any sale or transfer of ownership or use by other person. Care Quip warrants its products are free from defects in material
and workmanship under normal use for the period commencing upon the date of purchase and continuing for the following
specified period of time after that date:
Care Quip’s comprehensive one year warranty against faulty manufacture extends to the frame and parts. Brake cable,
handgrips and castors are not covered by warranty.
This warranty does not cover problems due to user negligence, misuse of the product, failure to adhere to product
instructions, or normal wear and tear. Items that have been subject to negligent abuse, modified without prior written
authorisation are not covered within this warranty. For warranty service, please contact the dealer from whom you
purchased your Care Quip product. Be prepared to indicate the nature of the defect, the product serial number, and the
name and location of where you purchased the product. You will also be required to provide a receipt of your purchase.
Do not return any products to our oce without prior consent.
Repair or replacement is the only remedy under this limited warranty. This warranty does not include any labor or shipping
charges incurred in replacement part installation or repair of product.
This warranty is exclusive and in lieu of all other express warranties, implied warranties, if any, including the implied
warranties of merchantability and fitness for a particular purpose. Care Quip shall not be liable for any squential or
incidental damages whatsoever.
Table of contents
Other Care Quip Mobility Aid manuals