Carecar C68 User manual

www.obd2express.co.uk
Statement
This User Manual is for auto diagnostic tool C68. Without the prior written
permission of Carecar (Short for “Shenzhen Carecar Technology Co.,
Ltd.”), any enterprise or person is NOT allowed to copy or store any data
(electronic, mechanic, photo copying, recording, etc). The information
contained herein is only used for Carecar C68. Carecar is not responsible
for any damage by wrong usage as stated below.
Carecar shall not be liable for any part that has been abused, altered, used
for a purpose other than for which it was intended, or used in a manner
inconsistent with instructions regarding use. Other product names
mentioned herein are for explaining how to use this device; the copyrights
belong to the corresponding original enterprise.
TradeMark
Shenzhen Carecar Technology Co., Ltd. registered the trademark of
“Carecar” in China and other countries. In any countries where Carecar
trademarks, service marks, logos and company name is not registered,
Carecar claims other right associated with unregistered trademarks, service
marks, logos and company name. Without prior written permission,
anyone is NOT allowed to use trademark, service mark, logo or company
name of Carecar.

www.obd2express.co.uk
Safety Precautions
To avoid personal injury, instrument damage and/or damage to your
vehicle, please do not use this tool before reading this manual.
The safety messages cover situations Carecar is aware of. Carecar
cannot evaluate or advise you all the possible hazards. You must be
certain that any conditions or service procedures encountered do not
jeopardize your personal safety.Always read your vehicle's service
manual and follow its safety precautions before and during any test or
service procedure. ALWAYS observe the following general safety
precautions:
Always perform automotive testing in a safe environment.
When an engine is running, it produces carbon monoxide, a toxic
and poisonous gas. To prevent serious injury or death from carbon
monoxide poisoning, operate the vehicle ONLY in a well-
ventilated area.
To protect your eyes from propelled objects as well as hot or
caustic liquids, always wear eye protection that meets ANSI
standards.
When an engine is running, many parts (such as the coolant fan,
pulleys, fan belt,etc.) turn at high speed. To avoid serious injury,
always be aware of moving parts. Keep a safe distance from these
parts as well as other potentially moving objects.
Engine parts become very hot when the engine is running. To
prevent severe burns, avoid contact with hot engine parts.
Before starting an engine for testing or troubleshooting, make sure
the parking brake is engaged. Put the transmission in park (for
automatic transmission) or neutral (for manual transmission).
Block the drive wheels with suitable blocks.
Connecting or disconnecting test equipment when the ignition is
ON can damage test equipment and the vehicle's electronic
components. Turn the ignition OFF before connecting the Scan
Tool to or disconnecting the Scan Tool from the vehicle’s Data
Link Connector (DLC).
To prevent damage to the on-board computer when taking vehicle
electrical measurements, always use a digital multimeter with at

www.obd2express.co.uk
least 10 megohms of impedance. Fuel and battery vapors are
highly flammable.
To prevent an explosion, keep all sparks, heated items and open
flames away from the battery and fuel / fuel vapors. DO NOT
SMOKE NEAR THE VEHICLE DURING TESTING.
Don't wear loose clothing or jewelry when working on an engine.
Loose clothing can become caught in the fan, pulleys, belts, etc.
Jewelry is highly conductive, and can cause a severe burn if it
makes contact between a power source and ground.
Use extreme caution when working around the ignition coil,
distributor cap, ignition wires and spark plugs. These components
create hazards voltages when the engine is running.
Keep a fire extinguisher suitable for gasoline/chemical/electrical
fires nearby
Keep the scan tool dry, clean, free from oil/water or grease. Use a
mild detergent on a clean cloth to clean the outside of the scan
tool, when necessary.
Do not drive the vehicle and operate the scan tool at the same time.
Any distractions may cause an accident.
To avoid damaging the scan tool or generating false data, make
sure the vehicle battery is fully charged and the connection to the
vehicle DLC is clean and secure.
Do not place the scan tool on the distributor of a vehicle. Strong
electro-magnetic interference can damage the scan tool.

www.obd2express.co.uk
Contents
1. Introduction···································································································································1
1.1 Brief Introduction·····························································································································1
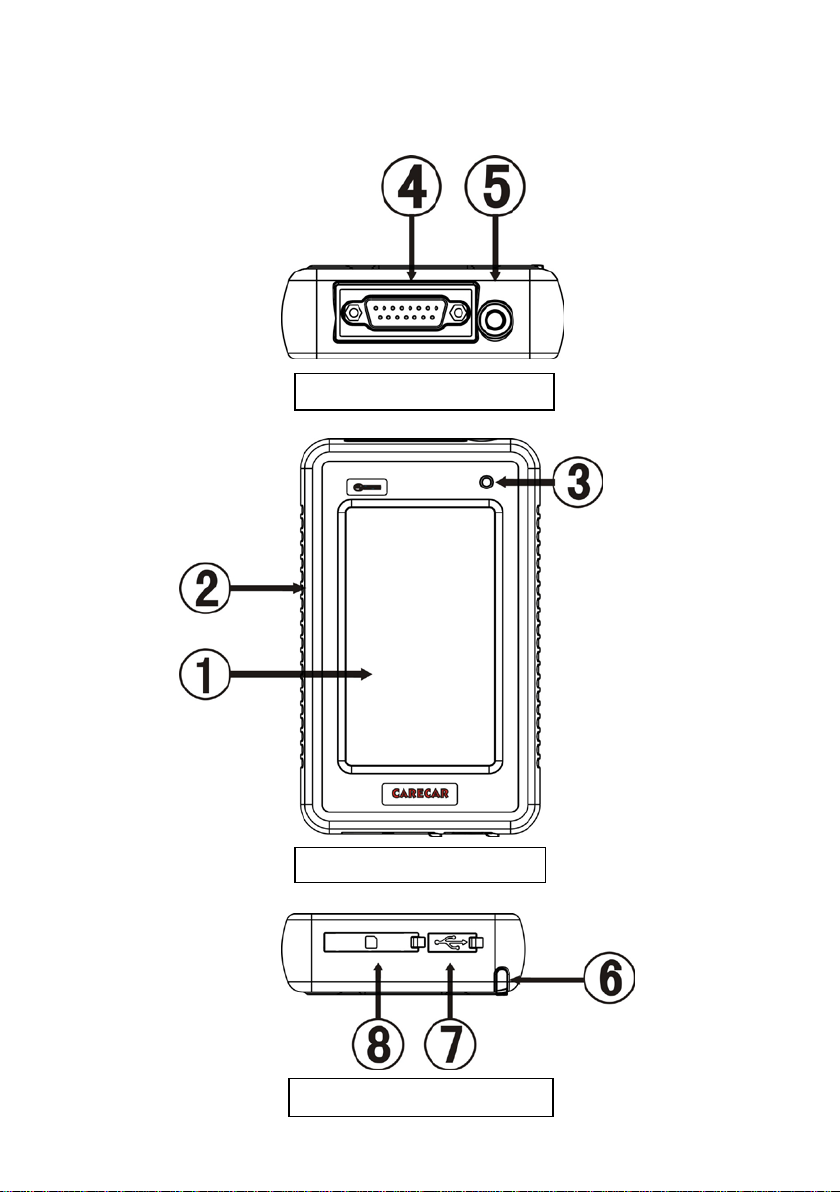
1.2 Tool Description ································································································································2
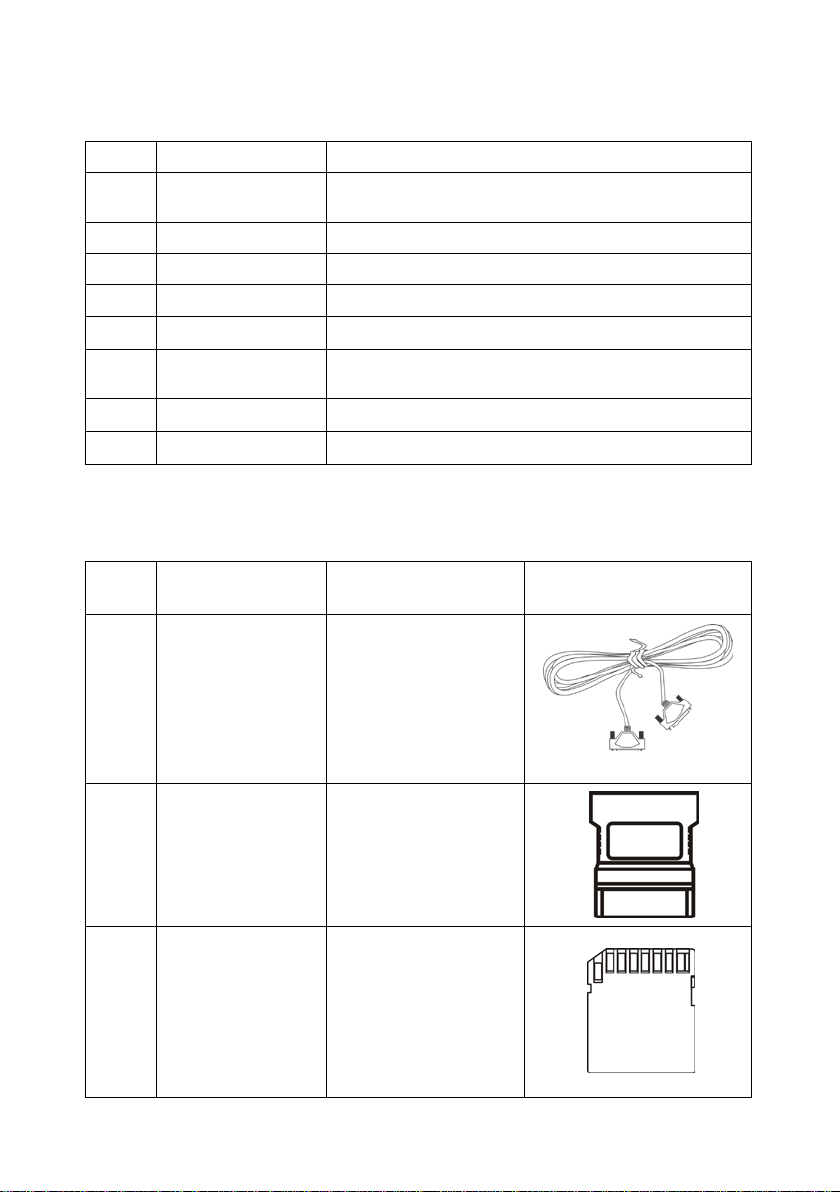
1.3 Accessory Description ···················································································································3
1.4 Technical Parameters ····················································································································4
2. Use the Tool ·································································································································5
2.1 Power On ············································································································································5
2.2 Screen Calibration ··························································································································6
2.3 Power Off ···········································································································································7
2.4 Standby ···············································································································································7
2.5 Function Button Description of Diagnostic Interface ······················································7
2.6 Enter Three Modes by Pressing Shortcut Key ···································································8
2.7 Check Screenshots ··························································································································8
3. Diagnostic Instruction ·····································································································8
3.1 Set-up and Connection ··················································································································8
3.1.1 Set-up ··············································································································································8
3.1.2 Connect C68 with vehicle ··············································································································9
3.2 Diagnostic Procedure ···················································································································10
3.2.1 Select available vehicle makes ····································································································10
3.2.2 Enter diagnostic system ···············································································································10
3.2.3 Diagnostic function menu ···········································································································12
3.2.4 Read Datastream ··························································································································13
3.3 C68 Function Description ·······································································································14
4. Updating the C68···················································································································15
4.1 Registration ·····································································································································15
4.1.1 Distributor registration ·············································································································15
4.1.2 Product user registration ··········································································································17
4.2 Upgrade ·············································································································································19
4.2.1 Upgrade preparation ·················································································································19
4.2.2 Download software ····················································································································19

www.obd2express.co.uk
4.2.3 Upgrade the tool···························································································································20
4.2.4 Upgrade update show ··············································································································25
4.3 Member Center Information ······································································································26
4.3.1 Member information ·················································································································26
4.3.2 Change password ·······················································································································26
4.3.3 Add serial number ·····················································································································26
4.3.4 Customer service ························································································································27
4.3.5 Software download ····················································································································27
5. Registration and Upgrade FAQ··············································································27
5.1 Registration FAQ ·························································································································27
5.2 Upgrade FAQ ································································································································28
6. Maintenance, Warranty and Service································································29
6.1 Maintenance ····································································································································29
6.1.1 Cleaning and protect the touch screen ····················································································29
6.1.2 Clean and inspect the unit ·········································································································29
6.1.3 Quick troubleshooting tips ········································································································29
6.2 Warranty ··········································································································································29
6.3 Service ················································································································································30

www.obd2express.co.uk
1
1. Introduction
1.1 Brief Introduction
C68 is an ultimate professional auto diagnostic tool that can check all
systems of all major European, American and Asian vehicles. With more
than 50 vehicle makes and hundreds of vehicle electronic systems make it
globally adaptive and practical in use, and multifunction performs
outstanding diagnostic performance. It provides an ever fast and stable
diagnostic speed with its new and unique platform. The new technologies
of which its compatibility with different platforms and strengthened
firmware and software that advances the diagnostic functions, speed up the
diagnostic processes and extend the capability in firmware and software. It
integrates the needs from DIY market to professional technicians’ criteria.
A more convenient and trouble-free diagnostic experience is provided at
any time by your side as to its compact and durable housing. This unique
solution keeps it up-to-date to meet the market needs and development
trends. Easy operation on diagnosis symptoms and codes, the creative
screenshots capturing in real time function offer an efficient repairing
service for individuals or workshops. External SD card with large capacity
stores the screenshots captured in real time.
Advantages
Multilanguage supported which allows it to be used in different
countries and areas.
Mechanical but compact design with rubber and screen protector
housing, high-resolution and sensitivity colorful touch screen
combined with advanced diagnostic multifunction make it more
convenient, efficient, practical and accurate for diagnosis.
Unique platform provides high speed and stable of diagnosis
Durability
The integrative structural design is anti-falls, anti-seismic and durable.
The industrialization design ensures that the product works stably even
under adverse environments such as high-temperature, low-
temperature, etc.
High-voltage class protection design which supports vehicles with 12V
and 28V.

www.obd2express.co.uk
2
1.2 Tool Description
Figure1.2 C68 Front view
Figure1.1 C68 Top view
Figure1.3 C68 Bottom view

www.obd2express.co.uk
3
NO. Name Description
1 Touch Screen
Indicate operation buttons, testing information
and help information
2 Protective Case To protect C68 from vibration, dropping and dirt
3
Power Light
To indicate tool’s operation status
4 Diagnostic Port To connect main cable
5 Shortcut Key
Touch screen calibration
6 Stylus
Selecting items and enters information
while operating the C68
7 Micro USB Port
To connect the computer for update
8 SD Card Slot
To insert the SD card
1.3 Accessory Description
NO. Name Description Picture
1 C68 Main Cable To connect C68
with OBDII
connector
2 C68 Connector OBDII diagnostic
connector
3 SD Card To store C68 vehicle
diagnostic softwares
and screenshots

www.obd2express.co.uk
4
4 USB Cable To connect 68 with
PC
5 Stylus To click operation
on C68
6 Screen Protector To protect C68
touch screen
Remark: Instruction for using the screen protector
1.4 Technical Parameters
Main Unit Size: 5.91''x 3.54''x 1.12''
CPU: Industrial Class ARM32
Memory: 64M

www.obd2express.co.uk
5
SD card: Support mass external storage card
Interface: USB 2.0
Voltage: DC9V/DC28V
Display Screen: 4.3 inch LCD touch screen (480*270) TFT
2. Use the Tool
2.1 Power On
It is powered automatically to connect with vehicle DLC by main cable,
or connect with PC by USB cable, screen will display initializing
interface as shown in picture 0.1 below. Use the stylus to click anywhere
of the screen, system will enter into diagnostic interface as shown in
picture 0.2 below:
Picture 0.1 Picture 0.2

www.obd2express.co.uk
6
2.2 Screen Calibration
After enter into initializing interface, press [Shortcut Key] twice, system
will change to screen calibration interface as shown in picture 0.3 below.
According to tips on the screen, enter into the interfaces as picture 0.4, 0.5,
0.6 shown below to finish screen calibration, after finish it, according to
tips shown as picture 0.6, click screen to exit screen calibration.
Picture 0.3 Picture 0.4
Picture 0.5 Picture 0.6

www.obd2express.co.uk
7
2.3 Switch off
Disconnect C68 with DLC or USB if you want to turn off after using it.
2.4 Standby
Under C68 is in ‘On’ status, press [Shortcut Key] to turn off screen
display, then C68 will be in standby mode. Press [Shortcut Key] again if
you want to stop standby mode and turn on the screen display.
2.5 Function Button Description of Diagnostic Interface
UP: Display last page of menu, if there is only one page or the current
page is the last page, the button will be inactive and turn to grey.
DOWN: Display next page of menu, if there is only one page or the
current page is the last page, the button will be inactive and turn to grey.
HISTORY: Record last diagnostic procedure.
SETTING: Set language, time and contrast. Click [Setting] button, enter
system setting interface as shown in picture 0.7
1)Language setting: click to
select desired language, language
can be set after re-start the tool.
2)Time setting: set system time
according to current time when in
use.
3)Contrast setting: pull the scroll bar
to adjust display’s brightness.
4)Tool serial number: serial number is
produced from production date,
which will be used for after service
(registration for download or
change configurations)
Click [OK] to exit after setting the
language, time and contrast.
Picture 0.7

www.obd2express.co.uk
8
2.6 Enter Three Modes by Pressing Shortcut Key
1) Calibration mode: Power up C68 to enter starting interface, double
press shortcut key, then it will turn to calibration interface, details about
screen calibration, please refer to [2.2 Screen Calibration].
2) Update starting mode: After copy the display program or vehicle
software to [UPDATA] folder, power up the tool, if it appears problem
during updating, press the shortcut key and connect tool with PC by
USB cable at the same time, this is to avoid power up problem and be
able to restart the tool, details please refer to [5.2 Upgrade FAQ]
3) SD card mode: Power up C68 by USB cable, DO NOT press shortcut
key and wait few seconds, it will enter into SD card mode, then you can
check system files and screenshots, detailed operation please refer to
below instruction [2.7 Check Screenshots]
2.7 Check Screenshots
A. Check screenshots by SD card
1) Connect SD card with PC by using a SD card converter or plug
the SD card to SD card slot if your PC has a SD card slot.
2) Find the folder [bmp] in removable disk, click to enter and
check the screenshots.
B. Check screenshots by USB cable
1) Connect the tool with PC by USB cable.
2) Find the folder [bmp] in removable disk, click to enter and
check the screenshots.
3. Diagnostic Instruction
3.1 Set-up and Connection
3.1.1 Set-up
General test conditions
1)Turn on vehicle power switch
2)Battery voltage of the vehicle should be within 11V-14V, C68’
working voltage range is 9V-36V
3)Throttle should be Off

www.obd2express.co.uk
9
4)Ignition timing and idle speed should be within specification range,
water and transmission oil temperature is in normal working range
(water temperature is 90 – 105°C and transmission oil temperature is
50– 80°C).
Connector selection
There are various connectors provided with the main unit. Every
connector has an application, please check the connector application
carefully and select the correct connector for the vehicle being diagnosed.
Find Location of the Data Link Connector
The location of the data link connector is usually in the left side under the
dash, behind covers on center of dash or center console, but there are 8
common locations as shown below.
3.1.2 Connect C68 with Vehicle
Please refer to below figures to learn how to connect to get power.
1) Check DLC location and shape
2) Select correspondent connector according to vehicle brand and
model
3) Connect the correspondent connector with one terminal of main
cable and plug this terminal in DLC
4) Connect main unit with another terminal of main cable

www.obd2express.co.uk
10
3.2 Diagnostic Procedure
3.2.1. Select available vehicle makes
C68 can diagnose various makes of vehicles. Carecar keeps updating to
enhance the software. Please visit the Carecar website
http://www.carecartech.com to download the latest released software.
The vehicle brands are showing as icons. Click on the corresponding vehicle
icon to load the diagnostics software and start diagnosis. It’s very useful and
fast to enter into the vehicle diagnostic system if you are familiar with the
vehicle icons.
There are different software packages for different user needs according to
regions and vehicle makes. For the software in your unit, please refer to the
packing list or contact the local distributor.
3.2.2. Enter diagnostic system
After connect the C68 with vehicle by the main cable, C68 will turn on
automatically and enter to initialize interface as shown in picture 0.1(Page
5), click anywhere of the screen at initialize interface to enter diagnostic

www.obd2express.co.uk
11
interface.
After enter diagnostic interface, find correspondent vehicle icon by click [UP]
[DOWN] buttons. There are three ways to enter vehicle diagnosis:
1)Click correspondent vehicle icon, and click [ENTER] to start
diagnosis.
2)Quick double click correspondent vehicle icon, system will start
diagnosis
3)Click [History] at diagnostic interface, system will enter into last
diagnostic record ( only apply to the same vehicle that diagnosed
last time)
Here take OBDII as an example to show how to diagnose the car. Click
OBDII as shown in picture 0.2. Then click [ENTER] to enter the
software version selection interface of vehicle diagnosis as shown in
picture 0.8. Select desired version( There is only one version V12.00 as
shown in picture 0.8 below, normally it’s requested to choose the latest
version, each last version is compatible with older versions). Click
[ENTER] to start OBDII diagnosis.
Remark:
In picture 0.8: [HELP] button helps
user to know the tool functions,
update information and operations,
details please refer to [HELP]
function of C68. [UP] [DOWN]
ENTER] [BACK] button functions,
please refer to page 7.
Picture 0.8

www.obd2express.co.uk
12
After enter OBDII diagnostic system, click [Generic OBDII & EOBD] as
shown in picture 0.9, then system will enter into [Select diagnostic function]
interface as shown in picture 1.0 next page:
In picture 0.9:
[RESET] BUTTON:It helps to re-
enter diagnostic system (to set the
diagnostic system that is under
processing re-enter the diagnostic
system).
[CAPTURE] BUTTON: To capture
the screen interface in real time,
captured screenshots will be saved
in SD card.
Picture 0.9
3.2.3. Diagnostic function menu
1)In diagnostic function menu,
select and click [Read trouble
code] to execute this function,
result will be shown in few
seconds.
If it shows no trouble code, that
means there is no trouble of the
car system.
2)Click [Clear trouble code] to
clear the trouble codes that has
read. A message will tell you
“Trouble code is successfully
cleared” after you successfully Picture 1.0

www.obd2express.co.uk
13
cleared the code. If a message indicate “No trouble code” that
means the trouble code is cleared in all systems, or the system you
diagnose has no trouble code.
3)Click [Current powertrain diagnostic data], system will show
current DataStream of powertrain as shown in picture 1.1. Click
needed DataStream’s and click [ENTER] to enter [DataStream]
menu.
Remark:Different vehicle system has different data selections in
[Select Diag. Functions], details refer to C68 operation.
Picture 1.1 Picture1.2
3.2.4. Read Datastream
Live data can be read under [DataStream] menu as shown in picture 1.3,
[Capture] function can capture screenshots with live data in real time, or click
[Back] to exit, or click [Reset] to re-enter the diagnostic system again if needed.

www.obd2express.co.uk
14
Click [GRAPH] button as shown in picture 1.2, system will display graphic
view of DataStream as shown in picture 1.3. Click [EXIT] button to get back.
Picture 1.3
3.3 C68 Function Description
1. Communication test of CAN-BUS and K communication cable
Support following protocols:
1)PWM
2)VPW
3)KWP2000
4)ISO9141
5)CAN-BUS
2.Basic Function:
1)Read ECU information
2)Read trouble code
3)Clear trouble code
4)Read DataStream
5)Component test

www.obd2express.co.uk
15
6)Basic setting
7)Programming
8)Reset service lights
3.Special Function:
1)Read password ( VW)
2)Reset airbag (VW, Geely etc)
3)Reset throttle(BMW, Toyota, Honda etc)
4)Immobilizer(BENZ, Greatwall, Brilliance, Roewe, MG
etc)
4. Upgrade the C68
4.1 Registration
4.1.1 Distributor registration
Note: Distributor registration is applied to distributor only.
Distributor shall get a dealer code and a password from us before register
on our website at the first time to purchase our tool.
Step 1: Browse our website www.carecartech.com and you will see
register section as shown in below picture:
Table of contents
Popular Diagnostic Equipment manuals by other brands

Continental Refrigerator
Continental Refrigerator AUTODIAGNOS TPMS SE quick start guide

OBDLink
OBDLink LX quick start guide

MSW Motor Technics
MSW Motor Technics MSW-CA-115 user manual

Seemoto
Seemoto Seemoto GW Installation quick guide

Kaixin
Kaixin MSU1 user manual

Launch
Launch Creader Professional 129i user manual