Carestream INDUSTREX M43ic User manual

User Guide
INDUSTREX M43ic Film Processor
Non-Destructive Testing (NDT) Applications
Software: AT800 v2.8r09p and up

CHSP-9039 | 2021-09-10 2
Table of Contents
Introduction ........................................................................................................................................................ 3
User Guide Conventions.................................................................................................................................. 3
Special Messages ......................................................................................................................................... 3
Product Description ......................................................................................................................................... 4
Hazard Sticker.............................................................................................................................................. 4
Technical Specifications................................................................................................................................ 4
Qualified Staff.............................................................................................................................................. 4
General Considerations................................................................................................................................ 4
Mechanical Hazards..................................................................................................................................... 5
WEEE and RoHS Compliance Statement ....................................................................................................... 7
Tanks and Chemicals.......................................................................................................................................... 8
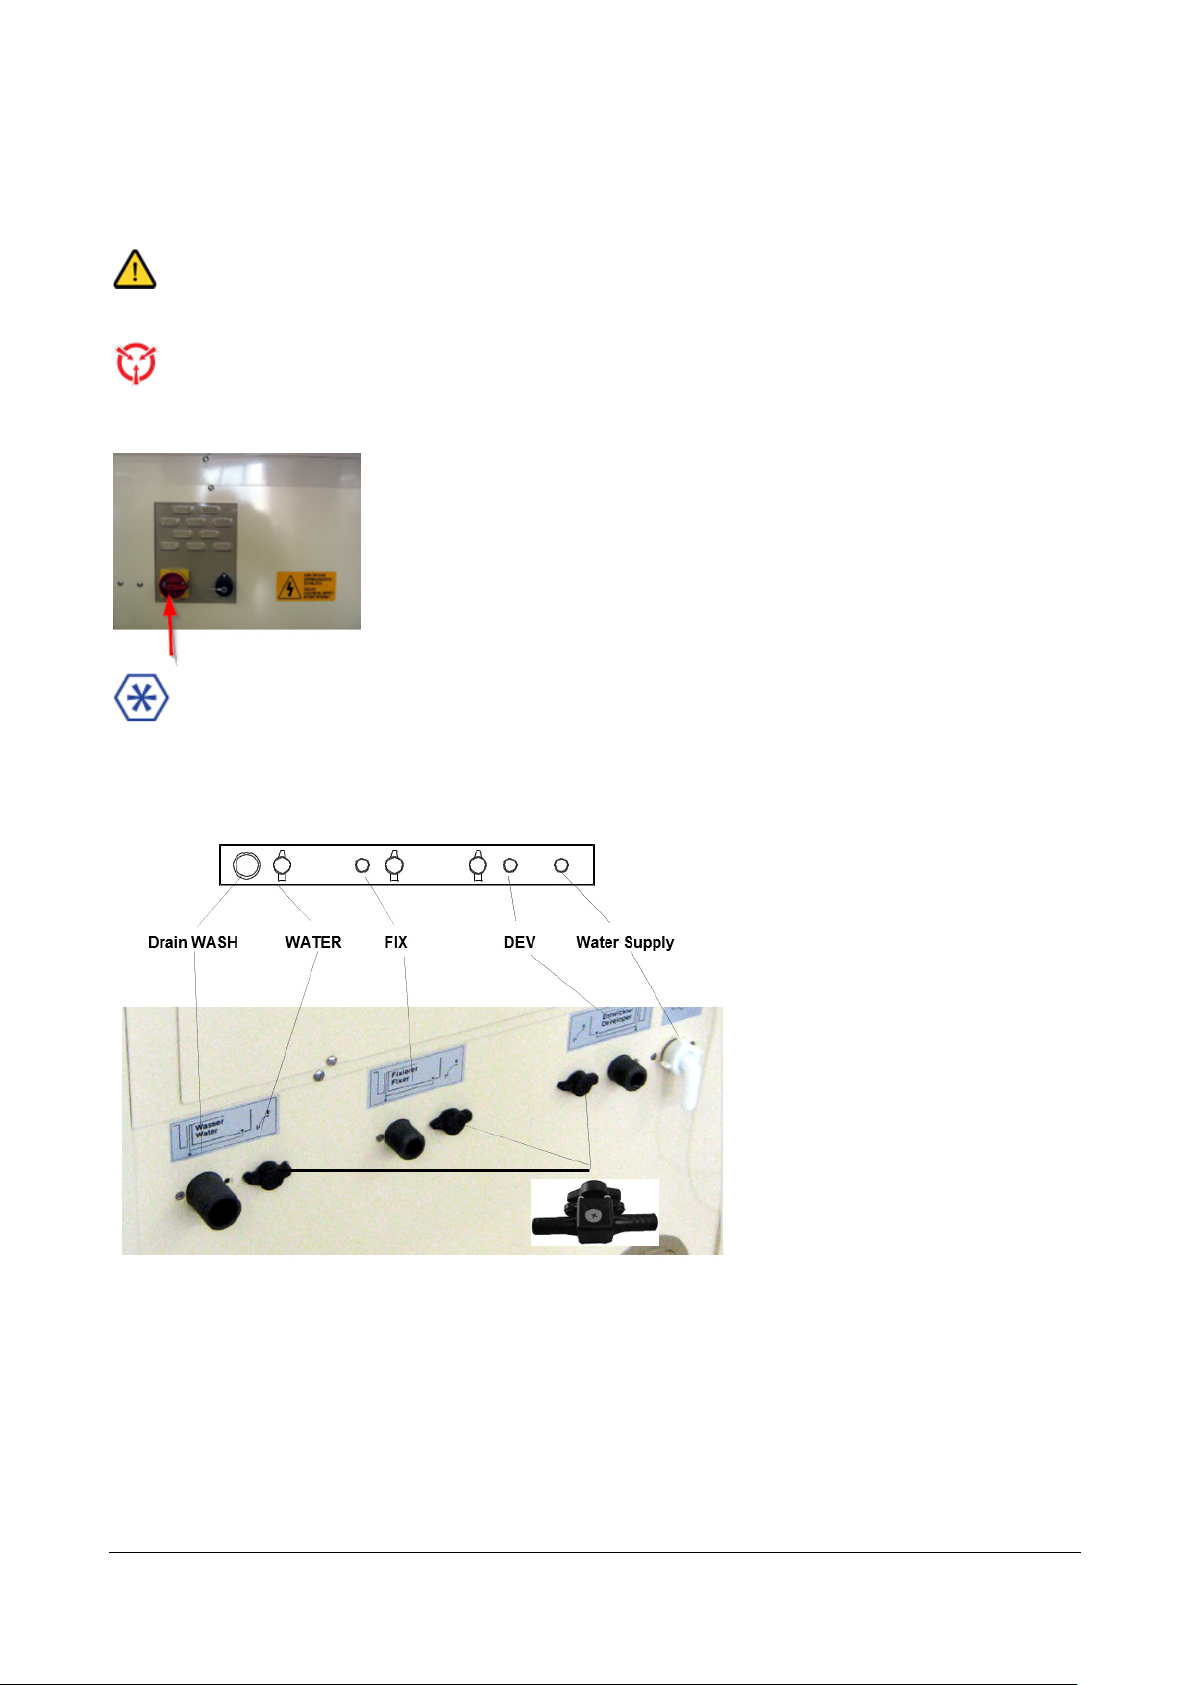
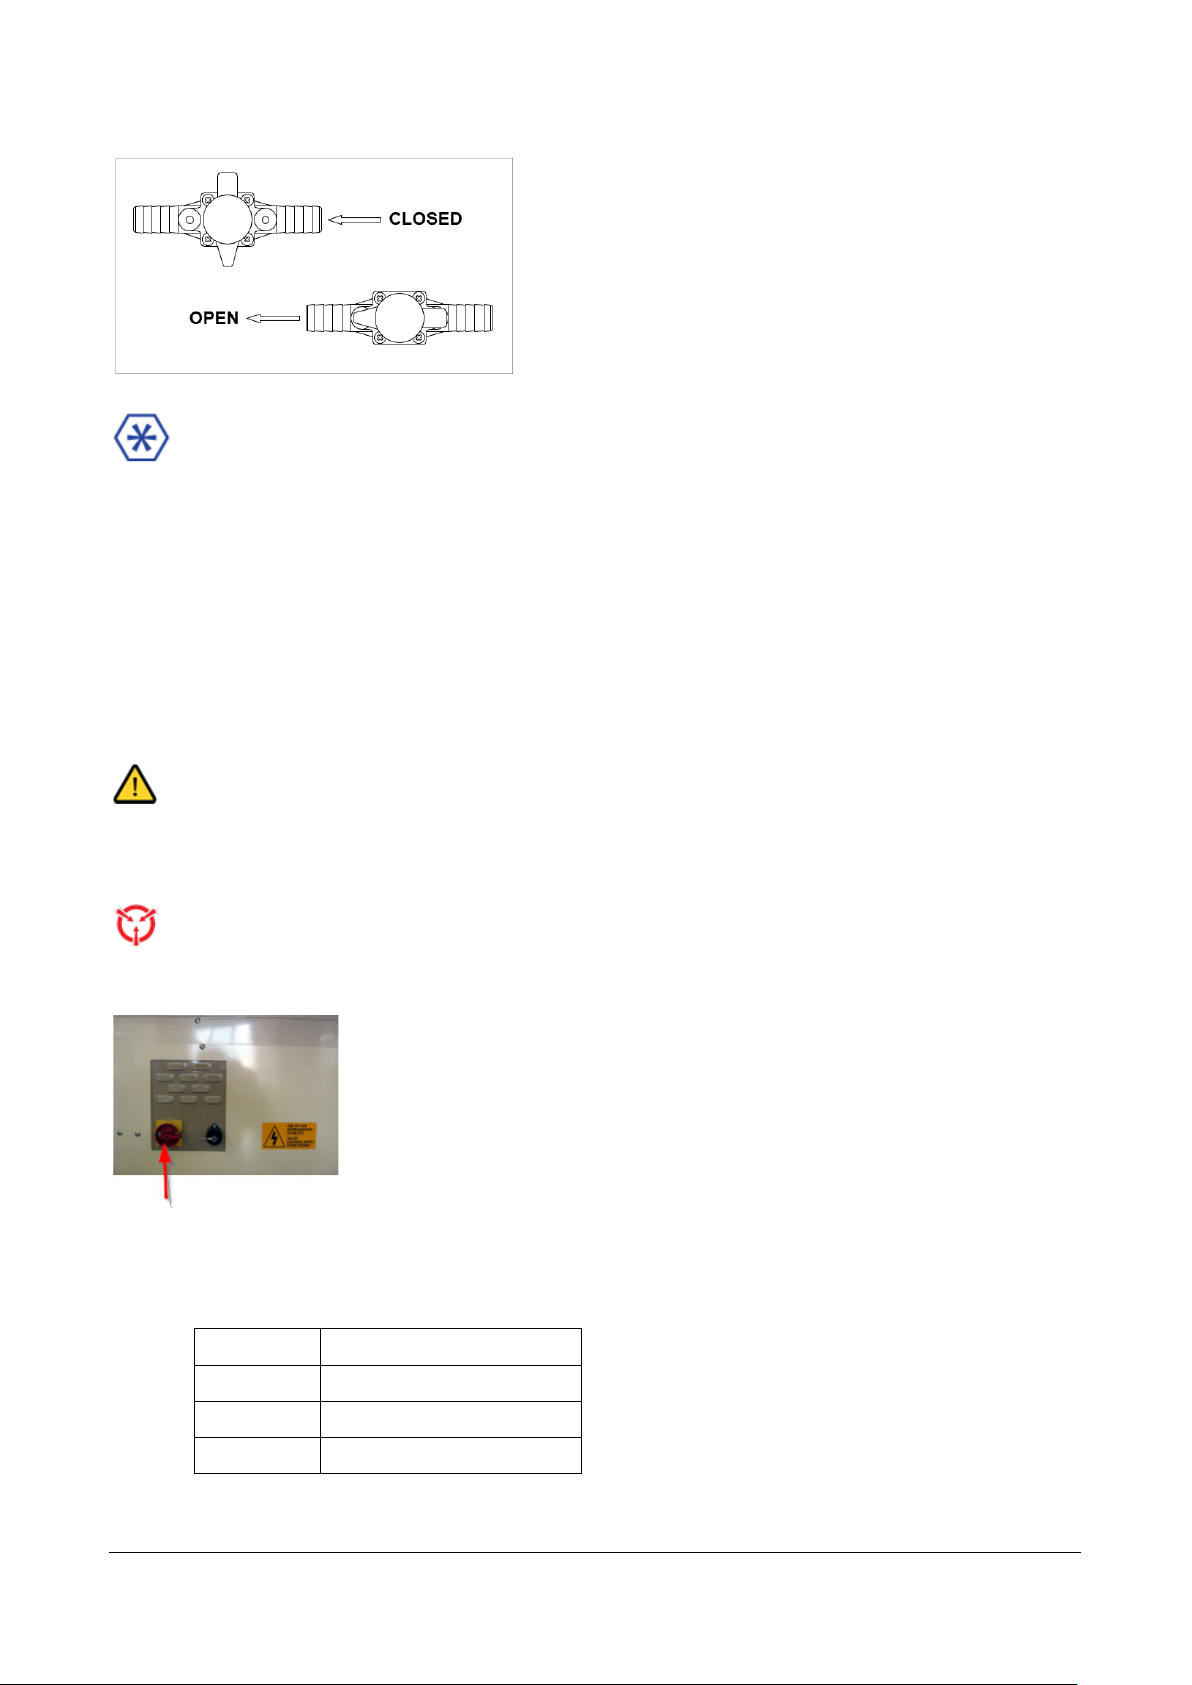
Draining the Tanks .......................................................................................................................................... 8
Installing the Transport Racks .......................................................................................................................... 9
Additional Connection for the Fix Rack ...................................................................................................... 11
Fix Rack ..................................................................................................................................................... 11
Filling the Tanks ................................................................................................................................................ 12
Fill the Fixer Tank........................................................................................................................................... 12
Fill the Developer Tank .................................................................................................................................. 12
Operating the Film Processor............................................................................................................................. 13
Daily Startup.................................................................................................................................................. 13
Starting Work................................................................................................................................................ 13
Daily Shutdown ............................................................................................................................................. 13
Functions....................................................................................................................................................... 14
Using the Display ............................................................................................................................................. 15
Overview ....................................................................................................................................................... 15
Programming the Values............................................................................................................................... 16
Changing the Program .............................................................................................................................. 16
Setting the Date and Time ......................................................................................................................... 17
Check the Parameters and the Work in Progress in Automatic Mode ............................................................ 17
Use the Options in Standby Mode ................................................................................................................. 18
Use the Manual Replenishment Cycle ............................................................................................................ 19
Check the Errors............................................................................................................................................ 19
Start and Stop the Film Processor Manually ................................................................................................... 19
Turn the Back Light On and Off..................................................................................................................... 19
Loading the Film............................................................................................................................................ 19
Using the Monitor Mode ............................................................................................................................... 20
Using the Filter Control.................................................................................................................................. 21
Additional Features – Auto-fill Water / Auto-fill Chemicals (Dev & Fix) ........................................................... 21
Automatic Wash Tank Fill / Automatic Wash Tank Drain ............................................................................ 21
Automatic Developer and Fixer Tank Fill..................................................................................................... 22
Systems............................................................................................................................................................. 23
Tempering..................................................................................................................................................... 23
Temperature Sensing..................................................................................................................................... 23
I2C Bus.......................................................................................................................................................... 23
Ventilation..................................................................................................................................................... 24
Chemical Replenishment ............................................................................................................................... 25
Infrared Sensor Bar........................................................................................................................................ 26
Maintenance, Troubleshooting, and Error Messages ......................................................................................... 27
Daily Maintenance......................................................................................................................................... 27
Weekly Maintenance..................................................................................................................................... 28
Three-to-Six Months Maintenance................................................................................................................. 28
Troubleshooting ............................................................................................................................................ 30
Error Messages .............................................................................................................................................. 34
Publication History ..................................................................................................................................... 35

CHSP-9039 | 2021-09-10 3
Introduction
The information contained herein is based on the experience and knowledge relating to the subject matter
gained by the manufacturer prior to publication. No patent license is granted by this information. The
manufacturer reserves the right to change this information without notice and makes no warranty, express or
implied, with respect to this information. The manufacturer shall not be liable for any loss or damage, including
consequential or special damages, resulting from the use of this information, even if loss or damage is caused by
the manufacturer’s negligence or fault.
Note: This equipment has been tested and found to comply with the limits for a Class A digital device,
pursuant to part 15 of the FCC rules. These limits are designed to provide reasonable protection against harmful
interference when the equipment is operated in a commercial environment. This equipment generates, uses, and
can radiate radio frequency energy and, if not installed and used in accordance with the instruction manual, may
cause harmful interference to radio communications. Operation of this equipment in a residential area is likely to
cause harmful interference, in which case the user will be required to correct the interference at his own
expense.
CAUTION:
Personnel operating and maintaining the film processor should receive training and be familiar with all aspects of
operation and maintenance. Observe all Warnings, Cautions, and Important
notes.
When doing the procedures in this document, you must use safe work practices and wear the correct personal
protective equipment (for example, safety eyewear) according to your company's standard operating procedures.
User Guide Conventions
Special Messages
The following special messages emphasize information or indicate potential risks to personnel or equipment.
CAUTION:
Caution points out a potentially hazardous situation which, if not avoided, might cause minor or moderate
injury.
ESD:
Electrostatic discharge (ESD) is a primary source of product downtime, lost productivity, and costly repairs
.
As few
as 30 VDC can damage or destroy the essential components in electronic equipment.
IMPORTANT:
Important highlights critical policy information that affects how you use this manual and this product.
NOTE:
Notes provide additional information, such as expanded explanations, hints, or reminders.
CAUTION:
If you witness or become aware of a potential safety issue with this equipment, take the appropriate safety
measures and report this to your Carestream Service representative immediately.
Typeface Conventions:
Boldface type represents buttons or selections the user makes on the interface and identifies screen names,
cautions, and warnings.

CHSP-9039 | 2021-09-10 4
Product Description
This film processor has been designed to meet the highest technical standards
.
Its design features include:
•
Compact, space-saving design
•
Fully automatic processing cycle
•
Smooth roller transport system
•
Low tank volumes
•
Electronically controlled temperature system
•
Automatic replenishment
•
Low energy consumption
Hazard Sticker
The hazard sticker is applied to covers where applicable. You must isolate the
electrical power supply before opening the cover.
Technical Specifications
For technical specifications, see the Technical Data / Reference doc for the film processor.
Qualified Staff
CAUTION:
•Only trained staff can unpack and/or operate the film processor. Only trained service engineers may work
on the equipment and electrical installation.
•Staff in charge of maintaining the film processor must be thoroughly familiar with the equipment and
trained
.
The film processor should not be operated without supervision.
•The operator may remove only the top cover of the film processor.
•The installation, service, repair, and initial operation of the film processor must be carried out only by
qualified and trained service personnel.
•Do not operate the film processor after consuming alcohol or taking strong medication.
General Considerations
CAUTION: Electrical Hazards
•
Observe all safety warnings to minimize the risk of electrical shock, burns, or equipment damage.
•
High voltage is used to power the film processor.
CAUTION:
•
The film processor is a complex device with moving parts such as rotating gears and roller components.
It uses photo processing chemicals that are irritating to the eyes, lungs, and skin.
•
Photographic film processors are complex machines with many electrical and mechanical parts and
chemicals.

CHSP-9039 | 2021-09-10 5
Mechanical Hazards
CAUTION:
•
Observe all safety warnings to minimize the risks of mechanical hazards.
•
Do not wear jewelry or loose clothing when operating the processor. Check that clothing or other
objects cannot get trapped in the gear drives or the roller transport system within the film processor.
•
The roller transport system of the film processor is a potential hazard. Fingers, loose clothing, or jewelry
can get drawn into the rollers or gear wheels.
CAUTION: Crushing of Hands
Hands or fingers may be pinched or injured by the moving parts or when handling the heavy parts.
CAUTION: Heavy Parts
Parts are heavy. Use caution and safe handling techniques when moving heavy parts.
CAUTION: Electrical Hazards
•
During installation, service personnel must certify that the film processor is permanently and reliably
grounded according to the standards in the national electrical code.
•
Before doing any maintenance, the film processor must be isolated from the mains power by moving
the mains power switch to the off (0) position.
•
Built-in safety devices must not be bypassed or made inoperative. Only use the original COLENTA spare
parts when replacing any failed electrical components.
•
Hazardous voltage can cause electrical shocks, burns, or fatal injury.
CAUTION: Fire Hazards
•
Beware that combustible materials can ignite and cause fires.
•
Always keep an area of 3 meters surrounding the processor clean. Keep dust, wood shavings, scrap
paper, or other flammable materials out of the dryer compartment.
•
A functional 5 kg ABC fire extinguisher must be available in the room in which the processor is installed.
•
The dryer compartment produces heat. Paper or other flammable materials can ignite.
CAUTION: Hot Surface
The dryer compartment produces heat. The dryer parts and covers get hot. Do not touch the dryer parts or
covers when the processor is in operation. Be careful of hot surfaces.

CHSP-9039 | 2021-09-10 6
CAUTION: Chemical Hazards
Corrosive Liquids
CAUTION:
•
Chemicals may irritate the eyes, lungs, skin, and digestive tract.
•
Eyes, skin, and lungs may be irritated by photo chemicals. Before using photo processing chemicals,
always read the Material Safety Data Sheets (MSDS) for information about the hazards of the specific
chemicals, the procedure to use them safely, and the contact information for the chemical manufacturer
or dealer.
•
When handling chemicals, wear safety goggles, protective gloves, and chemical aprons as indicated on
the MSDS.
•
To avoid hazardous situations, always keep the floors and floor coverings around the processor and
associated drains clean and dry. Immediately clean and remove any accumulation of fluids outside the
film processor.
•
Check for proper ventilation in the areas where chemicals are prepared, used, or stored.
•
Drain the tanks carefully and avoid splashing. Always drain the system thoroughly before working on
any of the external hose systems. Do not allow untrained personnel to handle the photo processing
chemicals or to operate the film processor.
Chemical Disposal
CAUTION:
•
Waste from photographic processing normally contains diluted chemicals. These chemicals should be
collected and disposed of in accordance with local environmental codes. Dumping chemicals into a drain
system could lead to a pollution problem. Contact your local water treatment and sewer district
authorities before disposing of chemicals.
•
All plumbing must comply with local and national codes. The drain must be made of chemical-resistant
and non-corroding material. Use PVC or an equivalent material.
Exhaust, Temperature, and Humidity
CAUTION:
•
Proper ventilation is necessary to receive the correct processing results. Check that the exhaust hose of
the built-in exhaust fan is properly connected to the exhaust air socket.
•
The built-in exhaust fan removes the fumes from the film processor. These chemical fumes are corrosive.
•
The top cover and the feed cover lid of the film processor should be left slightly open overnight.
•
Take care when draining the processor tanks for cleaning with running water. All racks must be
removed from the film processor for cleaning.

CHSP-9039 | 2021-09-10 7
IMPORTANT:
Room temperatures between 15–30 ˚C (59–86 ˚F) with a relative humidity from 40–76 % are ideal for
photographic processing and working.
Handling Chemicals and Preventing Accidents
CAUTION:
•
Misuse of almost any chemical can create a hazard. Although photo chemicals are not more dangerous
than most of the regular cleaning agents, there is always a risk.
•
When handling chemicals, observe the following:
•
Never smell into a container or an open bottle to determine its contents. A cautious sniff of the cap
or lid is safer.
•
Label the storage containers properly.
•
Avoid storing hazardous chemicals on high shelves or in unprotected glass containers.
•
Keep chemicals away from children.
•
Do not store chemicals in a refrigerator that is used for food. The chemicals can contaminate the
food or be mistaken for food.
•
Observe the manufacturer’s recommendations for using and mixing chemicals.
•
Overexposure to photographic chemicals may cause skin irritation on some individuals.
•
For photographic chemical emergencies, remember these first aid procedures:
• Skin—Rinse thoroughly with water.
• Eyes—Rinse thoroughly with water and consult a physician.
• By Mouth—Consult a physician immediately.
WEEE and RoHS Compliance Statement
European Union (EU) Directives WEEE and RoHS
We are committed to being a good corporate citizen. As part of that commitment, we strive to maintain
environmentally conscious manufacturing operations. The European Union (EU) has enacted two directives. The
first directive, Waste Electrical and Electronic Equipment (WEEE) is for product recycling. The second directive,
Restriction on the use of Hazardous Substances (RoHS) is for limiting the use of certain substances. Carestream
ensures that products marketed in Europe are compliant with both regulations.
In the European Union, this symbol indicates that when the last user wishes to discard
this product, it must be sent to the appropriate facility for recovery and recycling.
Contact your local representative for additional information on the collection and
recovery programs available for this product.
CAUTION:
•
Do not dispose the product with municipal waste.
•
Special collection and disposal are required.
For the original directive text, see:
https://eur-lex.europa.eu/legal-content/EN/TXT/?uri=CELEX%3A32006L0066&qid=1628026152001.
You can also locate the current directives using the link above.
For more information, see the EPBA web site, http://www.epbaeurope.net.

CHSP-9039 | 2021-09-10 8
Tanks and Chemicals
Draining the Tanks
CAUTION:
Wear safety goggles, gloves, and protective clothing.
ESD:
Isolate the film processor from the mains power by switching the main power switch of the film processor to the
off (0) position.
IMPORTANT:
Used developer and used fixer must be collected in suitable and separate containers.
1. Check that the containers for the developer and fixer have sufficient space available.
2. Open the drain taps for the developer, the fixer, and the wash from the film processor to remove the
chemicals and water as shown below.

CHSP-9039 | 2021-09-10 9
Drain taps:
IMPORTANT:
When the tanks are empty, keep the main power switch of the film processor in the off (0) position to avoid the
danger of the pumps running dry and causing damage.
Before filling the tanks:
•
Check that all drain taps are fully closed.
•
Check the chemical tank levels before switching the main power switch of the film processor to the on
(|) position.
Installing the Transport Racks
CAUTION:
•
Wear safety goggles, gloves, and protective clothing.
•
When handling the racks, always hold them at the upper cross beams
.
It is recommended that two
persons handle
the racks.
ESD:
Isolate the film processor from the mains power by switching the main power switch of the film processor to the
off (0) position.
Remove all packing materials before installing the racks.
Rinse the tanks with water and then fill each with respective working solutions to the red marker on the
tank wall.
The supporter of the racks must be completely set into the grooves of the tank.
Rack 1 In the developer tank
Rack 2 In the fixer tank
Rack 3 In the wash tank
Dryer In the dryer

CHSP-9039 | 2021-09-10 10
Take care that all gears are installed as shown:

CHSP-9039 | 2021-09-10 11
Additional Connection for the Fix Rack
Open/close thehose connectorbypressingthe markedbutton:
Fix Rack
IMPORTANT:
Pay special attention to the roller configuration about the fix rack!
1-Steel roller Ø (diameter) 19 mm
2 PE roller Ø 26 mm
3 Special PE roller Ø 32 mm
Separate package for rollers:

CHSP-9039 | 2021-09-10 12
Filling the Tanks
CAUTION:
•
Wear safety goggles, gloves, and protective clothing.
•
Check that all related chemical safety datasheets are available.
IMPORTANT!
•
Only use chemicals suitable for roller transport systems.
•
Follow the instructions of the chemical manufacturers.
•
Even the smallest quantity of fixer will contaminate the developer solution. Therefore, always fill the
fixer first. When removing the fixer rack, always cover the developer tank. After removing the fixer rack,
place onto a rack carrier/drip tray (optional accessory).
ESD:
Isolate the film processor from the mains power by switching the main power switch of the film processor to the
off (0) position.
Fill the Fixer Tank
1. Empty fixer tank by opening the fix drain tap.
2. Remove the fixer rack.
3. Check that the fixer tank is free of foreign material.
4. Close the fix drain tap.
5. With fixer solution that is ready to use, fill the fixer tank to the red marker on the tank wall.
6. Insert the fixer rack very carefully and slowly.
7. Add hardener solution if advised by the chemistry manufacturer.
Fill the Developer Tank
1. Empty the developer tank by opening the developer drain tap.
2. Remove the developer rack.
3. Check that the developer tank is free of foreign material.
4. Close the developer drain tap.
5. With developer solution that is ready to use, fill the developer tank to the red marker on the tank wall.
6. Insert the developer rack very carefully and slowly.
The replenishment tanks may be used to mix the chemicals. Any remaining chemicals can be used for
replenishment.

CHSP-9039 | 2021-09-10 13
Operating the Film Processor
IMPORTANT:
In countries where the electrical supply is 60 Hz, the replenishment pumps must be adjusted to ensure that they
deliver the recommended replenisher amount. Contact a qualified service provider to check and make
adjustments if needed.
Daily Startup
1. Turn on the water supply.
2. Check that all tank levels are full.
3. Check that the water supply is on.
4. Press the main power switch of the processor to the on (|) position.
5. Wait for the processor to heat up. A Ready message appears.
Starting Work
1. Check the level of the replenishment containers for the developer and fixer.
2. Check level of the waste containers for the developer and fixer.
3. Select the required program.
4. Insert a minimum of two full-sized cleaning films.
5. When inserting the films, always check the free signal, provided on the display.
6. Check that the feed rollers accept the films and transport them smoothly.
7. Insert large format films parallel, or in-line, with the direction of the film transport.
8. Put a leader on roll films.
9. Fold the leading edge on roll paper.
Daily Shutdown
CAUTION: Hot Surface
The cover of the drying rack might be hot. Do not touch.
1. Turn off the water supply.
2. Press the main power switch of the processor to the off (0) position.
3. Open water drain tap to prevent algae growth in water tank.
IMPORTANT:
4. Lift the top cover to prevent condensation.

CHSP-9039 | 2021-09-10 14
Functions
Function Description
Programming Automatic processing parameters, such as temperature, speed, and
replenishment rates, can be stored in nine different programs.
Warming up Once programmed, the temperature settings are accurately controlled.
Heating starts with switching on at the mains. Constant solution temperatures
are maintained in the processing tanks. Temperature tolerances of ±0.2 ˚C are
achieved by the microprocessor control unit. The solutions are circulated by the
circulation pumps. When the temperature reaches the pre-set levels, the film
processor enters Standby mode and is ready for use.
Standby Soon after the last film exits the dryer and with the infeed sensors clear, the film
processor automatically enters a Standby/Energy Saving mode. While in the
Standby mode, the film processor maintains the Production Ready status.
Anti-Crystallization Cycle During Standby mode and within a programmable cycle period, the transport and
intermediate rinse bath water supply are activated to prevent a build-up of
crystallization on the crossover rollers.
Anti-Oxidation Cycle During Standby mode and when no material is processed for a set time, a pre-
programmable anti-oxidation (replenishment) cycle is available to compensate for
the impact of oxidation of the chemicals during Standby mode. The chemical
levels in the tanks are increased, compensating for evaporation of the water in
the solutions during Standby mode.
Auto Replenishment Infrared sensors scan the film area without any direct contact to the film. After a
pre-programmed amount of film or a film area has entered the processor, a
replenishment cycle is activated.
Automatic Start-Stop Infrared sensors automatically control the start cycle of the film processor. The
processor changes from Standby to Run when a film interrupts the light barrier.
As the rollers turn, water is supplied to the wash tank and to the intermediate
rinse bath system. After the last film has passed through, the film processor
reverts to Standby. The film is then removed from the receiving and
collection tray.

CHSP-9039 | 2021-09-10 15
Using the Display
Overview
1 Back light on and off
2
Check errors and alarm shutdown
3
Setup mode
4 Return to the top menu
5
Manual operation
6
Move the cursor
7
Select the menu item and change the value
8
Scroll down the page
Feature
Description
Software version AT800 v2.8r09p and up
Number of programs 9
Temperature range for
the developer and fixer
18.0 to 43.0 ˚C
Temperature range for
the dryer
18 to 60 ˚C
Temperature control
tolerances
±0.2 ˚C
Temperature
measurement resolution
0.03 ˚C
Developing time
tolerances at maximum
speed
±0.2 ˚C
Motor speed Quartz-stabilized and
controlled by a separate
microprocessor

CHSP-9039 | 2021-09-10 16
Programming the Values
IMPORTANT:
•
Only authorized service technicians can set the values in the Setup menu. Although you can select the
menus, scroll through the data, and make changes, the Save feature is disabled.
•
Use the Program menu only during Standby mode when the film processor is not processing media.
•
RS232 appears as an option when a COLENTA Autoloader is in use.
1. Press the main power switch of the film processor to the on (|) position. By default, the processor starts
in the working mode.
2. Press button 3. The programming menu appears.
3. Press button 6to move the cursor to Program, and press button 7to select Program. The Set time
menu appears. See Setting the Date and Time to set the date or time.
4. Press button 7to modify the program.
5. Press button 6to move the cursor to Modify, and press button 7to select Modify. The program
consists of four pages.
6. Press button 8to scroll through the pages.
7. When the page you want appears:
a.
Press button 6to move the cursor to the value you want to set.
b.
Press button 7to select and change the value.
c.
Repeat a and b for each value you want to set.
8.
If you want to:
Save and store the values
Cancel the values
Press button 6to move the cursor to Save,
and press button 7to store the values.
Press button 6to move the cursor to Cancel,
and press button 7to cancel the values.
NOTES:
•
If any of the values are set too high or too low, first an Out of range message appears for two
seconds and then the page to change the value appears.
•
A parameter that was set too high automatically resets to the maximum possible value.
•
A parameter that was set too low automatically resets to the minimum possible value.
•
To set the highest or lowest value, you can intentionally set a value that is out of range and save it.
9. To return to the work mode, press button 4.
Changing the Program
1. Press button 5to change the program. The following options appear:
•
Start, P1, and Use are only available when the film processor is not processing media.
•
Rep and Monitor are available when processing and not processing film.
2. Press button 6to move the cursor to P1, and press button 7to select a different program.
3. Press button 6to move the cursor to Use, and press button 7to select Use.
NOTE:
A cyclic redundancy check is used to verify the data that is read from the non-volatile memory. If the
program data is damaged, the program was set up incorrectly, or the EEPROM was replaced, then the
error message Program invalid appears. Enter the programming mode and program the data again.
4. To return to the work mode, press button 4.

CHSP-9039 | 2021-09-10 17
Setting the Date and Time
1. Press button 3.
2. Select:
•
Program
•
Set time
3. Press button 7.
4. Set the date and time. This has no impact on the film processor’s functions.
5. If you want to:
Save and store the values
Cancel the values
Press button 6to move the cursor to Save,
and press button 7to store the values.
Press button 6to move the cursor to Cancel,
and press button 7to cancel the values.
6
.To return to the work mode, press button 4.
Check the Parameters and the Work in Progress in Automatic Mode
The film processor is designed to operate automatically. Under normal conditions, use the display to check the
processing parameters and the work in progress.
1. Press button 8to scroll through the pages.
2. To return to the work mode, press button 4.
If the display says: Description
P1 Program 1 is in use.
M1 The film processor was started manually.
55% Done 55% of the developing process is complete. When it reaches 100%, the
film processor changes to Standby mode.
T1= The actual temperature in tank 1 for the developer appears. The same
indication is available for tank 2 for the fixer and tank 3 for the dryer.
The value is the programmed temperature.
Rep 1 The developer replenishment rate for tank 1 is indicated.
Rep 2 The fixer replenishment rate for tank 2 is indicated.
Tank1 time The developer immersion time is indicated.
Dry to dry The amount of time for a complete processing cycle is indicated.
Film speed The linear speed of the media inside the film processor is indicated.
USB not conn. For service personnel only
Stage 28 70,0%
R1=1 R2=0 SR=80
"Stage" shows the actual dryer power used.
"R1" = state of the 50% power relays
"R2" = state of the 25% power relays
"SR" = On / OFF Ratio of the 25% power Solid state relays.
Explanation of the example shown: (50% x 1) +( 25% x 0) + (25% x 80%)
= 70%
Feeder speed Speed of the feeder. Only when a COLENTA autoloader is in use.
Film location Used to monitor the films from the feeder to the film processor. Left side:
loader / Right side: film processor.
-…. no film / o…. film

CHSP-9039 | 2021-09-10 18
Use the Options in Standby Mode
The film processor has anti-oxidation and anti-crystallization cycles. During Standby mode, the film processor
rotates the transport and starts the wash at regular intervals to prevent crystallization (anti-crystallization) on the
rollers. At programmable time intervals, anti-oxidation activates a replenishment cycle to prevent oxidation of the
chemicals. During this cycle, the film processor accepts the media.
1. Press button 3.
2. Select:
• Options
• Standby
3. Press button 7.
4. Press button 8to scroll through the pages (see below for more details).
5. When the page you want appears:
a. Press button 6to move the cursor to the value you want to set.
b. Press button 7to select and change the value.
c. Repeat a and b for each value you want to set.
6. If you want to:
Save and store the values Cancel the values
Press button 6to move the cursor to Save,
and press button 7to store the values.
Press button 6to move the cursor to Cancel, and
press button 7to cancel the values.
7. To return to the work mode, press button 4.
If the display says Description
SB dryer drop 10 The dryer drop is a value that defines how many
degrees C the dryer temperature can go below the
programmed value when the film processor is in
Standby mode.
When the temperature decreases by 10 ˚C, the
heater and fan are activated to warm up the dryer.
SB replenishment 100 ml each 6 h The film processor will activate a 100 ml
replenishment cycle every six hours (anti-oxidation
cycle).
SB self-cleaning 20 cm each 10 min The film processor activates two roller turns (one
roller turn = 10 cm) every 10 minutes
(anti-crystallization cycle).
Save Saves and stores the value
Cancel Cancels the value

CHSP-9039 | 2021-09-10 19
Use the Manual Replenishment Cycle
There may be times, such as cleaning, when you need to run the replenishment cycle manually.
1. Press button 5, and then select Rep.
2. Select Rep 1 for replenishment tank 1. This adds 100 ml. The Off indicator changes to On, indicating
that the replenishment pump is working.
3. To add more replenishment, press button 7. Add the replenishment in quantities of 100 ml. You do not
need to wait for the replenishment pump to finish.
4. Repeat steps 3 and 4 for Rep 2.
NOTE:
A quantity of 2000 ml of manual replenishment or a maximum working time of 25 minutes for the
pump is allowed (whichever is greater).
5. To return to the work mode, press button 4.
Check the Errors
At the start of the workday, the temperature in the tanks is likely to be low. As a result, the ER indicator appears
without an alarm. If the temperature in the tanks decreases during the workday, the alarm is activated. If an
error occurs, P1 or M1 will alternate on the display with ER.
1. Press button 2to stop the alarm and access the Error menu.
2. Press button 8to scroll the page and view additional errors.
3. Resolve the error. See the section: Error Messages.
4. To return to the work mode, press button 4.
Start and Stop the Film Processor Manually
You can start and stop the film processor manually only when the film processor is not processing the media.
When the film processor is processing the media, you cannot move the cursor to select these options.
When you start the motor manually, M1 (not P1) appears on the main page.
To run the motor manually:
1. Press button 5to access manual operation.
2. Press button 6to move the cursor to Start, and press button 7to and select Start. This starts the
motor. The Start option changes to Stop.
3. Press button 7to stop the motor.
4. To return to the work mode, press button 4.
Turn the Back Light On and Off
In a dark room, it might be necessary to turn off the display’s back light to prevent exposure. You may also want
to turn the back light off if the film processor is unattended, thereby reducing the likelihood of unauthorized
individuals operating the film processor. Press button 1to toggle the back light on and off. When the back light
is off, only button 1is enabled.
Loading the Film
To prevent the film from overlapping during loading, you must maintain a minimum distance between the films.
If you see the message, Don’t feed, wait until the message disappears. A feed signal indicates that you can load
the film.

CHSP-9039 | 2021-09-10 20
Using the Monitor Mode
Use the monitor mode to check some of the parameters of the film processor.
1. Press button 5to access manual operation.
2. Press button 6to move the cursor to Monitor, and press button 7to and select Monitor. The
parameters appear.
3. Press button 8to scroll through the pages.
4. To return to the work mode, press button 4.
If the display says: Description
The first DDDD represents the developer tank, FFFF represents the fixer tank,
WWWW represents the water, and the last DDDD represents the dryer. The
dashes indicate the position of the media in the film processor. The wash and
crossover water flow only during a process cycle for water saving. Each film is
tracked while it is in the film processor. The software can track up to 70 films.
Two films running in parallel are tracked as one film. Tracking starts when the
film enters the infeed sensor bar.
The motor is on or off. The speed is 19 tach pulses. The number of pulse counts
from the tacho motor is 001.
A six-position sensor bar is the norm for the film processor. This includes the
loading area. A visual check on the programmed area replenishment cycle
occurs every 0.125 sq meter.
This feature checks the six integrated sensors. To check the sensors:
Place a small piece of film under each sensor, sequentially and one at a time. Do
not feed the film into the film processor. When moving the film, check the
display:
Sensors 1 and 0 are occupied.
Sensors 3 and 2 are occupied.
Heater tank 1 is off. Heater tank 2 is off. The heater dryer is on. The dryer fan is
on. The wash valve is on. The crossover is on.
The automatic developer and fixer tank fill when the switches for the in-tank
levels are installed.
The total area of the film that was loaded into the processor is displayed.
The date and time are displayed.
This manual suits for next models
1
Table of contents
Other Carestream Laboratory Equipment manuals