CarKids 360 User manual

360°
GROUP /GROEP
GROUPES /GRUPPE
0/0/II/III
ISOFIX
ECE R44/0
ECE R44/0
4
APPROVED - ISOFIX
APPROVED - ISOFIX
APPROVED - ISOFIX
AUTOSTOEL 360°
CAR SEAT 360°
SIÈGE AUTO 360°
AUTOSITZ 360°
ENGLISH / NEDERLANDS
FRANÇAIS / DEUTSCH
0-36 kg
0-12 year/jaar/ans/Jahr
50-135 cm
INSTRUCTIONS MANUAL / HANDLEIDING
MODE D’EMPLOI / BEDIENUNGSANLEITUNG

2
EN
Index
Only suitable for use in the listed vehicles tted with 3 point with retractor safety
belts, approved to ECE Regulation No. 16 or other equivalent standards.
1. Notice ......................................................................................................................................................................................3
2. Use in the vehicle ................................................................................................................................................5
3. Car Seat Components .................................................................................................................................8
4. Care and Maintenance...............................................................................................................................11
5. lnstallation .................................................................................................................................................................... 17
6. Removal Fabric Cover and Assembly .........................................................................22
7. Cleaning .......................................................................................................................................................................... 26
8. Checklist .........................................................................................................................................................................27
9. Warranty ....................................................................................................................................................................... 28

3
EN
1. Notice
WARNING
• Read this instruction manual carefully.
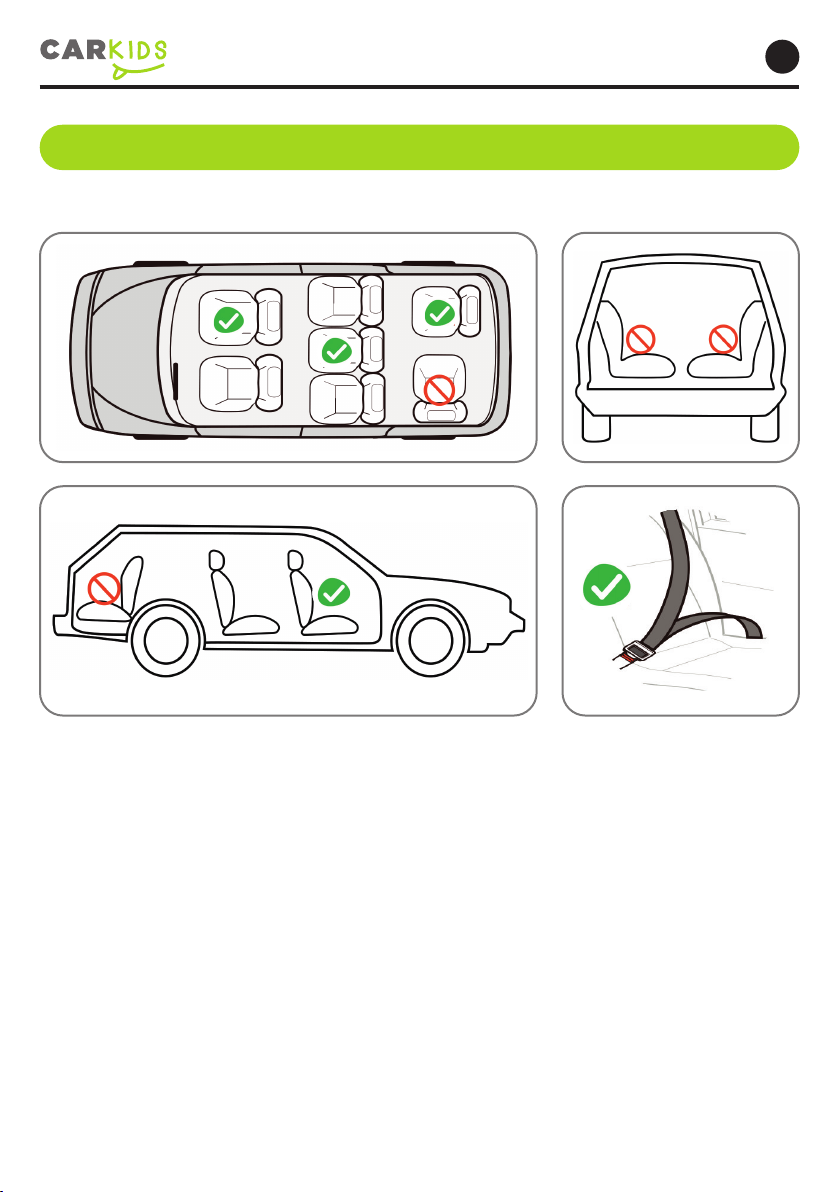
• Thecorrectttingof3-pointbeltortheISOFIXanchoringsystemsisofvital
importanceforthesafetyofyourchild.
• Forthefutureuseoftheseat,itisimportantthatyoukeeptheinstruction
manual carefully.
• Neverleaveyourchildunattendedinthecar.
• Donotuseachildsafetyseatifthevehicleseatisequippedwithfrontairbags.
Thiscanbedangerous.Thisdoesnotapplytoso-calledsideairbagsorincase
theairbagscanbeswitchedoff.Pleaserefertothecarmanualand/ordealer.
• Before use our product, please read the instruction manual carefully, the product
is a safety product and is only safe when used in accordance with the instruction
manual.
• The product has been approved according to the strictest European safety stan-
dards (ECE R44/04) and is suitable for Group 0+(0-13kg), Group I (9-18kg), Group
II (15-25kg) and Group Ill (22-36kg).
• After an accident the seat may become unsafe due to damage that may not be
noticeable immediately. It should therefore be replaced.
• We advise you strongly that not to use a second- hand product, because you are
not sure what has happened to it. The harness pads are important for the safety of
your child, therefore use them at all time.
• Ensure that all luggage and objects likely to cause injury in the event of an acci-
dent are properly secured.
• The rigid items and plastic parts of a child restraint shall be so located and instal-
led that they are not liable, during everyday use of the vehicle, to become trapped
by a movable seat or in a door of the vehicle.
• Any straps holding the restraint to the vehicle should be tight; restraining the child
should be adjusted to the child’s body, and should not be twisted.
• It is important to ensure that any lap strap is worn low down, so that the pelvis is
rmly engaged, shall be stressed.

4
EN
• The child restraint system should be changed when it has been subject to violent
stresses in an accident.
• It is dangerous to make any alterations or additions to the device without the
approval of the Type Approval Authority, and it is also dangerous not following
closely the installation instructions.
• Be sure that children are not left in their child restraint system unattended.
• Be sure that any luggage or other objects liable to cause injuries in the event of
a collision shall be properly secured.
• The child restraint shall not be used without the cover; The seat cover should not
be replaced with any other than the one recommended by the manufacturer.
• Do not use any load bearing contact points other than those described in the
instructions and marked in the child restraint. Please contact the child restraint
manufacturer if in doubt about this point.
• It is extremely danger to use any load bearing contact points other than those
described in the instructions and marked in the child restraint.
• Please read the car manufacturer’s handbook during use of child restraint system
with ISOFIX.
QUESTIONS
Contact your supplier or importer if you wish to make a warranty claim or have any
other questions. Your car seat can be xed safely on almost all seats of the cars.
However, on some seats the belts are xed so that proper installation is not possible,
in that case, try another seat.

5
EN
2.Useinthevehicle
•DONOTusewith2-pointbelt.Pleaseinstallwiththe3-pointbelt.
•Pleaseobservetheregulationsapplicabletoyourparticularcountry.
•ThesafetybeltmustbeapprovedtoEGER16oracomparablestandard.
•Donotusewith2-pointbelt.
•Canbeusedifthevehicleseatisequippedwitha3-pointbelt.
You can use your child car seat as follows:

6
EN
In the direction of travel Yes
Against the direction of travel Yes
With 2-point belt No
Theuseofa2-pointbeltsubstantiallyincreasestheriskof
injurytoyourchildintheeventofanaccident.
With 3-point belt Yes
ThesafetybeltmustbeapprovedtoECER16oracomparable
standard(seetestlabelonbeltwithan“E”or“e”inacircle).
With the ISOFIX and Top Tether anchoring systems Yes
lfthereisafrontairbag:Slidethepassengerseatalongwayback
andrefertoanyinstructionsinvehicleowner’smanual.
On front passenger seat Yes
Donotuseonpassengerseatswithafrontairbag!Thefrontpassengerseat
maybeusedwithorwithoutISOFIX,withthesamenotesascurrentlygiven
fortheISOFIX(slidetheseatbackandrefertovehicleinstructions).
On outer rear seat Yes
On center rear seat Yes
Canbeusedifthevehicleseatisequippedwitha3-pointbelt.
(Please observe the regulations applicable to your particular country)

7
EN
Theseathastwoinstallationmethods,thefollowingtableshowstheinstallation
typesforeachgroup:
Group Facing
towards
Seat installation
method Child installation
0+, I (0-18 kg) Rearward
Facing
ISOFIX + TOP
TETHER ISOFIX
Class, C
With 5-point
harness
I (9- 18 kg) Forward
Facing
ISOFIX + TOP
TETHER ISOFIX
Class, B1
With 5-point
harness
II, III (15-36 kg) Forward
Facing
FIX +3-point
vehicle belt Vehicle belt

8
EN
3.CarSeatComponents

9
EN

10
EN
No. Name No. Name
1Headrest 10 Headrest handle
2Red belt guide hook 11 Harness
3Fabric cover 12 Backrest reclining handle
4Shoulder pad 13 Backrest rotating handle
5Cushion 14 Base
6Buckle 15 Top Tether
7Crotch pad 16 Backrest
8Adjusting device 17 ISOFIX Button
9Harness adjustment strap 18 ISOFIX Connector

11
EN
4. Care and Maintenance
4.1 How to use the harness buckle
4.1.1 Guide the two buckle latches together.
4.1.2 Make sure right side up.
4.1.3 Engage them before putting them into the harness buckle,
this should make a CLICK noise.
4.1.4 Pull shoulder be its to remove all slack from the lap section ensuring
the harness lies at and harness buckle locked. Open the harness buckle
by pressing the red button.
4.2 Care for the harness buckle
lt is vital for the safety of your child that the harness buckle works correctly.
Malfunctions of the harness buckle are usually caused by accumulations of
dirt or foreign bodies.
Possiblemalfunctions:
• The buckle latches are ejected only slowly when the red release button is pressed.
• The buckle latches will no longer lock (i.e. they are ejected again if you try to
push them in).
• The buckle latches engage without an audible CLICK.
• The buckle latches are difcult to insert (you feel resistance).
• The buckle only opens if extreme force is applied.
4.3 Remedy
Wash out the harness buckle so that it functions properly once again.

12
EN
4.4 Removing 5-point harness
4.4.1 Loosen the 5-point harness of the child seat as much as possible by
pressing the button of the crotch belt.
4.4.2. Turn the baby safety car seat to back, unzip the seat cover.
4.4.3. Loosening the shoulder belt in order to access the metal link and
connector at the back of the child seat, remove the belt from connector,
then remove the shoulder belt from metal link.
4.4.4 Then from the front of the child seat, pull out shoulder belt through
the slots.
4.4.5 Pull below both, the shoulder pads and the belts to the front through
the slots. (front side of the chiId seat).
4.4.6 Remove the shoulder pads from the shoulder belts and put them in
the storage bag.
4.4.7 Roll the shoulder belts separately on both side and place them into
the fabric cover from the slot of fabric.

13
EN
4.4.8 Grasp the metal plate from underneath and turn it into a vertical position.
Push upwards and slide the metal plate through the slot.
4.4.9 Remove the harness buckle with the crotch pad and store it in the
storage bag.
4.5 Cleaning the harness buckle
4.5.1 Open the harness buckle (press the red button).
4.5.2 Grasp the metal plate from underneath and turn it into a vertical position.
4.5.3 Slide the metal plate through the slot.
4.5.4 Remove the harness buckle.
4.5.5 Soak the harness buckle in warm water with washing-up liquid for at
least an hour. Then rinse and dry it thoroughly.
4.6 Adjust the angle of child safety car seat
There are 3 levels adjustment in the child safety car seat. Before xing a child in
the child restraint system, the seat must be set on the recline position for
rear-facing use or in the sitting position for forward-facing use.
To achieve that, use the recline handle located in front of the child restraint system
between the sitting part and the base to adjust the desired position.

14
EN
Use backrest reclining
handle to adjust the
position 1, 2 and 3 when
forward facing installation.
Adjust the reclining angle
to position 3 rst, then
use backrest rotating
handle to swivel the seat
180° for rearward facing
installation.
Position 3 is advised when facing rearward.

15
EN
4.7 Adjust the length of harness
In order to protect your child much better, after xing him/her in the child
restraint system and lock the buckle, you should tighten the harness so they are
snug and at against the child’s body, they should never be twisted or loose.
4.7.1 To tighten the harness, pull the shoulder belt upwards to remove the slack
from the lap sections of the harness, at the same time to pull the adjuster
crotch belt coming from the lock by your other hand.
4.7.2
To lengthen the harness, press the button on lock between the child’s
two legs, then pull the two shoulder belt simultaneously in your direction,
please note while you are doing this hold the harness, not the harness cover.
CAUTION!Checkthattheharnessstrapsarenottwistedandthattheyhavebeen
correctlyinsertedinthebeltslotsonthecover.
4.8 Adjusting the headrest in an installation with a 5 point harness. Group 0+ and I.
4.8.1 A correctly adjusted harness ensures that the diagonal seat belt section
is positioned, and gives your child the optimal protection.
4.8.2 The harness must be adjusted to that there is a space two ngers wide
between the harness and your child’s body.
4.8.3
A correctly adjusted headrest ensures optimal protection for your child in
the safety seat: shoulder belts are at the same level as your child’s shoulders.

16
EN
4.8.4 Pull the headrest handle, the shoulder straps will be moved together,
select correct height and x them in the correct position for the child
by releasing the headrest handle.
Pull the headrest handle
4.9 Adjusting the headrest in an installation that uses the vehicle safety belt – groups
II and III.
4.9.1 A correctly adjusted headrest ensures that the diagonal seat belt section
is optimally positioned, and gives your child the optimal protection.
4.9.2 The headrest must be adjusted so that a space equivalent to two ngers
remains between the headrest and the child’s shoulders.
4.9.3 Pull the headrest handle to adjust headrest to the correct height,
then release the headrest handle. Place the safety seat on the car seat,
put the child in the seat and check the height.
4.9.4 Repeat the process until the correct height is achieved.

17
EN
5. lnstallation
WARNING:
Don’tuseforwardfacingbeforethechild’sweightislessthan9kg.
5.1 Group 0+I (birth to 18kg) – Install Rearward Facing
5.1.1 Check the safety seat is ready to be installed rearward facing (Group 0+I),
pull the backrest reclining handle to recline the seat fully, adjust the angle
of recline to position 3, then release the handle.
5.1.2 lt is necessary swivel the seat 180° to place the seat in the opposite
direction of travel. Release the backrest rotating handle when the seat is
in the desired position.
5.1.3 Locate the ISOFIX arms in the base of the seat.
5.1.4 Place the seat in the back seat of the vehicle in the opposite direction
of travel.
5.1.5 Hold the safety seat with bath hands and insert the two ISOFIX arms
rmly into the vehicle’s ISOFIX anchoring points until they fasten with
a click on both sides. The red button will change to green on both sides.
5.1.6 Shake the seat to check that it is correctly anchored to the vehicle’s
ISOFIX points.
5.1.7 Pull out the Top Tether and press the tether strap release button to
extend the strap until it is long enough to connect it to the Top Tether
anchorage point in the vehicle. lf the Top Tether is tightened favorably
and correctly, the button will change to green.
5.1.8 Make sure the 5-point harness of safety seat has been correctly installed
(see section 4.1)
5.1.9 Open the buckle, put the shoulder harness to the sides, then put the child
into the safety seat. Please check if shoulder harness height is equal to
your child’s shoulder height, press the adjusting device and pull the
shoulder harness to be loose, then press the headrest handle to
adjust the shoulder harness to the suitable position.
5.1.10 Slide the two tongues together into the buckle. The buckle will not work
well till you hear “click”. Adjust the child restraint belt to make sure the lap
belt is well restrained the child’s pelvis. Then tighten the shoulder straps
by pulling the adjustable strap at the front of the bottom cushion.
5.1.11 lf you want to release your child from the safety seat, press the adjusting
device at the front of the bottom, at the same time pull the shoulder
straps. Then press the red button on the buckle, place the shoulder straps
at the side and let your child out.

18
EN
5.1.12 The insertion guides facilitate the installation of the safety seat with the
aid of the ISOFIX securing points and prevents damage to the upholstery.
When not in use they should be removed and stored in a safe place.
In vehicles with a reclining back the insertion guides should be removed
before the seat is reclined. Problems that may arise are generally the
result of accumulation of dirt or foreign bodies in the insertion guides and
the clasps. To solve this type of problem simply clean the part in question.
Uninstalling the ISOFIX system
1. To free the Top Tether, press the button and pull the tether strap in the
opposite direction (the indicator will change from green to red color),
in order to take off the top tether.
2. To free the ISOFIX anchoring, press backwards the ISOFIX System unlock
buttons (the indicator will change from green to red color), in order to free
the seat from the vehicle ISOFIX anchoring system.

19
EN
5.2 Group I (9 to 18kg) lnstall Forward Facing
5.2.1 Ensure the seat is ready to install in forward facing (Group I), pull the
backrest reclining handle to adjust to angle to position 1, 2 or 3,
then release the handle.
5.2.2 lt is necessary swivel the seat 180° to place the seat in the direction
of travel. Release the backrest rotating handle when the seat is in the
desired position.
5.2.3 Locate the ISOFIX arms in the base of the seat.
5.2.4 Place the child safety seat in the back seat of the vehicle facing in the
direction of travel.
5.2.5 Hold the child seat with both hands and insert the two ISOFIX arms rmly
into the vehicle’s ISOFIX anchoring points until they fasten with a click on
both sides. The red button will change to green on both sides.
5.2.6 Shake the seat to check that it is correctly anchored to the vehicle’s
ISOFIX points.
5.2.7 Pull out the Top Tether and press the tether strap release button to
extend the strap until it is long enough to connect it to the Top Tether
anchorage point in the vehicle. lf the Top Tether is tightened favorably
and correctly, the button will change to green.
5.2.8 Make sure the 5-point harness of safety seat has been correctly installed
(see section 4.1)
5.2.9 Open the buckle, put the shoulder harness to the sides, then put the child
into the safety seat. Please check if shoulder harness height is equal to
your child’s shoulder height, press the adjusting device and pull the
shoulder harness to be loose, then press the headrest handle to adjust the
shoulder harness to the suitable position.
5.2.10
Slide the two tongues together into the buckle. The buckle will not
function well till you hear “click”. Adjust the child restraint belt to make
sure the lap belt is well restrained the child’s pelvis. Then tighten the
shoulder straps by pulling the adjustable strap at the front of the
bottom cushion.
5.2.11 lf you want to release your child from the safety seat, press the adjusting
device at the front of the bottom, at the same time pull the shoulder
straps. Then press the red button on the buckle, place the shoulder straps
at the side and let your child out.
5.2.12 The insertion guides facilitate the installation of the safety seat with the
aid of the ISOFIX securing points and prevents damage to the upholstery.
When not in use they should be removed and stored in a safe place. In
vehicles with a reclining back the insertion guides should be removed
before the seat is reclined. Problems that may arise are generally the
result of accumulation of dirt or foreign bodies in the insertion guides and
the clasps. To solve this type of problem simply clean the part in question.

20
EN
Note:
Usebackrestrotatinghandletoswiveltheseat180°forforwardfacinginstallation,
backresthangerandL-backresthangerarehookedeachother.
Uninstalling the ISOFIX system
1. To free the Top Tether, press the button and pull the tether strap in the
opposite direction (the indicator will change from green to red color), in order
to take off the top tether.
2. To free the ISOFIX anchoring, press backwards the ISOFIX System unlock
buttons (the indicator will change from green to red color), in order to free the
seat from the vehicle ISOFIX anchoring system.
5.3 GROUP II/III (15 to 36kg) – lnstall Forward Facing: belt+Fix or belt only
For belt+Fix, please refer to 5.3.1-5.3.10
For belt only, please refer to 5.3.1-5.3.5, then turn to 5.3.8-5.3.10.
5.3.1 Ensure that the child seat’s 5-point harness and buckle are removed
correctly (see 4.4)
5.3.2 Ensure the seat is ready to install in forward facing (Group II/III),
pull the backrest reclining handle to adjust to angle to position 1 , 2 or 3,
then release the handle.
5.3.3 lt is necessary to swivel the seat 180° to place the seat in the direction
of travel. Release the backrest rotating handle when the seat is in the
desired position.
5.3.4 Before installing the safety seat, place your child in the seat and adjust
the headrest to the correct height (see 4.9)
5.3.5 Place the child safety seat in the back seat of the vehicle facing in the
direction of travel.
Table of contents
Languages:
Other CarKids Car Seat manuals