Carmanah SPEEDCHECK Parts list manual

Carmanah Technologies Corp. | 250 Bay St, Victoria, BC V9A 3K5, Canada | 1.250.380.0052 | customersupport@carmanah.com | carmanah.com 2
SOLAR CHARGE CONTROLLER
REPLACEMENT GUIDE
Table of Contents
Table of Contents .....................................................................................................................................................2
1.0 Warnings and Precautions ................................................................................................................................3
1.1 Warranty Disclaimer ...................................................................................................................................3
1.2 Standards ...................................................................................................................................................3
1.3 Safety and Usage Precautions...................................................................................................................3
2.0 Solar Charge Controller Kit Overview ..............................................................................................................5
3.0 Installation Procedure........................................................................................................................................6
3.1 Wiring Overview..........................................................................................................................................6
3.2 SPEEDCHECK-15/18.................................................................................................................................7
4.0 Capacitor Removal.............................................................................................................................................8
4.1 SPEEDCHECK-15 Capacitor Removal......................................................................................................8
4.2 SPEEDCHECK-18 Capacitor Removal......................................................................................................9

Carmanah Technologies Corp. | 250 Bay St, Victoria, BC V9A 3K5, Canada | 1.250.380.0052 | customersupport@carmanah.com | carmanah.com 3
SOLAR CHARGE CONTROLLER
REPLACEMENT GUIDE
1.0 Warnings and Precautions
The following symbols indicate important safety warnings and precautions throughout this guide:
WARNING indicates that serious bodily harm or death may result from failure to adhere to the
precautions.
CAUTION indicates that damage to equipment may result if the instructions are not followed.
NOTE suggests optimal conditions and provides additional information.
1.1 Warranty Disclaimer
This guide will familiarize you with the installation of Carmanah's replacement SpeedCheck charge controller kit.
Failure to comply with the use, storage, maintenance, installation or placement instructions detailed in this guide
could void the warranty.
1.2 Standards
Perform all installation, wiring, grounding and maintenance in conformance with local building and electrical
codes. Adherence to the National Electrical Code (NEC) is mandatory to comply with any certification markings.
Non-adherence to code may void the warranty.
1.3 Safety and Usage Precautions
Use extreme caution when handling the batteries as they can generate hazardous short-circuit
currents. Remove all jewelry (bracelets, metal-strap watches, etc.) before handling the batteries.
Solar panels produce DC electricity when exposed to light and can therefore produce an
electrical shock or burn. To render solar panels inoperative, remove them from sunlight or fully
cover their front surface with an opaque material.
Before lifting any heavy or bulky equipment, ensure the load is secured so moving parts do not
shift, and that it can be lifted as far as needed without back strain or loss of grip. Installation may
require more than one person.
Ensure the equipment is not powered during installation and wiring of the system.

Carmanah Technologies Corp. | 250 Bay St, Victoria, BC V9A 3K5, Canada | 1.250.380.0052 | customersupport@carmanah.com | carmanah.com 4
SOLAR CHARGE CONTROLLER
REPLACEMENT GUIDE
Recheck all completed wiring for proper polarity prior to energizing the system.
Changes or modifications to Carmanah equipment not expressly approved by Carmanah could
void both the user's authority to operate the equipment and the warranty.
This guide is specific to the SpeedCheck charge controller installation and is not a
replacement for the complete SPEEDCHECK-15/18 product user manual.
Visit support.carmanah.com to download the complete product user manual.

Carmanah Technologies Corp. | 250 Bay St, Victoria, BC V9A 3K5, Canada | 1.250.380.0052 | customersupport@carmanah.com | carmanah.com 5
SOLAR CHARGE CONTROLLER
REPLACEMENT GUIDE
2.0 Solar Charge Controller Kit Overview
Note:
1. Retrofit mounting bracket required only if installing the SunSaver charge controller into a legacy battery
cabinet as shown below. This would replace a legacy charge controller by ASC.
2. All six mounting screws only required when using the retrofit mounting bracket.
SunSaver-10L
(SS-10L-12V)
Retrofit mounting bracket
Mounting screws

Carmanah Technologies Corp. | 250 Bay St, Victoria, BC V9A 3K5, Canada | 1.250.380.0052 | customersupport@carmanah.com | carmanah.com 6
SOLAR CHARGE CONTROLLER
REPLACEMENT GUIDE
3.0 Installation Procedure
This guide is for installing the SunSaver-10L charge controller into a solar equipped SPEEDCHECK-15/18
system.
Refer to the individual product user manual for more details at support.carmanah.com and the SunSaver
installation/operation manual at morningstarcorp.com.
Refer to Section 4 to confirm if your system contains a large capacitor that needs to be removed.
The images in this guide may differ from your SpeedCheck radar speed sign. They are for illustrative
purposes only.
3.1 Wiring Overview

Carmanah Technologies Corp. | 250 Bay St, Victoria, BC V9A 3K5, Canada | 1.250.380.0052 | customersupport@carmanah.com | carmanah.com 7
SOLAR CHARGE CONTROLLER
REPLACEMENT GUIDE
3.2 SPEEDCHECK-15/18
1. Disconnect power to the SPEEDCHECK-15/18 sign by removing the fuse(s) in the associated battery
cabinet.
2. Disconnect the wiring and remove the existing charge controller from the battery cabinet. Remove the
solar panel wires last and cap off temporarily with wire nuts.
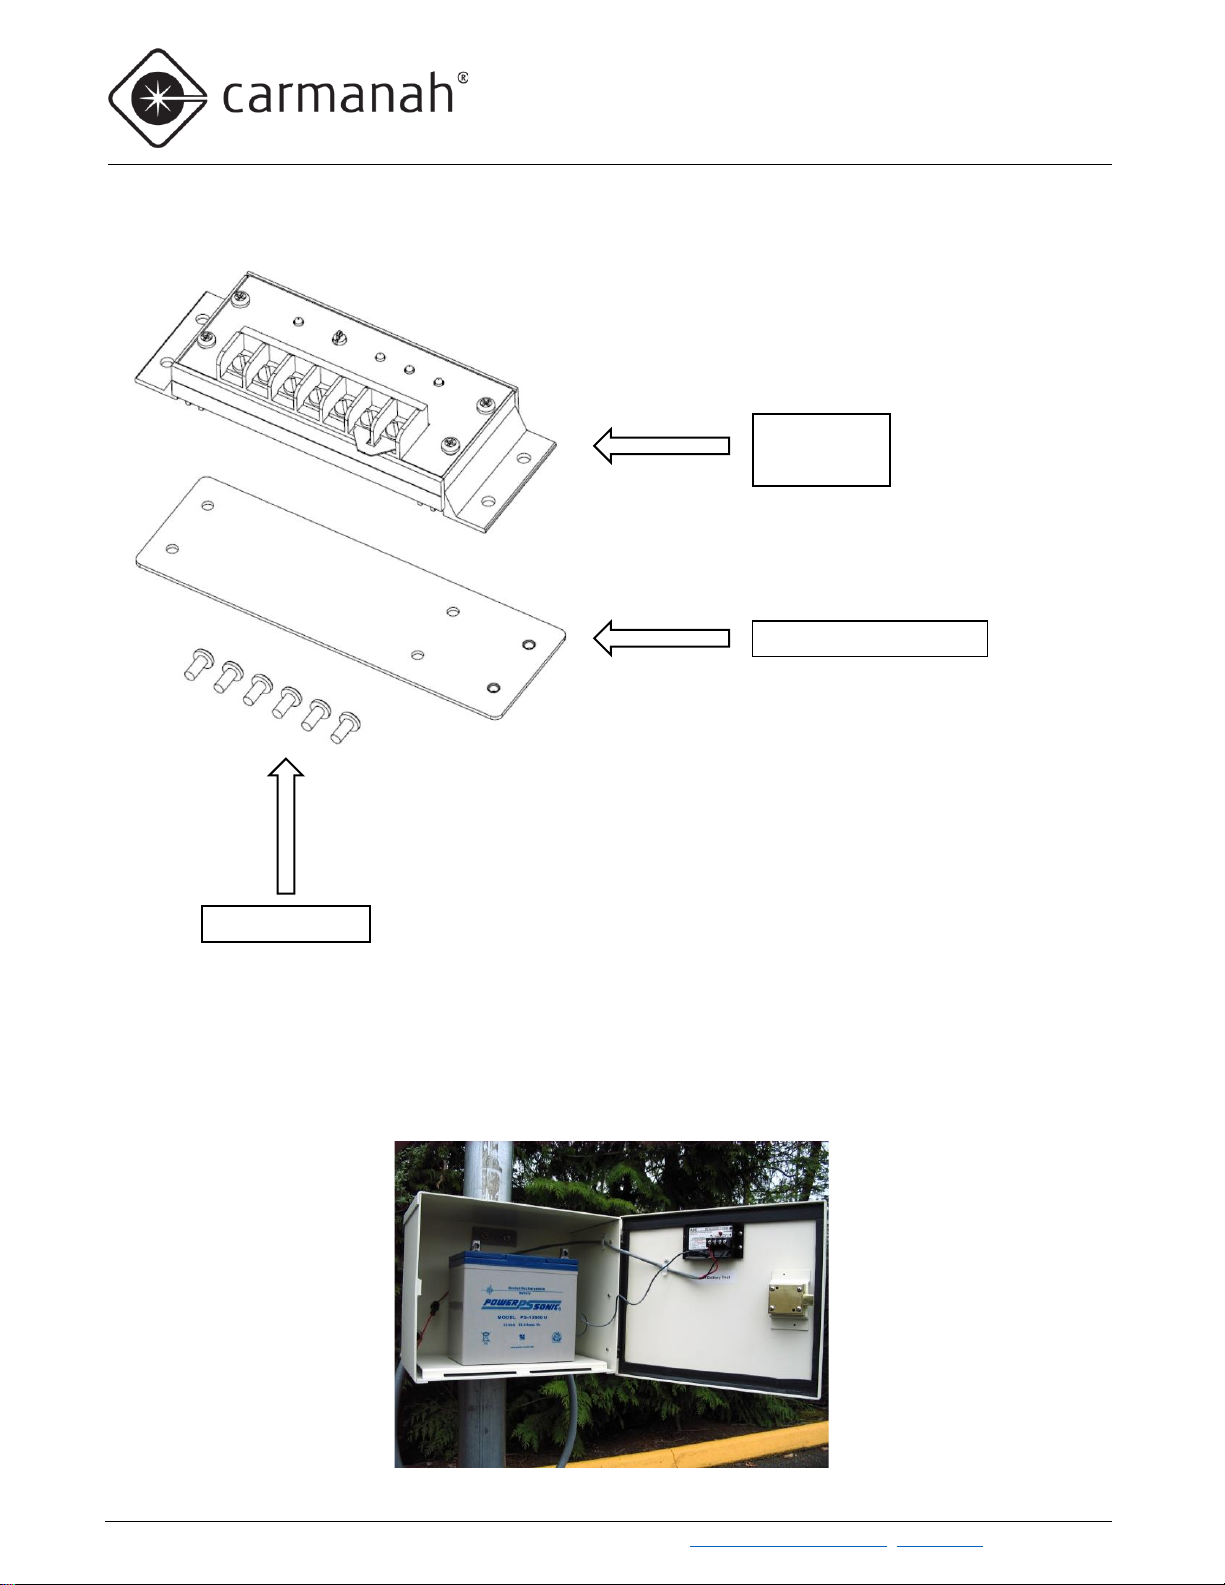
3. For systems that are replacing the legacy ASC charge controller you will require the retrofit mounting
bracket. Attach the new charge controller using the provided mounting screws to the battery box. All six
screws are required when replacing the ASC charge controller.
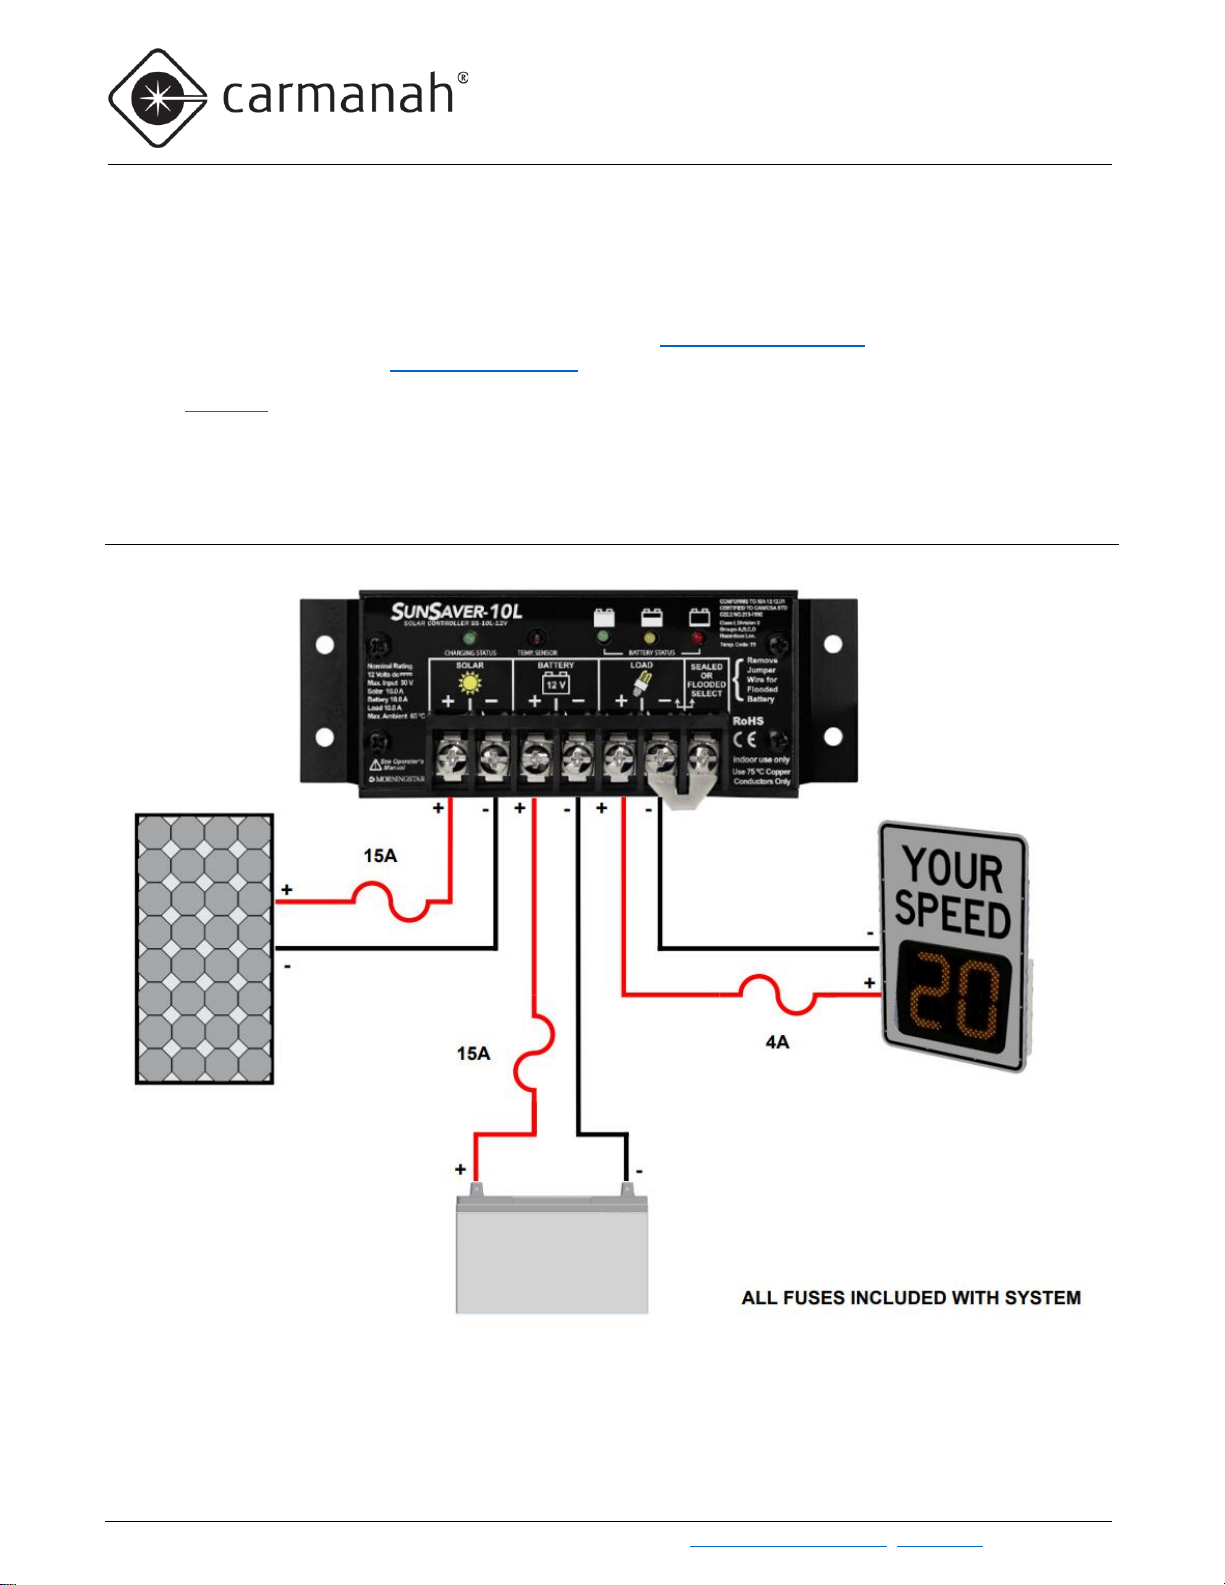
4. Refer to Section 3.1 and below for wiring the new charge controller, using the same existing wiring.
Without StreetHub Option With StreetHub Option
a. Ensure the radar sign power cable is connected to the load terminals. This will enable the sign to
take advantage of the charge controller’s built-in low voltage disconnection protection.
b. Keep track of the polarity for each component (red/yellow = positive, black/brown = negative).
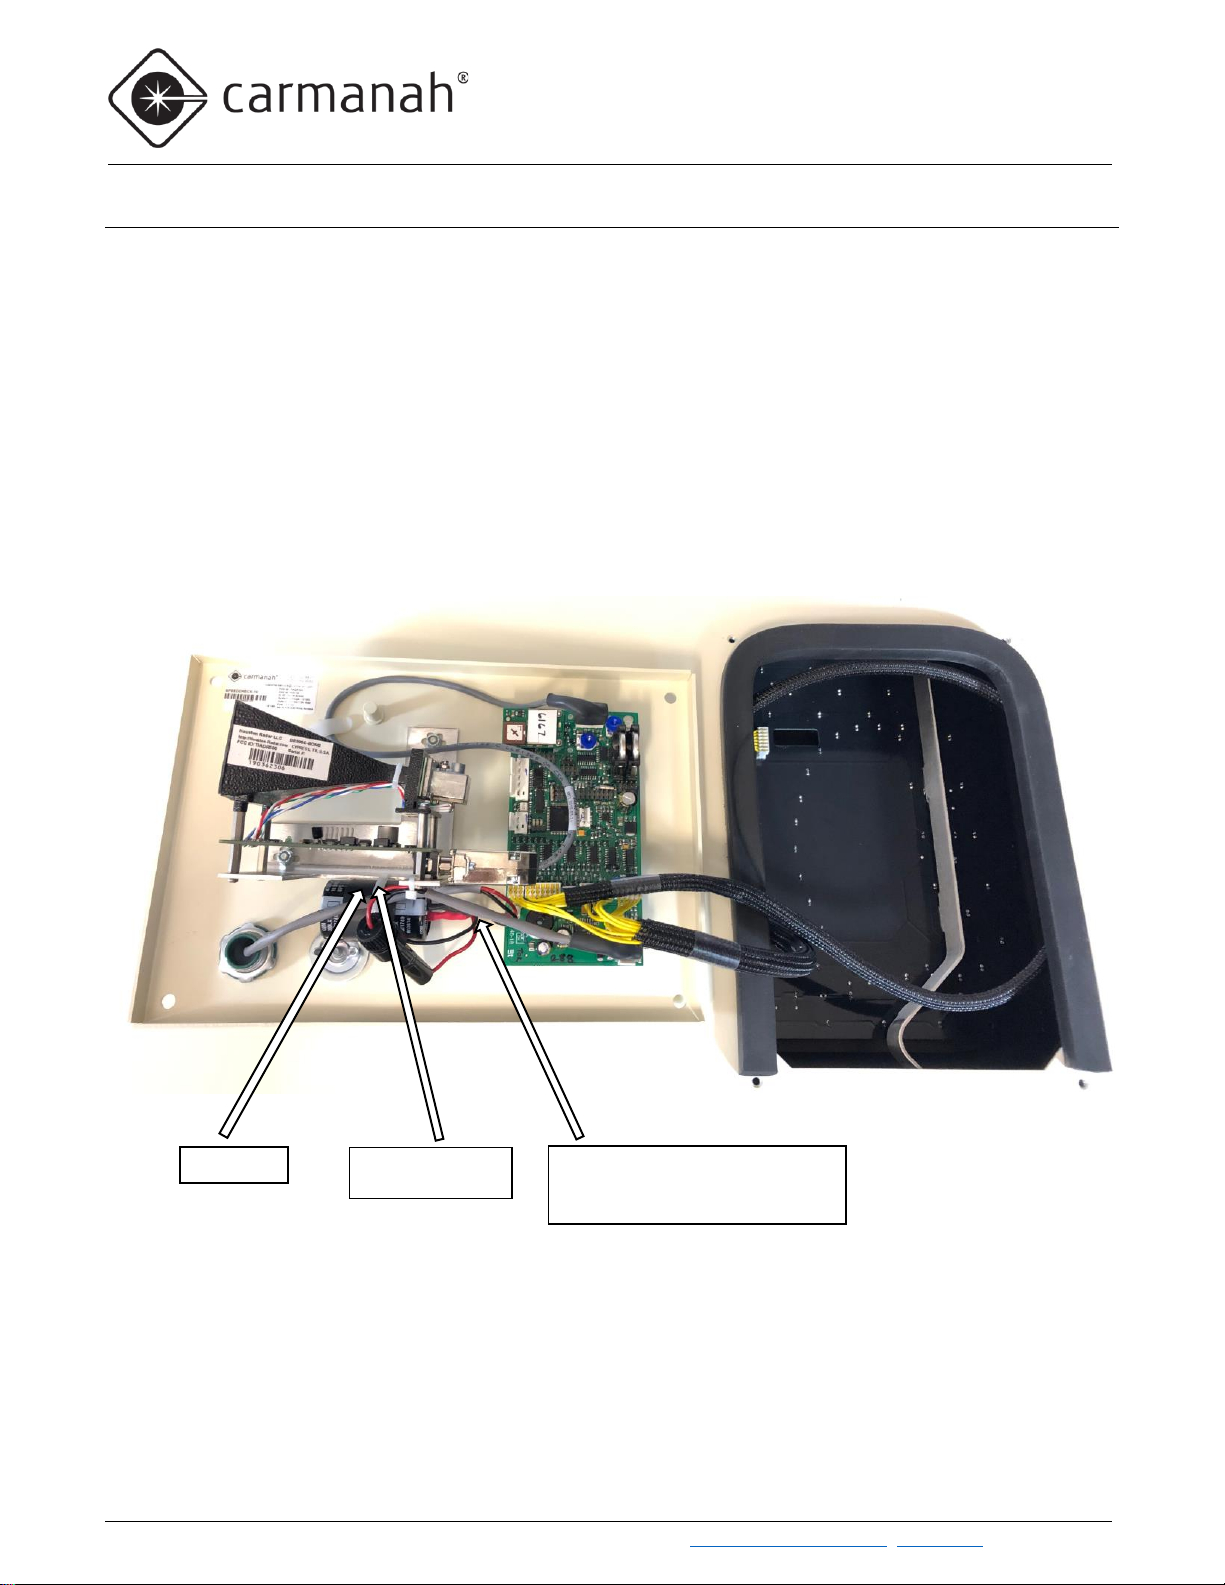
5. Refer to Section 4.0 to confirm if your system has a large capacitor installed. If this is present it must be
removed, otherwise the charge controller may exhibit a load error.
6. Reinstall the fuses in the battery cabinet to apply power to the radar sign. Ensure the charge controller
charging status LED turns green and the battery starts charging.
Radar sign power
cable to DC+/-
Radar sign power
cable to Load +/-

Carmanah Technologies Corp. | 250 Bay St, Victoria, BC V9A 3K5, Canada | 1.250.380.0052 | customersupport@carmanah.com | carmanah.com 8
SOLAR CHARGE CONTROLLER
REPLACEMENT GUIDE
4.0 Capacitor Removal
This section is only required if your system has a large capacitor installed in one of the following locations:
•SPEEDCHECK-15 –installed in the bottom right corner of the sign enclosure
•SPEEDCHECK-18 –installed on the rear back panel of the sign enclosure
The capacitor needs to be removed after installing the replacement controller.
Do not short the two capacitor wires together as this can short out the capacitor and cause
physical harm or burns.
4.1 SPEEDCHECK-15 Capacitor Removal
1. Remove the capacitor wires from the terminal blocks. Cap off each wire one at a time with wire nuts after
they are removed.
2. Remove the nyloc nut and fully remove the capacitor from the system.
3. Close all fuse blocks and ensure battery voltage is passing through to the SpeedCheck control board
inside the SPEEDCHECK-15.
4. Reassemble system.
Fuse holder
Capacitor positive
wire (red)
Capacitor negative
wire (black)
Nyloc nut
Capacitor

Carmanah Technologies Corp. | 250 Bay St, Victoria, BC V9A 3K5, Canada | 1.250.380.0052 | customersupport@carmanah.com | carmanah.com 9
SOLAR CHARGE CONTROLLER
REPLACEMENT GUIDE
4.2 SPEEDCHECK-18 Capacitor Removal
1. Remove the four screws securing the back panel on the rear of the radar sign, locate the capacitor, and
open the fuse holder.
2. Cut the two positive and two negative wires going into the capacitor, just before the heat shrink.
3. Cut the cable tie (or remove the nyloc nut on legacy systems) and fully remove the capacitor from the
system.
4. Butt splice the two positive wires together and then the two negatives together, using heat shrinkable butt
splices. It is advised to also put heat shrink over the butt splice for added protection.
a. Wago splicing connectors are also an acceptable alternative to butt splicing.
5. Close the fuse holder on the back panel of the SPEEDCHECK-18.
6. Reassemble system.
Capacitor
Cut wires here and splice the two
positive (red) and negative (black)
wires together respectively
Cut cable tie and
remove capacitor

Carmanah Technologies Corp. | 250 Bay St, Victoria, BC V9A 3K5, Canada | 1.250.380.0052 | customersupport@carmanah.com | carmanah.com 10
SOLAR CHARGE CONTROLLER
REPLACEMENT GUIDE
© 2021 Carmanah Technologies Corporation
Technical Support:
Toll Free: 1.877.722.8877 (US & Canada)
Worldwide: 1.250.380.0052
Fax: 1.250.380.0062
Web: carmanah.com
Other manuals for SPEEDCHECK
2
This manual suits for next models
1
Table of contents
Other Carmanah Controllers manuals
Popular Controllers manuals by other brands

Roku
Roku BrightSign HD110 quick start guide

Meunier Technologies
Meunier Technologies DICE ES Installation, operation and maintenance manual

Toho Electronics
Toho Electronics TRV1-C015 Operation manual

SYCLOPE
SYCLOPE TERE'O operating instructions

Omron
Omron E5CC instruction manual

LSIS
LSIS XGT Series user manual