Carrera 623 User manual

MODELL 15490036MODELL 15490036
DE
BARTSCHNEIDER
Bedienungsanleitung
GB
BEARD TRIMMER
Instruction manual
FR
TONDEUSE À BARBE
Mode d‘emploi
IT
REGOLABARBA
Istruzione d‘uso
ES
BARBERO
Manual de instrucciones
MODELL 15173011
Danke.
Für Ihr Vertrauen in CARRERA – und dafür, dass wir es mit
unserem Bartschneider gleich einlösen dürfen.
Eine Idee, die alles antreibt.
Jedes Gerät von CARRERA folgt einer klaren Linie. Keine
Rücksicht auf bestehende Geschlechterrollen, kein rosa für
Frauen, kein blau für Männer. Seit wann haben denn Qualität
und Performance ein Geschlecht?
Wir erschaffen Technologie, die Bedienungsfreundlichkeit,
Handling, Ästhetik maximiert und Performance erlebbar macht.
Gleich beim Anschalten und noch Jahre später. Leistung
kommt eben nicht nur aus dem Motor, sondern resultiert aus
dem gekonnten Zusammenspiel jeder einzelnen Baugruppe.
Wir nennen es einfach den Boost von CARRERA.
Dabei haben wir das Rad nicht neu erfunden – aber wir
hatten den Mut, das Entscheidende richtig zu machen und
alles Unwichtige wegzulassen.
Das ist unser Stil. Und Sie werden ihn wiederfinden in jedem
weiteren CARRERA-Gerät.
Machen Sie aus 24 Monaten Garantie gleich 36!
Sie wollen und sollen lange etwas von Ihrem CARRERA haben.
Daher innerhalb der nächsten 36 Tage die Garantie auf Ihren
Bartschneider direkt auf 36 Monate verlängern. Weitere Infor-
mationen dazu in der beigelegten Garantiekarte oder direkt
auf www.carrera.de/service.
www.carrera.de
DESIGNED IN GERMANY
www.carrera.de
DESIGNED IN GERMANY
623

D
E
S
I
G
N
E
D
I
N
G
E
R
M
A
N
Y
;
START
STOP
01. LIEFERUMFANG/GERÄTETEILE
3
1Edelstahl-Schneidsatz
2Schiebeschalter für Feineinstellung
(0,8/ 1,2/1,6/2,0 mm) ohne Kammaufsatz
3Ein-/Ausschalter
4Steckerbuchse
5Kammaufsatz mit Arretierungsfunktion
6Reinigungspinsel
7USB-Anschlussbuchse
8USB-Stecker
9Steckernetzteil
10 5-V-Stecker mit Stromkabel
11 Ladekapazitätsanzeige in %
12 Batteriesymbol
13 Blinkt, wenn Batterie schwach
14 Einschaltsperre
15 Anzeige für Schnittlängen-Feineinstellung
16 Schnittlängen-Einstelltaste
(4/ 6/ 8/ 10/ 12/ 14 mm bei Feineinstellung 0,8 mm)
Weiteres Zubehör (ohne Abb.)
Aufbewahrungstasche
4 DE
A
B
D
C
E
START
STOP
START
STOP
1
2
3
4
4
6
9
7
8
10
11
12
13
16
14
15
5

5DE
INHALTSVERZEICHNIS
01. Lieferumfang/Geräteteile 4
02. Sicherheitshinweise 6
03. Zu dieser Anleitung 9
04. Erstinbetriebnahme 10
05. Aufladen 11
06. Travellock – Einschaltsicherung 12
07. Bedienung 13
08. Reinigung und Pflege 15
09. Aufbewahrung 15
10. Störungen beheben 16
11. Technische Daten 16
12. Konformitätserklärung 17
13. Entsorgung 17

6 7DEDE
Gerät trocken halten
HINWEIS:
Verwenden Sie zum Aufladen des
Akkus ausschließlich das mit diesem
Gerät gelieferte abnehmbare Netzteil
(Typ: ZD5C050100EUDU).
GEFAHR für Kinder
Verpackungsmaterial ist kein Kinderspielzeug.
Kinder dürfen nicht mit den Kunststoffbeuteln spielen.
Es besteht Erstickungsgefahr.
GEFAHR von Stromschlag durch Feuchtigkeit
Das Gerät, das Kabel, und das Steckernetzteil dürfen nicht in
Wasser oder andere Flüssigkeiten getaucht werden und nicht
unter fließendem Wasser abgespült werden.
Legen Sie das Gerät niemals so ab, dass es im angeschlossenen
Zustand ins Wasser fallen kann.
Sollte das Gerät doch einmal ins Wasser gefallen sein, ziehen
Sie sofort das Steckernetzteil und nehmen Sie erst danach das
Gerät heraus. Benutzen Sie das Gerät in diesem Fall nicht mehr,
sondern lassen Sie es durch einen Fachbetrieb überprüfen.
GEFAHR durch Stromschlag
Nehmen Sie das Gerät nicht in Betrieb, wenn das Gerät, das
Steckernetzteil oder das Kabel sichtbare Schäden aufweist
oder wenn das Gerät zuvor fallen gelassen wurde.
Stecken Sie das Steckernetzteil erst dann in eine Steckdose,
wenn das Kabel mit dem Gerät verbunden ist.
Schließen Sie das Steckernetzteil nur an eine ordnungsgemäß
installierte, gut zugängliche Steckdose an, deren Spannung der
Angabe auf dem Typenschild entspricht. Die Steckdose muss
auch nach dem Anschließen weiterhin gut zugänglich sein.
02. SICHERHEITSHINWEISE
Bestimmungsgemäßer Gebrauch
Der Bartschneider ist ausschließlich zum Schneiden von menschlichen
Haaren vorgesehen. Verwenden Sie das Gerät nur für trockene Haare.
Das Gerät ist für den privaten Haushalt konzipiert und darf nicht für
gewerbliche Zwecke eingesetzt werden. Das Gerät darf nur in Innen-
räumen benutzt werden.
Vorhersehbarer Missbrauch
Schneiden Sie mit dem Gerät kein Kunsthaar und kein Tierhaar.
Anweisungen für den sicheren Betrieb
Verwenden Sie für den Netzbetrieb nur
das mitgelieferte Original-Steckernetzteil.
Dieses Gerät kann von Kindern ab 8 Jahren
sowie von Personen mit reduzierten physi-
schen, sensorischen oder mentalen Fähig-
keiten oder Mangel an Erfahrung und/oder
Wissen benutzt werden. Dies gilt, wenn sie
beaufsichtigt oder bezüglich des sicheren
Gebrauchs des Gerätes unterwiesen wurden
und die daraus resultierenden Gefahren
verstanden haben.
Kinder dürfen nicht mit dem Gerät spielen.
Reinigung und Benutzerwartung dürfen
nicht durch Kinder durchgeführt werden,
es sei denn, sie sind beaufsichtigt.
Kinder jünger als 8 Jahre sind vom Gerät
und der Anschlussleitung fernzuhalten.

8 9DEDE
Vermeiden Sie den Kontakt von Scheröl mit den Augen.
Sollte dennoch Scheröl in die Augen gelangt sein, spülen Sie
sofort und mit reichlich Wasser das Öl aus den Augen.
Scheröl darf nicht verschluckt werden.
VORSICHT! Sachschäden
Verwenden Sie nur das Original-Zubehör.
Das Gerät darf nicht betrieben werden, während es am USB-
Port eines PCs angeschlossen ist.
Legen Sie das Gerät nie auf heiße Oberflächen (z. B. Herdplatten)
oder in die Nähe von Wärmequellen oder offenem Feuer.
Decken Sie das Steckernetzteil nicht ab, um eine Überhitzung zu
vermeiden.
Der Schneidsatz ist ein Präzisionsteil. Schützen Sie ihn vor
Beschädigungen.
Verwenden Sie keine scharfen oder kratzenden Reinigungs-
mittel.
Als zusätzlicher Schutz wird die Installation einer Fehler-
stromschutzeinrichtung (FI/RCD) mit einem Bemessungsaus-
lösestrom von nicht mehr als 30mA im Stromkreis empfohlen.
Fragen Sie Ihren Elektroinstallateur um Rat. Lassen Sie den
Einbau ausschließlich von einer Elektro-Fachkraft durchführen.
03. ZU DIESER ANLEITUNG
Lesen Sie vor der ersten Inbetriebnahme diese Bedienungs-
anleitung gründlich durch und befolgen Sie vor allen Dingen die
Sicherheitshinweise!
Das Gerät darf nur so bedient werden, wie in dieser Anleitung
beschrieben. Der Hersteller oder Händler übernimmt keine Haftung
für Schäden, die durch nicht bestimmungsgemäßen Gebrauch ent-
standen sind.
Bewahren Sie diese Anleitung auf.
Falls Sie das Gerät einmal weitergeben, legen Sie bitte diese
Bedienungsanleitung dazu.
Achten Sie darauf, dass das Kabel nicht durch scharfe Kanten
oder heiße Stellen beschädigt werden kann.
Achten Sie darauf, dass das Kabel nicht eingeklemmt oder
gequetscht wird. Wickeln Sie das Kabel nicht um das Gerät
oder das Steckernetzteil (Gefahr von Kabelbruch!).
Um das Steckernetzteil aus der Steckdose zu ziehen, immer am
Steckernetzteil, nie am Kabel ziehen.
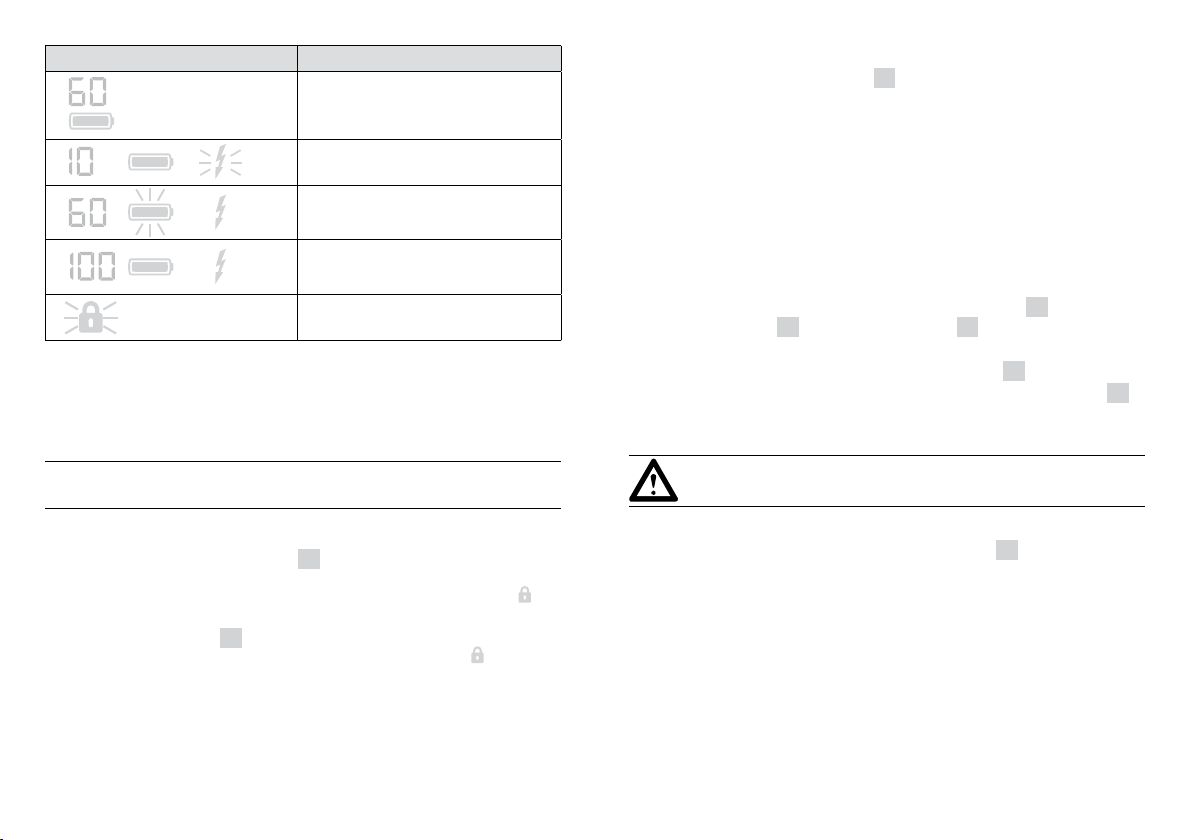
Trennen Sie das Gerät von der externen Stromversorgung, …
… nach jedem Gebrauch,
… nach jedem Ladevorgang,
… wenn eine Störung auftritt,
… bevor Sie das Gerät mit dem Kabel verbinden,
… bevor Sie das Gerät reinigen und
… bei Gewitter.
Um Gefährdungen zu vermeiden, nehmen Sie keine Verän-
derungen am Gerät sowie an den Zubehörteilen vor. Auch
das Kabel darf nicht selbst ausgetauscht werden. Lassen Sie
Reparaturen nur durch einen Fachbetrieb durchführen.
WARNUNG vor Verletzungen durch Schneiden
Die Spitzen des Schneidsatzes sind scharf. Gehen Sie vorsichtig
damit um.
Benutzen Sie das Gerät nicht, wenn der Vario-Aufsteckkamm
Beschädigungen aufweist.
Schalten Sie das Gerät aus, bevor Sie den Vario-Aufsteckkamm
aufstecken oder vor jeder Reinigung.
WARNUNG vor Verletzungen
Legen Sie das Kabel so, dass niemand darüber stolpert oder
darauf tritt!
Benutzen Sie das Gerät nicht bei offenen Wunden, Schnitt-
wunden, Sonnenbrand oder Blasen.
WARNUNG vor Verletzungen durch Scheröl
Bewahren Sie das Ölfläschchen außerhalb der Reichweite von
Kindern auf.

10 11DEDE
05. AUFLADEN
GEFAHR! Umgang mit Lithium Ionen Akkus
Nicht ordnungsgemäße Verwendung kann zu Verletzungen
und Sachschäden führen! Brand- und Explosionsgefahr!
VORSICHT! Sachschäden
Beachten Sie, dass die Kapazität von Akkus während längeren
Lagerzeiten, technisch bedingt, nachlässt.
Deshalb sollten längere Lagerzeiten und die damit verbundene Unter-
brechung der Lade- und Entladezyklen vermieden werden.
Sollte es beim Ladevorgang zu Störungen (Erhitzung von Gerät,
Kabel oder Stromquelle, zu langsames Laden o.ä.) kommen, so
unterbrechen Sie den Ladevorgang und wenden Sie sich an das
Service-Center.
HINWEISE:
Bewahren Sie das Gerät bei einer Temperatur zwischen 5°C und
35°C auf.
Vor dem ersten Gebrauch: Laden Sie das Gerät ca. 90 Minuten und
verwenden Sie hierfür ausschließlich das mitgelieferte Steckernetzteil.
Bei regelmäßigem Gebrauch beträgt die Ladezeit für eine volle
Batterie-Ladung 90 Minuten.
Aufladen
1. Verbinden Sie den USB-Stecker 8mit der USB-Anschlussbuchse
7und den 5-V-Stecker 10 mit dem Gerät.
2. Stecken Sie das Steckernetzteil in eine gut zugängliche Steckdose.
3. Beachten Sie die Leuchtanzeigen am Bartschneider (siehe Tabelle).
WARNUNG! Beachten Sie immer die auf dem Typenschild des
Steckernetzteils angegeben Daten für Spannung und Strom
(mA). Hiervon abweichende Stromquellen keinesfalls nutzen.
Warnhinweise in dieser Anleitung
Falls erforderlich, werden folgende Warnhinweise in dieser
Bedienungsanleitung verwendet:
GEFAHR! Hohes Risiko: Missachtung der Warnung kann
Schaden für Leib und Leben verursachen.
WARNUNG! Mittleres Risiko: Missachtung der Warnung
kann Verletzungen oder schwere Sachschäden verursachen.
VORSICHT: Geringes Risiko: Missachtung der Warnung
kann leichte Verletzungen oder Sachschäden verursachen.
HINWEIS: Sachverhalte und Besonderheiten, die im Umgang mit dem
Gerät beachtet werden sollten.
04. ERSTINBETRIEBNAHME
Bartschneider und Lieferumfang prüfen
1. Nehmen Sie den Bartschneider aus der Verpackung.
2. Prüfen Sie, ob die Lieferung vollständig ist (siehe Abb. A).
3. Kontrollieren Sie, ob der Bartschneider, die Einzelteile oder das
Zubehör Schäden aufweisen.
4. Wenn die Lieferung unvollständig ist oder der Bartschneider, die
Einzelteile oder das Zubehör Schäden aufweisen, benutzen Sie den
Bartschneider nicht. Wenden Sie sich über die auf der Garantiekarte
angegebene Serviceadresse an den Hersteller.

12 13DEDE
Travellock deaktivieren
4. Halten Sie den Ein-/Ausschalter 3länger als 5 s gedrückt;
die Travellock-Einschaltsicherung ist deaktiviert und der Bartschnei-
der eingeschaltet.
5. Durch Anstecken des Bartschneiders ans Netz wird die Travellock-
Einschaltsicherung ebenfalls deaktiviert.
07. BEDIENUNG
Sie können das Gerät unabhängig vom Ladezustand der Batterien je-
derzeit im Netzbetrieb, ausschließlich mit dem mitgelieferten Stecker-
netzteil, verwenden.
1. Für den Netzbetrieb verbinden Sie den USB-Stecker 8mit der USB-
Anschlussbuchse 7und den 5-V-Stecker 10 mit dem Gerät.
2. Stecken Sie das Steckernetzteil in eine gut zugängliche Steckdose.
3. Schalten Sie das Gerät mit dem Ein-/Ausschalter 3ein.
4. Um das Gerät auszuschalten, drücken Sie den Ein-/Ausschalter 3.
Verwenden des Vario-Aufsteckkamms
WARNUNG! Schalten Sie das Gerät aus, bevor Sie den
Vario-Aufsteckkamm aufstecken.
Zum Aufstecken des Vario-Aufsteckkamms schieben Sie die Arre-
tierungsvorrichtung des Vario-Aufsteckkammes 5vorsichtig in die
mittlere Führungsrille des Gerätes; drücken Sie gleichzeitig auf die
Schnittlängen-Einstelltaste auf der Rückseite des Kammaufsatzes
und stellen Sie die gewünschte Schnittlänge ein.
Zum Abnehmen des Vario-Aufsteckkammes drücken Sie die
Schnittlängen-Einstelltaste, fahren den Vario-Aufsteckkamm ganz
aus und ziehen ihn ab.
Symbol Bedeutung
%-Anzeige
Akku-Betrieb
Batteriekapazität gering
Nachladeaufforderung
Ladevorgang oder Netzbetrieb
Voll geladen am Netz
Einschaltsperre aktiv
06. TRAVELLOCK – EINSCHALTSICHERUNG
Der Bartschneider ist gegen versehentliches Einschalten, z.B. auf Reisen,
einfach zu sichern.
HINWEIS: Bei Beginn des Ladevorgangs wird die Travellock-Einschalt-
sicherung automatisch deaktiviert.
Travellock aktivieren
1. Halten Sie den Ein-/Ausschalter 3länger als 5 s gedrückt.
Die Schalterfunktion des Bartschneiders ist verriegelt und das Gerät
schaltet ab. Auf dem LCD-Display erscheint ein Schlosssymbol .
2. Überprüfen Sie durch wiederholtes kurzes Drücken (unter 5 s) auf
den Ein-/Ausschalter 3ob die Einschaltsicherung aktiv ist. Bei akti-
ver Einschaltsicherung ist im Display das Schlosssymbol sichtbar.
3. Der Ein-/Ausschalter ist vorübergehend ohne Funktion;
ein versehentliches Einschalten des Gerätes und das Entleeren der
Akkus wird verhindert.

14 15DEDE
08. REINIGUNG UND PFLEGE
GEFAHR!
Ziehen Sie das Steckernetzteil aus der Steckdose, bevor Sie
das Gerät reinigen.
WARNUNG!
Schalten Sie vor jeder Reinigung das Gerät aus.
VORSICHT!
Verwenden Sie keine scharfen oder kratzenden Reinigungsmittel.
HINWEIS: Reinigen und ölen Sie das Gerät nach jedem Gebrauch.
Nehmen Sie den Vario-Aufsteckkamm ab. Spülen Sie ihn mit Wasser
ab und lassen Sie ihn trocknen, bevor Sie ihn wieder auf das Gerät
setzen
.
Wischen Sie das Gehäuse des Gerätes mit einem leicht angefeuch-
teten Tuch ab.
Schneidsatz reinigen und ölen
1. Drücken Sie den Schneidsatz mit dem Daumen nach hinten vom
Gerät ab (siehe Abb. C).
2. Entfernen Sie Haarreste mit dem gelieferten Pinsel vom Schneidsatz.
3. Der Schneidsatz kann unter fließendem Wasser gereinigt werden.
Lassen Sie ihn gut trocknen, bevor Sie ihn wieder aufsetzen.
4. Tragen Sie wenige Tropfen Öl auf die Schnittkante des Schneid-
satzes auf. Wischen Sie ggf. überschüssiges Öl mit einem weichen
Tuch ab. Verwenden Sie nur säurefreies Öl, wie z.B. Nähmaschinenöl.
5. Drücken Sie von der Rückseite den Schneidsatz vorsichtig auf das
Gerät, bis er einrastet.
09. AUFBEWAHRUNG
GEFAHR! Ziehen Sie den Netzstecker aus dem Gerät. Wickeln
Sie das Kabel nicht um das Gerät (Gefahr von Kabelbruch!)
Bewahren Sie das Gerät an einem trockenen, staubfreien Raum auf.
Schneiden mit dem Vario-Aufsteckkamm
Mit dem Vario-Aufsteckkamm können die Schnittlängen in 6 Stufen
variiert werden. Die Schnittlängen betragen bei Feineinstellung
0,8 mm è4/6 /8/10/12/14 mm.
HINWEIS: Die Schnittlängen kommen nur dann
zustande, wenn Sie das Gerät mit der Fläche des
Kammes aufsetzen (siehe Abb.) Die Feineinstel-
lung muss 0,8 mm betragen.
Schneiden ohne Vario-Aufsteckkamm
Wenn Sie den Bart ohne Vario-Aufsteckkamm sehr kurz schneiden
wollen, kann die Schnittlänge mit dem Schiebeschalter für Fein-
einstellung zwischen 0,8 und 2 mm eingestellt werden. Die einge-
stellte Schnittlänge wird im Display angezeigt.
HINWEIS: Die Schnittlängen kommen nur dann
zustande, wenn Sie das Gerät mit der vorderen
kurzen Schneidfläche aufsetzen – relativ steil
(siehe Abb.).

16 17DEDE
12. KONFORMITÄTSERKLÄRUNG
In Übereinstimmung mit den Europäischen Richtlinien wurde
das CE-Zeichen angebracht.
Die Konformitätserklärung ist beim Inverkehrbringer hinterlegt:
Aquarius Deutschland GmbH
Adalperostrasse 29 ·85737 Ismaning b. München · DEUTSCHLAND
(Dies ist keine Serviceadresse!)
13. ENTSORGUNG
Das nebenstehende Symbol bedeutet, dass das Produkt in der
Europäischen Union einer getrennten Müllsammlung zugeführt
werden muss. Dies gilt für das Produkt und alle mit diesem
Symbol gekennzeichneten Zubehörteile. Gekennzeichnete
Produkte dürfen nicht über den normalen Hausmüll entsorgt
werden, sondern müssen an einer Annahmestelle für das
Recycling von elektrischen und elektronischen Geräten abge-
geben werden.
Der Akku muss aus dem Gerät entfernt werden, bevor
dieses entsorgt wird
Wenn Sie den Akku entnehmen, müssen Sie das Gerät von
der Stromversorgung trennen
Der in diesem Gerät fest verbaute Lithium-Ionen Akku darf
nicht in den Hausmüll. Der Akku muss sach- und fachgerecht
entsorgt werden.
Wenden Sie sich dazu an den batterievertreibenden Handel
oder an die kommunalen Sammelstellen.
Fachkräfte können die Ausbauanleitung beim Importeur erhal-
ten z.B. über die Internetseite.
Verpackung
Wenn Sie die Verpackung entsorgen möchten, achten Sie auf
die entsprechenden Umweltvorschriften in Ihrem Land.
Li-Ion
10. STÖRUNGEN BEHEBEN
GEFAHR! Versuchen Sie auf keinen Fall, das Gerät selbst-
ständig zu reparieren. Ziehen Sie im Fall einer Störung immer
den Netzstecker aus der Steckdose.
Störung: Überprüfen Sie Folgendes:
Keine Funktion Stromversorgung beim Laden
sichergestellt?
Batterien leer?
Einschaltsperre gelöst?
Steckerverbindungen geprüft?
Schneidsatz läuft schwer Schneidsatz gereinigt und geölt?
Bei hier nicht aufgeführten Störungen wenden Sie sich an unser
Service-Center. Lassen Sie Reparaturen am Gerät nur in einer Fach-
werkstatt durchführen.
11. TECHNISCHE DATEN
Artikeltyp CRR-623
Artikelnummer 15173011
Steckernetzteil:
Eingangsspannung
Ausgangsspannung
Schutzart
Schutzklasse
Umgebungsbedingungen
100–240V~, 50/60Hz, 0,2A
5,0V ä, max. 1000 mA
IP20
⧈ II
nur für Innenräume zugelassen
Bartschneider:
Eingangsspannung
Wiederaufladbare Batterien
Betriebszeit
5,0V ä, max. 1000 mA
1x 3,7V Li-Ion (AA)700mAh
ca. 60 Minuten bei Vollladung
CARRERA ist eine registrierte Handelsmarke. Im Zuge von Produktverbesse-
rungen behalten wir uns technische und optische Veränderungen am Gerät
und am Zubehör vor.

18 19GBGB
CONTENT
01. Scope of Delivery / Appliance Parts 20
02. Safety Instructions 21
03. About these Instructions 24
04. Initial Operation 25
05. Charging 26
06. Travel Lock 27
07. Operation 28
08. Cleaning and Care 29
09. Storage 30
10. Troubleshooting 31
11. Technical Data 31
12. Declaration of Conformity 32
13. Disposal 32
Thank you.
For having placed your trust in CARRERA – and for giving us
the opportunity to prove you right with our beard trimmer.
Everything is driven by one idea.
Each CARRERA appliance follows a clear concept.
No consideration of existing gender roles, no pink for women
or blue for men. Since when did quality and performance
have a gender?
We create technology maximising user friendliness, handling
and aesthetics and bringing performance to life. Directly
when switching on the appliance and even after many years.
Performance is not just delivered by the motor alone, but
results from the skilful interplay of each individual component.
We just call it the CARRERA boost.
Although we have not reinvented the wheel, we had the cour-
age to do right what is crucial and to dispense with every-
thing that is unimportant.
That is our style. And you will rediscover it in each further
CARRERA appliance.
Extend your warranty from 24 to 36 months now!
You want to and should enjoy your CARRERA appliance for
a long time. So why not directly extend the warranty for your
beard trimmer to 36 months within the next 36 days?
Further information can be found in the enclosed warranty
card or directly on www.carrera.de/service.

20 21GBGB
02. SAFETY INSTRUCTIONS
Intended use
The beard trimmer is intended exclusively for trimming human hair.
The appliance is designed for private home use and must not be used
for commercial purposes. The appliance must only be used indoors.
Foreseeable misuse
Do not use the appliance to cut artificial hair or animal hair.
Instructions for a safe operation
Only use the included original mains
adapter for mains operation.
This appliance may be used by children
older than 8 years, people with reduced
physical, sensory or mental faculties, as
well as people without experience or who
do not know the appliance. This applies as
long as they are supervised or have been
instructed on the safe use of the appliance
and have understood the related dangers.
Children must not play with the appliance.
Cleaning and user maintenance shall not
be carried out by children unless they are
supervised.
Children younger than 8 years must be kept
away from the appliance and power supply
cord.
Keep the appliance dry.
01. SCOPE OF DELIVERY / APPLIANCE PARTS
1Stainless steel shaving unit
2Slide switch for fine adjustment
(0.8/1.2/1.6/2.0mm) without comb attachment
3On/off switch
4Female connector
5Comb attachment with locking function
6Cleaning brush
7USB female connector
8USB plug
9Mains adapter
10 5V plug with power cord
11 Charging capacity display in %
12 Battery symbol
13 Flashes when the battery is low
14 Travel lock
15 Display for cutting length fine adjustment
16 Cutting length adjustment button
(4/6/8/10/12/14mm with 0.8mm fine adjustment)
Further accessories (no image):
Storage pouch

22 23GBGB
NOTE: For the purposes of recharging
the battery, only use the detachable
supply unit provided with this appli-
ance (type: ZD5C050100EUDU).
DANGER for children
Children must not play with packaging material.
Do not allow children to play with plastic bags.
Danger of suffocation.
DANGER of electric shock as a result of moisture
The appliance, the cord and the mains adapter must not be im-
mersed in water or other liquids or rinsed under running water
Never place the appliance in such a way that it could fall into
water when connected.
If the appliance has fallen into water, pull out the mains
adapter immediately, and only then remove the appliance from
the water. Do not use the appliance again, but have it checked
by a specialist.
DANGER of electric shock
Do not operate the appliance if the appliance, the mains
adapter or the cord shows visible signs of damage or if the
appliance has been dropped.
Connect the cord to the appliance before plugging the mains
adapter into a power point.
Only connect the mains adapter to a properly installed and
easily accessible socket whose voltage matches the data stated
on the type plate. The socket must still be easily accessible
after connection.
Ensure that the cord cannot be damaged by sharp edges or
hot surfaces.
Ensure that the cord is not trapped or crushed. Do not wrap
the cord around the appliance or the mains adapter (risk of
cable break!)
To unplug the mains adapter, always pull the mains adapter
and not the cord.
Disconnect the appliance from the external power supply, …
… after each use,
… after each charging process,
… if a fault occurs,
… before connecting the appliance to the cable,
… before cleaning the appliance and
… during thunderstorms.
To avoid any risk, do not make any changes to the appliance
or accessories. Do not replace the cord yourself either. Repairs
must only be carried out by a specialised company.
WARNING! Risk of injury from cutting
The points of the shaving unit are sharp. Handle with care.
Do not use the appliance if the variable attachment comb
is damaged.
Switch off the appliance before pinning up the variable attach-
ment comb and each time before cleaning.
WARNING! Risk of injury
Place the cord in such a way that no one trips over it
or steps on it!
Do not use the appliance on open wounds, cuts, sunburn
or blisters.
WARNING! Risk of injury from trimmer oil
Keep the small oil bottle out of children’s reach.
Avoid contact of trimmer oil with eyes. However, if trimmer oil
gets into your eyes, rinse immediately with plenty of water to
fully remove the oil.
Trimmer oil must not be swallowed.

24 25GBGB
CAUTION! Material damage
Use the original accessories only.
The appliance must not be operated while connected to a PC
via the USB port.
Never place the appliance on hot surfaces (e.g. hob plates) or
near heat sources or open fire.
Do not cover the mains adapter to prevent overheating.
The shaving unit is a precision part. Protect it from damages.
Do not use any harsh or abrasive cleaning agents.
Installation of a residual current appliance (FI/RCD) with a rated
residual operating current of no more than 30 mA is recom-
mended to provide additional protection.
Ask your electrician for advice. The installation should only be
carried out by a qualified electrician.
03. ABOUT THESE INSTRUCTIONS
Before using the appliance for the first time, read the
Instructions for Use carefully and ensure you comply with the safety
instructions!
The appliance should only be used as described in these instruc-
tions. The manufacturer or dealer is not liable for damages arising
from any use contrary to the intended purpose.
Keep these instructions for reference.
If you pass the appliance on to someone else, please include these
instructions.
Warnings in these instructions
If necessary, the following warnings will be used in these operating
instructions:
DANGER! High risk: Failure to observe this warning may result
in injury to life and limb.
WARNING! Moderate risk: Failure to observe this warning may
result in injury or serious material damage.
CAUTION: Low risk: Failure to observe this warning may result
in minor injury or material damage.
NOTE: Circumstances and specifics that must be observed when
handling the appliance.
04. INITIAL OPERATION
Checking the beard trimmer and scope of delivery
1. Remove the beard trimmer from its packaging.
2. Check the delivery for completeness (see fig. A).
3. Check whether the beard trimmer, the individual parts or the acces-
sories show any damages.
4. If the scope of delivery is incomplete or the beard trimmer, the in-
dividual parts or the accessories show any damages, do not use the
beard trimmer. Contact the manufacturer via the service address
stated on the warranty card.

26 27GBGB
05. CHARGING
DANGER! Handling of lithium-ion batteries
Improper use may lead to injuries and material damages!
Fire and explosion hazard!
CAUTION! Material damage
Keep in mind that, for technical reasons, the capacity of batter-
ies will decrease during extended periods of storage.
Extended periods of storage and the related interruption of the charg-
ing and discharging cycles should therefore be avoided.
If there are any interruptions during the charging process (heating of
the appliance, cord or power source, too slow charging and the like),
interrupt the charging process and contact our Service Centre.
NOTES:
Store the product at a temperature between 5°C and 35°C.
Prior to the first use: Charge the appliance for approx. 90 minutes
using the provided mains adapter only.
With regular use it will take 90 minutes to fully charge the battery.
Charging
1. Connect the USB plug 8to the USB female connector 7and the
5V plug 10 to the appliance.
2. Connect the mains adapter to an easily accessible wall socket.
3. Observe the indicator lights on the beard trimmer (see table).
WARNING! Always observe the voltage and power (mA) data
stated on the type plate of the mains adapter. Never use exter-
nal power sources strongly deviating from these data.
Symbol Meaning
% display
Battery operation
Battery capacity low –
recharging
Charging or mains operation
Fully charged at the mains
Travel lock is active
06. TRAVEL LOCK
It is easy to prevent the beard trimmer from being accidentally switched
on, e.g. when travelling.
NOTE: The travel lock function will be deactivated automatically when
the charging process starts.
Activating the travel lock
1. Press and hold the on/off switch 3for more than 5 seconds. The
switch of the beard trimmer is locked and the appliance switches off.
A padlock symbol appears on the LCD display.
2. Check whether the travel lock is activated by briefly pressing the
on/off switch 3(for less than 5 seconds). If the travel lock is active,
the padlock symbol is shown on the display.
3. The on/off switch is temporarily without function; accidental activa-
tion of the appliance and discharging of the batteries are prevented.

28 29GBGB
Deactivating the travel lock
1. Press and hold the on/off switch 3for more than 5 seconds; the
travel lock is deactivated and the beard trimmer switched on.
2. The travel lock will also be deactivated by connecting the beard
trimmer to the mains.
07. OPERATION
Regardless of the state of charge of the batteries, mains operation of the
appliance is always possible using the provided mains adapter only.
1. For mains operation, connect the USB plug 8to the USB female
connector 7and the 5V plug 10 to the appliance.
2. Connect the mains adapter to an easily accessible wall socket.
3. Use the on/off switch 3to switch on the appliance.
4. Press the on/off switch 3to switch off the appliance.
Using the variable attachment comb
WARNING! Switch off the appliance before attaching the vari-
able attachment comb.
To attach the variable attachment comb, carefully push the locking
mechanism of the variable attachment comb 5into the central
guide groove of the appliance; at the same time, press the cutting
length adjustment button on the back of the comb attachment and
set the desired cutting length.
To remove the variable attachment comb, press the cutting length
adjustment button, fully extend the variable attachment comb and
pull it off.
Trimming with the variable attachment comb
The variable attachment comb can be used to set the cutting length
to 6 different levels. With 0.8mm fine adjustment, the cutting lengths
are è4/6/ 8/10 /12/14 mm.
NOTE: The cutting lengths can only be achieved
when you position the appliance with the surface
of the comb (see fig.). The fine adjustment must
be set to 0.8mm.
Trimming without variable attachment comb
If you want to trim your beard to a very short length without us-
ing the variable attachment comb, the cutting length can be set
between 0.8 and 2mm using the slide switch for the fine adjustment.
The selected cutting length is shown on the display.
NOTE: The cutting lengths can only be achieved
when you position the appliance with the short
front cutting surface – relatively steep (see fig.).
08. CLEANING AND CARE
DANGER!
Remove the mains adapter from the socket before cleaning the
appliance.
WARNING!
Always switch off the appliance before cleaning it.
CAUTION!
Do not use any harsh or abrasive cleaning agents.
NOTE: Clean and oil the appliance after every use.

30 31GBGB
Remove the variable attachment comb. Rinse the variable attachment
comb with water and let it dry before reattaching it to the appliance.
Wipe down the housing of the appliance with a damp cloth.
Cleaning and oiling the shaving unit
1. Remove the shaving unit from the appliance by pressing it with the
thumb towards the rear (see fig. C).
2. Use the provided brush to remove the hair remnants from the shav-
ing unit.
3. The shaving unit can be cleaned under running water. Allow it to dry
well before reattaching it.
4. Apply a few drops of oil onto the cutting edge of the shaving unit.
Use a soft cloth to wipe off the excess oil, if necessary. Only use
acid-free oil such as sewing machine oil.
5. Carefully press the shaving unit from the rear onto the device until it
locks into place.
09. STORAGE
DANGER!
Remove the mains plug from the appliance. Do not wrap the
cord around the device (Danger! Risk of cable break!).
Store the appliance in a dry, dust-free room.
10. TROUBLESHOOTING
DANGER! Do not attempt to repair the device yourself. Always
remove the mains plug from the socket whenever a fault occurs.
Fault: Please check the following:
No function Is the power supply ensured during
charging??
Are the batteries discharged?
Is the travel lock deactivated?
Did you check the plug-in connections?
The shaving unit is
not running smoothly
Shaving unit cleaned and oiled?
If you are experiencing a fault which is not listed here, please do not
hesitate to contact our Service Centre. Repairs must only be carried
out by a specialised company.
11. TECHNICAL DATA
Type Designation CRR-623
Article no. 15173011
Mains adapter:
Input voltage
Output voltage
Type of protection
Class of protection
Ambient conditions
100–240V~, 50/60Hz, 0.2A
5.0V ä, max. 1000 mA
IP20
⧈ II
Only approved for indoor use
Beard trimmer:
Input voltage
Rechargeable batteries
Operation Time
5.0V ä, max. 1000 mA
1x 3.7V Li-Ion (AA)700mAh
approx. 60 minutes, when fully charged
CARRERA is a registered trademark. In the course of product improve-
ments, we reserve the right to make technical and visual changes to the
appliance and its accessories.

32 33GBGB
12. DECLARATION OF CONFORMITY
The CE mark was applied in accordance with the correspond-
ing European directives.
The conformity declaration is held by the distributor:
Aquarius Deutschland GmbH
Adalperostrasse 29 ·85737 Ismaning b. München · GERMANY
(This is not a service address!)
13. DISPOSAL
This symbol indicates that, in the European Union, the product
must be disposed of at a separate waste collection point.
This applies to the product and all accessories marked with this
symbol. Products marked as such may not be discarded with
normal domestic waste, but must be taken to a collection point
for recycling electrical and electronic appliances.
The battery must be removed from the appliance before it
is scrapped.
The appliance must be disconnected from the supply mains
when removing the battery.
The lithium-ion battery installed in this appliance must not
be thrown away with your household waste. The battery
must be disposed of properly. For this purpose, turn to the
retail markets selling batteries or the local collecting points.
Qualified employees can obtain the removal instructions
from the importer, e.g. via the web page.
Packaging
If you want to dispose of the packaging, make sure you comply
with the environmental regulations applicable in your country.
Li-Ion

34 35FRFR
SOMMAIRE
01. Contenu de la livraison / pieces de l’appareil 36
02. Consignes de sécurité 37
03. Concernant ce mode d’emploi 41
04. Avant utilisation 42
05. Chargement 42
06. Verrou de voyage 44
07. Utilisation 44
08. Nettoyage et entretien 46
09. Stockage 47
10. Dépannages 47
11. Déclaration de Conformité 48
12. Caractéristiques techniques 48
13. Elimination 49
Merci
Merci d’avoir placé votre confiance en CARRERA – et de nous
donner l'opportunité de vous confirmer la justesse de votre
choix de cette tondeuse à barbe.
Nous sommes guidés par une seule idée.
Chaque appareil CARRERA suit un concept clair. Aucune
examen du rôle des genres, pas de rose pour les femmes
ni de bleu pour les hommes. Depuis quand la qualité et la
performance ont-elles un sexe?
Nous créons une technologie qui optimise la convivialité de
la manutention et de l'esthétique et donnons corps à la per-
formance, non seulement dès l'allumage de l'appareil, mais
aussi de nombreuses années plus tard. La performance est
obtenue par le moteur lui-même et résulte aussi de l'interac-
tion habile de chaque composant individuel.
Ce concept, nous l’appelons simplement « le coup de pouce
CARRERA ».
Bien que nous n’ayons pas réinventé la roue, nous avons eu
le courage de concevoir un produit avec tout ce qu’il a de
plus essentiel et nous dispense de ce qui n’a pas d’impor-
tance.
Voilà notre style ! Et vous le retrouverez dans chaque autre
produit CARRERA.
Prolongez votre garantie de 24 à 36 mois dès main-
tenant !
Alors, pourquoi ne pas prolonger immédiatement la garantie
de votre tondeuse à barbe jusqu’à 36 mois au cours des 36
prochains jours ? Vous trouverez de plus amples informations
dans la carte de garantie ci-jointe ou directement sur le site
www.carrera.de/service.

36 37FRFR
02. CONSIGNES DE SÉCURITÉ
Utilisation conforme
La tondeuse à barbe est exclusivement destinée à la coupe des poils
humains.
L'appareil est conçu pour un usage domestique privé et ne peut être
utilisé à des fins commerciales.
L'appareil ne doit être utilisé qu'en intérieur.
Contre-indication d'utilisation
Ne pas utiliser cet appareil pour couper les cheveux artificiels ou les
poils des animaux.
Instructions pour une utilisation
en toute sécurité
Pour le fonctionnement sur secteur, utilisez
exclusivement le bloc d’alimentation enfi-
chable d’origine fourni.
Cet appareil ne peut être utilisé par des
enfants de plus de 8 ans, des personnes
aux facultés physiques, sensorielles ou
mentales réduites, ainsi que des personnes
sans expérience ou qui ne connaissent pas
l'appareil que s'ils sont surveillés ou s'ils
ont reçu les instructions sur l'utilisation en
toute sécurité de l'appareil et s'ils ont com-
pris les dangers liés à son utilisation.
Il est interdit aux enfants de jouer avec
l'appareil.
01. CONTENU DE LA LIVRAISON /
PIECES DE L’APPAREIL
1Unité de coupe en acier inoxydable
2Interrupteur coulissant pour un réglage fin
(0,8 / 1,2 / 1,6 / 2,0 mm) sans peigne
3Interrupteur On/off
4Prise femelle
5Sabot de coupe avec fonction de verrouillage
6Brosse de nettoyage
7Prise femelle USB
8Fiche USB
9Adaptateur au secteur
10 Fiche 5V avec cordon d’alimentation
11 Affichage du niveau de batterie en %
12 Symbole de batterie
13 Témoin clignotant de batterie faible
14 Verrou de voyage
15 Affichage pour le réglage fin de la longueur de coupe
16 Bouton de réglage de la longueur de coupe
(4 / 6 / 8 /10 / 12 /14 mm avec réglage fin à 0,8 mm)
Autres accessoires (pas d’image):
Pochette de rangement

38 39FRFR
Il est interdit aux enfants de procéder au
nettoyage et à la maintenance à moins
qu'ils soient sous la surveillance d'un
adulte.
L'appareil et le câble de raccordement
doivent être tenus hors de portée des
enfants de moins de 8 ans.
Maintenez l’appareil sec.
REMARQUE :
Afin de recharger la batterie, utilisez
uniquement le bloc d'alimentation
amovible fourni avec cet appareil
(type: ZD5C050100EUDU).
DANGER pour les enfants
Les emballages ne sont pas des jouets. Il est conseillé
de tenir les sachets en plastique hors de portée des enfants.
Risque de suffocation.
DANGER d'électrocution lié à l'humidité
Ne pas plonger dans l’eau ni dans aucun autre liquide, et ne pas
rincer sous l’eau courante l’appareil, le cordon ou le bloc secteur.
Ne jamais placer l’appareil de sorte qu’il risque de tomber dans
l’eau lorsqu’il est branché.
Si l’appareil est tombé dans l’eau, débranchez immédiatement
le bloc secteur de la prise et, seulement après, retirez l’appareil
de l’eau. Ne plus jamais utiliser l’appareil, mais le confier à un
spécialiste à des fins de vérification.
DANGER d'électrocution
Ne mettez pas l'appareil en marche, si l'appareil, le bloc
secteur ou le câble présentent des dommages visibles ou que
l'appareil a déjà subi une chute.
Insérez le bloc secteur à la prise une fois le câble raccordé à
l'appareil.
Ne branchez le bloc secteur qu'aux prises accessibles instal-
lées correctement et dont la tension correspond aux indica-
tions sur la plaque signalétique. La prise de courant doit rester
facilement accessible après le raccordement.
Veillez à ce que le câble ne soit pas endommagé par les bords
tranchants ou les zones chaudes.
Veillez à ce que le câble ne soit pas coincé ou écrasé.
N'enroulez pas le cordon autour de l'appareil (Risque d'en-
dommagement).
Pour débrancher l'appareil, tirez toujours sur le bloc secteur,
jamais sur le câble.
Débranchez l'appareil de l'alimentation électrique externe, …
… après chaque utilisation,
… après chaque opération de rechargement,
… lorsqu'une panne survient,
… avant de raccorder l'appareil au câble,
… avant de nettoyer l'appareil et
… en cas d'orage.
Pour éviter tous risques, n'entreprenez aucune modification
sur l'appareil ou sur les pièces accessoires. Ne pas échanger
le câble vous-même. Ne faire faire les réparations que par une
entreprise spécialisée.
Table of contents
Languages:
Other Carrera Electric Shaver manuals

Carrera
Carrera CRR ICE-213 User manual

Carrera
Carrera 9113110 User manual

Carrera
Carrera 421 User manual

Carrera
Carrera CRR GLOSS-30 User manual

Carrera
Carrera CRR Match-15 User manual

Carrera
Carrera CRR RACE-210 User manual

Carrera
Carrera CRR ICE-21 User manual

Carrera
Carrera 9133301 User manual

Carrera
Carrera 521 User manual