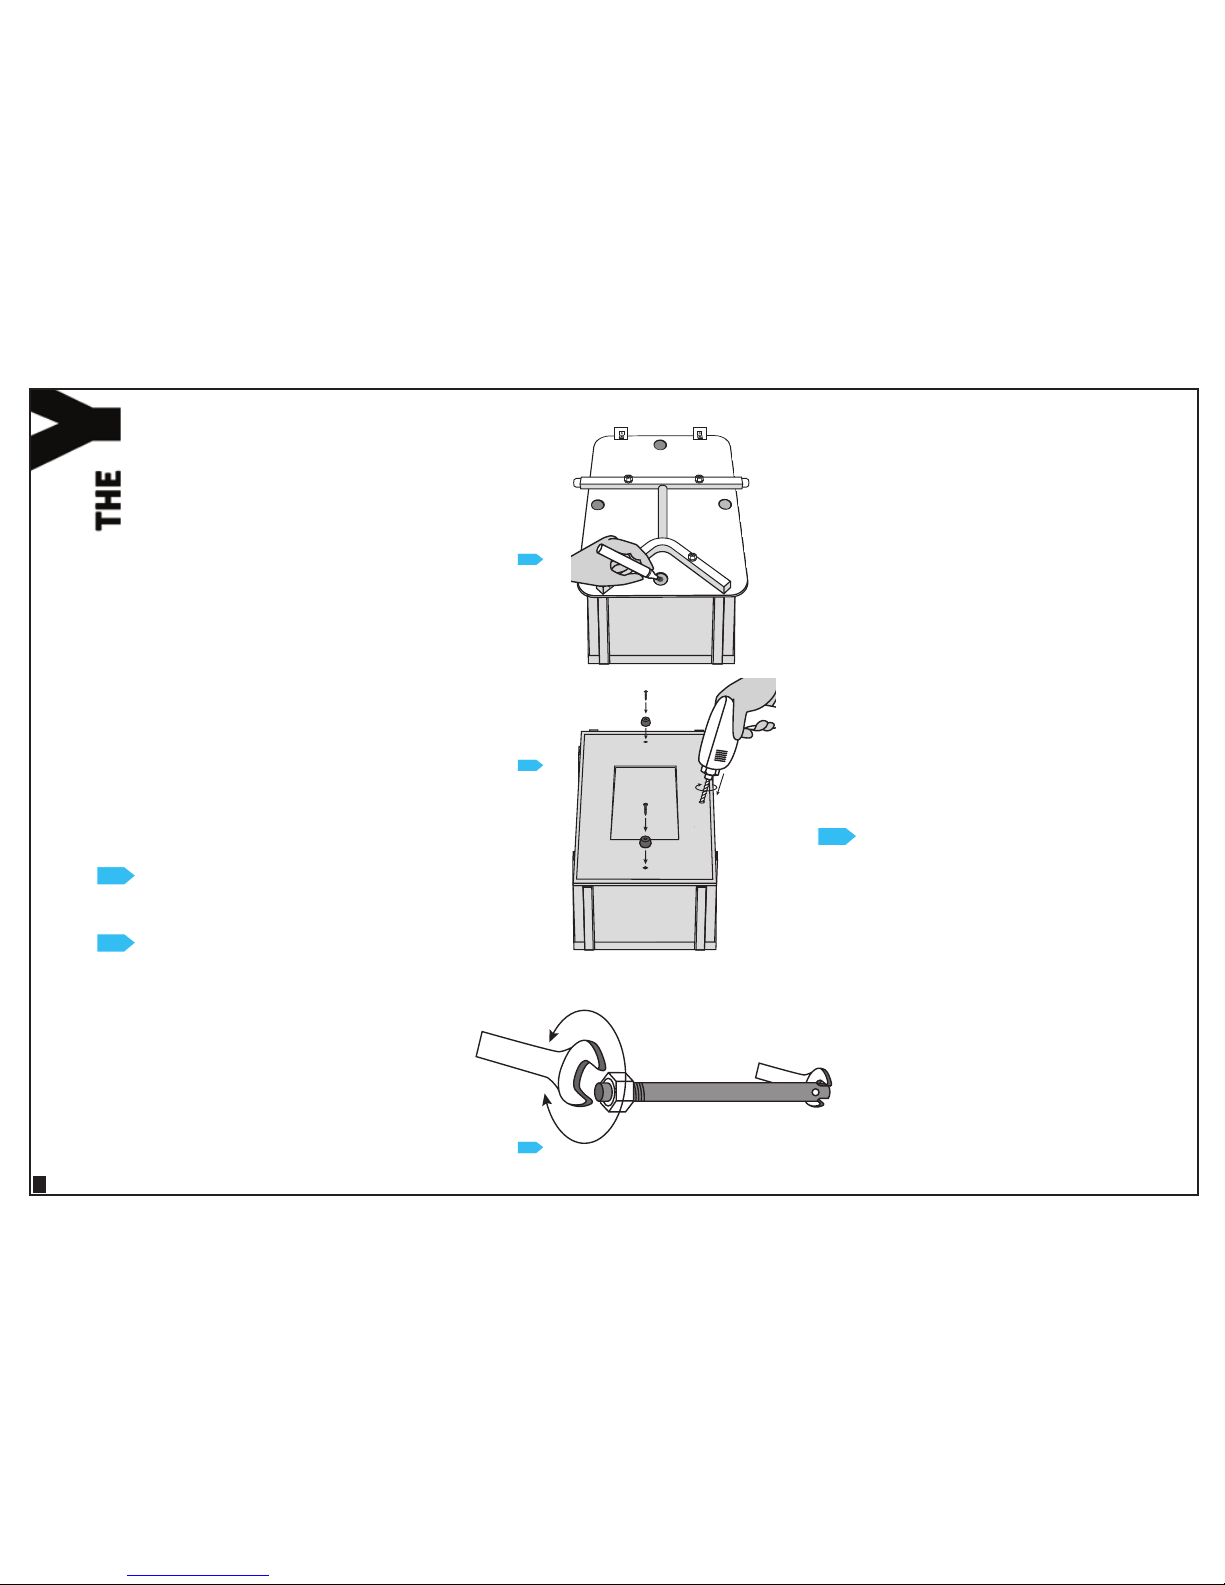
Carry Freedom Y Assembly instructions

1
a bike trailer revolution
THE
Y
MANUAL
english

2
Y trailer small - maximum load 45 kg (100 lbs)
Y small - At the max. load of 45 kg, the support load (nose weight) is approx. 8 kg
Y trailer large - maximum load 90 kg (200 lbs), with Quick Release axle 50 kg
Y large - At the max. load of 90 kg, the support load (nose weight) is approx. 10 kg
1 x tow arm
2 x wheel
2 x velcro load strap
1 x frame
4 x load bed bolt, nut & washer
1 x load bed
1 x safety pin for the chassis
2 x QR axle
2 x hub cap
2 x rubber axle ring
4 x box QR bolt, nut & washer
4 x box QR feet
1 x safety strap
2 x deection device with bolts,
nuts and washers
2 x rear reector with xing screw
1 x front reector with bolt, nut and
washer
1 x bike bracket with QR washer
1 x lollypop elastomer hook with
screw/nut/washer and safety pin
1
2
3
4
5
6
7
8
9
10
11
12
13
15
14
17
16
Parts List
Welcome
Thank you for buying a Carry Freedom
trailer. These instructions will help you get
the most out of your new Y trailer.
Read these instructions carefully before
use.
IMPORTANT:
It is your responsibility to understand these
instructions. We do not accept responsi-
bility for how you use, modify, ride, or load
the trailer. You must decide if what you are
doing with the trailer is safe, within your
ability, and within the law. Please check
your highway laws concerning bicycles and
trailers.
Y Manual
GB
18

3
1
2
12
MARKER
- Linke Seite
- left side
1 x
1 x
1 x
1 x
2 x
2 x
1 x
4 x
4 x
4 x
2 x 2 x1 x
4 x
1 x
1 2 3
4 5
6
7 8 9 10
2 x
11 12
13
14
16
17
18
2 x
1 x
15
Red White
2 x

4
1
2
12
MARKER
- Linke Seite
- left side
1
2
12
MARKER
- Linke Seite
- left side
1
2
12
MARKER
- Linke Seite
- left side
1
2
12
MARKER
- Linke Seite
- left side
8
11
9
6
1
2
12
MARKER
- Linke Seite
- left side
3
4
1
2
10
5
Assembly - Load Bed and Tow Bar
Slide the tow bar (#1) into the main frame (#4) until
its hole aligns with the frame hole.
Slide the safety pin (#7) through the frame and tow
bar handle and secure.
Screw the two red reectors (#15) to the load bed.
Bolt the white front reector (#16) to the towing arm.
Fit the red lollypop elastomer (#18) with the safety
strap (#13) to the tow bar end with the screw, nut
and washer.
The safety strap (#13) is used as in drawing 6below.
The deection device (#14) consists of two black
plastic wings. Bend them and bolt them to the right
and left side of the load bed using the bolts and nuts
in the box. The bed has been drilled for this, you just
need to make a hole in the griptape. See drawing 13
Assembly - Wheel to Frame
Check the the tires to determine the left and right
side wheel. Push the button on the end of the axle
(#8), and insert into the wheel. Push the rubber ring
(#10) on the axle so that it ts between the hub and
the frame. This ring stops water getting into the
bearings and helps against trailer noise.
Important!
Grease the axle before inserting into the frame.
Insert a rubber hub cap (#9) to cover the axle end.
Push the hub cap and insert the wheel into the trailer.
Pull at the wheel to ensure it is secure. If not see
Adjusting axle length on Page 6.
The rubber hub caps can fall out but this does not
shorten the bearing life of the wheel, as the inside
bearing has the most strain. Secure the caps with a
drop of super glue or by using a zip tie between two
opposing spokes.
1
2
3
4
5
6
7
8
9
10
GB
11

5
1
2
12
MARKER
- Linke Seite
- left side
1
2
12
MARKER
- Linke Seite
- left side
1
2
12
MARKER
- Linke Seite
- left side
1
2
12
MARKER
- Linke Seite
- left side
12
13
14
15
Hitch
The bike bracket (#16) for your trailer is xed perma-
nently to your bike. The trailer hooks to this, and is
secured by a pin. The bike bracket will t almost all
axle types, both threaded and quick release.
This bracket uses your existing quick release skewer
or wheel axle. Avoid removing any existing washers
or springs of the bike axle assembly. A washer to
centralise the QR axle on the bike bracket is included.
The trailer is now assembled. See drawing 13 below.
IMPORTANT: Make sure there is at least 4 mm thread
on your QR skewer or threaded axle. And use the
safety strap as shown in drawing 6.
We can supply a longer QR-axle in case your QR-axle
is too short. Be careful that the hitch does not aect
the function of the axle assembly.
IMPORTANT: After cycling for 1 km inspect the hitch
to make sure it is secure, has not twisted, and the
wheel has not moved.
Loading the Y
The Y trailer can accept most loads. You can bolt con-
tainers directly to the frame or load bed, strap things
down, or t a box with our box quick release system.
Loading directly - Any load can be tied down onto
the anti slip surface of the load bed. The four holes in
the load bed can be used as tie down points, as can
the aluminium frame below the load bed. Regularly
check the load is secure and has not slipped.
Bags - Most bags can be strapped directly to the load
bed using the enclosed straps, but the grip surface
can abrade bags quickly. Place a mat between bag
and the trailer, if this is a problem.
Waterproof Ortlieb Rack Packs can clip directly to the
load bed, the 48 l for the Y small, and the 90 l for the
Y large. Carradice of Nelson make a special Y-Bag
for Carry Freedom Y small. See www.ortlieb.com or
www.carryfreedom.com for more details.
13
12
14
15

6
HANDCART HANDLE
1
2
12
MARKER
- Linke Seite
- left side
1
2
12
MARKER
- Linke Seite
- left side
1
2
12
MARKER
- Linke Seite
- left side
10 mm
19 mm
16
17
18
Boxes
Many at bottomed boxes will t. The maximum
normal box footprint is around 450 x 900 mm for the
Y small and 600 x 900 mm for the Y large.
1/4 Euro Pallet boxes are 60 cm long and 40 cm wide
and t the small Y trailer.
1/2 Euro Pallet boxes are 80 cm long and 60 cm wide
and t the large Y trailer.
A box can be bolted permanently to the Y or tted
with our box quick release. The center of the box
should lie ahead of the trailer axle, and the front of
the box must be clear of your bicycles wheel.
To t a box permanently secure it at least four points,
as close to its corners as practical. Boxes may need
penny washers tted to stop the bolt pulling through
the box’s base. Secure weak boxes to the load bed,
strong boxes may be bolted directly to the frame.
Box Quick Release
This simple system allows at bottomed hard body
boxes to attach and detach from the Y trailer quickly
and easily.
Fitting
The load bed should be positioned so that the box
sits centrally between the two wheels. Mark the
rough centre of the load beds four holes.
Remove the trailer and drill four 6mm holes. Bolt
the location feet to the box using the following
sequence:
IN bolt-washer-box-washer-foot-nut OUT
Using
Fit the two load straps to the left and right load bed
holes. Place the box so the four feet sit in the four
load bed holes. Secure the box with the straps.
The straps will retain any lid on the box.
Loading Rules
IMPORTANT: Do not carry more than 90 kg (200 lbs)
of luggage when cycling. Anything higher is too
heavy for your bicycle brakes to stop eectively.
Keep the trailers centre of gravity lower than 60 cm,
and in front of the trailer axle.
Cycle slower, as you carry more.
Make sure your load is secure, and that nothing can
catch in the wheels, or drag on the ground.
Adjust tyre pressures to match the load, higher
pressures for heavier loads. 30 psi is normally about
right. If the trailer is bouncing or skipping as you ride
along the tyre pressure is too high.
No rigid load should be closer than 25 mm to any
wheel, and no exible load should be closer than
50 mm to any wheel.
Never use the trailer to carry children or live animals.
Adjusting axle length
If an axle is too short the wheel and axle will fall o,
if the axle is too long the wheel will rattle against the
frame, it is better to be too long than too short.
To adjust the axle length, t a 10 mm spanner to
the ats at the end of the axle and a 19 mm spanner
to the lock nut at the other end. Twist the lock nut
to lengthen or shorten the axle. Adjust by small
increments only, checking the axle in the frame until
it’s secure and does not rattle excessively. This is
important when using the small rubber washers we
include to reduce noise and to protect the bearings.
Recheck the length at regular intervals.
16
17
18

7
Monthly maintenance
IMPORTANT:
The Y trailer needs very little maintenance, however
its reliability and length of service can be dramatically
improved by the following:
DO THIS: Clean and grease the axle shafts, or else
they rust in place.
DO NOT store the trailer with axles in the frame,
condensation can cause them to rust in place.
NEVER grease or oil the hitch. Grease attracts grit
and shortens the hitches life.
DO THIS: Check wheel condition regularly.
DO THIS: Check to see if the red Lollypop on the
hitch is in good condition, are there any tears?
CHECK if any of the nuts or bolts on the trailer are
loose?
INSPECT for any signs of damage to the frame or
load bed.
Warning: Read this before use!
Your bike
Make sure your bike is suitable for use with this
trailer. Check your bicycle manual to see if trailer use
has been excluded. If you are not sure, contact your
local bicycle dealer.
Checkyourbike,yourtrailerandespecially
your brakes before every journey.
Trailer use
Be warned that you need to be careful:
Bikes handle dierently when pulling a trailer. The
braking distance will be longer than usual, especially
when the road is wet. The space needed to turn a
corner will be more than you are used to.
Lights and reectors
We sell Carry Freedom Trailers throughout the world.
In the global market there are many laws and regu-
lations about lights and reectors. We have tested
the trailers against the German Law on lights and
reectors. The German Law is one of the toughest, so
we think this will work in many other countries BUT
you must check your transport laws in your country
and change any reectors that do not conform to
the law.
The deection device and the safety strap are not
required by law throughout the world. You are
responsible for using them when mandatory.
Safety rst
The Y Trailer has been tested and conforms to the
European DIN EN 15198 for bicycle load trailers. The
testing was done by velotech.de in Germany.
Remember! A lot of commonsense should be used
when carrying loads. Be safe and have fun!
Options ...
Handcart Handle - for Y trailer (small and large): A
simple adjustable handle that pins to the right hand
Y trailer arm. This allows you to walk with the Y trailer
while keeping the load bed level. It does not need to
be removed for cycling. The handle also has a foot to
keep the trailer level.
Extension Arm - Long Arm for towing bicycles, surf-
boards, canoes and kayaks. Available in two lengths:
a) +0.5 m for loads up to 1.8 m (about 5 ft 10) long
b) +0.9 m for loads up to 2.5 m (about 8 ft 2) long
Comes with a Lollypop Elastomer and safety splint.
Replaces the standard Y trailer tow bar.
Looong Arm for towing bicycles, surfboards, canoes
and kayaks up to 6 meters (19 ft 8) long. Comes
with 2 x 1.5 meter (4 ft 11) long tow bars, which bolt
together to make the tow bar 3 meters (9 ft 10) long.
These 2 bars can be cut down for specic use.
Wide Axle Beam - Will bolt to any existing Y trailer
(without any modication needed) to give an axle
beam width of 85 cm. The normal width is 50 cm for
the Y small and 65 cm for the Y large. Mainly used for
Kayaks and canoes when extra width is needed.
Fender Set - The heavy duty fenders, made of sheet
aluminium, t the Y large and are perfect for those
needing rain protection in hardcore situations.
The Touring Fenders are made of plastic and curved
so that the water does not spray to the side. These
are available for both Y small and large. All fenders
can be retro tted to older trailers.
Folding boxes - The Carry Freedom folding box is
robust and versatile. It folds small when not in use.
It’s perfect for that shopping trip.
Cargo straps - Carry Freedom cam straps for keeping
the most dicult loads safe and sound.
And lots more....!

8
There are a lot more options for your Y trailer:
Flag and rear light holder which can be retrotted
on all Y trailers.
Kayak holder - Fits to the load bed of the Y large.
Tow arm for the Weber hitch.
Trailer Snake - to join more than one Y trailer
together.
Also check out the other trailers in the Carry
Freedom portfolio:
The LEAF - a shopping travel trailer, light and
foldable.
The CITY - the classic foldable suitcase bike trailer.
Our trailers are ...
Ecient
A bicycle trailer is more ecient than a
rucksack or panniers. Trailers isolate your
bike from the load so you don’t waste
energy wiggling the load.
Safe
A bicycle towing a bicycle trailer handles
normally. It corners predictably, and
remains manoeuvrable.
Practical
Bicycle trailers are easier to live with.
They’re easy to pack, convenient to hitch,
and light to walk with. Our trailers also
atten easily for storage.
Alternative
A bike/trailer combination is a good
addition to your car and public transport,
oering another way to carry.
Every journey with a trailer is a journey
without a car. By making “stu carrying
by bike” easy, we encourage more cycle
journeys. Frequently our trailers are the
last step for people to stop depending on
their car.
German Bike Magazine
Best price / performance ratio
UK Bike Magazine
Best buy
UK Bike Magazine
Best product award
ISPO Munich
Brand New Award
German independent bicycle group
Ethic award for Bamboo Trailer
Need more information?
Go to the website
At www.carryfreedom.com
you will nd this and more:
Technical Information
We try to cover all your questions and
have a large FAQ. Contact us if anything is
still unclear.
Blog
Read about all the weird and wacky things
that happen here at Carry Freedom. See
who is travelling the world, climbing the
mountains and riding the waves on a bike
with a Carry Freedom trailer.
Dealer list
Find out where your nearest dealer is.
History
Read about how the company started
in a chicken shed on a farm not far from
Glasgow, Scotland. And how it grew.
Environment
Learn about how Carry Freedom and
USED support projects and people that
are changing the world. Car Free is not just
a slogan, it’s a philosophy.
Thanks for listening!
Contact: USED GmbH - Am Bahnhof 3
49610 Quakenbrück - Deutschland
Table of contents
Other Carry Freedom Bicycle Accessories manuals
Popular Bicycle Accessories manuals by other brands

Cube
Cube LITENING C:68 X Additional instructions

Burley
Burley BARK RANGER Owner's instruction and safety manual

Bosch
Bosch HERCULES Futura Compact 8 Translation of the original operating instructions

Shimano
Shimano ULTEGRA SL-BS78 - TECHNICAL Service instructions

Rotac
Rotac Carbonio Series owner's manual

Tern Bicycles
Tern Bicycles Axis Adjustable Stem manual