Cartek Speed Alert User manual

For off-road use only Made in UK
For the very latest information and extra
installation advice go to:
www.cartekmotorsport.com/downloads

The Speed Alert should be mounted securely on the dashboard where the LEDs can be clearly seen by the
driver. Mounting can be by two M3 screws from the underside or two M3 screws from the rear of the unit.
If mounting using M3 screws from the underside then please note the maximum thread depth is 8mm.
The SPEED-ALERT from is a dashboard mounted device that plugs into the car’s OBD2 socket and
is designed to alert a driver when they are approaching, or exceeding, a preset road speed. This can be used
for rally events where a maximum speed on stage is set and penalties applied to drivers who exceed it.
The Speed Alert therefore behaves in a similar way to a Sequential Shift Light where the multi-coloured LEDs
will begin to display at a speed that is below the maximum and increase as the maximum speed is approached
ending with a flashing display when maximum speed is exceeded.
The Speed Alert is plugged directly into the OBD2 port and is therefore compatible with most vehicles fitted
with this type of diagnostic connector. It is supplied with a dedicated 1.5 metre OBD2 cable and connector so
no additional wiring is necessary.
On first installation and power-up, the Speed Alert OBD2 will search for the correct OBD2 protocol and store
this to memory.
When the engine is switched off, the Speed Alert will enter sleep mode to minimise battery consumption but
will re-awake as soon as the engine is re-started.
Rear View of Speed Alert
66.0mm
25.5mm 12.7mm
1.0mm
1.1mm
1.3mm
17.7mm
75.0mm
Cable outlet Pushbutton
M3
M3
1

After installing the Speed Alert, and with the OBD2 cable plugged in, Configuration Mode can then be entered
where the following four settings can be checked or adjusted:
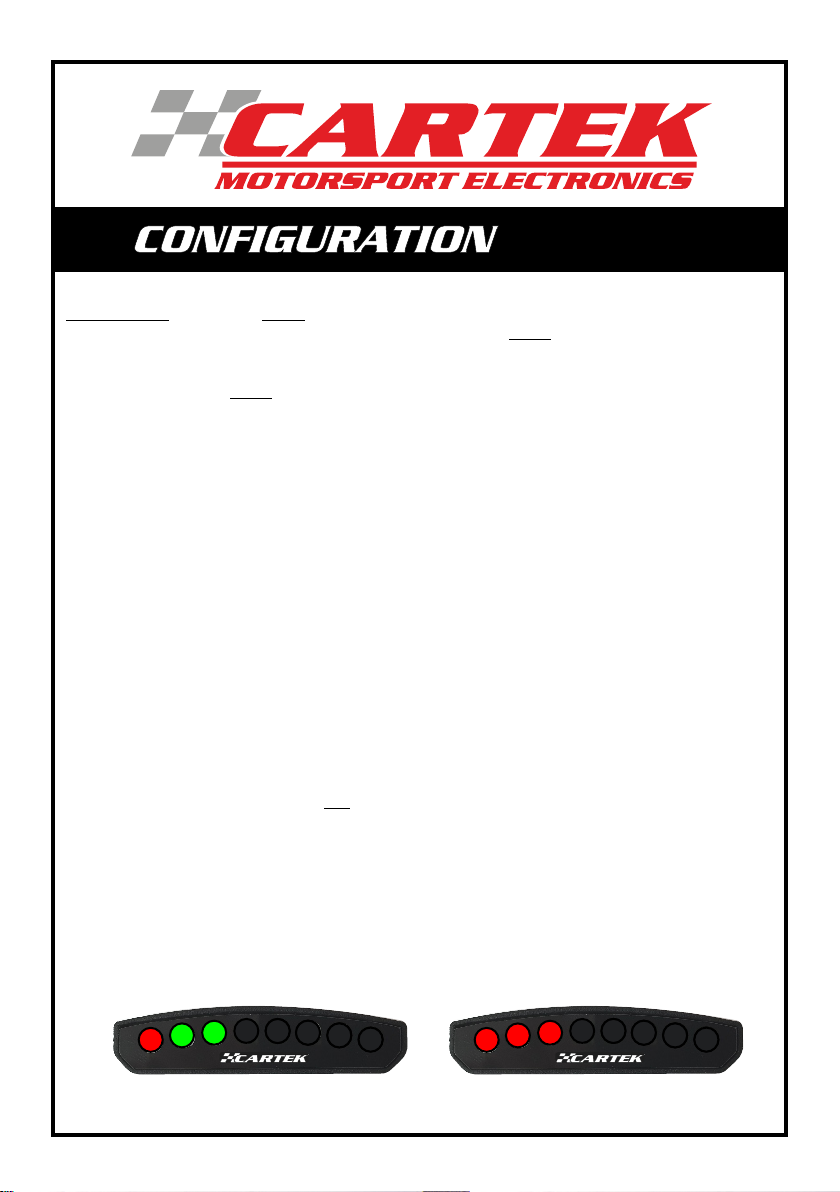
Configuration Mode is entered by pressing and holding the pushbutton on the rear of the unit for 2 seconds.
All 8 LEDs will flash White during this time. Configuration Mode will commence when the display changes to
1 White LED. This single White LED will indicate that Configuration Menu 1 can be entered by releasing the
pushbutton. If you wish to go directly to another Configuration then simply continue to hold the pushbutton
until the required Configuration number is displayed, e.g. 4 White LEDs represents Configuration Menu 4, etc..
Note 1:
Each Configuration is described in more detail below. Any changes to a Configuration are saved immediately.
There are 3 ways to exit a Configuration Menu:
1. Unplug OBD2 connector.
2. Press and hold the pushbutton for 2 seconds, and release when the LEDs are flashing.
3. Press and hold the pushbutton for 4 seconds. Doing this will go back to the Configuration menu selection
as above, starting from the next Configuration Menu item.
Factory Reset
If you wish to go back to the factory/default settings then a 'Factory Reset' needs to be performed. To do this,
unplug the OBD2 cable then, while pressing and holding the pushbutton, re-connect OBD2 cable. The outer
LEDs will display Blue. Continue to hold the pushbutton until the outer LEDs begin flashing, which will indicate
that the default settings have been restored. The pushbutton can now be released.
Factory/default settings are as follows:
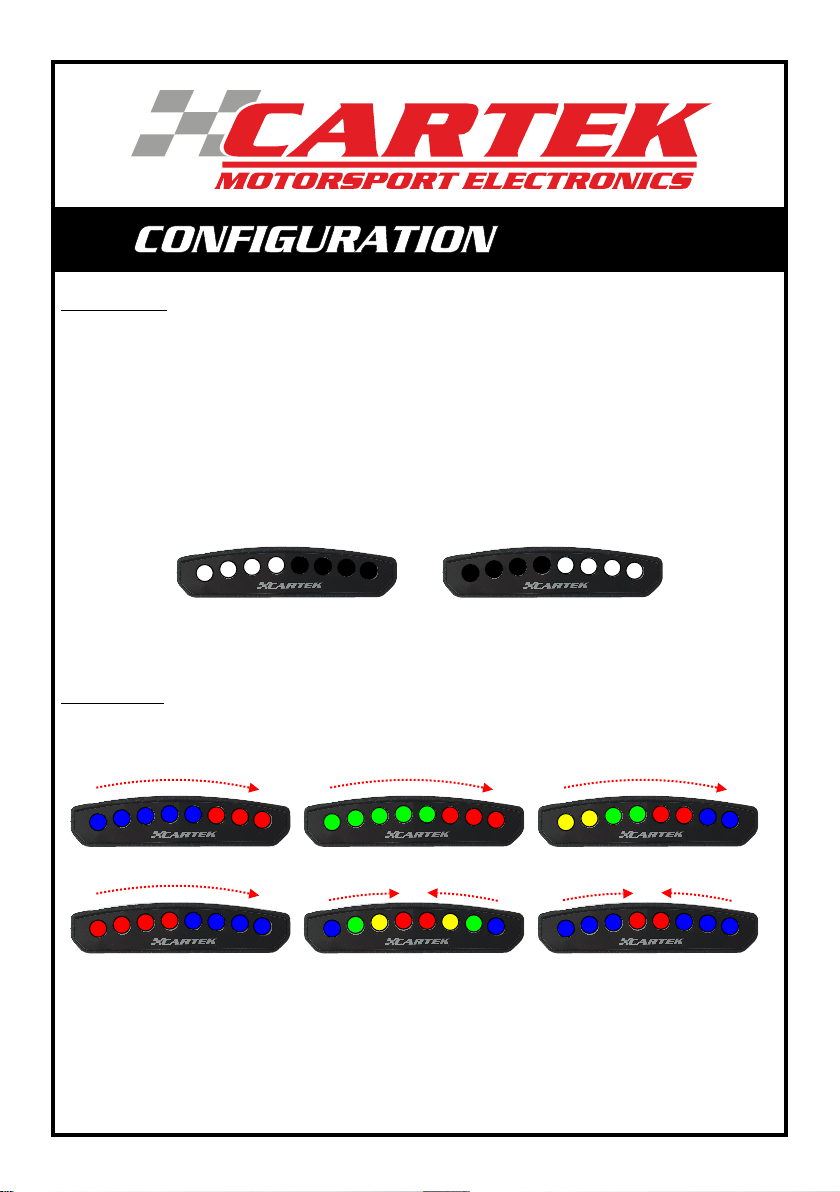
1 - LED Brightness Levels: Day Brightness (Maximum brightness), Night Brightness (Half Brightness)
2 - LED Speed Alert Pattern: Pattern 1 (Blue + Red display)
3 - Speed Alert Pattern START SPEED: 110 KPH
4 - Speed Alert Pattern END SPEED: 130 KPH
Configuration Menu LEDs Displayed Description
1 1 LED Brightness Level
2 2 LED Speed Alert Pattern
3 3 Speed Alert Pattern Start Speed
4 4 Speed Alert Pattern End Speed
2

Configuration 2 - Speed Alert Pattern:
On entering Configuration Menu 2, the LEDs will demonstrate the current selected Speed Alert pattern.
Subsequent quick presses of the pushbutton will cycle through each of the 6 available Speed Alert Patterns
below:
Pattern 1 - Linear Pattern 2 - Linear Pattern 3 - Linear
Pattern 4 - Linear Pattern 5 - Converging Pattern 6 - Converging
Once you have chosen your Speed Alert Pattern then refer back to Note 1 to either exit configuration or move
onto the next Configuration Menu.
SPEED ALERT (OBD2)
3
Configuration 1 - Brightness:
There are two adjustable brightness levels which allows the Speed Alert to be run in a Day brightness mode
or Night brightness mode. To toggle between the two brightness levels press the rear button momentarily.
Four LEDs will light up momentarily on the left if you are in Day mode, and 4 LEDs will light up momentarily
on the right if you are in Night mode. To adjust either brightness setting, enter Configuration Menu 1 by
pressing and holding the rear button for 4 seconds. Release the button when the first LED has lit up. Four
white LEDs on the left will now be displayed indicating you are in Day mode. A single press of the rear button
will change this brightness level ( 9 to choose from). Once you are happy with the brightness level press and
hold the rear button for 4 seconds until 4 white LEDs on the right light up. You are now in Night mode. Once
you have chosen your brightness levels then refer back to Note 1 to either exit configuration or move onto
the next Configuration Menu.
Brightness Level 1
(Default brightness = Max)
Brightness Level 2
(Default brightness = Half)

Configuration 3 - Speed Alert START SPEED:
There are two methods available for setting the Speed Alert Pattern START SPEED. This can be done by either
using the pushbutton to enter an exact SPEED value required, or driving the car at the precise speed.
3.1) Speed Alert Pattern START SPEED using the pushbutton (Engine must be stationary)
Firstly, consider the actual road speed (KPH) that you wish the display to start. This KPH value will be entered
as separate numbers, i.e. 100, 10 and 1. Any KPH value can be entered up to 299 KPH in steps of 1 KPH.
Perhaps write the required speed onto a piece of paper, e.g. 95 = 095.
On entering Configuration 3 when the engine is stationary, the display will show one Red LED followed by 2
Green LEDs on the left side of the display. This will be displaying the current 100 KPH setting. Static, (no
flashing) will represent 0x 100, 1 flash will represent 1x 100, 2 flashes will represent 2x 100. Quick presses of
the pushbutton will allow the value to be adjusted, however, only three values are available, 0x 100 1x 100
and 2x 100.
Pressing and holding the pushbutton for a minimum of 4 seconds will cause the configuration to move onto
the next KPH factor, 10 KPH. This value can also be adjusted with quick presses of the pushbutton which will
result in the value incrementing, e.g. static, (no flashing) will represent 0x 10 KPH, 9 flashes will represent 9x
10 KPH.
Pressing and holding the pushbutton again for a minimum of 4 seconds will cause the configuration to move
onto the last KPH factor, 1 KPH. This value can similarly be adjusted with quick presses of the pushbutton
which will result in the value incrementing.
If you now want to check or adjust the end KPH speed then hold down the push button for a minimum of 4
seconds to move onto the next Configuration Menu (4) as shown by 4 White LEDs, or to exit the Configuration
Menu refer back to Note 1.
1
0
0
K
P
H
1
0
K
P
H
1
K
P
H
Example:
Start of sequence = 095 KPH
0 Flashes
9 Flashes
5 Flashes
Configuration:
Start of sequence KPH
4
SPEED ALERT (OBD2)
Table of contents
Other Cartek Automobile Accessories manuals
Popular Automobile Accessories manuals by other brands

ULTIMATE SPEED
ULTIMATE SPEED 279746 Assembly and Safety Advice

SSV Works
SSV Works DF-F65 manual

ULTIMATE SPEED
ULTIMATE SPEED CARBON Assembly and Safety Advice

Witter
Witter F174 Fitting instructions

WeatherTech
WeatherTech No-Drill installation instructions

TAUBENREUTHER
TAUBENREUTHER 1-336050 Installation instruction