CAS BioMAT 2-S2 User manual

Contained Air Solutions Ltd | Unit 4 Greengate | Middleton Junction | Manchester M24 1RU |
T +44 (0)161-655-8860 | F +44 (0)161-655-8865
sales@containedairsolutions.co.uk | www.containedairsolutions.co.uk
We reserve the right to change specification without notice. © 2016 Contained Air Solutions Ltd
BioMAT 2-S2

Contents
Section
Description
Section 1
Your Manual
1.1
1.2
1.3
1.4
1.5
1.6
1.7
General Description
Quality Assurance/CE compatibility
Cabinet Siting
Installation
Avoiding Disturbances
Technical Data
Your Manual
Section 2
Using your Cabinet
2.1
2.2
2.3
2.4
2.5
2.6
2.7
2.8
Switches & Indicators
Start Up Procedure
Shut Down Procedure
Cleaning Procedure
Fumigation & Formalin Quantities
Fumigation Procedure
Airflow Measurements
Ultraviolet Radiation
Section 3
Cabinet Control Panel
3.1
3.2
3.3
3.4
3.5
Display
Alarm Circuits
Electrical Protection
Fan Speed Control
Engineers Menu
Section 4
Filter Replacement
4.1
4.2
4.3
4.4
Downflow HEPA Filter
Re-circ HEPA Filter
Exhaust HEPA Filter
General Notes
Section 5
Service & Spares
5.1
5.2
5.3
Service Schedule
Spares List
Wiring Diagrams (attached)

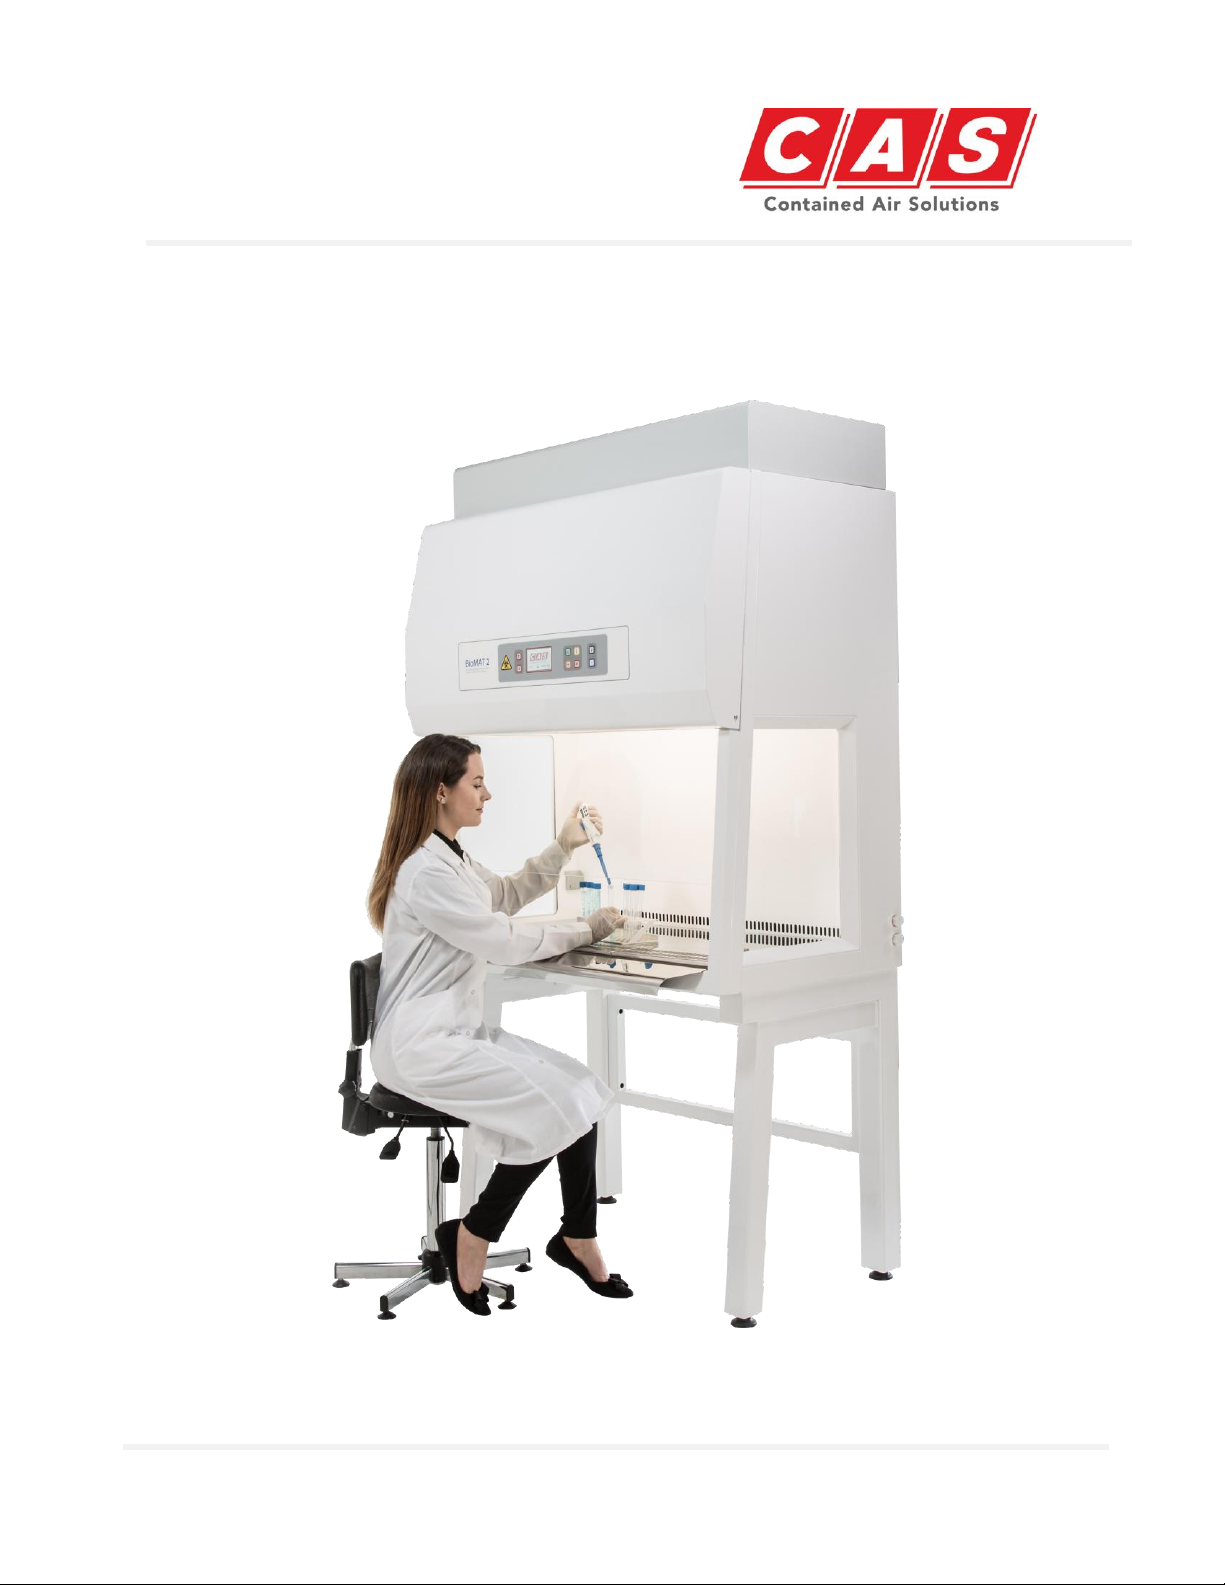
General Description –1.1
The BioMAT 2 Microbiological Safety Cabinet has been designed to provide optimum
performance for both operator and product protection. Using the latest developments in
microprocessor and fan technology, it is designed to exceed the performance requirements of
the European Microbiological Safety Cabinet Standard EN12469:2000. The safety cabinet
carcass and all seals are maintained under negative pressure ensuring air cannot leak out
during normal operation.
Class 2 Safety Cabinets offer both operator and product protection; they ensure that any
aerosols generated within the cabinet are filtered via high efficiency filtration (HEPA) prior to
being dispersed back into the laboratory or discharged to atmosphere. Operator protection is
provided by an air curtain across the working aperture in the front screen. Protection of the
products from external contamination is provided by a unidirectional downflow of sterile air
into the working area.
The Class 2 Microbiological Safety Cabinet can be supplied as standard in any of the following
three configurations:
Re-circulating Type –Air from the safety cabinet passes through two high
efficiency filters (HEPA) before being released back into the laboratory. The
exhaust air is made up of approximately 40% of the total air volume handled by
the safety cabinet. Approximately 60% of the air is re-circulated within the safety
cabinet and passes through a high efficiency (HEPA) filter to ensure sterility
within the work area.
Exhaust Type –Exhaust air from the safety cabinet is passed through a single
high efficiency filter (HEPA) before being dispersed to atmosphere via a fan
assisted extract system. The exhaust air is made up of approximately 40% of the
total air volume handled by the safety cabinet. Approximately 60% of the air is
re-circulated within the safety cabinet and passes through a high efficiency
(HEPA) filter to ensure sterility within the work area.
Thimble Type –Air from the safety cabinet passes through two high efficiency
filters (HEPA) before being discharged into an open duct, usually a specific
building extract system used to ensure laboratory extract & pressures are
maintained. This extract system is monitored via the safety cabinet controls, in
the event of an extract system failure the operator will be notified by an audible
and visual alarm on the cabinet. The exhaust air is made up of approximately
40% of the total air volume handled by the safety cabinet plus an amount of air
from the laboratory. Approximately 60% of the air is re-circulated within the
safety cabinet and passes through a high efficiency (HEPA) filter to ensure
sterility within the work area.

Quality Assurance –1.2
Although fully tested before leaving our factory as part of the ISO 9001:2008 Quality Assurance
Programme, the specified performance will only be maintained if your cabinet is sited correctly
and regularly serviced. CAS can only accept responsibility for correct functioning of your
cabinet if: -
The safety cabinet is correctly sited in the laboratory to avoid any adverse
conditions within the room that may affect the level of operator protection i.e. close
to air supply grilles, laboratory doors or thoroughfares.
It has been installed and commissioned by CAS trained personnel or approved CAS
agents.
Extension, modification, relocation, repairs or other maintenance is carried out by
CAS personnel or persons authorised by CAS or, in the case of electrical work, by
qualified electricians.
In the case of repair or maintenance, it is important OEM replacement parts supplied
by CAS are used.
The electrical installation surrounding the unit and to which it is connected
comply with the latest IEC regulations.
The unit is used and maintained in compliance with the instructions contained in this
manual.
CE Declaration of Conformity
CAS declares that the equipment supplied conforms to the following CE directives—
72/23/EC Low Voltage Directive and its amending directives
89/336/EC Electromagnetic Compatibility Directive and its amending directives
98/37/EC Machinery Directive and its amending directives

Cabinet Siting –1.3
The siting of your Safety Cabinet is extremely important. Air currents and the movement of
people in the laboratory can adversely affect the performance.
Safety Cabinets should be sited away from;
Doors and windows which open
Draughts caused by ventilation and air conditioning units
Pedestrian traffic routes
Other safety cabinets or fume cupboards
Adjacent fridge & Incubator doors
These points are of particular relevance to class 2 safety cabinets. The diagram shown below
indicates some suggested locations for the correct siting of safety cabinets and highlights some
situations which should be avoided.
3 4
2
1
HORIZONTAL
LAMINAR FLOW
SUPPLY GRILLE
Position 1 - An acceptable site not affected by disruptive air currents
Position 2 - Well sited, supply grille must be low velocity discharge.
Position 3 - Poorly sited if windows open –If not it should be a safe distance
from the cabinet opposite.
Position 4 - Poorly sited –can be affected by air currents from the opening door,
through traffic and the horizontal laminar flow workstation sited
directly opposite.

Installation –1.4
Safety Cabinets are sophisticated items of equipment containing delicate filters which require
expertise in their safe handling and installation into laboratories.
For exhaust type safety cabinets, the exhaust ductwork route should ideally be surveyed and
ductwork installation be carried out by qualified engineers as it forms an integral part of the
system relating to the overall performance of the cabinet and is required to conform to various
safety standards.
A poorly installed cabinet may compromise the protection provided by the cabinet to both
personnel and work being handled, it may also present a hazard to other occupants of the
building and the general public.
Make-up Air
It is important that any make-up air compensating for the air exhausted from the safety
cabinet does not cause draughts to the discomfort of the laboratory staff or be detrimental to
the cabinet performance.
Air supply diffusers should be positioned more than 1500mm away from the front of the safety
cabinet and have a maximum velocity of no more than 0.30m/sec.
Commissioning
When any safety cabinet is installed, it is necessary to carry out a number of commissioning
checks in order to ensure it is fully operational and that the performance on site satisfies the
current standard BS EN 12469:2000. This includes measuring airflows, testing the HEPA filters
with a suitable challenge aerosol and a KI Discus Test (operator protection test) at the open
aperture which is used to assess the containment of the cabinet.
CAS employ a team of fully trained installation and commission engineers to carry out all work
necessary. This ensures all new safety cabinets operate to the desired performance.
Site Surveys
If you have any queries regarding the siting of your safety cabinets we will be only too pleased
to arrange a site survey by one of our regionally based technical support staff.
Periodic Maintenance & Servicing
To maintain safety cabinets at their optimum level of performance and to ensure lifetime
operation, regular servicing is essential. CAS provide a full service and maintenance scheme
tailored to suit your individual needs. For more information on this please contact our service
department on 0161-655-8860.

Avoiding Disturbances –1.5
The sketches below show recommendations to help avoid disturbances for the cabinet
operator and safety cabinet performance.
1000
Keep pedestrians away from the front
of your safety cabinet Keep clear of adjacent wall
300
Position well away from the door openings
1500
1500
Position clear of bench opposite Keep clear of structural columns Keep well away from opposite wall
2000
Bench
C
300

Technical Data –1.6
Cabinet Size
900mm
1200mm
1500mm
1800mm
Dimensions
External Dimensions
(w/d/h)
900/705/1420
1200/705/1420
1500/705/1540
1800/7051540
Internal Dimensions
(w/d/h)
810/560/700
1110/560/700
1410/560/700
1710/560/700
Work Tray
(w/d)
770/400
1070/400
1370/400
1670/400
Opening to Work Area
(w/h)
770/200
1070/200
1370/200
1670/200
Weight Typical
Kg
210
220
315
350
Loading Capacity
Work Surface
Kg
25
25
25
25
Air Volumes Typical
Exhaust Air Volume
m³/sec
0.09
0.130
0.160
0.190
Re-circ Air Volume
m³/sec
0.130
0.190
0.240
0.290
Pressure Drop Typical
Exhaust Clean Filters
Pa
300
300
300
300
Exhaust Dirty Filters
Pa
500
500
500
500
HEPA Filter Data
HEPA Type
H14 (EN1822)
H14 (EN1822)
H14 (EN1822)
H14 (EN1822)
Efficiency
@ 0.3µ
99.999%
99.999%
99.999%
99.999%
Heat Gains Typical
Recirc
Watts
190
190
270
350
Exhaust
Watts
100
100
135
175
Noise Typical
Noise Level
dB (A)
<52
<52
<55
<55
Light Typical
White interior
Lux
>1000
>1000
>1000
>1000
St/St Interior
Lux
>800
>800
>800
>800
Duct Connection (Exh)
Mm
160
160
200
200
Electrical Data Typical
Voltage
Volts
AC
230
230
230
230
Frequency
Hz
50
50
50
50
Phase
N/A
Single
Single
Single
Single
Power Consumption
kW
0.19
0.19
0.27
0.35
Current
A
3
3
5
7
Internal Socket(s)
230v /13 Amp
230v /13 Amp
230v /13 Amp
230v /13 Amp

This Manual –1.7
This user manual has been prepared to provide a basic operating and maintenance instruction.
It is intended to supplement existing in-house procedures and codes of practice, and not to
replace them. If further advice is required on the use or maintenance of this equipment, the
staff of Contained Air Solutions Ltd. will be pleased to assist wherever possible.

Switches & Indicators –2.1
The diagram below shows a typical control panel membrane layout for the BioMAT 2
safety cabinet.
DESCRIPTION
LEGEND
COLOUR
FUNCTION
A –Cabinet Operation
Green
Starts / Stops power supply to
fans and control circuits.
B –Lights
Yellow
Controls power to work area
lighting.
C –Gas Valve (Optional
Feature)
Black
Used to activate a solenoid Gas
Valve (if fitted). Will only function
when cabinet airflows are in a
safe working condition.
D –Alarm Mute
Red
To mute the audible alarm. Fault
indication on display will remain
lit until fault is rectified, red alarm
strip bar mounted in the bottom
of the control panel door works in
conjunction with the visual alarm.
E –Fumigate
Orange
To activate decontamination
cycle. Will only operate when
cabinet is switched OFF and visor
is closed. (can be configured to
formaldehyde or VHP).

F –UV Lights (Optional
Feature)
Blue
Used to activate power to UV
Lights. Will only operate when
cabinet is switched OFF,
interlocked with cabinet lights.
G –Lock Function
On TFT Display
(Touch screen)
Shown locked
Lock facility for supervisor &
maintenance engineer control,
used to prevent cabinet operation
during decontamination or
otherwise. When pressed it will
request a lock number, this is
8860.
DESCRIPTION
LEGEND
COLOUR
FUNCTION
UP Arrow
Red Border
Used to drive the front sash open
DOWN Arrow
Red Border
Used to drive the front sash
closed

Start Up Procedure –2.2
The following notes are for guidance where local laboratory instructions do not exist or are
inappropriate. They should complement, not replace, existing codes of practice issued by your
Laboratory Safety Officers.
Ensure mains power supply to the cabinet is switched on as evidenced by the main TFT
display illumination, the CAS logo will be displayed (home screen). The lock function
must be set to `un-locked` icon. This is a padlock symbol on the main display.
Press the green switch ‘A’ on the control panel membrane –The display will change to
show a cabinet complete with an animated airflow diagram, the front glass sash will
automatically rise to provide a 200mm working height and the fans will start. The
exhaust fan will be energised initially to ensure a sufficient inflow of air is achieved,
once the required inflow velocity is achieved the downflow fans will start. The main
display will show `AIRFLOW STABILISING` and a countdown timer of 30 seconds will be
displayed, once the airflows are settled and the timer has elapsed the display will show
`INFLOW SAFE` & `DOWNFLOW SAFE`, adjacent the animated airflow diagram should
display green filters. On start up an audible alarm will sound until the airflows achieve
a safe condition; this may be muted using the Alarm Mute button `D’.
NOTE: Should the airflows change significantly and fall out of the specifications laid
down in EN12469:2000 then the cabinet alarms will be automatically activated.
Switch on the interior lighting using button ‘B’.
The lighting can be configured as interlocked or non-interlocked. If the lighting is
interlocked, it will only operate once the cabinet has achieved a safe working
condition.
Should the lighting configuration be set to non-interlocked then the lighting can be
operated regardless of cabinet operation, i.e. lights can be witched ON or OFF for use
when loading or unloading equipment prior to operation.
NOTE: A lighting configuration of either interlocked or non-interlocked are generally
factory set, however this can be amended on site by a CAS engineer if required
during commissioning.
Should the sash need opening further than the 200mm point to load or unload
equipment then the UP arrow on the control panel membrane should be used. Once
the equipment is loaded the DOWN arrow button should be de-pressed once and the
sash will return to the 200mm position.
NOTE: In the event an object is trapped when the sash is travelling down an anti-
trap feature will drive the door back upwards by approx 50mm. To drive the visor
closed from 200mm to fully closed the DOWN arrow must be pressed and held.

Shut Down Procedure –2.3
The work area should be cleared of any apparatus and equipment; it should be fully
cleaned in accordance with laboratory codes of practice. The cabinet should be left
running for a few minutes to ensure any residual aerosols are removed.
Switch off the interior light using button `B` on the control membrane.
Switch off the cabinet using button `A` on the membrane.
Drive the sash closed by pressing and holding the DOWN arrow on the control
membrane. In the event something gets trapped the visor will rise back up approx
50mm. If the sash DOWN button is pressed whilst the cabinet is operating the fans will
automatically switch off once it reaches the 50mm position, this ensures the fans are
off when the sash is closed.

Cleaning Procedure –2.4
Regular cleaning is very important to prevent the build-up of dirt and hence potentially
infectious material. Routine swabbing of work surfaces with 70% v/v IMS (ethanol) or IPA
(Isopropyl Alcohol) is recommended.
For cleaning the work surfaces swabbing with a mild detergent in warm water is very effective.
Phenolic or Cresolic disinfectants should be avoided as they may stain the white surfaces with
a brownish colour. If they are used, any spillage should be quickly rinsed with clean water and
mopped up with an absorbent tissue. Most of the quaternary ammonium compounds and the
Glutaraldehyde based surface disinfectants are suitable.
To facilitate cleaning of the work zone and the interior, the whole front screen / visor may be
opened and lowered from the top, supported by the hinges at the lower edge. It is good
practice to clean the inside of the viewing screen to ensure adequate visibility of the working
zone. Always consult the Laboratory Safety Officer before carrying out this procedure.
Warning
If Hypochlorites are used to clean the stainless
steel interior of the safety cabinet, they will
initially cause rust spots and over time may lead to
further damage.
Disinfectants containing acids, alkalis, electrolytes
and hypochlorite’s can adversely affect metal
parts and cause corrosion.
Disinfectants containing organic solvents can
damage plastics.

Fumigation & Formalin Quantities –2.5
When handling hazardous materials, the air space inside the cabinet should be
decontaminated regularly and always before servicing and following any spillages. Fumigation
by formaldehyde gas is the recommended decontamination procedure for biological hazards
although there are alternative methods available including VHP and Ozone decontamination.
To facilitate the fumigation a sequence has been incorporated in the cabinet controls, this is
detailed under fumigation procedure.
A convenient way of generating sufficient formaldehyde is to boil off Formalin (40%
formaldehyde BP or equivalent) in a suitable vessel such as a formalin vaporiser. These are
available from CAS.
Formalin Quantities
The recommended quantity stated in BS EN12469:2000 on Page 40 Annex J, Part 2 is 60ml
formaldehyde solution mixed with 60ml distilled water per cubic meter of cabinet volume.
However, this quantity is now considered in excess of that required to achieve a satisfactory kill
throughout the cabinet.
We have therefore produced the following table based on quantities employed by users of
large numbers of Safety Cabinets.
If you still consider that the quantities recommended in the British Standard are to be used,
you may find on completion of the fumigation cycle that high quantities of fluids containing
formaldehyde are present in the cabinet and across the work surface.
Cabinet Size
900mm
1200mm
1500mm
1800mm
Formalin
15ml @40%
20ml @ 40%
25ml @ 40%
30ml @ 40%
Distilled Water
15ml
20ml
25ml
25ml
Always consult your Laboratory Safety Officer
prior to fumigation of a safety cabinet.
** If in doubt ask **

Fumigation Procedure –2.6
Switch off the cabinet fans by pressing the green button ‘A’ on the control panel.
For re-circulating type safety cabinets, a fumigation extract kit (Optional Kit) should be
fitted to the cabinet discharge. Ensure the manual damper or blanking plate is fitted
and fully closed, this prevents any fumigant leakage from the cabinet discharge during
fumigation. For cabinets connected to a duct system proceed as follows:
Fill the formalin vaporiser with the correct amount of Formalin (see section 2.5
for quantities) and screw on the aluminium cap –finger tight, having checked
the gasket in the cap is undamaged. If the vaporiser is free standing, place on
the cabinet work tray, plug into the cabinet internal socket and switch on.
Press the DOWN button on the control panel and drive the sash to the fully
closed position. Fumigation wedges are provided with each cabinet, these are
used to help provide additional pressure from the glass to the seal during
fumigation. The image shown below shows the fitting positions for the
fumigations wedges.
Now press the fumigation button `E’ and the display will show `FUMIGATION
IN PROGRESS’. A countdown timer will be shown directly below in minutes
e.g. `285 MINS`. During the first hour of the fumigation cycle the internal fans
(downflow fans) will cycle for 20 seconds at 20 minute intervals, this ensures
formaldehyde is well dispersed within the cabinet and through the HEPA
filters.
Warning
The cabinet should be left for a minimum of 6 hours, preferably overnight.
Note: Once the ‘fumigate’ button has been activated DO NOT SWITCH CABINET ON
until the cycle has been completed.
On completion the cabinet will display `FUMIGATION COMPLETE` and `READY TO
VENT`. When ready, press the fumigation button to exit the fumigation cycle and then
press the green button `A` to purge the cabinet of formaldehyde gas.
Ensure all laboratory personnel are aware that the
fumigation is taking place; appropriate warning
notices should be put on all doors entering the
laboratory and on the cabinet being fumigated.

For re-circulating type safety cabinets press the ‘fumigate’ button to complete the cycle
and open the manual shut-off damper on the fumigation adaptor kit (Optional kit)
having first fitted the extract tubing and placed the discharge point in a location
approved by the Laboratory Safety Officer.
** When fumigating a re-circulating type safety cabinet where venting is unobtainable,
CAS can offer a ForMAT sterilisation kit, this is a semi-automated process which uses
ammonia to neutralise the formaldehyde following the decontamination cycle. Any
residual ammonia is then removed via a carbon filter module which attaches to the
cabinet discharge, contacts CAS for more info on the ForMAT sterilisation kit **
Switch on the cabinet and then remove the sealing tape. To avoid formaldehyde being
drawn out of the cabinet remove the rubber bung when using a 100% sealing closure
panel. If using a lightweight closure panel carefully remove.
Within the first few minutes of purging, the majority of the formaldehyde gas within
the safety cabinet will be removed. However due to the fact that formaldehyde
adheres to the surfaces of the cabinet and within the media of HEPA filters, we
recommend that the cabinet is continuously run for at least 6 hours before it is
serviced or work re-commences.
Swab down the inside surfaces and thoroughly clean any residual poly-formaldehyde
residue.
Remove the fumigation kit (optional) from the cabinet discharge before
commencing to use the cabinet.
** Any poly-formaldehyde residue in the vaporiser may be removed by heating with water
containing a little mild detergent at neutral pH.
General Note
Other methods of generating formaldehyde and other methods of cabinet decontamination
can be employed; prior to using alternative methods your Laboratory Safety Officer should be
consulted. Contained Air Solutions will be pleased to advise if they are able, but a detailed
knowledge of every technique cannot be guaranteed.
A VHP sterilisation cycle is available on the BioMAT 2, this would either be factory set or set by
a CAS engineer at the time of commissioning. The VHP cycle when selected runs the down flow
fans continuously at 50% of the normal speed, this ensures the air is cycled throughout the
cabinet work area and fan & filter plenums. Various sizes of inlet and outlet VHP connection
ports can be fitted by CAS either in our factory or later on site.
If your cabinet is fitted with ports to allow fumigation using Vaporised Hydrogen
Peroxide (VHP) please refer to the VHP equipment manufacturer’s manual for the
correct application of this technique.

Airflow Measurements –2.7
It is recommended that the downward airflow within the work zone is checked regularly, i.e.
weekly or monthly according to cabinet usage. A calibrated rotating vane type anemometer
with a head diameter of approximately 100mm is considered satisfactory. On 1200mm wide
cabinets, take 8 readings, namely four along a line one quarter of the depth of the working
space forward of the rear wall, and four along a line the same distance behind the front
window on a horizontal plane 100mm above the top edge of the working aperture. Typical
anemometer positions for the 1200mm & 1800mm sizes of cabinet are illustrated below. The
results should be recorded to monitor cabinet performance over time.
1/4
1200mm wide
1/4
1/2
1/4
1/8 1/4 1/81/4
1/121/6 1/61/61/61/12
1/2
1/4
1/4
1800mm wide
1/6

Unidirectional Downflow Air
NOTE: - The unidirectional Downflow air within the cabinet is set up during
factory testing and checked again during on site commissioning to give an
average velocity of 0.3 to 0.35m/sec measured at a horizontal plane 100mm
above the top edge of the working aperture. The limitations laid down in the BS
EN standard are a minimum 0.25m/sec and a maximum of 0.50m/sec with no
one reading being greater than +/- 20% of the mean velocity.
This preset velocity can only vary if (a) the soiling of the downflow filter occurred, or (b) there
is a fan failure.
NOTE: - We recommend that the downflow velocity be checked on a regular basis and
the results recorded to monitor cabinet performance over time.

Ultraviolet Radiation (Optional Feature) –2.8
Ultraviolet Radiation (UV) lamps may be fitted as an optional feature; these are usually fitted as
new in our factory but could be retrofitted at a later date on site if required. If installed the cabinet
will have 2 short wavelength Ultraviolet (UV) tubes emitting 254 nano metres fitted at high level to
the inside work area of the safety cabinet.
Once operated using the UV button on the control membrane a timer will be displayed on the TFT
display. The required time for the UV can be factory set or alternatively adjusted to suit your
requirements on site by the CAS commissioning engineer. Once the cycle as started and the pre-set
time period is shown, +/-5 mins buttons will appear, these allow the UV cycle time to be increased
or decreased to suit user requirements.
As a safety feature the UV tubes are interlocked with the cabinet lights and visor position to
prevent them being used when the cabinet is in normal use or the visor is open.
NOTE: - Over time, the effective life of UV tubes is known to deteriorate; therefore, we
recommend that tubes are replaced on an annual basis to ensure maximum efficiency is
maintained.
Applications
Many bacteria are quite resistant to UV Radiation, and may require prolonged exposure for
sterilisation. Dry and/or protein covered organisms may be protected against UV and may be only
slightly affected if at all. However, moist, vegetative cells without too much protein covering are
killed with reasonable effectiveness after 3-4 hours exposure.
Warning
Extreme care must be exercised when using UV
radiation. Consult your Laboratory Safety Officer
prior to use.
UV Radiation can cause burns to unprotected skin
and it is very important not to look directly at the
illuminated tubes with the naked eye.
Table of contents
Other CAS Laboratory Equipment manuals
Popular Laboratory Equipment manuals by other brands

Hemotherm
Hemotherm 400MR Operation & technical manual

Biuged Laboratory Instruments
Biuged Laboratory Instruments BGD 626 instruction manual

Fritsch
Fritsch ANALYSETTE 3 operating instructions

Barnstead International
Barnstead International Harvey Hydroclave MC8 Owner's and operator's manual

Gilson
Gilson PIPETMAN P Standard operating procedure

Veracity
Veracity PointSource operating instructions