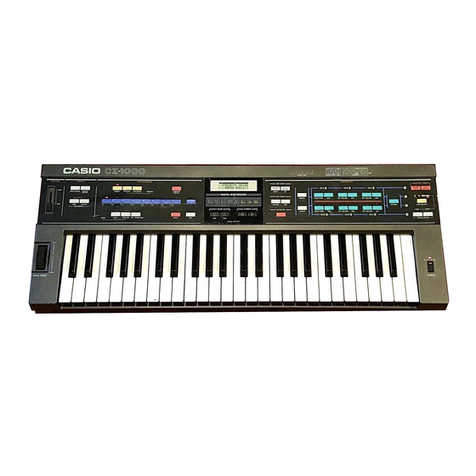
Casio Cosmo CZ-1 User manual


Congratulations upon your selection of aCasio CZ-1.
The CZ-1 is astate-of-the-art musical instrument which
incorporates the latest electronics technology to make its
operation as easy as possible. Exceptional sound quality
backed up by ahost ofsophisticatedfeatures andfunc-
tions makes the CZ-1 atruly unique musical instrument.
In order to enjoy the features andfunctions of the CZ-1
to theirfullest, be sure to carefully read this manual and
follow the instructions contained herein.

CONTENTS
CZ-1 MODES 3
GENERAL GUIDE —FRONT PANEL 4
GENERAL GUIDE —REAR PANEL 11
PART 1NORMAL MODE 13
1-1 RECALLING INTERNAL TONES 13
1-2 RECALLING PRESET TONES 14
1-3 RECALLING CARTRIDGE TONES 15
1-4 EFFECT/OVERALL CONTROL 15
1-5 PD (PHASE DISTORTION) SOUND SOURCE 20
1-6 8-STEP ENVELOPES 22
1-7 BLOCK CONFIGURATION 23
1-8 DCO (DIGITAL CONTROLLED OSCILLATOR) 24
1-9 DCW (DIGITAL CONTROLLED WAVE) 26
1-10 DCA (DIGITAL CONTROLLED AMPLIFIER) 28
1-11 VELOCITY 29
1-12 VIBRATO/OCTAVE 31
1-13 DETUNE/LINE SELECT 32
1-14 RING/NOISE MODULATION 33
1-15 NAME 33
1-16 PARAMETER COPY 34
1-17 INITIALIZE 35
1-18 COMPARE/RECALL 36
1-19 TONE DATA WRITE/SAVE/LOAD 36
1-20 EXCHANGE 39
PART 2TONE MIX MODE 40
2-1 TONE MIX SETTINGS 40
2-2 EFFECT/OVERALL CONTROL 41
2-3 TONE MIX MODE SOUND CREATION 42
PART 3KEY SPLIT MODE 43
3-1 KEY SPLIT SETTINGS 43
3-2 EFFECT/OVERALL CONTROL 45
3-3 KEY SPLIT MODE SOUND CREATION 45
PART 4OPERATION MEMORY MODE 46
4-1 OPERATION MEMORY OVERVIEW 46
4-2 OPERATION RECALL 46
4-3 OPERATION DATA WRITE 48
4-4 OPERATION DATA MODIFICATION 49
4-5 OPERATION DATA SAVE/LOAD 50
4-6 EXCHANGE 50
PART 5MIDI 52
5-1 COMMUNICATION DATA 52
5-2 COMMUNICATION SETTINGS 54
5-3 TONE, OPERATION DATA COMMUNICATION 56
SYSTEM INITIALIZE 64
CARE OF YOUR UNIT 65
SPECIFICATIONS 66
-2-

CZ-1 MODES
The CZ-1 is afully digital synthesizer under control of an LSI (large-scale integrated circuit). CASIO's oriainal PD
reLireZX%"nXr ^°""' ^^^"'°" ^°"^^^^^ ^°""^ '" *^^^'^'°-' ^^'^^ ^^^'^ ^p'^uL^sSs^of
MODES
The operation of the CZ-1 can be divided into four major modes, the details of which are explained below.
NORMAL MODE
®Recall and play of tones stored in memory
(D Modification of recalled tone data to form new tones
(3) Creation of totally new tones
®Application of various effects to tones
(D Storage of tones to internal memory or to RAM car-
tridges (optional)
KEY SPLIT MODE
®Recall of two tones for assignment to UPPER key-
board and LOWER keyboard
(2) Modification of recalled tones into new tones
(3) Setting of keyboard split point
®Independent setting of level and effect for each tone
®Writing of split to operation memory
TONE MIX MODE
®Recall of two tones for mixing
@Modification of recalled tones into new tones
@Setting of level balance and detune for two mixed
tones
®Writing of mixed tones to operation memory
OPERATION MEMORY MODE
®Storage of panel settings (operation) made in
NORMAL, TONE MIX and KEY SPLIT modes
@Recall of operation memory contents
@Writing of all stored operation memory data to RAM
cartridges
-3

GENERALGUIDE-FRONTMNEL
(3) (4) (5) (6)
®dj)
©OVERALL CONTROL SECTION
©MODE SELECT SECTION
©SOLO KEY
©MIDI KEY
©PROGRAMMER SECTION
©LIQUID CRYSTAL DISPLAY (LCD)
©DATA ENTRY SECTION
©CARTRIDGE/MIDI KEY
©EFFECT SECTION
©PARAMETER SECTION
©MODULATION WHEEL
©PITCH BEND WHEEL
©KEYBOARD
-4-

(Z)®(|
©OVERALL CONTROL SECTION
Indicator
MIDI ON/OFF key -
"^ IMIIIJIlJj MAX
3-"
CIZI CZI
MASTER TUNE key
KEY TRANSPOSE key -
MODULATION ON/OFF key -
»'>^ IIIII IIIIII MAX
TUNS
POS£
-CHORUS CONTROL
•MASTER VOLUME
GLIDE ON/OFF key
PORTAMENTO ON/OFF key
-5-

•MIDI ON/OFF key
Switches between MIDI ON and MIDI OFF modes. MIDI
ON is in effect and the indicator is lit when the power
of the keyboard is switched ON. In the MIDI OFF mode,
the indicator is not lit, and MIDI message communica-
tions are impossible.
•MASTER TUNE key
Adjusts the pitch of the keyboard within arange of
±100 cents (one semitone). The standard pitch is set
at A4 =442Hz.
•KEY TRANSPOSE key
Transposes the key of the keyboard at semitone steps
within the range of G-F#.
•MODULATION ON/OFF key
Switches modulation ON and OFF. When ON, the in-
dicator lights, and modulation is applied in accordance
with the position of the MODULATION WHEEL® and
the keyboard after touch setting.
•PORTAMENTO ON/OFF key
Switches portamento ON and OFF. When ON, the in-
dicator lights, and portamento is applied in accordance
with the portamento time which is set using the
PORTAMENTO key in the EFFECT SECTION (9).
•GLIDE ON/OFF key
Switches glide ON and OFF. When ON, the indicator
lights, and glide is applied in accordance with the NOTE
and TIME values which are set using the GLIDE key
in the EFFECT SECTION (9).
•VOLUME (master volume)
Adjusts the output level through line out and the head-
phone volume.
•STEREO CHORUS (chorus control)
Adjusts the strength of the chorus effect. The chrous
effect becomes stronger as the setting moves towards
MAX, and weaker as MIN is approached.
2) MODE SELECT SECTION
Indicator-
NOftMAL ITONE MIX
KEY SPLIT key
TONE MIX key
NORMAL key
OPERATION MEMORY key
•NORMAL key
Sets the NORMAL mode.
•TONE MIX key
Sets the TONE MIX mode.
•KEY SPLIT key
Sets the KEY SPLIT mode.
•OPERATION MEMORY key
Sets the OPERATION MEMORY mode.
*The mode indicators light to indicate the current
mode setting. One of the mode indicators lights to
indicate the current mode setting. The NORMAL,
TONE MIX, and KEY SPLIT indicators can only be
lit while the OPERATION MEMORY mode is in effect.
(D SOLO key
Switches the solo function ON and OFF. When ON, the indicator lights and monophonic play only is possible on
the keyboard. When OFF, the keyboard is capable of up to 16-note polyphonic.

@MIDI key
Switches the MIDI send/receive mode ON and OFF. When ON, the indicator lights and data send/receive operations
with the MIDI musical instrument or computer connected to the MIDI terminals on the rear panel become possible
(see page 52).
5) PROGRAMMER SECTION
CARTRIDGE key MEMORY BANK keys
COMPARE/RECALL key
jinnnnnri fi
EXCHANGE key MEMORY NO. keys WRITE key
•MEMORY BANK keys
Used to select one of eight memory banks (A through
H). The indicator above the bank which is selected
lights when its key is pressed.
•MEMORY NO. keys
Used to select one of eight memory numbers (1 through
8). The indicator above the bank which is selected lights
when its key is pressed.
•CARTRIDGE key
Switches ON and OFF when aROM cartridge or RAM
cartridge (both optional) are loaded. When ON, select-
ed tone data can be recalled directly from the loaded
cartridge.
•EXCHANGE key
Swaps the memory banks and memory numbers of two
tones selected from among the 128 internal and car-
tridge tones.
•COMPARE/RECALL key
Compares original tone data with tone data created by
altering the original tone data. The newly created data
is temporarily stored in the COMPARE/RECALL area
automatically, and the indicator above this key lights
when tone data is altered. Pressing this key so the in-
dicator is OFF recalls the original tone, while pressing
again so the indicator is ON recalls the newly created
tone.
The CZ-1 is equipped with aCOMPARE/RECALL area
capable of storing atotal of up to five tones: 1in the
NORMAL mode, 2in the TONE MIX mode, 2in the KEY
SPLIT mode.
•WRITE key
Writes tone data newly created using the PARAMETER
SECTION (10) at aselected location on an internal
memory or aRAM cartridge, and operation data set on
the panel to aselected operation memory.
®LIQUID CRYSTAL DISPLAY (LCD)
The 32-character liquid crystal display shows the current status of the C2-1. including such data as tone number,
tone name, parameter name, and data. All settings should be performed while monitoring the values on this display.
-7-

(7) DATA ENTRY SECTION
OIGJTAL SYNTHCSIZEH
URME FORM
FIRST=2 SECi:iHD='
VALUE keys-
PAGE keys-
-©LCD
-Cursor
AVE LOAD
IDOWN IUP IF
•VALUE keys
Used to change the data (values) that appear on the
LCD ®. Each press of the Hkey decreases avalue
by 1,while each press of the key increases avalue
by 1.Holding either key down causes high speed con-
tinous decrease/increase of avalue. These keys are
also used for cartridge data SAVE and LOAD oper-
ations.
*ln the case of KEY TRANSPOSE, these keys are used
to change the key name (represented by alphabetic
characters) rather than numeric values. For MASTER
TUNE, these keys change the pitch of the keyboard,
but the LCD does not show any numeric value.
•ENV POINT keys
Used to specify the SUSTAIN POINT and END POINT
for each of the six envelopes in the dual-line DCO,
DCW. DCA envelopes of the PARAMETER SECTION
TI5USTAM I
-CURSOR keys
-ENVELOPE POINT keys
•PAGE keys
Scrolls the data shown on the LCD (6) to display the
various parameters shown in the table below. The UP
key scrolls the display up, while the DOWN key scrolls
the display down.
•CURSOR keys
Used to move the cursor (" _"below data) on the LCD
®. The akey moves the cursor to the left, while the
Emoves the cursor to the right, when multiple
parameters are being displayed.
*These keys are also used as YES (Q) and NO (0)
keys in data SAVE/LOAD operations, and when ini-
tializing the keyboard memory contents.
PAGE (UP/DOWN)
>^ECTION MODE DATA SAVE/LOAD EFFECT PARAMETER
page\key NORMAL TONE MIX KEY SPLIT MIDI CARTRIDGE/MIDI M.WHEEL/AFTER TOUCH ENV
DOWN
I
UP
TONE NO. LEV 1. LEV 2LOWER. UPPER POLY MULT! CARTRIDGE MOD.WHEEL STEP 1-8
CHORUS ON/OFF TONE 2PITCH SUS.PEDAL ENA/DIS TONE DATA EfW/DIS CHECK CHANNEL MIDI MOD.AFTER TOUCH
^-^-""'''^ CHORUS ON/OFF OCT.SHIFT ^.-.---''^ ^.....----^^ ___--------^ AMP.AFTER TOUCH
^^^-^-^'"^'^ ^.----'''''^ CHORUS ON/OFF ^....^--''"^ ___.,- ^____--------^
•^"^ _i
®CARTRIDGE/MIDI key
1*.?!!? In fnAH*?? '?' ^^® ^"^ '"*®!"^' *°"®® °' ^"^ operation memories from the keyboard to aRAIVI cartridge (option-
hIh nr H^t »""^ ^'.^"^'"^^^ ^° ^^^ ^^^^°''''^- ^^^' ^^^°"'"9' "«'"9 '^^ P^GE UP key. these keys are also
used for data transmission between two CZ-1 's or between aCZ-1 and other Casio synthesizers
r^r^^HHl «r^?'°^f»^^^.°' *^^ PROGRAMMER SECTION is used, specific tones are directly recalled from
acartndge. so internal tone data is no affected. In the case of the CARTRIDGE/MIDI key. however all 64 tones
on the cartndge are written to the keyboard's internal memory by the LOAD operation.
'
-8-
DEFFECT SECTION
PORTAMENTO/
SWEEP TIME key GLIDE/
NOTE TIME key
BEND RANGE key
•PORTAMENTO key
Used to set the portamento time. Portamento is applied
in accordance with the value set when the
PORTAMENTO ON/OFF key in the OVERALL
CONTROL SECTION ®is ON.
•GLIDE key
Used to set the glide pitch difference and time. Glide
is applied in accordance with the values set when the
GLIDE ON/OFF key in the OVERALL CONTROL
SECTION ®is ON.
MODULATION WHEEL/
AFTER TOUCH key
•BEND RANGE key
Used to set the range for the PITCH BEND WHEEL @.
•MODULATION WHEEL/
AFTER TOUCH key
Used to set the range for the MODULATION WHEEL
®,the modulation range for the keyboard after touch,
and the volume range for the keyboard after touch.
These parameters are displayed using the PAGE
UP/DOWN keys. The modulation effect is applied when
the MODULATION ON/OFF key in the OVERALL
CONTROL SECTION ®is ON.
10) PARAMETER SECTION
(p ®
.CD (DJl® OJI&
©WAVEFORM key
Pressed to select the LINE 1waveform (basic
waveform).
©DCO ENV key
Pressed to set the LINE 1pitch envelope.
©DCW KEY FOLLOW key
Pressed to cause the waveform for the LINE 1DCW
to approach asine wave (cosine wave) at the higher
range of the keyboard.
®J[®
©DCW ENV key
Pressed to set the LINE 1wave envelope.
©DCA KEY FOLLOW key
Pressed to cause the envelope for the LINE 1DCW to
shorten (timewise) at the higher range of the keyboard.
©DCA ENV key
Pressed to set the LINE 1amp envelope.
-9-

(DLEVEL key
Pressed to set the overall volume level for the LINE 1
DCA.
©VELOCITY key
Pressed to set the degree of change in accordance with
the key touch strength for the LINE 1amp (volume),
wave (timbre), and pitch (pitch) envelopes.
©WAVEFORM key
Pressed to select the LINE 2waveform.
®DCO ENV key
Pressed to set the LINE 2pitch envelope.
®DCW KEY FOLLOW key
Pressed to cause the waveform for the LINE 2DCW
to approach asine wave (cosine wave) at the higher
range of the keyboard.
®DCW ENV key
Pressed to set the LINE 2wave envelope.
@)DCA KEY FOLLOW key
Pressed to cause the envelope for the LINE 2DCW to
shorten (timewise) at the higher range of the keyboard.
©DCA ENV key
Pressed to set the LINE 2amp envelope.
©LEVEL key
Pressed to set the overall volume level for the LINE 2
DCA.
©VELOCITY key
Pressed to set the degree of change in accordance with
the key touch strength for the LINE 2amp (volume),
wave (timbre) and pitch (pitch) envelopes.
©VIBRATO key
Pressed to set vibrato for each tone in accordance with
four parameters: wave, delay, rate, depth.
©OCTAVE key
Pressed to raise or lower the pitch of atone in one-
octave steps.
(D DETUNE key
Pressed to set differences in pitch between LINE 1and
LINE 1', or LINE 2and LINE 2'.
©LINE SELECT key
Pressed to select aline or line combination for sound
creation. Each press of this key changes the line set-
ting in the sequence: [l]-^[2]-*|Tl +[2l-^[i]-f
\r\ ,and aindicator lights to show the current selection.
©RING key
Pressed to apply ring modulation to either LINE 1' or
LINE 2\
©NOISE key
Pressed to apply noise modulation to either LINE 1'or
LINE 2\
\
(w)NAME key
Pressed to allow writing of aname up to 16characters
long for atone.
©PARAMETER COPY key
Used to copy waveform and envelope parameter data
between LINE 1and LINE 2in single-parameter units.
©INITIALIZE key
Pressed to initialize each data value. This key is held
down and the parameter key for the value to be initial-
ized is pressed simultaneously.
®MODULATION WHEEL
Turning this wheel when the MODULATION ON/OFF key in the OVERALL CONTROL SECTION is ON adjusts
vibrato depth in accordance with the range set using the MODULATION WHEEL/AFTER TOUCH key in the EFFECT
SECTION ®.
•Turning the wheel has no effect at all when the MODUALTION ON/OFF key is OFF.
@PITCH BEND WHEEL
Turning this wheel controls pitch in accordance with the range set using the BEND RANGE key in the EFFECT
SECTION d).
@Keyboard
A61 -key, 5-octave. 16-note maximum polyphonic keyboard with initial/after touch sensors.
'8-note polyphonic when 2DC0 is being used, 4-note polyphonic when TONE MIX is being used, monophonic when
SOLO is ON.
-10

GENERAL GUIDE-REAR PMIEL
The CZ-1 does not come equipped with abuilt-in speaker, so either headphones or akeyboard amp and speaker
system must be used to produce sound.
'CONNECTION DIAGRAM (CZ-1 REAR PANEL)
(T) Power switch
(2) AC power terminal
®FOOT VOLUME jack (7) LINE OUT jack (R/L)
®SUSTAIN jack
3) Cartridge slot @PROTECT switch ®PHONES jack
Accessory power cord
See page 52 for information
on MIDI terminals Sustain pedal
(SP-1)
Keyboard amp
(AS-3000, AS-2000) Headphones
(CP-2)
-11-

©Power switch
Switches power ON and OFF.
@AC power terminal
For connection of the accessory AC power cord.
(3) Cartridge slot
For loading of ROM cartridge or RAM cartridge, both
optional.
®PROTECT switch
Protects internal tone data and operation memory data
from inadvertent erasure.
memory; PROTECTION FUNCTION
This function protects memory contents by mak-
ing WRITE operations impossible while the
PROTECT switch is in the ON position. It also pro-
tects against loss of internal memory data by load-
ing data from an optional RAM cartridge.
PROTECT
OfF OH
•Always leave the PROTECT swtich in the ~| ["
ON setting except during WRITE, EX- fnfml
CHANGE, SAVE and LOAD operations. 4^
t
Normal setting
•Memory protection power supply
The contents of the internal memory of the CZ-1
are protected by alithium battery with alife of ap-
proximately 5years. Memory contents may be al-
tered or lost entirely when the battery weakens,
so be sure to have the battery replaced by an
authorized service person before the end of the
battery's life is reached.
(5) SUSTAIN
For connection of the optional sustain pedal (SP-1) for
control of the sustain effect. Connection of asustain
pedal gives the pedal priority over manual settings.
*ln the KEY SPLIT mode, panel settings allow sustain
pedal control to be applied independently to the
UPPER and LOWER keyboard tones.
(6) FOOT VOLUME
For connection of the optional foot volume pedal (VP-2)
for foot control of the overall volume level.
(7) LINE OUT (R/L)
For connection to keyboard amplifiers, external audio
equipment, etc.
*Stereo output is provided when speakers are attached
to each jack. Connection to asingle jack provides
monaural output (A and Boutput mixed).
STEREO OUTPUT
Terminal' A/A +B
MODE:CHORUS^
NOR-
MAL ON NORMAL
mode tone NORMAL
mode tone
OFF ditto ditto
TONE
MIX
T0NE1=0N
T0NE2 =0N TONE1+TONE2 T0NE1+T0NE2
T0NE1=0N
T0NE2 =0FF T0NE1 +TONE2 T0NE1
T0NE1=0FF
T0NE2 =0N T0NE2 T0NE1+T0NE2
TONE1=OFF
T0NE2 =0FF T0NE2 T0NE1
KEY
SPLIT
UPPER =ON
LOWER =ON UPPER +LOWER UPPER +LOWER
UPPER =ON
LOWER =OFF UPPER UPPER +LOWER
UPPER =OFF
LOWER =ON UPPER +LOWER LOWER
UPPER =OFF
LOWER -OFF UPPER LOWER
*Stereo chorus effect adjusted by the chorus control
is applied to tones where CHORUS =ON.
MONAURAL OUTPUT (one jack only)
;Connection K:rl^ -'^^vxalPutpu^^i^;.
A/A +B"'";;b; -••• am4]b Ir -.myBX^r^f.-^:
Monaural plug ^^^---^ A+B
mixed output ^^^
^^"^ Monaural plug ^^^^ A+B
mixed output
(8) PHONES (Headphone jack)
For connection of optional headphones (CP-2). Output
from the speakers is automatically cut when head-
phones are connected.
-12

NORMAL MODE
>1;1^RECALLING INTERNAL TONES .-,*-;K r.i^-.yjy4-f^ 'i
(1) NORMAL MODE SETTING
®First switch the power of the unit ON. At this time,
the LCD should appear as illustrated below:
(2) The NORMAL mode will already be set if it was in
effect when the power of the keyboard was switched
OFF. Otherwise, press the NORMAL key in the
MODE SELECT SECTION.
(2) INTERNAL TONES
64 different tones are preset in memory for the inter-
nal tones. Internal tones are selected using the
MEMORY BANK keys (A^-H) and the MEMORY NO.
keys (1 -8) in the PROGRAMMER SECTION to speci-
fy tone numbers.
MEMORY BANK keys
MEMORY NO. keys
•+IHTERNHL+ B"b n
Any tone name up to 16
characters long can be
assigned.
INOflMAL I
Lights Thejntemal^onesja^ at the^factory^^
.tones that are identical to the 64 presetiones (s«^ ^
tVpagl^4F^stlTONE:tABLE)l^|rf
13-

1-2;RECALLINGiRRESElw:rONES^?ms
The internal ROM of the CZ-1 is programmed with 64 preset tones which can be called whenever needed for play
or for modification into internal tones.
Press aMEMORY BANK key and MEMORY
NO. key to specify the preset tone of your
choice while holding down the INITIALIZE key
in the PARAMETER SECTION.
MEMORY BANK keys
Press and
J_ hold down
MEMORY NO. keys
•This operation does not erase or otherwise affect the
internal tone in the memory with the same number as
that selected.
•The preset tone selected is called to the COMPARE/
RECALL area of the PROGRAMMER SECTION, and
this situation will be indicated by the lit indicator above
the COMPARE/RECALL key. The name of the preset
tone called will be shown on the LCD.
Ights
+INTERNHL+ F-2
UIERRPHONEn
Preset tone name
•The indicator above the COMPARE/RECALL key will
go ON and OFF with each press of the key. The in-
ternal tone with the same number as that specified
is called when the indicator is OFF.
NOTE
•The COMPARE/RECALL area is used for tem-
porary storage of tone data. The WRITE proce-
dure (see page 36) should be used to write the
called preset tone to the internal bank. The
SYSTEM INITIALIZE operation should be used
to write all preset tones to the internal bank.
•Tone data stored in the COMPARE/RECALL
area is retained even when the power of the key-
board is switched OFF.
::^ :_:'/::' :^:' a:''-" '„--,:;•-«:. ;••. B,.• ...-..^^
'U0:;C-/..:.-ricvv-1v»<..v^!;.,"! Cij jj isiw^itf'i) nv't W,tp^n\-
1BRASS 1AGO. GUITAR BRASS 4PIANO 1
2BRASS 2JAZZ GUITAR SAXOPHONE PIANO 2
3BRASS 3ELEC. GUITAR CELLO PIANO 3
4STRINGS 1SLAP BASS FLUTE ELEC. PIANO
^5; STRINGS 2SYNTH. BASS WHISTLE HONKY-TONK
6STRINGS 3ELEC. BASS 1HARMONICA FUNKY CLAVI. 1
;7v STRINGS 4ELEC. BASS 2RECORDER FUNKY CLAVI. 2
8ORCHESTRA HARP KOTO HARPSICHORD
^EFG^^- ':':>-4iZH .^- '''^'':--
1JAZZ ORGAN 1MUSIC BOX SYNTH. STRINGS SYNTH. DRUMS 1
2JAZZ ORGAN 2VIBRAPHONE FAT ENSEMBLE SYNTH. DRUMS 2
3PIPE ORGAN 1XYLOPHONE SITAR CONGA
PIPE ORGAN 2MARIMBA SYNTH. LEAD 1STEEL DRUM
ACCORDION MALLET LOG SYNTH. LEAD 2SWEEP SOUND 2
VOICE 1AFRO-PERCUSSION SYNTH. LEAD 3MOTORCYCLE
VOICE 2BELLS SYNTH. LEAD 4JET ROAR
VOICE 3METALLIC SOUND SWEEP SOUND 1TYPHOON SOUND
14-
I

l)MFi[E(^^l!lN<6^^»^RIDaElnONES%l^^¥^ttf >vi:i^^ >^v>::;< -^ "^fy .^^- Vi^v
Loading ROM cartridges or RAM cartridges (both optional) Into the keyboard allows direct access to 64 cartridge
tones in addition to the 128 internal and preset tones.
•DIRECT CARTRIDGE TONE
ACCESS
®Load an optionally available ROM cartridge or RAM
cartridge into the cartridge slot on the rear panel of
the keyboard.
Cartridge slot
CZ-1 rear panel
ROM cartridge: (option)
RAM cartridge: RA-6 (option)
®Press the CARTRIDGE key in the PROGRAMMER
SECTION so that the indicator above the key lights.
(D Select atone number using the MEMORY BANK
keys and the MEMORY NO. keys in the PROGRAM-
MER SECTION. The name of the tone selected will
appear on the LCD as illustrated below.
+r:RF:TRIDGE+ fl-l
SVNTH.BRflSSn
Tone name for tone written
on cartridge
Use the LOAD operation (see page 36) to write
the called cartridge tone to the internal bank. The
LOAD operation can also be used to write all the
cartridge tones to the internal bank.
-Lights
laiiiiECl/OVEBlUtiGONIiROIIili^SG^^
The four effects shown below can be applied in the NORMAL mode. STEREO CHORUS ON/OFF, MASTER TUNE,
and KEY TRANSPOSE are also possible in this mode.
^^^^.$imEc;T,^iff^m. Mi^^i^y^aranieters (EFFECTfSECTION) ;%-. HV -. i;,M
PORTAMENTO SWEEP =0, 1/TIME =00-99 ON/OFF
GLIDE TONE- -12- +12/TtME=. 00-99 ON /OFF
PITCH BEND RANGE -0-12 BEND WHEEL
MOD. WHEEL
/AFTER TOUCH
MOD. WHEEL DEPTH -00 -99 MOD. WHEEL
MOD. AFTER TOUCH DEPTH =00 -99 Key after touch
AMP. AFTER TOUCH RANGE =00 -15 Key after toucfi
*AII four effects are applied in the same way for all tones.
-15-

(1) PORTAMENTO SWEEP =1
The portamento effect of the CZ-1 can be applied
using either afixed period in accordance with the
PORTAMENTO TIME setting or avariable period in ac-
cordance with the difference in the pitch. Application
of portamento also differs according to whether or not
the SOLO key is ON or OFF.
®POFITAMENTO SWEEP/
TIME SETTING
The LCD will appear as illustrated below when the
PORTAMENTO key in the EFFECT SECTION is ON.
Lights
priRTflMENTO
SUEEP=0 TIME=3m
'—Cursor
/SWEEP =0or1 \
V00^TIME^99 /
The SWEEP parameter is set to avalue of or 1to
determine whether the portamento is according to a
fixed period or avariable period. Pressing the VALUE
Skey in the DATA ENTRY SECTION sets SWEEP
to 1, while pressing the key sets SWEEP to 0.
<SWEEP =0>
This value sets afixed period portamento. As shown
in the illustration, the pitches change over the same
period of time for portamento C-+G and C-*C (one oc-
tave higher).
TIME
TIME expresses portamento time, which can be set
within arange of 00-99. The CURSOR 0B keys of
the DATA ENTRY SECTION are used to move the cur-
sor to below the TIME values, and then the VALUE
Hkeys are used to set the value. The higher the
value, the longer the portamento time.
(2) PORTAMENTO ON/OFF
The portamento effect can be switched ON and OFF
using the PORTAMENTO ON/OFF key in the OVER-
ALL CONTROL SECTION.
^I
-Lights
*Setting PORTAMENTO to ON while the SOLO key is
ON applies portamento only for legato play (succes-
sive key pressed while original key is still held down).
*Portamento and glide cannot be in effect at the same
time.
SWEEP =0
Time
(2) GLIDE
®GLIDE NOTE/TIME SETTING
The LCD will appear as illustrated below when the
GLIDE key in the EFFECT SECTION is ON.
NI
<SWEEP =1>
This value sets avariable period portamento. As shown
in the illustration, the greater the difference in pitch be-
tween two notes, the longer the time, so the slower the
change in pitch.
"1 tone is 2t and 1octave is 12t when the portamento
time for asemitone pitch difference is t.
:Lights
Cursor
/-12^NOTE^ +12\
V00^TIME^99 /

NOTE expresses the amount that the key pressed is
off of the standard pitch, and it can be set at semitone
steps within arange of one octave (±12 semitones).
The glide effect is produced by achange from the
preset pitch to the standard pitch, so the larger the
preset value, the greater the difference in pitch. TIME
expresses the glide time, which can be set within a
range of 00 -99. The CURSOR Hkeys of the DATA
ENTRY SECTION are used to move the cursor to be-
low the TIME values, and then the VALUE Hkeys
are used to set the value. The higher the value, the
longer the glide time (the slower the glide).
(2) GLIDE ON/OFF
The glide effect can be switched ON and OFF using
the GLIDE ON/OFF key in the OVERALL CONTROL
SECTION.
*Portamento and glide cannot be in effect at the same
time.
-Lights
(3) PITCH BEND
®PITCH BEND WHEEL
The pitch of the keyboard can be controlled manually
while playing by operating the PITCH BEND WHEEL.
Increases pitch p'tchbend
Decreases pitch
(2) BEND RANGE SETTING
The LCD will appear as illustrated below when the
BEND RANGE key in the EFFECT SECTION is ON.
Lights
(00 GRANGE ^12)
The PITCH BEND range can be set in semitone units
within arange of 00 -- 12(±1octave) using the VALUE
as keys in the DATA ENTRY SECTION. Each in-
crease of 1in the value represents an increase in the
bend range of ±100 cents (± semitone).
(4) MODULATION WHEEU
AFTER TOUCH
The depth of the vibrato applied by the CZ-1 can be
controlled by the MODULATION WHEEL or the after
touch of the keys. Volume can also be controlled by
the after touch of the keys.
0-1 MODULATION WHEEL
—Lights
IOWOFF
The depth of the vibrato is increased when the MODU-
LATION WHEEL is rotated forward while the MODU-
LATION ON /OFF key in the OVERALL CONTROL
SECTION is ON. At the highest or MAX position, the
vibrato applied is in accordance with the value preset
by the MOD WHEEL DEPTH in the EFFECT SECTION.
MODULATION
MAX
MODULATION WHEEL
*0f the four vibrato parameters (WAVE, DELAY, RATE,
DEPTH) in the PARAMETER SECTION, only the
DEPTH setting affects the MODULATION WHEEL.
The VIBRTATO DEPTH assigned to each tone in
memory is applied no matter what the MODULATION
WHEEL position when the MODULATION ON/OFF
key is set to OFF.
0-2 MODULATION WHEEL DEPTH
SETTING
The LCD will appear as illustrated below when the
MODULATION WHEEL/AFTER TOUCH key in the
EFFECT SECTION is ON.
-^4\-~ Lights
MOD.UHEEL
DEPTH=5e
I(00^ DEPTH ^99)
MODULATION WHEEL depth
The MODULATION DEPTH range can be set within a
range of 00-99 using the VALUE BS keys in the
DATA ENTRY SECTION. The larger the value, the
greater the MODULATION DEPTH range.
-17-

(2).1 AFTER TOUCH MODULATION
The depth of vibrato can be increased by the after touch
of the keyboard when the MODULATION ON/OFF key
in the OVERALL CONTROL SECTION is ON. Vibrato
is applied in accordance with the MODULATION
AFTER TOUCH DEPTH set in the EFFECT SECTION
when the keys on the keyboard are pressed all the way
down.
-^?v- —Lights
n^^Nojnodulatlpri. applied ::^
^^"^Vibrato depth changes
^wthjcey pressure ;^
^.^, <^»^ ™. ., .^XWstrbngelr pressure \
.^^Whep MOD. WHEELis at MIN (DEPTH-00)
*0f the four vibrato parameters (WAVE, DELAY, RATE,
DEPTH) In the PARAMETER SECTION, only the
DEPTH setting affects the after touch of the keyboard.
The VIBRATO DEPTH assigned to each tone in
memory is applied when the MODULATION ON/OFF
key is set to OFF.
*The operation with the greatest effect takes priority
when the MODULATION WHEEL is operated while
strong pressure is applied to the keyboard. However,
DEPTH cannot exceed avalue of 99.
The MODULATION DEPTH range can be set within a
range of 00-99 using the VALUE 00 keys In the
DATA ENTRY SECTION. The larger the value, the
greater the MODULATION DEPTH range.
(3).1 AFTER TOUCH VOLUME
CONTROL
Volume can be controlled by the after touch of the key-
board in accordance with the sensitivity set by the AMP.
AFTER TOUCH RANGE in the EFFECT SECTION.
•Modulation and volume can be controlled simultane-
ously by after touch when the MODULATION ON/OFF
key is ON.
^331 4Fbced.volumej
(D-2 AMP. AFTER TOUCH RANGE
SETTING
The LCD will appear as illustrated below when the
MODUALTION WHEEUAFTER TOUCH key in the
EFFECT SECTION is ON and the PAGE UP key in the
DATA ENTRY SECTION is pressed twice.
Lights
(2)-2 MODULATION AFTER TOUCH
DEPTH SETTING
The LCD will appear as illustrated below when the
MODULATION WHEEL/AFTER TOUCH key in the
EFFECT SECTION is ON and the PAGE UP key in the
DATA ENTRY SECTION is pressed once.
•Lights
OOWN IU' I'
MOD. AFTER TOUCH
DEPTH=5e
(00 ^DEPTH ^99) >—MOD. after touch depth
L-18-
hmp.rfter touch
RHNi3E=e0
(00 GRANGE ^15)
AMP. AFTER TOUCH RANGE
The AMP. (amplification) range can be set within a
range of 00-15 using the VALUE 00 keys in the
DATA ENTRY SECTION. The larger the value, the
greater the AMP. range.

RANGE =00 No change in volume no matter how
strongly the keyboard is pressed.
RANGE =15 Maximum difference in volume be-
tween normal and strong keyboard
pressure.
*l\/laximum key pressure results in volume equal to that
produced when RANGE =00 (see illustration).
-^Strongest pressure
Volume difference
-^Normal pressure
RANGE
(5) CHORUS ON/OFF
The built-in STEREO CHORUS of the CZ-1 can be
switched ON and OFF using the DATA ENTRY SEC-
TION. The strength of the effect applied Is adjusted
using the CHORUS CONTROL in the OVERALL
CONTROL SECTION.
The LCD shows the selected tone number and name
in the NORMAL mode when no changes are being
made in parameters.
+INTERNflL+ B"2
JflZZ GUITRR
The CHORUS ON/OFF display appears when the
PAGE UP or PAGE DOWN key is pressed while this
display is being shown.
Apage display function is employed on the CZ-1
to allow effective setting operations of the various
parameters available. When the MODULATION
WHEEUAFTER TOUCH key in the EFFECT SEC-
TION is ON, for example, the page display func-
tion allows scrolling among the WHEEL DEPTH,
MOD. AFTER TOUCH DEPTH, and AMP. AFTER
TOUCH RANGE to set the various parameters.
Each press of the PAGE UP or PAGE DOWN key
scrolls the displays as illustrated below.
MOD. WHEEL
DEPTH=33
fO
MOD. AFTER TOUCH
DEPTH=4S
^
AMP. AFTER TOUCH
GE=05 <P
PAGE UP -O-PAGE DOWN
CHORU
ON/OFF display
Either of the VALUE Hkeys can be used to switch
the current setting to ON/OFF. When this effect is ON,
the same chorus effect is applied to all tones in accor-
dance with the CHORUS CONTROL setting in the
OVERALL CONTROL SECTION.
(6) MASTER TUNE
The LCD will appear as illustrated below when the
MASTER TUNE key in the OVERALL CONTROL SEC-
TION is ON.
BTER TUNE
PUSH UHLUE KEV
Each press of the VALUE key in the DATA EN-
TRY SECTION raises the pitch by 1.7 cents, while each
press of the key lowers the pitch by 1.7 cents.
-19-
Other manuals for Cosmo CZ-1
3
Table of contents
Other Casio Synthesizer manuals

Casio
Casio Casiotone 1000P User manual

Casio
Casio EP-S120 User manual

Casio
Casio Cosmosunthesizer CZ-3000 User manual

Casio
Casio CTK-900 User manual

Casio
Casio VZ-1 User manual

Casio
Casio Privia PX-500L User manual

Casio
Casio CASIOTONE 310 User manual

Casio
Casio VZ-10M User manual

Casio
Casio MA-150 User manual

Casio
Casio FZ-1 Troubleshooting guide

Casio
Casio CDP-S105 User manual

Casio
Casio Privia PX-S1000 User manual

Casio
Casio PT-50 User manual

Casio
Casio CTK-530 User manual

Casio
Casio XW-P1 User manual

Casio
Casio CT-S300 User manual

Casio
Casio Casiotone MT-500 User manual

Casio
Casio WK-6000 User manual

Casio
Casio CTK-731 User manual

Casio
Casio ToneBank CT-420 User manual