manuals.online logo
Brands
  1. Home
  2. •
  3. Brands
  4. •
  5. Casio
  6. •
  7. Watch
  8. •
  9. Casio QW-1625 User manual

Casio QW-1625 User manual

- 2 -
2. OPERATION CHART : MODULE QW-1625
GENERAL GUIDE
• Press to change from mode to mode. After you perform an operation in any mode, pressing returns to the Timekeeping Mode.
• In any mode (except when making settings) press to illuminate the display for about two seconds.
Thermometer Mode Alarm ModeTimekeeping Mode Countdown
Alarm Mode
Trekking
Counter Mode
TIMEKEEPING MODE
To set the time and date
1. Hold down while in the Timekeeping Mode
until the seconds digits flash on the display
because they are selected.
2. Press to change the selection in the following
sequence.
3. While the seconds digits are selected (flashing),
press to reset the seconds to 00. If you press
while the seconds count is in the range of 30
to 59, the seconds are reset to 00 and 1 is added
to the minutes. If the seconds count is in the
range of 00 to 29, the minutes count is
unchanged.
Month
and Day
Minutes
PM
indicator
Day of
week
Seconds
Day Month Year
Hour Minutes 12/24-Hour
Format
Day of
week
Hour Seconds
Temperature
graph
4.While any other digits (beside seconds) are selected (flashing), press to increase
the number or to decrease it. While the day of the week is selected, press to
advance to the next day and to move back. While the 12/24-hour format setting
is selected, press to toggle it between 12 and 24.
• Except for when adjusting the seconds or setting the 12/24-hour format, holding
down a button changes the current selection at high speed.
• When the 12-hour format is selected, the indicator Aappears on the display to
indicate “A.M.” times or indicator Pappears on the display to indicate “P.M.” times.
Selecting the 24-hour format causes the indicator 24 to appear on the display.
5.After you set the time and date, press to return to the Timekeeping Mode.
• The date can be set within the range of January 1, 1995 to December 31, 2039.
• If you do not operate any button for a few minutes while a selection is flashing, the
flashing stops and the watch goes back to the Timekeeping Mode automatically.
ABOUT THE BACKLIGHT
About the Auto Backlight Function
When the auto backlight function is turned on, the backlight automatically turns on for
two seconds under the conditions described below. Avoid wearing the watch on the
inside of your wrist. Doing so causes the auto backlight to operate when not needed,
which shortens battery life.
Moving the watch to a position that is parallel to the ground and then tilting it
towards you approximately 40 degrees causes the backlight to illuminate.
Parallel to
ground
• The backlight may not illuminate if the face of the watch is more than 15 degrees off
parallel to the left or right. Make sure that the back of your hand is parallel to the
ground.
• Static electricity or magnetic force can interfere with proper operation of the auto
backlight function. If the auto backlight does not illuminate, try moving the watch
back to the starting position (parallel with the ground) and then tilt it back toward you
again. If this does not work, drop your arm all the way down so it hangs at your side,
and then bring it back up again.
• Under certain conditions the backlight may not light until about one second or less
after turn the face of the watch towards you. This does not necessarily indicate
malfunction of the backlight.
Parallel to ground More than 15 degrees
too high More than 15 degrees
too low
To switch the auto backlight function on and off
In the Timekeeping Mode, hold down for one or two seconds to turn the auto
backlight function on and off.
• The auto backlight indicator is shown on the display in all modes while the auto
backlight function is on.
• In order to protect against running down the battery, the auto backlight function is
automatically turned off approximately three hours after you turn it on. Repeat the
above procedure to turn the auto backlight function back on if you want.
• Pressing at any time illuminates the display for about two seconds, regardless of
the auto backlight's on/off setting.
Holding down
OFFON
Auto backlight indicator
Caution
• The backlight of this watch employs an electro-luminescent (EL) light, which loses its
illuminating power after very long term use.
• Frequent use of the backligfht shortens the battery life.
• The watch emits an audible sound whenever the display is illuminated. This is because the
EL light vibrates slightly when lit. It does not indicate malfunction of the watch.
Warning!
• Never try to read your watch when mountain climbing or hiking in areas that are dark
or in areas with poor footing. Doing so is dangerous and can result in serious
personal injury.
• Never try to read your watch when running on a roadside or in any other location
where there might be vehicular or pedestrian traffic. Doing so is dangerous and can
result in serious personal injury.
• Never try to read your watch when riding on a bicycle or when operating a motorcycle
or any other motor vehicle. Doing so is dangerous and can result in a traffic accident
and serious personal injury.
• When you are wearing the watch, make sure that its auto backlight function is turned
off before riding on a bicycle or operating a motorcycle or any other motor vehicle.
Sudden and unintended operation of the auto backlight can create a distraction,
which can result in a traffic accident and serious personal injury.
THERMOMETER MODE
A built-in temperature sensor measures temperature and shows the measured value
on the display. The readout from the temperature sensor can also be switched
between Celsius (˚C) and Fahrenheit (˚F). The thermometer can be calibrated to
correct for errors.
Important!
Temperature measurements are affected by your body temperature (while you are
wearing the watch), direct sunlight, and moisture. To achieve a more accurate
temperature measurement, remove the watch from your wrist, place it in a well
ventilated location out of direct sunlight, and wipe off all moisture from the case. It
takes approximately 20 to 30 minutes for the case of the watch to reach the actual
surrounding temperature.
Accurate temperature measurements cannot be achieved while you are wearing the
watch. The following graph illustrated affects of body temperature on actual
temperature.
Temperature
Temperature measured when watch is worn on wrist
40 C
30 C
20 C
10 C
0C
10 C20C30C40 C
Approximate
Differences caused by
individual body
temperture or clothing
About Temperature Measurement
• A temperature graph which is automatically updated every five minutes, is shown on
the display in all modes (except when making settings). Measured temperature
values can be viewed in the Thermometer Mode only.
• Pressing while in the Thermometer Mode
performs temperature measurement and causes
the measured value to appear on the display.
The display shows “– – . – ˚C (or ˚F)” if a
measured value falls outside the range of –20˚C
to 60˚C (–4˚F to 140˚F). The normal display will
return as soon as the temperature returns within
the allowable range.
Current
temperature
Mode
indicatorTemperature
graph
Switching between Celsius and Fahrenheit
1.Hold down while in the Thermometer Mode
and the current temperature digits flash.
2.Press to select either Celsius “˚C” or
Fahrenheit “˚F”.
3.After you select the Celsius or Fahrenheit, press
to return to the Temperature Display.
• If you do not operate any button for a few minutes
while a selection is flashing, the flashing stops and
the watch goes back to the Thermometer Mode
automatically.
Flashes
C
C
C C
D
D
D
D
DD
DD
B
BB
B
A
A
A
A
40˚
- 3 -
Calibrating the Temperature Measurement
The temperature sensor of this watch is calibrated at the factory before shipment and
further adjustment is normally not required. If noticeable error is found in the
temperature readings produced by the watch, you can adjust it to correct the error.
Important!
Incorrectly calibrating the temperature measurement of this watch can result in
incorrect readings. Carefully read the following before doing anything.
•Compare the readings produced by the watch with those of another reliable,
accurate thermometer.
•If calibration is required, remove the watch from your wrist and wait for 20 or 30
minutes to give the temperature of the watch time to stabilize.
•Perform the temperature calibration before procedure as quickly as possible to avoid
the temperature of the watch being affected by your body temperature.
•You can also perform temperature calibration underwater, if the water temperature is
stable.
To calibrate the temperature 1.Hold down while in the Thermometer Mode
and the current temperature digits flash.
2.Each press of increase the displayed
temperature by 0.1˚C, and pressing the
decrease it by 0.1˚C.
•If you have selected Fahrenheit as your unit of
measurement, the above operations change the
reading by 0.2˚F.
•You can calibrate the temperature within a range
of –9.9˚C to +9.9˚C (–18.0˚F to +18.0˚F).
•Press and at the same time to reset the
temperature calibration to the factory setting.
3.After calibrating the temperature, press to
return to the Temperature Display.
•If you do not operate any button for a few minutes
while a selection is flashing, the flashing stops and
the watch goes back to the Thermometer Mode
automatically.
Flashes
TREKKING COUNTER MODE
The Trekking Counter counts how many steps you
take and elapsed time while walking. After you input
the length of your stride, it also automatically
calculates and displays the distance you have
covered.
Important!
•The Trekking Counter cannot count the number of
steps you take if the watch is on your wrist. Be
sure to wear the watch on your waist as described
in “USING THE BAND CLIP”.
•Note that the accuracy of data measured by the
Trekking Counter can be affected when you are
walking on sand or other soft ground, on a steep
upgrade, or on a steep downgrade.
•To improve the accuracy of measured data, be sure to turn off the Trekking Counter
whenever you are taking a break or stop walking for any other reason.
•Be sure to take care not to drop the watch while walking.
Mode
indicator
Steps
Distance Elapsed time
To set your stride length Important!
•If you plan on changing the measurement units,
be sure do so before setting your stride length.
Changing the measurement units automatically
clears the stride length setting, which means you
will have to re-input it.
1.In the Trekking Counter Mode, hold down until
the stride length value flashes on the display.
2.Press to increase the setting or to decrease
it.
•Holding down either button changes the current
selection at high speed.
•You can set a stride length in the range of 10 cm
(4 inch) to 250 cm (98 inch).
Stride length
3.After you finish making the setting, press to return to the normal Trekking
Counter Mode (no flashing on the display).
•If you do not operate any button for a few minutes while the stride length is flashing,
the flashing stops and the watch goes back to the normal Trekking Counter Mode
automatically.
Changing the Measurement Units
You can change the measurement units displayed by the watch between the
following.
Stride Length: Centimeters (cm) Inches (inch)
Distance: Kilometers (km) Miles (mile)
To change the measurement units
While the stride length is flashing on the display as described under “To set your stride
length,” press to toggle between metric and inch/mile measurement units.
•Note that changing the measurement units automatically clears the stride length
setting. This means that if you want the Trekking Counter to calculate and display
the distance you cover, you must re-input your stride length whenever you change
the measurement units.
Important!
•The Trekking Counter is not intended for use as an all-day pedometer. Trekking
Counter operation requires considerable battery power, so be sure to press to
stop its operation after you are through using it. Next, press to return to the
Timekeeping Mode.
•To protect against prematurely running down the battery, Trekking Counter operation
turns off automatically and the watch emits a 2-second beep to alert you if the
Trekking Counter is left on for more than 24 hours. Note that measured values up to
the point that the Trekking Counter turns off are retained, so you can start the next
operation from the displayed values.
To use the Trekking Counter
1.Press to start Trekking Counter operation.
•Elapsed time, number of steps, and distance covered are all shown on the display
while the Trekking Counter is operating.
2.Press to temporarily stop Trekking Counter Operation.
•You can use to stop and re-start Trekking Counter operation as many times as
you like. Each time you press to re-start, the elapsed time, number of steps and
distance values start from point they were at when you pressed to stop Trekking
Counter operation.
3.After you are finished using the Trekking Counter, press to stop operation and
then press to clear all of the values to zero.
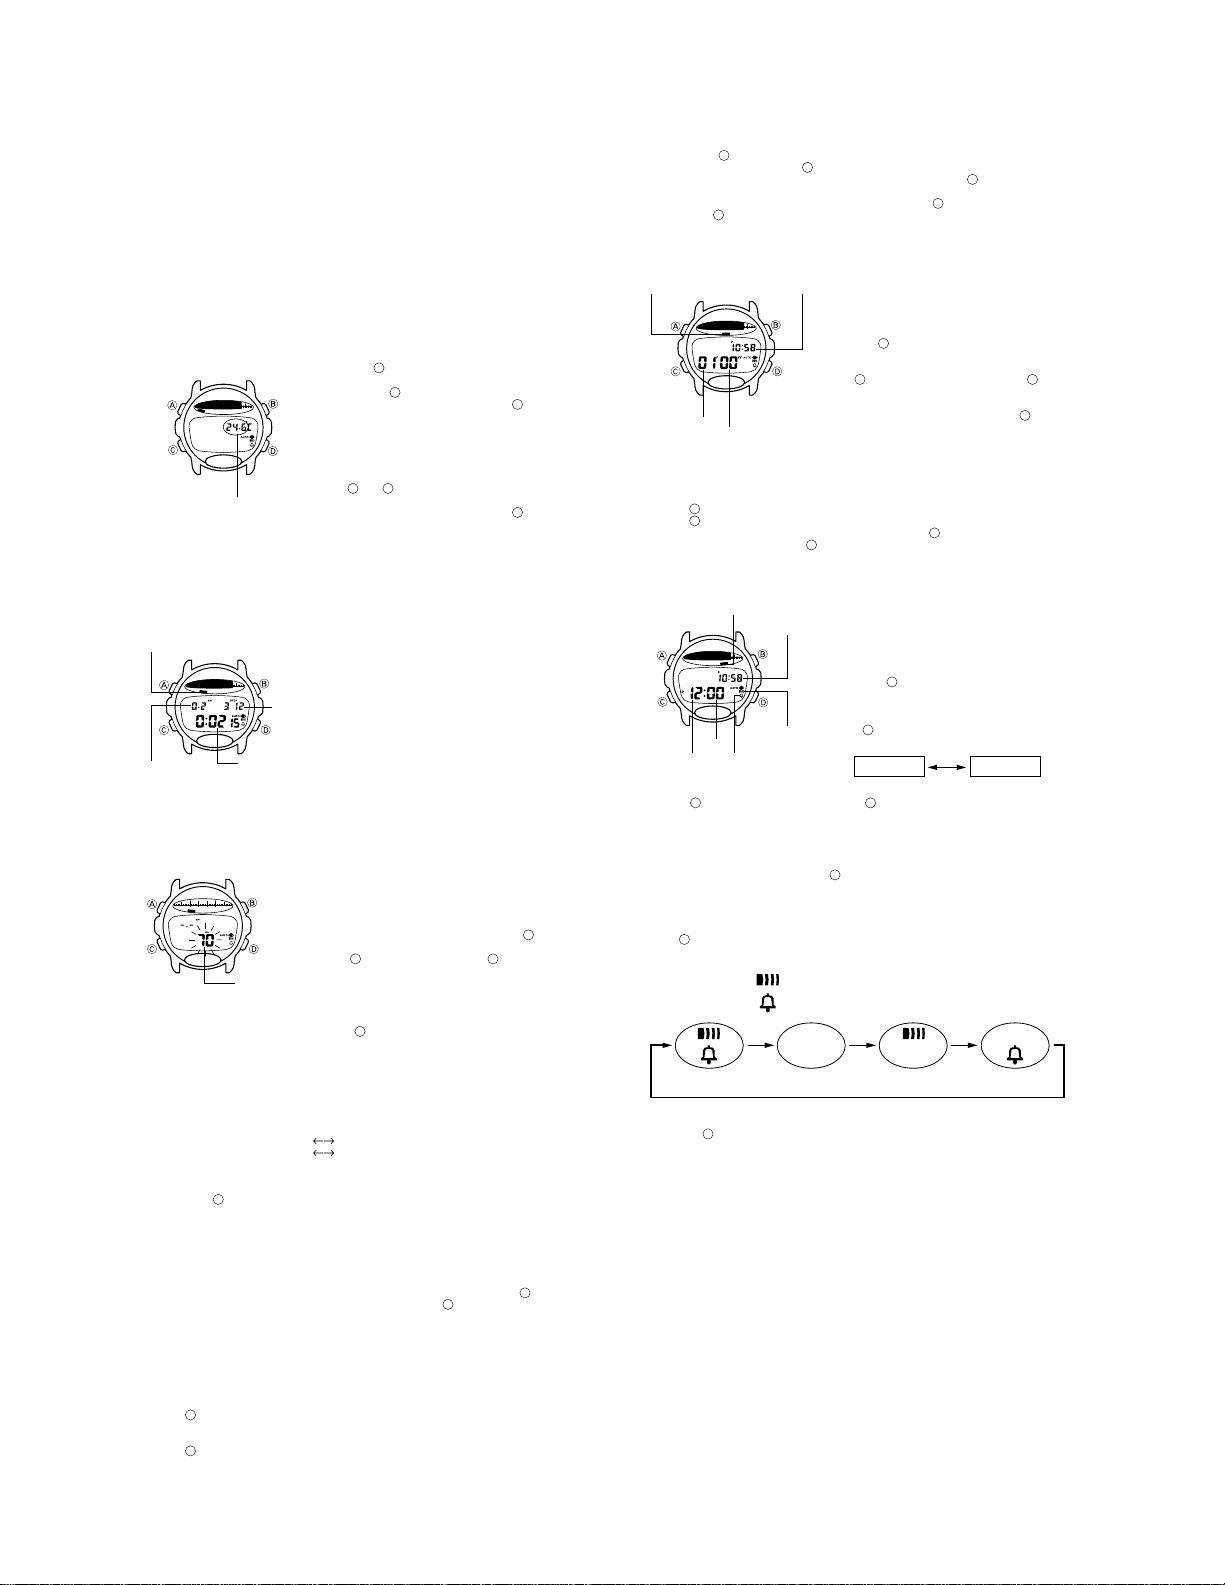
COUNTDOWN ALARM MODE
The countdown timer can be set within a range of
1 minute to 60 minutes. When the countdown
reaches zero, an alarm sounds for 10 seconds or
until you press any button.
To set the countdown time
1.Hold down while in the Countdown Alarm
Mode. The minutes digits flash on the display
because they are selected.
2.Press to increase the minutes digits or to
decrease them. Holding down either button
changes the setting at high speed.
3.After you set the countdown time, press to
return to the Countdown Alarm Mode.
•If you do not operate any button for a few minutes
while a selection is flashing, the flashing stops and
the watch goes back to the Countdown Alarm
Mode automatically.
Mode
indicator Current
time
Minutes Seconds
To use the countdown timer
1.Press while in the Countdown Alarm Mode to start the countdown timer.
2.Press again to stop the countdown timer.
•You can resume countdown timer operation by pressing .
3.Stop the timer and then press to reset the countdown time to its starting value.
ALARM MODE
When the Daily Alarm is turned on, the alarm
sounds for 20 seconds at the preset time each day.
Press any button to stop the alarm after it starts to
sound. When the Hourly Time Signal is turned on,
the watch beeps every hour on the hour.
To set the alarm time
1.Hold down while in the Alarm Mode. The hour
digits flash on the display because they are
selected. At this time the Daily Alarm is turned on
automatically.
2.Press to change the selection in the following
sequence.
Mode
indicator Current
time
Minutes Alarm on
indicator
Hourly time
signal on
indicator
Hour
Hour Minutes
3.Press to increase the selected digits or to decrease them. Holding down
either button changes the selection at high speed.
•The format (12-hour and 24-hour) of the alarm time matches the format you select
for normal timekeeping.
•When setting the alarm time using the 12-hour format, take care to set the time
correctly as morning (A) or afternoon (P).
4.After you set the alarm time, press to return to the Alarm Mode.
•If you do not operate any button for a few minutes while a selection is flashing, the
flashing stops and the watch goes back to the Alarm Mode automatically.
To switch the daily alarm and hourly time signal on and off
Press while in the Alarm Mode to change the status of the daily alarm and hourly
time signal in the following sequence.
To test the alarm
Hold down while in the Alarm Mode to sound the alarm.
Both ON Both OFF Daily Alarm
only Hourly Time
Signal only
Alarm on indicator
Hourly time signal on indicator
C
C
C
D
D
D
D
D
D
D
D
D
D
D
D
D
D
D
D
DB
B
B
B
B
A
A
A
A
A
A
A
A
A
A
- 4 -
USING THE BAND CLIP
To attach the band clip
1.Remove the band from the watch.
2.Insert the band clip into band attachment at
the bottom (6 o’clock position) of the watch,
and fasten the button to secure it in place.
How to wear the watch during Trekking Counter operation
Note that the Trekking Counter cannot take
measurements correctly while the watch is on
your wrist. When using the Trekking Counter,
be sure to use the band clip to attach the
watch to your belt. Your belt must pass
through the metal part of the band clip for
proper operation. If you are not wearing a belt,
attach the watch to a belt loop.
Trekking Counter Precautions
Be sure to turn off the Trekking Counter in the following cases. If you don’t the Trekking
Counter may interpret your movements as steps and produce incorrect measurements.
•Any activity involving jumping, bending, stretching, etc.
•Resting
•Riding on a bicycle, train, bus, or any other vehicle that generates vibration
Any of the following conditions can cause Trekking Counter measurements to lose accuracy.
• Walking on loose ground, or steep up slopes or down slopes
• Running
• Shuffling your feet while walking
• Uneven stride
• Walking in sandals, shower shoes or similar footwear
• Walking up or down stairs
Trekking Counter measurements may become inaccurate or even fail entirely if the watch is
exposed to strong magnetic force.
Always be sure to fasten the band clip to the bottom (6 o’clock position) of the watch, and not
to the top (12 o’clock position).
Take care to avoid dropping the watch while walking.
When using the Trekking Counter, make sure the watch is not resting against your clothing or
waist pack. If the watch is not hanging loosely, the Trekking Counter will not be able to count
your steps correctly.
Band
Attachment
Top of watch
(12 o’clock position faces down)
Band Clip

Other Casio Watch manuals

Casio 5165 User manual

Casio

Casio 5165 User manual

Casio Analog (MAB) User manual

Casio

Casio Analog (MAB) User manual

Casio Baby-G MSG-S200 series User manual

Casio

Casio Baby-G MSG-S200 series User manual

Casio Baby-G BG1301-2 User manual

Casio

Casio Baby-G BG1301-2 User manual

Casio 5412 User manual

Casio

Casio 5412 User manual

Casio 3423 User manual

Casio

Casio 3423 User manual

Casio 3271 User manual

Casio

Casio 3271 User manual

Casio WVA-400D Troubleshooting guide

Casio

Casio WVA-400D Troubleshooting guide

Casio 347 User manual

Casio

Casio 347 User manual

Casio QW-1000 User manual

Casio

Casio QW-1000 User manual

Casio G-SHOCK MTG-B2000PH-2A User manual

Casio

Casio G-SHOCK MTG-B2000PH-2A User manual

Casio WV-54DA Troubleshooting guide

Casio

Casio WV-54DA Troubleshooting guide

Casio 3179 User manual

Casio

Casio 3179 User manual

Casio QW-3390 Troubleshooting guide

Casio

Casio QW-3390 Troubleshooting guide

Casio 2524 User manual

Casio

Casio 2524 User manual

Casio G-Shock MTG-900D-2V User manual

Casio

Casio G-Shock MTG-900D-2V User manual

Casio 2140 User manual

Casio

Casio 2140 User manual

Casio QW-950 Configuration guide

Casio

Casio QW-950 Configuration guide

Casio 3503 User manual

Casio

Casio 3503 User manual

Casio 5113 User manual

Casio

Casio 5113 User manual

Casio LW200-1AV User manual

Casio

Casio LW200-1AV User manual

Casio 5019 User manual

Casio

Casio 5019 User manual

Casio 5583 User manual

Casio

Casio 5583 User manual

Casio 5378 User manual

Casio

Casio 5378 User manual

Popular Watch manuals by other brands

Citizen CTZ-B6810 instruction manual

Citizen

Citizen CTZ-B6810 instruction manual

Realme Watch 2 Pro user manual

Realme

Realme Watch 2 Pro user manual

Swatch Touch Zero Two manual

Swatch

Swatch Touch Zero Two manual

NIXON REASON LS Instruction guide

NIXON

NIXON REASON LS Instruction guide

Citizen AT8260-18A instruction manual

Citizen

Citizen AT8260-18A instruction manual

Seiko 7T04A Technical guide

Seiko

Seiko 7T04A Technical guide

bitmore SW400 user guide

bitmore

bitmore SW400 user guide

FOREVER Forevive SB-320 manual

FOREVER

FOREVER Forevive SB-320 manual

Bell & Ross BR S QUARTZ Technical notes

Bell & Ross

Bell & Ross BR S QUARTZ Technical notes

Quicksilver MOLOKAI instruction manual

Quicksilver

Quicksilver MOLOKAI instruction manual

TMI Products VH67A manual

TMI Products

TMI Products VH67A manual

Xiaomi Mi Band 6 user manual

Xiaomi

Xiaomi Mi Band 6 user manual

Fitbit Zip Ionic user manual

Fitbit Zip

Fitbit Zip Ionic user manual

Oakley OAKLEY TRANSFER CASE instruction manual

Oakley

Oakley OAKLEY TRANSFER CASE instruction manual

Samsung SM-R750P user manual

Samsung

Samsung SM-R750P user manual

Starvox L8STAR Quick use guide

Starvox

Starvox L8STAR Quick use guide

Ralph Christian VX9J User instructions

Ralph Christian

Ralph Christian VX9J User instructions

Zeon IN7205 Calibre 735 Operation manual

Zeon

Zeon IN7205 Calibre 735 Operation manual

manuals.online logo
manuals.online logoBrands
  • About & Mission
  • Contact us
  • Privacy Policy
  • Terms and Conditions

Copyright 2025 Manuals.Online. All Rights Reserved.