Casio QW-2365 User manual

SERVICE MANUAL
& PARTS LIST
(WITHOUT PRICE)
QW-2365
QW-2366
MODULE NO.
R
REF. NO. S/M-725
DEC. 2000
SHN-110SHN-111

— 1 —
Battery SR721W
Battery life Approx. 2 years
Current consumption 0.96 µA maximum
Alarm system Piezo plate on Back cover
Accuracy ±30 sec./month
Accuracy setting system Pad selection (P1 – P3)
Accuracy setting Unadjustable
Accuracy checking See page 10
Functions: • Electro-luminescent backlight
Afterglow
• Dual time
• 1/100-sec. stopwatch
Measuring capacity: 59’59.99”
Measuring mode: Elapsed time
• Daily alarm
• Hourly time signal
• Auto-calendar (28 days for February)
• 12/24-hour formats
• Regular timekeeping
Analog: 2 hands (Hr, min.)
Digital: Hr, min, sec, pm, month, date, day
1. SPECIFICATIONS: QW-2365/2366
Item
CONTENTS
Page
1. SPECIFICATIONS: QW-2365/2366............................................................ 1
2. OPERATION CHART: QW-2365/2366.......................................................2
3. DRAWINGS: QW-2365/2366
3-1. LCD DIAGRAM ................................................................................... 4
3-2. CIRCUIT DIAGRAM ............................................................................ 5
3-3. CHECKING TERMINALS AND COMPONENTS: QW-2365/2366 ..... 6
4. EXPLODED VIEW: QW-2365/2366............................................................7
5. EXPLODED VIEW: ANALOG BLOCK (C-20) OF QW-2365/2366 ............ 8
6. PARTS LIST: QW-2365/2366.....................................................................9
7. PRECAUTIONS FOR REPAIR: QW-2365/2366
7-1. AC (ALL CLEAR) AND REMOVING OF MODULE........................... 10
7-2. ACCURACY CHECKING ................................................................... 10
Detail

— 2 —
2. OPERATION CHART: QW-2365/2366
GENERAL GUIDE
•Press AA
AA
Ato change from mode to mode.
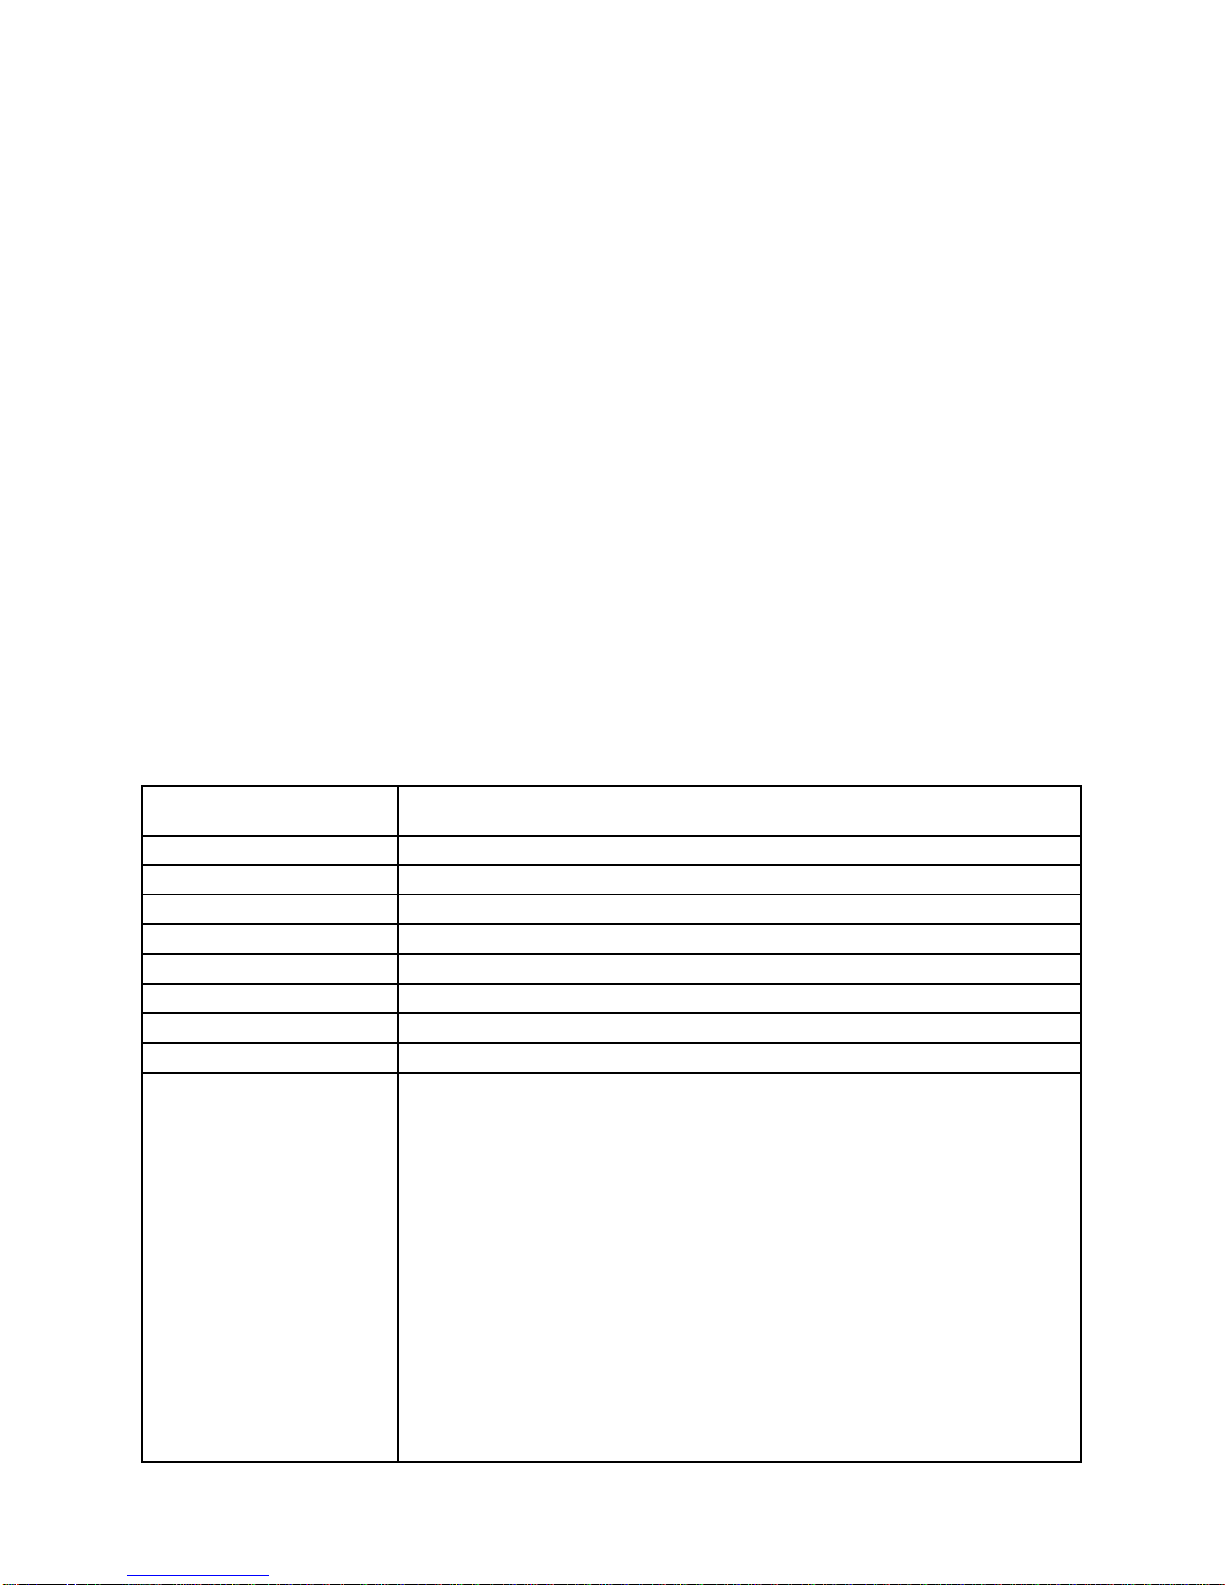
Timekeeping Mode Stopwatch ModeDual Time ModeAlarm ModeCalendar Mode
ABOUT THE BACKLIGHT
•Press LL
LL
Lto illuminate the display for about 2 seconds.
•The backlight of this watch employs an electro-luminescent (EL) light, which loses
its illuminating power after very long term use.
•Frequent use of the backlight shortens the battery life.
•The watch emits an audible sound whenever the display is illuminated. This does
not indicate malfunction of the watch.
•The illumination provided by the backlight may be hard to see when viewed under
direct sunlight.
•The backlight automatically turns off whenever an alarm sounds.
•When the backlight is turned on, it blinks whenever the minute hand moves. This is
normal, and does not indicate malfunction of the watch.
•The backlight of Module 2366 illuminates both the digital display and analog face.
The backlight of Module 2365 illuminates the digital display only.
TIMEKEEPING MODE
•Use this mode to set the current time. An incorrect digital time setting will result in
incorrect operation of the calendar.
To set the time and date
1.Hold down CC
CC
Cuntil the seconds digits start to flash.
2.Press AA
AA
Ato reset the seconds to 00. If you press AA
AA
Awhile the seconds count is in
the range of 30 to 59, the seconds are reset to 00 and 1 is added to the minutes. If
the seconds count is in the range of 00 to 29, the minutes count is unchanged.
3.Press CC
CC
Cto move the selection to the hour digits.
4.Press AA
AA
Ato increase the hour digits. Holding down AA
AA
Achanges the hour digits at
high speed.
5.Press CC
CC
Cto move the selection to the minutes digits.
6.Press AA
AA
Ato increase the minutes digits. Holding down AA
AA
Achanges the minutes
digits at high speed.
7.Press CC
CC
Cto move the selection to 12/24.
8.Press AA
AA
Ato toggle the timekeeping format between 12-hour and 24-hour.
•When 12-hour format is selected, the indicator Pappears on the display to indicate
“p.m.” times. There is no indicator for “a.m.” times.
9.Press CC
CC
Cto complete the procedure.
•If you do not operate any button for a few minutes while a selection is flashing, the
flashing stops and the watch goes back to the Timekeeping Mode automatically.
To set the hands
When in any Mode, press BB
BB
Bwith a thin object to advance the analog time setting.
Each press of BB
BB
Badvances the time by 20 seconds. Three presses advance by one
minute.
Holding down BB
BB
Badvances the analog setting at high speed. You can only advance
the setting and cannot reverse it.
CALENDAR MODE
To set the date
1.Hold down CC
CC
Cuntil the month digits start to flash.
2.Press AA
AA
Ato increase the month digits. Holding down AA
AA
Achanges the digits at high
speed.
3.Press CC
CC
Cto move the selection to day digits.
4.Press AA
AA
Ato increase the day digits. Holding down AA
AA
Achanges the digits at high
speed.
5.Press CC
CC
Cto move the selection to the day of the week indication.
6.Press AA
AA
Ato advance to the next day. Holding down AA
AA
Achanges the indication at
high speed.
7.Press CC
CC
Cto complete the procedure.
•If you do not operate any button for a few minutes while a selection is flashing, the
flashing stops and the watch goes back to the Calendar Mode automatically.
ALARM MODE
When the Daily Alarm is turned on, an alarm sounds for 20 seconds at the preset
time each day. When the Hourly Time Signal is switched on, the watch beeps every
hour on the hour.
To set the alarm time and to turn the Daily Alarm and Hourly Time Signal
on and off
Month Day of weekDay
Month Day
Day of week
Hold down CC
CC
C.
Press CC
CC
C.
Press CC
CC
C. Press CC
CC
C.
1.Hold down CC
CC
Cuntil the hour digits start to flash.
2.Press AA
AA
Ato increase the hour digits. Holding down AA
AA
Achanges the digits at high
speed.
•The format (12-hour and 24-hour) of the alarm time matches the format you select
for normal timekeeping.
3.Press CC
CC
Cto move the selection to the left minutes digit.
4.Press AA
AA
Ato increase the left minutes digit. Holding down AA
AA
Achanges the digit at
high speed.
5.Press CC
CC
Cto move the selection to the right minutes digit.
6.Press AA
AA
Ato increase the right minutes digit. Holding down AA
AA
Achanges the digit at
high speed.
7.Press CC
CC
Cto move Daily Alarm and Hourly Time Signal on and off setting.
8.Press AA
AA
Ato change the status of the Daily Alarm and Hourly Time Signal in the
following sequence.
•At this time Daily Alarm and Hourly Time Signal automatically turn on.
Hour
Alarm/Hourly Time Signal setting
Right
minutes
digit
Left
minutes
digit
Hour Minutes
Mode indicator
Alarm on indicator
Hold down
CC
CC
C.Press
CC
CC
C.Press
CC
CC
C.
Press CC
CC
C.
Press CC
CC
C.
Hourly Time Signal on indicator
9.Press CC
CC
Cto complete the procedure.
•If you do not operate any button for a few minutes while a selection is flashing, the
flashing stops and the watch goes back to the Alarm Mode automatically.
To stop the alarm
•Press any button to stop the alarm after it starts to sound.
To test the alarm and select an alarm tone
Hold down AA
AA
Ain any mode (except when making any settings) to sound the alarm.
Each time you test the alarm, a four different alarm tones. The alarm tone you select
is used for the Daily Alarm and Hourly Time Signal.
•Note that holding down AA
AA
Aalso changes the mode.
Both ON Both OFF Daily Alarm
only Hourly Time
Signal only
Seconds
12/24
Hour
Minutes
Hour Minutes
Seconds
PM indicator
Minute handHour hand
Hold down CC
CC
C.
Press CC
CC
C.
Press CC
CC
C.
Press CC
CC
C.
Press CC
CC
C.

— 3 —
DUAL TIME MODE
To set the Dual Time
1.Hold down CC
CC
Cuntil the hour digits start to flash.
2.Press AA
AA
Ato increase the hour digits. Holding down AA
AA
Achanges the digits at high
speed.
3.Press CC
CC
Cto move the selection to the minutes digits.
4.Press AA
AA
Ato increase the minutes digits. Holding down AA
AA
Achanges the digits at high
speed.
5.Press CC
CC
Cto move the selection to 12/24.
6.Press AA
AA
Ato toggle the timekeeping format between 12-hour and 24-hour.
•When 12-hour format is selected, the indicator Pappears on the display to indicate
“p.m.”times. There is no indicator for “a.m.”times.
7.Press CC
CC
Cto complete the procedure.
•If you do not operate any button for a few minutes while a selection is flashing, the
flashing stops and the watch goes back to the Dual Time Mode automatically.
•In the Dual Time Mode, the seconds count is synchronized with the seconds count
of the Timekeeping Mode.
STOPWATCH MODE
The Stopwatch Mode lets you measure elapsed time. The
range of the stopwatch is 59 minutes 59.99 seconds.
To use the Stopwatch
1.Press CC
CC
Cto start the stopwatch.
2.Press CC
CC
Cto stop the time measurement.
•You can press CC
CC
Cas many times as you want to resume
and stop timing.
3.After you are finished using the stopwatch, hold down
CC
CC
Cto clear the stopwatch time to all zeros.
Hour Minutes 12/24
Hour Minutes
Seconds
Press CC
CC
C.
Hold down CC
CC
C. Press CC
CC
C. Press CC
CC
C.
PM indicator
Mode indicator
Minutes Seconds
1/100 second
Mode indicator

— 4 —
3. DRAWINGS: MODULE QW-2365/2366
3-1. LCD DIAGRAM
COM
LC1
L1
L2
L3
L4
L5
L6
L7
L8
L9
L10
L11
L12
L13
L14
L15
L16
L18
L20
L22
d0
h0
e0
d1
h1
e1
c2
d2
c3
e3
c4
d4
e4
c5
e5
SIG ON
AL2
DT1
ST1
c0
g0
f0
c1
g1
f1
g2
e2
b3
g3
COL
g4
f4
g5
f5
-
-
-
-
b0
a0
a1
b1
i1
a2
b2
f2
ad3
f3
b4
a4
b5
ad5
PM
AL ON
-
-
-
SEG
LC2 LC3
LC3
LC1
L22
L20
L18
L16
L15
L14
L13
L12
L11
L10
L9
L8
L7
L6
L5
L4
L3
L2
L1
LC2
f2
c2
c3
a2
b2
g2
d2
e2
ad3
ad3
b3
b4
g3
f3
e3
col
a1
c4
d4
a4
g4
f4
e4
ad5
ad5
e5 c5
g5
f5 b5
PM
AL2
DT1
ST1 SIG ON
AL ON
b1
c1
d1
e1
f1
g1
h1
i1
a0 b0
c0
d0
e0
f0
g0
h0

— 5 —
3-2. CIRCUIT DIAGRAM
TOTAL
BONDING 50PINS
47PINS
LSI
LCD
VCH
LC1 LC3 L1 ~ 16.18. 20. 22 L17. 19. 21
AC
XTB
Xtal
XT
P1
P2
P3
ELD
C3
EL
Tr1
LL1
R1
C4
GND
L –
VOUT
INV
L +
E'
CLF2
CLF1
V +
FRONT
BACK
BAT C2
C1
+
VSS1 VDD VSS2 VC1 VC2 BD
SL SL
S4
S3
S1
S4
S3
S1
T5
T4
T3
T2
O1
T1
O2
An. B
Tr2
LL2
PZ

— 6 —
3-3. CHECKING TERMINALS AND COMPONENTS: MODULE QW-2365/2366
Top view of P.C.B. Ass'y Bottom view of P.C.B. Ass'y
VSS1
L-
VOUT
L+
E'
CLF2
CLF1
VDD
VDD
L+
L-
ELD
O2
O1
O1O2
SL
S4 S3
S1
CLF2 ELD VSS1
CLF1
E' E'
VSS1
VOUT
VDD
VDD
VDD
AC VCH
VSS1
ELD
SL
S4
S1
S3
VDD
T2
VC1
T2
VSS1
XTB
VC2
L
AC
VDD
VDD
VDD
P1
P2
P3
S3
T4
T5
BD
VSS1
VDD
VCH
T3
S4
VSS1
VOUT T1
VSS2
VDD
L
L
VC1
XT
R1 Resistor/Chip C3 Capacitor/Tantalum
C4 Capacitor/Chip
Inverter
INV
Coil
LL1
Coil
LL2
Transistor
Tr2
Xtal
Transistor
Tr1
C2 Capacitor/Chip C1 Capacitor/Chip
4. Oscillator/Crystal
(1000 8260)
PCB ASS'Y
3a (7640 3737)
3b (7640 3738)

— 7 —
4. EXPLODED VIEW: QW-2365/2366
CASIO
16 (7235 0905)
15 (7227 0294)
8 (1002 6642)
1a (1003 3950)
1b (1003 9653)
1c (1003 3982)
1d (1003 3983)
5 (7640 3140)
Analog block
Battery/Silver oxide
(SR721W)
3a (7640 3737)
3b (7640 3738)
PCB ass'y
11 (1002 6638)
10 (7228 0105)
6 (7225 5084)
12 (1001 6289)
13 (1001 6333)
7 (1003 3949)
9 (1002 6637)
2a (1002 6640)
2b (1003 3981)
2c (1002 6646)
2d (1002 7681)

— 8 —
5. EXPLODED VIEW: ANALOG BLOCK (C-20) OF QW-2365/2366
5-2 (1000 9244)
5-1 (1001 3324)

6. PARTS LIST: QW-2365/2366
Note:1. Prices and specifications are subject to change without prior notice.
2. Spare parts are classified as follows according to their importance in after-sales service.
A Rank -----------------------------------Very Important
B Rank -----------------------------------Important
C Rank -----------------------------------Less important
3. Batteries in Bulk pack on the tray will be supplied from our Overseas Spare Parts Section under charge basis.
Batteries in Blister pack will be supplied from our Sales Department.
4. As for order/supply of spare parts, refer to the separate publication "GUIDE BOOK for spare parts supply".
Item Code No. Parts Name Specification Applicable QR
7640 4274MODULE/WITH MOVEMENT QW-2365CM-01TKSHN-111-6C / SHN-112-7C 1A
/ SHN-112N-7C
7640 4275MODULE/WITH MOVEMENT QW-2365CM-02TKSHN-109-1C / SHN-112-1C 1A
/ SHN-112-1C / SHN-112N-1C
7640 4276MODULE/WITH MOVEMENT QW-2365CM-03TKSHN-111-3C / 1A
7640 4277MODULE/WITH MOVEMENT QW-2365CM-04TKSHN-109-2C / SHN-111-2C 1A
7640 4278MODULE/WITH MOVEMENT QW-2366CM-01TKSHN-110-6B 1A
7640 3980MODULE/WITH MOVEMENT QW-2366CM-02TKSHN-110-2B 1A
1a 1003 3950LCD S2365-01TF QW-2365CM-01 / QW-2366CM-01 1A
1b 1003 9653LCD S2366-01TFN QW-2365CM-02 1A
1c 1003 3982LCD S2365-01GF QW-2365CM-03 1A
1d 1003 3983LCD S2365-01BF QW-2365CM-04 / QW-2366CM-02 1A
2a 1002 6640EL EL-2337-A-01 QW-2365CM-01/02 1A
2b 1003 3981EL EL-2337-A-13 QW-2365CM-03/04 1A
2c 1002 6646EL EL-2338-A-01 QW-2366CM-01 1A
2d 1002 7681EL EL-2338-A-13 QW-2366CM-02 1A
3a 7640 3737PCB ASS'Y Q254689*1TK QW-2365CM Common 1A
3b 7640 3738PCB ASS'Y Q254689*2TK QW-2366CM Common 1A
41000 8260OSCILLATOR/CRYSTAL CFS-145JK07 QW-2365CM / QW-2366CM Common 1B
57640 3140ANALOG BLOCK QW-2323MV-82TKQW-2365CM / QW-2366CM Common 1A
5-1 1001 3324COIL ASS'Y 2323 Q365709*1 QW-2365CM / QW-2366CM Common 1A
5-2 1000 9244SCREW/2323 Q465649-1 QW-2365CM / QW-2366CM Common 2A
67225 5084CONTACT/BATTERY (-) 388 Q322764-1 QW-2365CM / QW-2366CM Common 1C
71003 3949HOLDER/EL 2365 Q367610A-1 QW-2365CM / QW-2366CM Common 1C
81002 6642HOLDER/HOUR WHEEL 2337 Q367606A-1 QW-2365CM / QW-2366CM Common 1C
91002 6637INTERCONNECTOR/2337 Q466995-1 QW-2365CM / QW-2366CM Common 1C
10 7228 0105SCREW/349 Q421212A-1 QW-2365CM / QW-2366CM Common 1C
11 1002 6638SHEET/INSULATION 2337-2 Q466996-1 QW-2365CM / QW-2366CM Common 1C
12 1001 6289SPRING/COIL 2323-1 Q465902-1 QW-2365CM / QW-2366CM Common 2B
13 1001 6333SPRING/COIL 2323-2 Q465903-1 QW-2365CM / QW-2366CM Common 1B
14 1000 6652TAPE/ADHESIVE 2306 Q465964-1 QW-2365CM / QW-2366CM Common 1C
15 7227 0294WASHER/745 Q436294A-1 QW-2365CM / QW-2366CM Common 1C
16 7235 0905WHEEL/HOUR 2321 Q364155B-1 QW-2365CM / QW-2366CM Common 1B
BATTERY/SILVER OXIDE SR721W QW-2365CM / QW-2366CM Common 1
For the prices and minimum order/supply quantities of the above parts, refer to the Parts Price List P.P.L.-565.
Notes: Q- Used quantity
R- Rank — 9 —

— 10 —
7-2. ACCURACY CHECKING
Check the accuracy of the module with the quartz timer after switching the module to “ACCURACY
CHECKING MODE”.
The operations are shown below:
A) SWITCHING TO “ACCURACY CHECKING MODE”
While pressing Cbutton, press Abutton for about 3 seconds, at the timekeeping mode.
Then all the segments are displayed and the LCD drive signals are changed to the static drive signal
of “32 Hz” so that you can check the accuracy with the quartz timer.
B) CANCELLATION OF THE “ACCURACY CHECKING MODE”
Press Aor Cbutton.
Then the display is returned to its original state.
NOTE: The “ACCURACY CHECKING MODE” will automatically
return to the regular mode in 1 ~ 2 hour(s) without any
operation.
7. PRECAUTIONS FOR REPAIR: QW-2365/2366
7-1. AC (ALL CLEAR) AND REMOVING OF MODULE
1. Perform AC (ALL CLEAR) when inserting a new battery, or else the memories and or counters may
give erratic displays.
Touch the AC contact and the positive (+) side of the battery or main plate with the metallic tweezers.
The contact should be made for about two seconds.
2. On removing of the module from the case, please insert the precision screw driver between the module
and the case pointed by arrows.
QW-2365/2366
Metallic tweezers

CASIO TECHNO CO.,LTD.
Overseas Service Division
Nishi-Shinjuku Kimuraya Bldg. 1F
5-25, Nishi-Shinjuku 7-Chome
Shinjuku-ku, Tokyo 160-0023, Japan
This manual suits for next models
2
Table of contents
Other Casio Watch manuals

Casio
Casio AQS800WD-1EV User manual

Casio
Casio G-Shock GBA-400-4B User manual

Casio
Casio 3542 User manual

Casio
Casio 5192 User manual

Casio
Casio 5406 User manual

Casio
Casio 5028 User manual

Casio
Casio 10B+7L(VER.C) User manual

Casio
Casio MO0401-EC User manual

Casio
Casio 766 Configuration guide

Casio
Casio IC-01 User manual