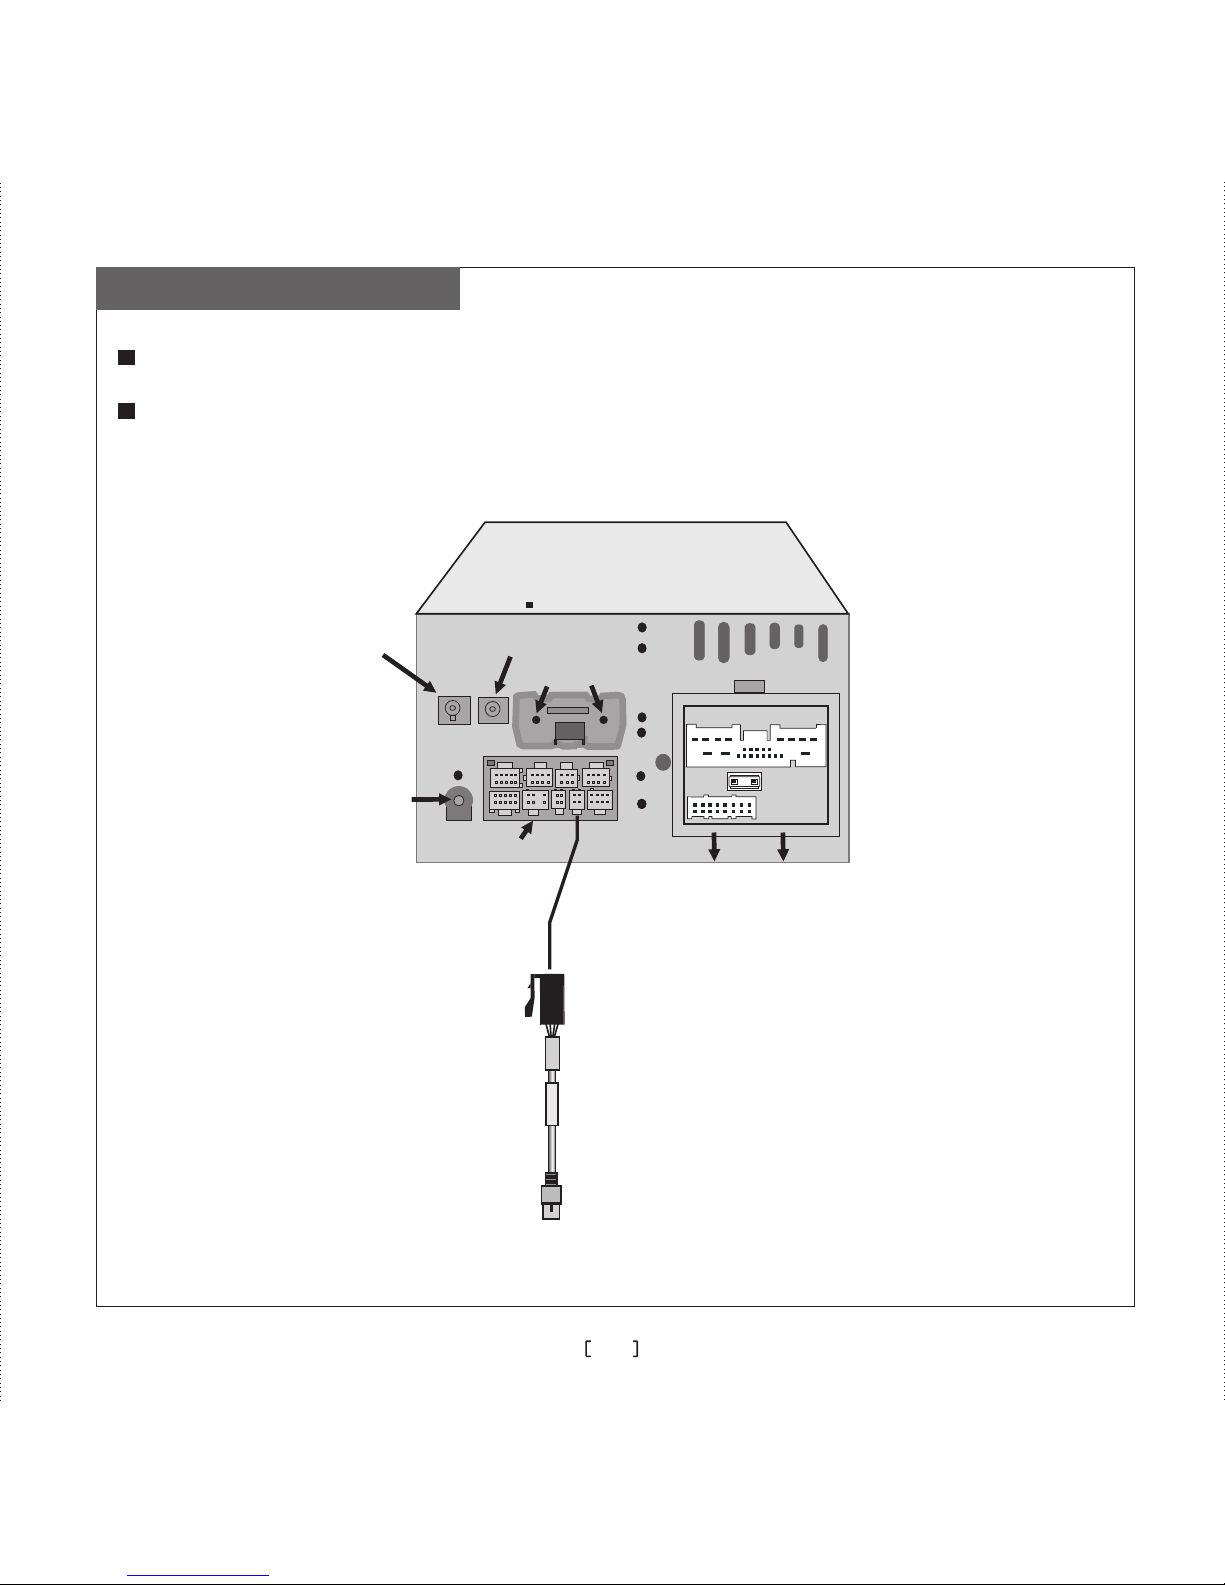
CASKA CA109-R User manual

卡仕达
Quick Guide
Please read this guide carefully before using this product and properly keep the guide for future use.
Car DVD/TV/Radio/Bluetooth/GPS
No.CA109-R
0
1
2
3
4
VO L -
MU T E
VO L+
NAV
FM /AM
DV D
GPS

★★★★
Copyright
The copyright of this manual is reserved by our company. All rights are reserved.
This manual may not be copied, reproduced or translated in whole or in part without the
express written permission by our company.
Our company reserves the right to improve the product, and its hardware and
software.
This manual is an operating guide, but not the warranty of the product. Our company
doesn't guarantee the contents included in this manual.
Since we adhere to the strategy of sustainable development, printing error in the
manual, incompliance with latest materials, software upgrade, and product improvement
may be performed at any time. The product is subject to change without further notice,
and revision will be directly edited to the manual of new edition.
Our company reserves the right of final interpretation for the manual.

1
Precautions
To ensure the traffic safety and avoid contravening the traffic regulations, do not
watch any program or operate the system during driving.
For safety and correct operation of the product, the product shall be installed by
professional. Do not disassemble or repair the system by yourself to avoid an
accident or damage to the system.
To avoid electric shock, damage and fire resulting from short-circuit, do not place
the product in water or places where are wet.
Since the screen of the product adopts precision electronic structure, do not hit the
TFT display to avoid damage to the product.
Since the reverse monitoring function is only used as auxiliary reverse function,
we take no responsibility for any accident that occurs during reverse.
Tire pressure monitoring system can monitor the pressure and temperature of the
tire, and helps to reduce the risk of tire burst. However, tire burst may still occur.
Under normal tire pressure or temperature, tire burst can be caused by wear of tire
and the perfection degree. Therefore, the monitoring data of the system is only for
reference, and you should check the tire status in time.

2
NOTE
Trademark
Licence:
In order to use the product correctly and safely, please read this manual carefully.
Specification and design due to technical improvement are subject to variation
without notice!
Please read this manual carefully before using this product and properly keep the
manual for future use.
Remark: the above symbol indicates that this product hasn't any harmful
materials or elements, it is environmentally friendly and recyclable, and
shouldn't be littered at random.
①Manufactured under license from Dolby Laboratories;
②“Dolby” and the “double-D” symbol are trademarks of Dolby Laboratories.

3
Brief Introduction
Thank you for purchasing our high-quality car electronic product. This system is a multi-
functional car AV entertainment system with a brand-new GUI, which is designed for Mazda
2. It combines DVD player, radio, bluetooth communication,navigation system, browser,
multimedia,iPod player (externally plugged) and audio poweramplifier together. The system
adopts built-in slot-loading car DVD chip, which can play discs in format of DVD, VCD,
MP3, WMA, MPEG4, JPEG.In addition, the system adopts high-sensitive FM and AM
digital tuner making you master the world's trends and financial information at any time and
any place while you are in your car; with 8” extra-clear digital TFT LCD, your vision can
be extremely broadend and it is always kept in the best performance; with outlay USB
port,when there is USB,audio and pictures can be viewed and played;with optional
reverse radar, reverse camera, tire presssure monitoring, navigation, AV and other
interfaces for auxiliary functions,you can use these products to realize more functions. The
structural dimensions of the system conform to the installation dimensions of ISO TWO DIN.
CD,
Car electronic product is specially designed, fully intelligent, humanized, and featuring
GUI operation; featuring OSD menu, various functions can be realized through function keys
on the panel and touch screen, thus realizing perfect HMI and meeting your requirements of
comfort. If your cell phone is a Bluetooth cell phone, you can answer your call through the
system without picking up your phone; with double zone functions, people at rear row can be
satisfied.
To correctly install and use the system, please read this manual carefully.

4
Product Functions
Built-in Functions:
Built-in radio,DVD player,bluetooth hand-free,
navigation,USB port,display and high power
amplifier.
Bluetooth Hand-free:
It supports Bluetooth hand-free communication
and plays bluetooth music(cellphone supported
is required).
SD Card Port 1:
It is used to read data of multimedia.
Touch Screen:
It is convenient to operate the host unit.
Multimedia Function(support USB playing):
It support to play in format of WMV/
MP3/MP4/MPG/AVI/WMA/RMVB ,and it
shows the lyric while playing.
s files
Navigation Function:
An intelligent system capable of intellectually
optimizes the best driving route according to
the user's destination and guides the driver
smoothly to the destination with displaying
high-precision graphical of both the road names
and signs and playing phonic traffic identifications.
Display:
Wide and new digital LCD with extra clear and
high definition.
Radio Receiving:
With high sensitive AM/FM receiving, it could
prestore 30 stations received.
DVD Player:
It could play discs in formats of DVD/VCD/CD/
MP3/WMA/JPEG/MPEG4 with touching completely.
SD Card Port 2:
It is used to read data of map and
update for software and map.
Analog TV Function:
It supports the analog TV function and
searching programs to play
Browse Function:
It supports browsing the internet when it is
connected with external 3G moduele

5
With tire pressure monitoring function.
Tire Pressure Monitoring System(Optional):
Language Settings Menu:
Chinese / English / Russian Portuguese can be
selected as language to display on the screen.
Audio Output Port:
It has 5.1 channel audio output port, which
is compatible with the outside amplifier.
Auto Memory:
All the adjusted parameters can be
memorized and restored automatically.
Black Screen:
The function is specially designed for
preventing intensive light glaring and
hindering of normal driving at night.
It features Treble/Mid /Bass/Cen/Mega Bass
adjustment.
Tone Modes:
EQ Modes:
It has Standard/Pop/Rock/Classic/Jazz/
Custom mode.
Music Navigation:
When there is no voice navigation indication,
y o u c a n e n j o y m u s i c a n d v i d e o
normally, thus being happy and relaxed in your
trip!
Reversing Display(Optional):
You can observe the reversing condition when
you are reversing by connecting the reversing
camera.
Reversing Radar(Optional):
Connecting with the reversing radar, the distance
detected by the radar is displayed on the TFT LCD,
then we can view reversing situations more directly.
Optional Function
AV Function:
It supports AV input from the external equipment.
iPod Play:
It supports playing music from iPod by the
switching wire.
The Steering- Wheel controling Function:
It supports the original steering-wheel
controling function.
Following are other functions:
Dynamic Graphical Interface:
User interface designed with graphical fully,
which makes it more directly and hunman
friendly.
Display system:
Auto PAL/NTSC/SECAM,with widely
application and highly compatible.

6
Connection Diagram
To make the system functions the best, please connect the wires strictly according to the
connection diagram.
To prevent from short-circuit, please cover the insulation casing of audio and video when they
have not been used.
Antenna Interface of
the built-in navigation
FU S E
USB
USB port
Host Unit
Reserved
Multi-functional
compound interface
Connected to Power
loudspeaker wire of the original car
Antenna interface
of Radio
Antenna Interface of TV

7
Left channel audio input
Video input
Red
V-I N
R-IN
L-IN
White
AV input wire A
Right channel audio input
Video input
Right channel audio input
Left channel audio input
Yellow
Multi-function compound interface
REAR-BUS1
REAR-BUS2
REAR-VO1
REAR-VO2
REAR-L01
REAR-LO2
REAR-R01
REAR-R02
Connected to iPod
iPod adaptor (optional)
Camera Radar wire
(optional)
Connected to radar
Connected to camera
Connected to camera
V- IN
Yellow
(Male radar)
(Female lens)
(Optional)
Video input
A
V put wire
out
(optional)
Yello
Red
Brown
Green
Red
Yello
White
White

8
AMP-C
FR-OUT
FL-OUT
SL-OUT
Output interface connected
with wire(optional)
SR-OUT
SW-OUT
Tire pressure detection
(optional)
C-OUT
Tire pressure module
Multi-function compound interface
Brown
Red
White
Red
White
White
Black
USB USB interface
USB
ANT-C
BACK
BRAKE
Reversing hand-brake wire ( )standard
USB cable used for internet(3G modem support is required )
3G NET interface
External microphone wire(optional)
MIC

Turn On/Off
9
Volume Adjustment
Insert/pull out the car key
the system.
to turn on/off
When the system is in standby state
on the panel to turn on the host.
, press “ ”
When the system is on
panel to enter the standby mode
, press and hold “ ”on the
.
Press / to adjust the volume.
VOL-VOL+
VOL-
MUTE
VOL+
NAV
FM/AM
DVD
GPS
VOL-
MUTE
VOL+
NAV
FM/AM
DVD
GPS

Descriptions of Buttons
10
34turn up/down the volume.
5Turn on/off volume,and long press to enter
the reversing radar interface.
2When it is on, press once to enter night mode, press
twice to enter black screen mode,long press to enter
standby state,when it is in standby state, press shortly to
turn on the system.
9In other states, press to switch to the radio state;
In radio status, press to switch bands between
FM and AM.
6This is the window used for
others when using the bluetooth handfree
function.
communicating
with
1Insert the hole and press the button inside ,then
the system will be reset to the factory defaults.
8Enter/exit from navigation mode,long press to
enter the calibration interface.
12 In other states,press to switch to DVD state.
In DVD state,press to switch among DVD /
SD/USB state.
7Press to inject/eject at any state
VOL-
MUTE
VOL+
NAV
FM/AM
DVD
GPS
2
3
4
5
1
6
7
8
9
10
11
12 13 14
1011 In Radio status press shortly to select the next/previous
station,long press to seek programs for high/low-
frequency band.In DVD/iPod/DISC status, press to
select the next/previous track.
14 Connection interface for SD card and host
unit.(for reading data of navigation)
13 Connection interface for SD card and host
unit.(for playing multimedia)

11
Main Menu
Press or to enter main menu.
For detailed information of these functions, please refer to “User's Manual”.
As the picture shows , main menu includes
Radio ,SD, USB , Bluetooth ,AUX ,Disc , iPod ,
ATV,Navigation ,AV OUT ,Virtual disk box ,
Camera tire Pressure ,IE and Setting-up, Totally
there are 15 modules.Then touch the icons
directly to enter the corresponding function
operations.
(Need phone
support)
(Optional)
Bluetooth hand-free interfaceRadio interface Disc interface
iPod interface
Navigation interface
USB play interface
ATV play interface
AUX interface CAM interface
TPMS interfaceSetup interface
AV OUT interface
SD interface
Virtual CDC interface
(Optional)
AV OUT
IE interface
(Optional)

12
Working voltage
Working current
MAX 15A
Standby current
<6mA
Working temperature
Screen dimensions
Weight 2.9Kg
Video system
-20℃ 60 ℃~ +
176.64mm(W)×99.36mm(H)
System Parameters
DC 11V-15V
Auto PAL/NTSC/SECAM
Product Specifications
DVD Parameters
1±0.2Vp-p(75Ω)
Video output
Diameter 12cmDisc format
20Hz~20KHz( 3dB)±
Audio Parameters
Frequency response
Tone
control
Bass
Mid
Treble
100Hz±8dB
1KHz±8dB
10KHz±8dB
Channel imbalance
Separation
≤2dB
≥45dB
DVD/VCD/CD/MP3/WMA/
JPEG/MPEG4
Disc compatible
Reservet emperature -30℃ 80 ℃~ +
Test voltage
Max output power
Speaker resistance 4Ω(4-8 could be
Ω
accepted)
13.8V
4×10W
Amplifier Parameters

13
TV box
Quantity
Model
Standard Accessories
1pcs
1copy
1pcs
1pcs
Optional Accessories
1pcs
Quick guide
1copy
User's manual
1pcs
1pcs
USB switch wire of H port
1pcs
AV output wire
AV input wire A
iPod switch wire
Remote control
5.1 Audio output wire
Stylus pen
1set
Tire pressure monitoring module
1pcs
NAV receiving antenna
List of Accessories
1pcs
Reversing hand-brake wire of F port
USB wire for internet
1pcs
1set
1pcs
1pcs
External microphone wire
Camera Radar wire

FCC STATEMENT
1. This device complies with Part 15 of the FCC Rules. Operation is subject to the
following two conditions:
(1) This device may not cause harmful interference.
(2) This device must accept any interference received, including interference that may
cause undesired operation.
Changes or modifications not expressly approved by the party responsible for compliance
could void the user's authority to operate the equipment.
NOTE: This equipment has been tested and found to comply with the limits for a Class B
digital device, pursuant to Part 15 of the FCC Rules. These limits are designed to provide
reasonable protection against harmful interference in a residential installation.
This equipment generates uses and can radiate radio frequency energy and, if not
installed and used in accordance with the instructions, may cause harmful interference to
radio communications. However, there is no guarantee that interference will not occur in a
particular installation. If this equipment does cause harmful interference to radio or
television reception, which can be determined by turning the equipment off and on, the
user is encouraged to try to correct the interference by one or more of the following
measures:
Reorient or relocate the receiving antenna.
Increase the separation between the equipment and receiver.
Connect the equipment into an outlet on a circuit different from that to which the
receiver is connected.
Consult the dealer or an experienced radio/TV technician for help.
Table of contents
Popular Car Video System manuals by other brands

Soundstream
Soundstream VCM-112 owner's manual

Alpine
Alpine DVA-7996R owner's manual

Cartechno
Cartechno NA-VL2DVD900 installation instructions

Alpine
Alpine IVA-W203 - 6.5" Touch Screen 2-DIN DVD In-Dash... owner's manual

ZENEC
ZENEC INFOTAINER Z-N328 user manual

Audiovox
Audiovox Mobile Video HR7010PKG installation guide