Cateye GAME BIKE CONTROL User manual

1
GAMEBIKE™ Controller
Operation Manual
Thank you for purchasing the CAT EYE GAMEBIKE.
Please read this manual carefully before using this product. Safeguard the manual along with the warranty card.
Handlebar
Pedals (speed)
See "How to adjust the GAMEBIKE" for information
on how to adjust the steering sensitivity.
See "How to adjust the GAMEBIKE" for information
on how to adjust the speed sensitivity.
What is the GAMEBIKE
The GAMEBIKE is a game controller which allows you to enjoy using a home video gaming machine while using a bicycle.
GAMEBIKE Controller
Bracket/Controller installation
Attach the controller bracket in the middle of the bicycle handlebar.Install the GAMEBIKE Controller by sliding it into the controller
bracket.
1 2 3
GAMEBIKE
Controller
Click
Handlebar Controller bracket
Connecting the controller to the GAMEBIKE
Connect the pin jacks from the GAMEBIKE to the GAMEBIKE Controller.
Brake button
Do not plug in/unplug the GAMEBIKE pin jack while "Playstation2" is turned on.
This may result in a malfunction of the "Playstation2" unit.
The GAMEBIKE controller controls various games using a bicycle and trainer not like a controller attached to a
gaming device.The function of the gaming device itself or game software is neither expanded nor modified.
Controller bracket
To "Playstation2"
To Brake button
GAMEBIKE MAIN UNIT To Speed sensor
Cable
For brake button
For speed sensor
For the unit
Reference:
GAMEBIKE bracket is compatible with all CAT EYE headlamps.
Reference:
Caution
U.S. Pat. No. 6,126,571 PS
E

2
GAMEBIKE Controller
Vibration function
The GAMEBIKE Controller is a virtual game controller with an integrated vibration function.
Vibration ON/OFF can be switched via the software screen.See the software operation manual for further details.
Some software performs the vibration function automatically even though this function may not explicitly have been
explained in the manual.
ANALOG
SELECT START
STEERING LEVEL SPEED LEVEL
RL
Certain software does not work well with this device due to differences in button functions.In such cases,
changing the function assigned to particular buttons will allow these software packages to work.
For further information on how to change these functions, see "Changing button functions".
L2 button*
Steering sensitivity level control
L1 button*
SELECT button
Direction key
Signal from controller:
When analog mode is OFF.
Left-hand stick/L3 button
Analog mode switch
R2 button*
R1 button*
Green button*
Pink button*
Red button*
Blue button*
Right-hand stick/R3 button
START button
Acceleration sensitivity level control
*
Signal from controller:
When analog mode is ON.
Brake signal
Speed signal
• Before using this product, be sure to read the "Notes on using the GAMEBIKE Controller " and the
"Notes on using the GAMEBIKE" in the GAMEBIKE Operation Manual.
• Certain software packages whose packaging or documentation provides no indication of analog
compliance or compatibility will not work in analog mode.
• Certain software packages will not switch mode even if the analog mode switch is pressed.
In the case of certain software packages, the mode switches automatically.
Caution
Depending on the software, GAMEBIKE operation sometimes takes precedence over the GAMEBIKE
Controller and prevents operation of the controller.
Important:
Important
If the GAMEBIKE Controller is not connected to the GAMEBIKE, it can be used as a controller for
"Playstation 2". In this case, the level controls for the GAMEBIKE will not be activated.
Reference:
• Before using the vibration function, read the "Notes on using the GAMEBIKE Controller" carefully.
• When not in use, turn off the unit or disconnect the GAMEBIKE Controller from the unit.
Caution
Controller Cover Care
While using GAMEBIKE,the user may perspire/sweat while training.
To prevent sweat from getting into the controller, please use
the controller cover provided.
Please wash and dry after use.
Controller cover
Controller
When the vibration mode is on while playing the game.
The vibration sometimes cause the controller to inadvertedly switch riding positions on the screen.
(this function is usually controlled by pressing the green button.
If the vibration has this effect, simply turn off the vibration mode.
E

3
How to adjust the GAMEBIKE
• Adjusting the steering sensitivity
Turn on the "Playstation2", then slide the steering
sensitivity control of the GAMEBIKE Controller while
operating the handle of the bicycle on the race
screen to adjust the steering sensitivity as required.
<Operation>
1. Press the blue (or pink) button depending on the function to be changed.
Keep pressing the SELECT button until the following steps are completed:
The LED will change from constantly lit to blinking.
While pressing the SELECT button, press the speed button (blue) or brake button (pink).
2. Press the default accelerator (or brake) button in the software currently being used.
• Revert to the original button function
The LED will change stop blinking and will be lit continuously, signifying that the function change is now complete.
(If analog mode is OFF, the LED will be off, signifying that the function change has been completed.)
• Adjusting the speed sensitivity
Turn on the "Playstation2", then slide the speed
sensitivity control of the GAMEBIKE Controller
while operating the pedal of the bicycle on the race
screen to adjust the speed sensitivity as required.
Button Function change
In the case of software with different button functions, change functions as follows:
The buttons to which functions can be assigned are green, pink, red, blue, L1, L2, R1 and R2.
ANALOG
SELECT START
STEERING LEVEL SPEED LEVEL
RL
ANALOG
SELECT START
STEERING LEVEL SPEED LEVEL
RL
Steering sensitivity
STEERING LEVEL
Min.Max.
Speed sensitivity
SPEED LEVEL
FastSlow
Connecting the device to Playstation2
This controller is compatible with the "Playstation2".Plug the connector of this device into the controller terminal
located at the front of the "Playstation2". Consult the operating manual of the "Playstation2" unit, if necessary.
"Playstation2" unit
1P side
Controller connector
2P side
To GAMEBIKE Controller
If the GAMEBIKE does not operate after connecting
it to the PlayStation2 unit, disconnect it and reconnect
it again.
Important:
It is possible for two players
to play simultaneously by
connecting two GAMEBIKEs
or connecting to a general
controller.
Reference:
FCC
NOTE: This equipment has been tested and found to comply with the limits for a Class B digital device, pursuant to part 15 of the
FCC Rules. These limits are designed to provide reasonable protection against harmful interference in a residential installation.
This equipment generates, uses and can radiate radio frequency energy and, if not installed and used in accordance with the
instructions, may cause harmful interference to radio communications. However, there is no guarantee that interference will not occur
in a particular installation. If this equipment does cause harmful interference to radio or television reception, which can be determined
by turning the equipment off and on, the user is encouraged to try to correct the interference by one or more of the following measures:
— Reorient or relocate the receiving antenna.
— Increase the separation between the equipment and receiver.
— Connect the equipment into an outlet on a circuit different from that to which the receiver is connected.
— Consult the dealer or an experienced radio/TV technician for help.
Depending on the software, while
moving the handlebar from Left to
Right, the steering reaction on the
game does not work.
Depending on the software,while
pedaling, the speed of the game does
not register.This will cause the game
not to move forward.
Caution
Caution
E

4
E
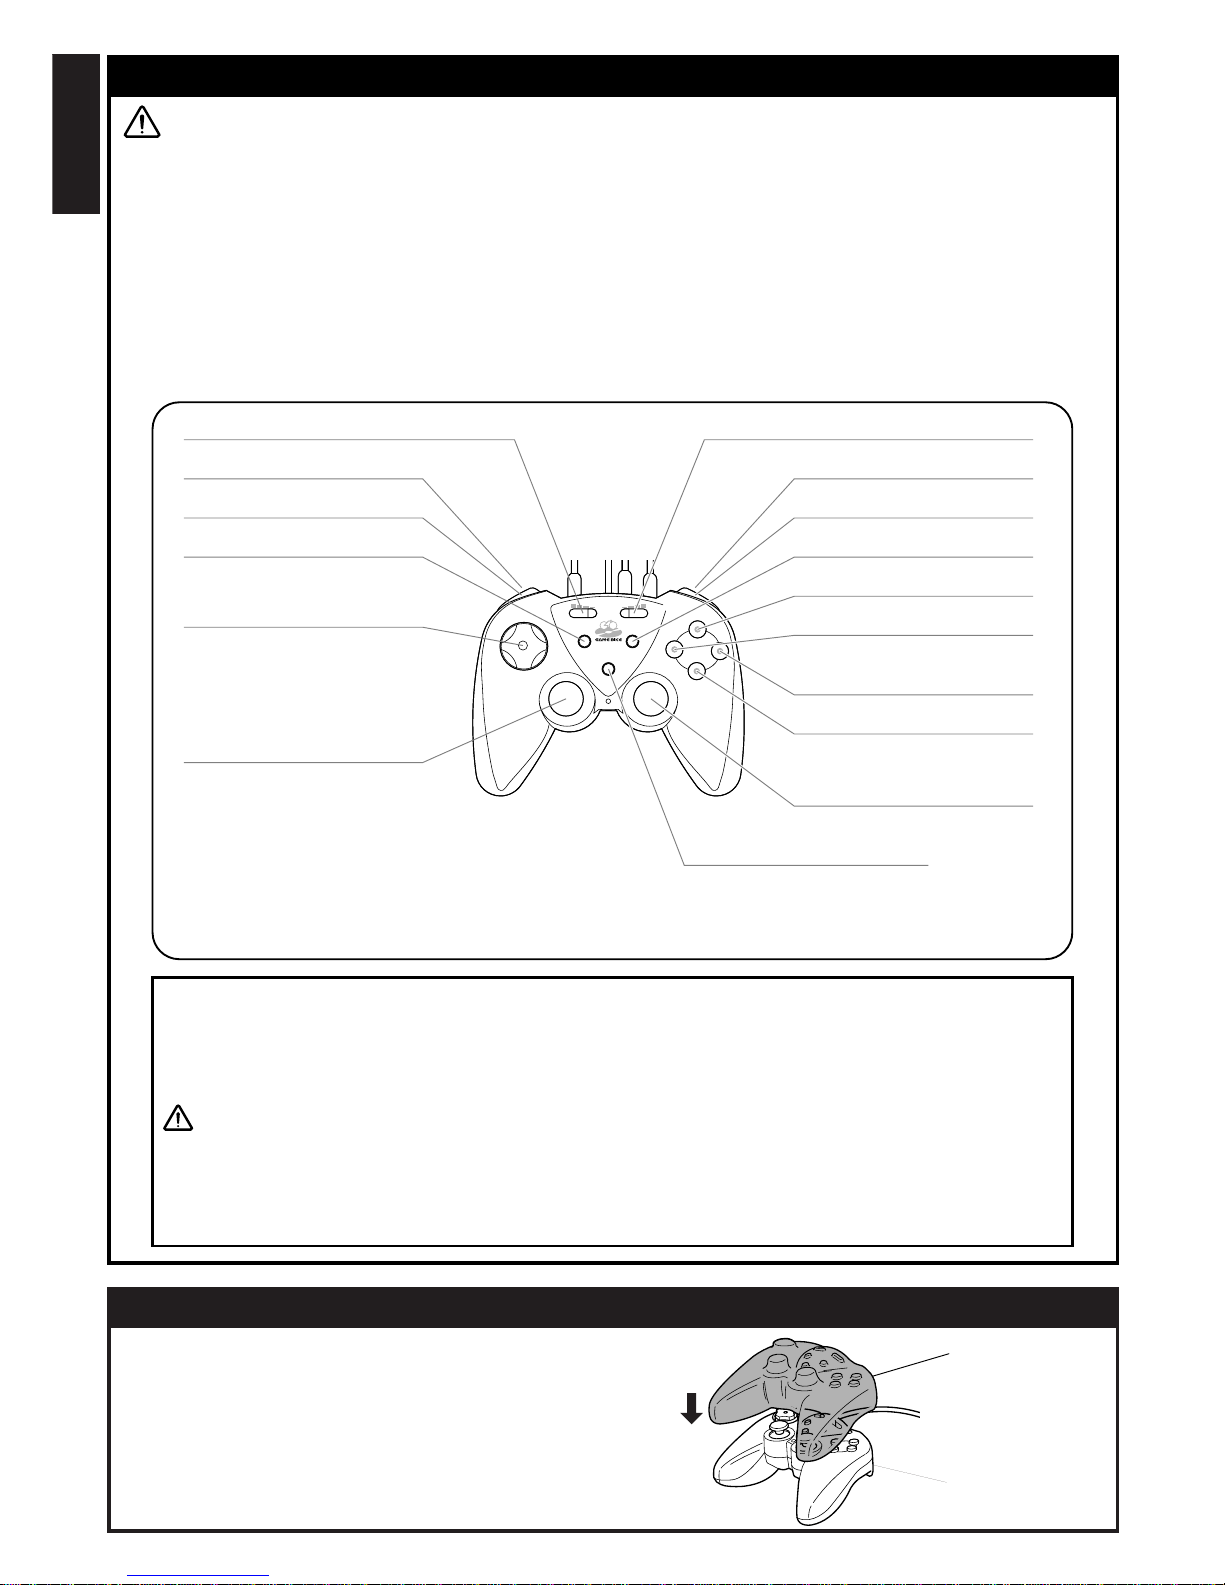
GAMEBIKE Controller usage cautions!
•Avibrating mechanism is incorporated into the GAMEBIKE controller; do not place the controller against the joints
or against the head, elbow, knee, face or abdomen.
•Do not use use the vibration function of the GAMEBIKE Controller if your fingers/hands/wrists/arms are broken/
dislocated/sprained or if you have recently pulled a muscle.Vibrations from the device may exacerbate the condition.
•Make sure to take at least 15 minutes break for each hour of playing the game to avoid eye fatigue.
•Avoid using the device if you are tired or have not had enough sleep.
•While using the game.Please use the controller cover to prevent sweat or moisture from entering the controller.
•Use the device in a well-lit room and as far away from a T.V.screen as possible.
•
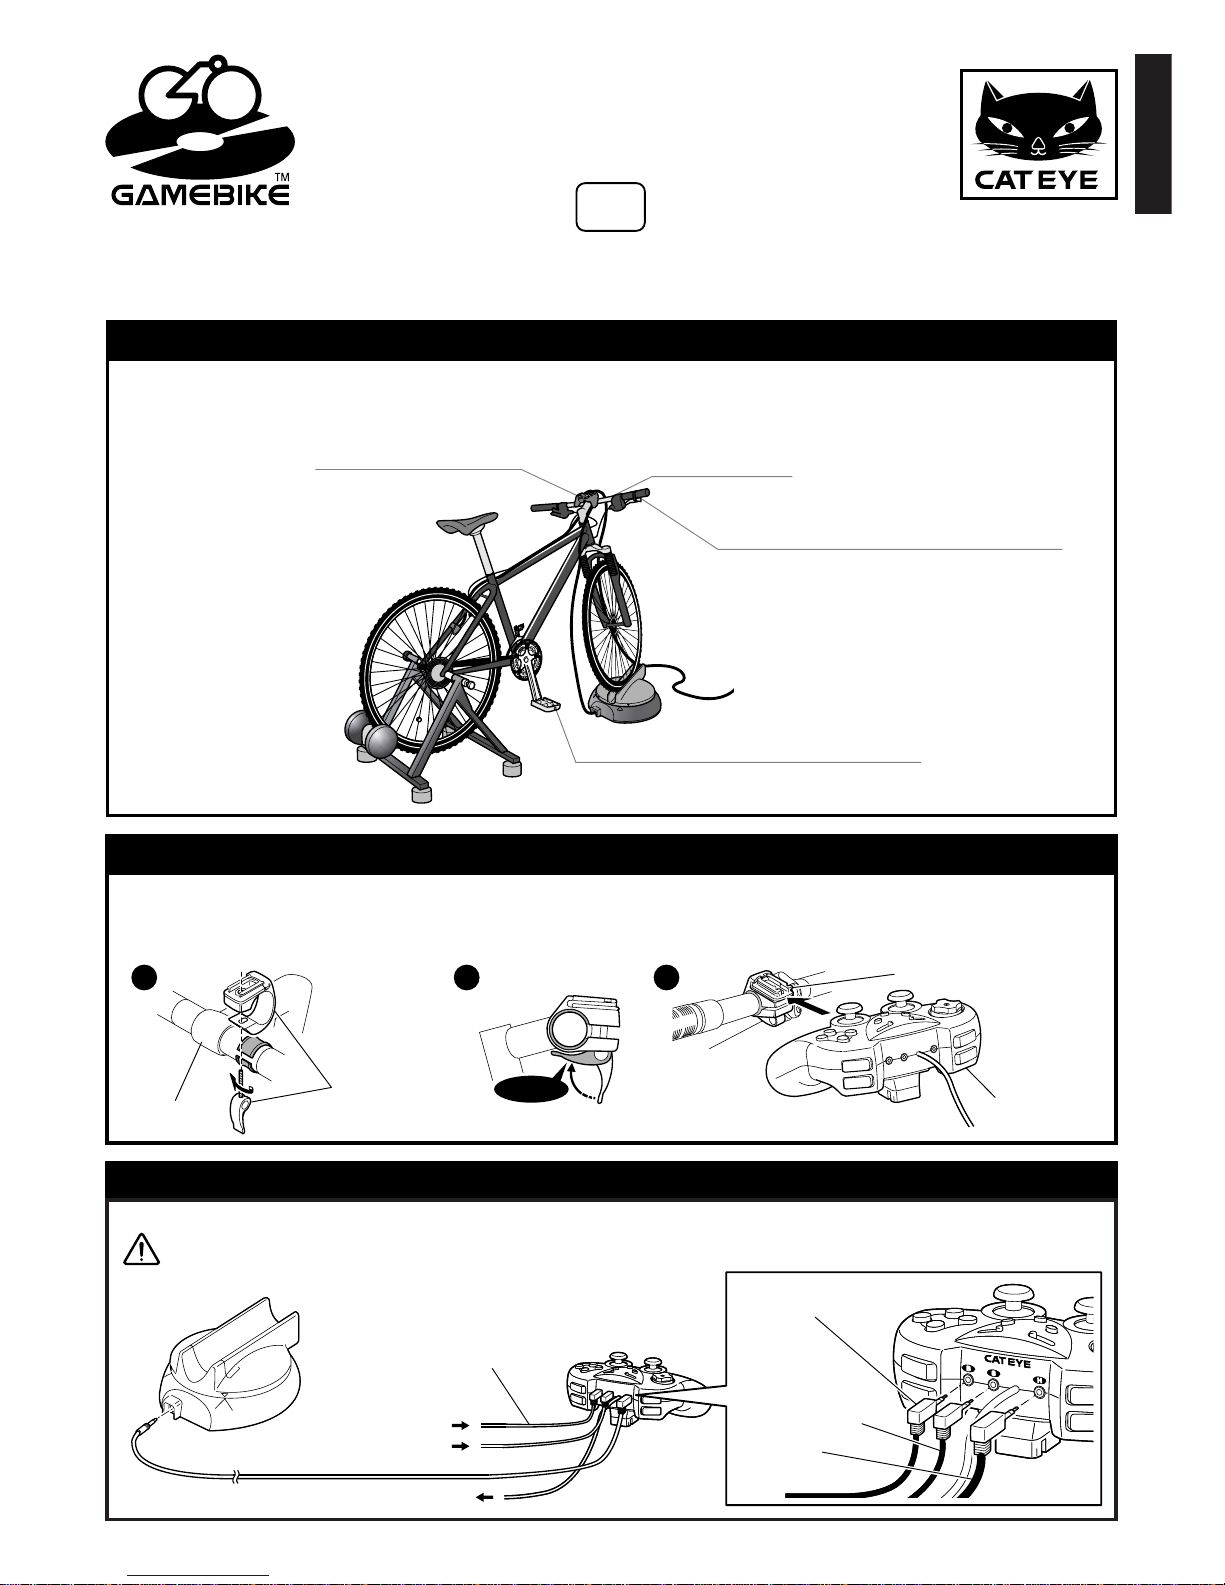
•While using the game.Handling operation is to be done with the bicycle handlebar.Do not touch the GAMEBIKE
controller when turning the wheel. This may cause damage to the controller or bracket.
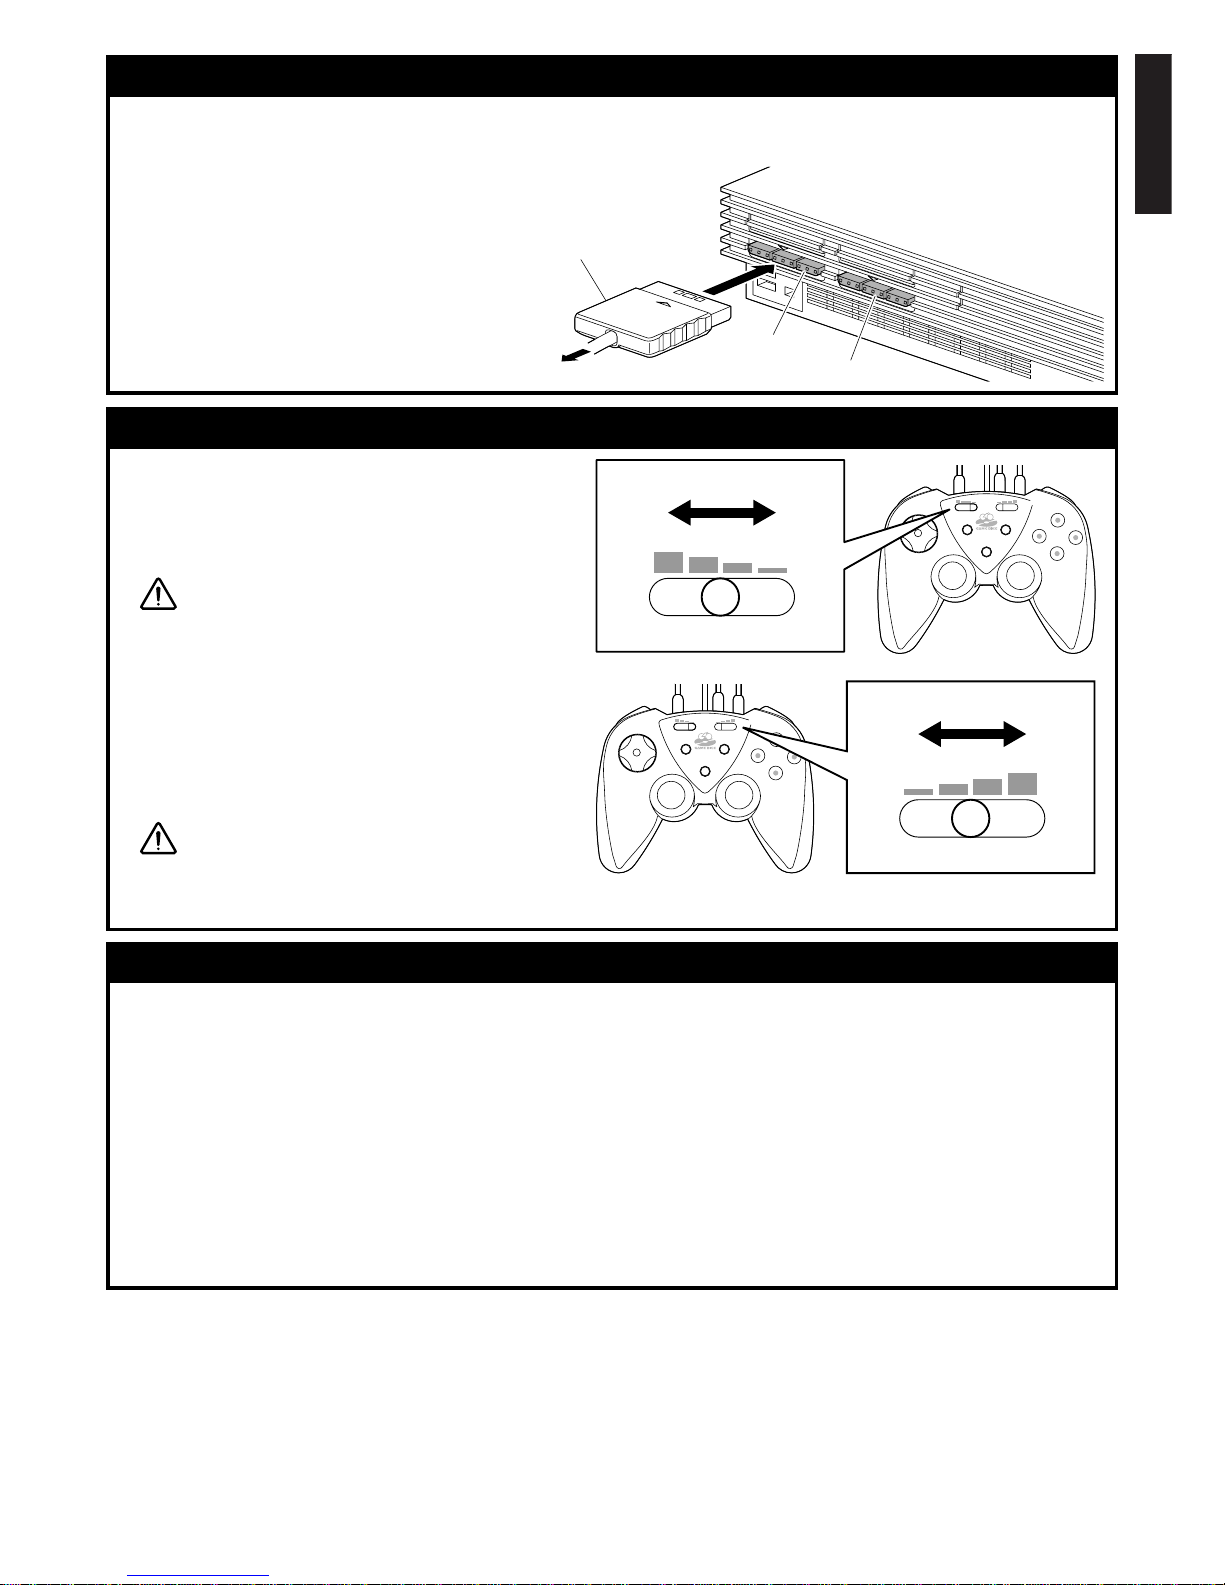
Warning!
If the unit gets an electrostatic shock, it can be reset by pressing the reset key or remove the
batteries and put them back in.
This controller is for home use only.Don`t use this device for any other use other than intended.
•It has been reported that, in rare cases, some people have experienced certain physical symptoms, for example muscle
spasms or temporary loss of consciousness as a result of stimulation from strong light rapidly changing on-screen images.
Persons who have experienced such symptoms should consult a doctor before using this device.Moreover, if such
symptoms should occur while watching the gaming screen, please consult a doctor immediately.
Caution
All company, product, and service names are trademarks and registered trademarks of the relevant companies.
"Playstation" is registered trademarks of Sony Computer Entertainment Inc.
Symbols Legend
The descriptions accompanying the following symbol marks in this manual refer to very important issues in terms
of your safety and handling of the unit.
You are strongly urged to observe these precautions carefully.
Symbol marks used for safety precautions in this manual
Failure to observe this warning could result in serious injury or death.
Warning
Failure to observe this warning could result in physical injury or damage to the GAMEBIKE.
Caution
Operations which require caution, items which should be observed in particular as well as certain
additionnal information are presented in this manual.
This symbol mark denotes helpful information ensuring proper usage.
Reference
Important
Specifications
Compatible gaming devices SONY Playstation, Playstation2
Size (W x H x D) (6.3" x 2.8" x 4.5") (160 mm x 71 mm x 115 mm)
Weight Approx. 0.66lb (0.3kg)
Operating temperature range Same as applied game device.
*Specification and actual appearance of components might change without notice due to improvements.
Warranty/Repairs. Service.
2-yearWarranty: Applicable to GAMEBIKE Controller only (Excluding accessories)
If the device becomes defective through normal use, it will be repaired or replaced free of charge. Send the device and
warranty card to us directly, filling in the purchaser's name, address, date of purchase and a information regarding the
malfunction.The warranty does not cover shipping charges incurred by the customer in returning the device to our
service department.The product will be returned to the customer on completion of necessary repairs.
2-8-25, Kuwazu, Sumiyoshi-ku, OSAKA, 546-0041 Japan
PHONE: 81-6-6719-7781 FAX: 81-6-6719-2362
E-mail address: Sales@cateye.co.jp
Attn: CS/PR. LIAISON.
Service & Research Address for North American Customers:
CAT EYE Service & Research Center
1705 14 th St. 115 Boulder, CO 80302
PHONE: 303-443-4595 FAX: 303-473-0006
E-mail: service@cateye.com URL: http://www.cateye.com
Toll Free:800-5CAT EYE
Product Service Section
Copyright© 2002
CAT EYE Co., Ltd.
Table of contents
Other Cateye Other manuals
Popular Other manuals by other brands

wellbots
wellbots FREEFLY VR instruction manual

Delta Electronics
Delta Electronics AE94BSTD Specifications

ALBA-KRAPF
ALBA-KRAPF Profi Serie II Assembly instructions

ATI Technologies
ATI Technologies 203200 installation instructions

Wildeboer
Wildeboer EK90 manual

Quest Engineering
Quest Engineering 70 Installation, operation and maintenance instructions