P2PE Instruction Manual for PCI P2PE v2.0 Version 1.5 – 15th November 2018
© 2018 Cayan LLC Page 5
2. Approved POI Devices, Applications/Software, and the Merchant Inventory
2.1 POI Device Details
The following information lists the details of the PCI-approved POI devices approved for use in this
P2PE solution.
Note all POI device information can be verified by visiting:
https://www.pcisecuritystandards.org/approved_companies_providers/approved_pin_transaction_security.php
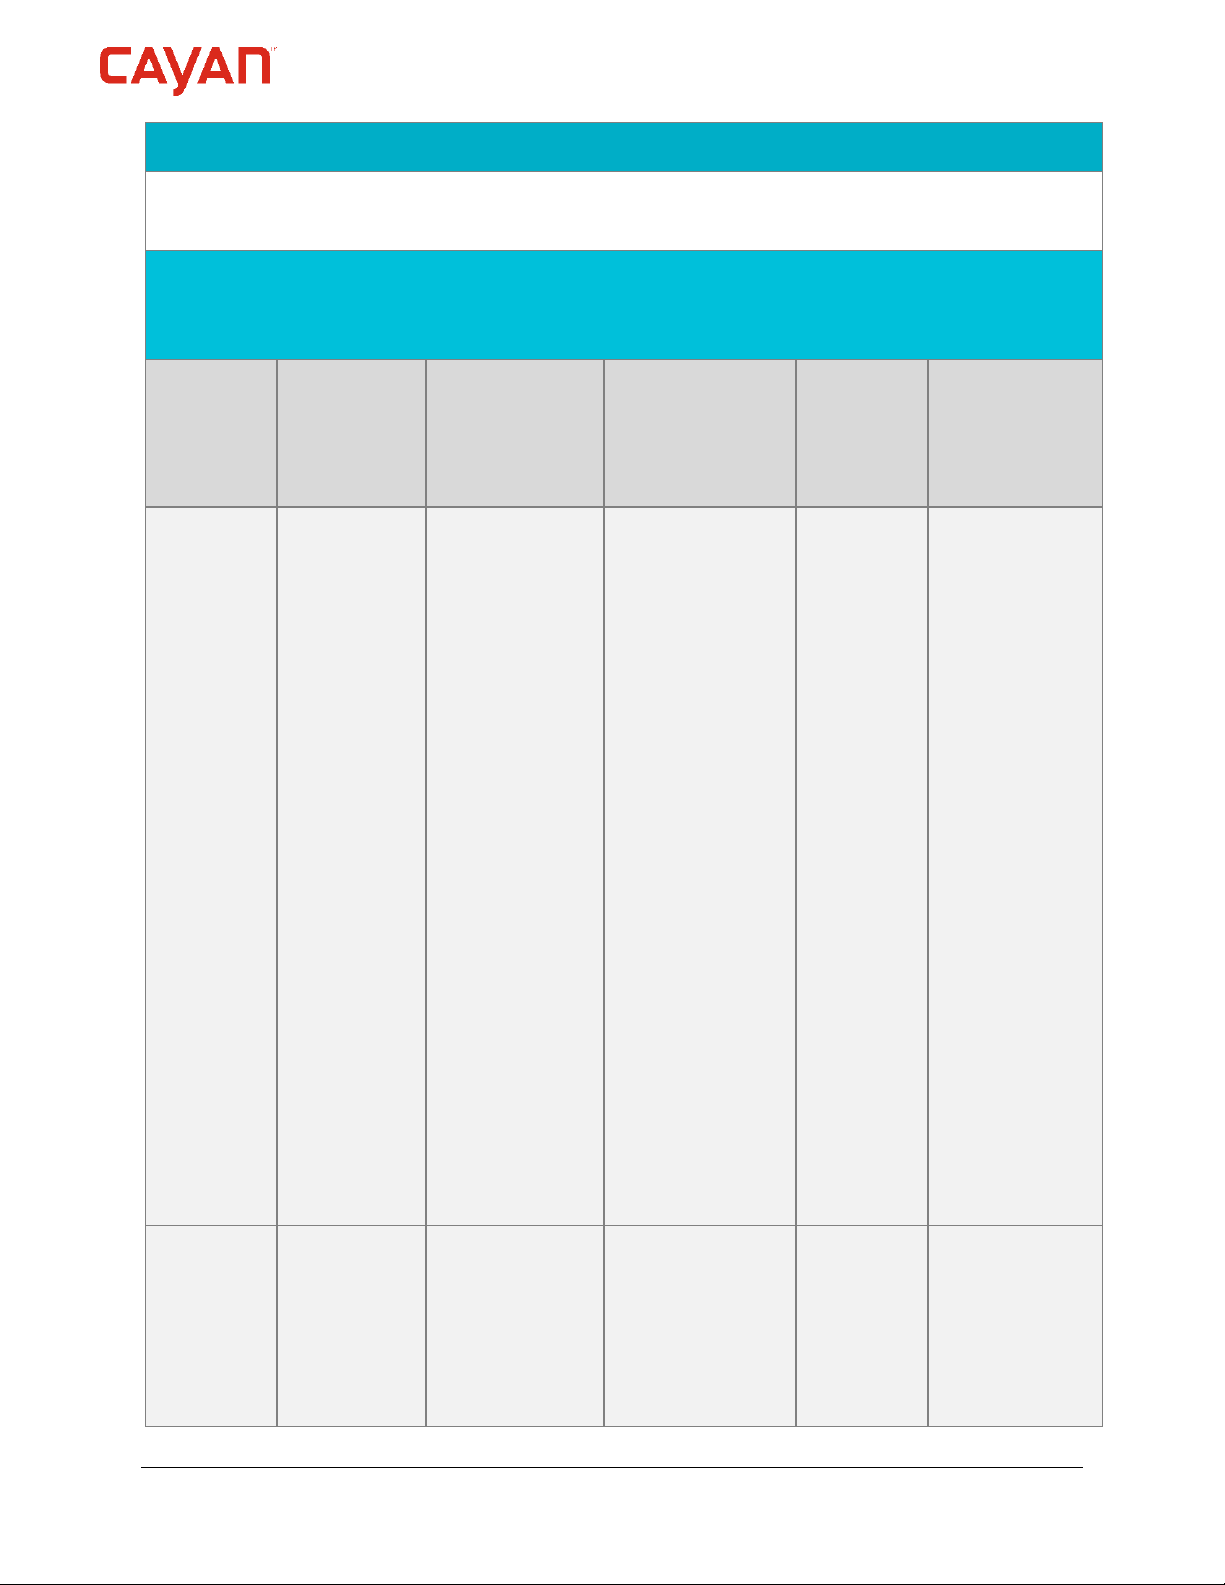
POI device vendor: Verifone
POI device model name and number: MX915: P132-40x-xx-xxx
Hardware version #(s): 3.x, Vault: 14.x.x; AppM: 8.x.x; SRED: 7.x.x, Vault: 16.x.x; AppM:
10.x.x
Firmware version #(s): Vault: 1.x.x, 3.x.x, 4.x.x, 11.x.x, 12.x.x, AppM: 1.x.x; 3.x.x; 4.x.x;
5.x.x, 5A.x.x, 6.x.x, SRED: 1.x.x, 3.x.x; 4.x.x; 5.x.x, OP: 1.x.x,
3.x.x; 4.x.x; 7.x.x, SRED 5.x.x.xxx, Vault: 13.x.x, AppM: 7.x.x,
Vault: 17.x.x, AppM: 10.x.x, SRED: 7.x.x, OP: 7.x.x
PCI PTS Approval #(s): 4-10110
POI device vendor: Verifone
POI device model name and number: MX925: P132-50x-xx-xxx
Hardware version #(s): 3.x, Vault: 14.x.x; AppM: 8.x.x; SRED: 7.x.x, Vault: 16.x.x; AppM:
10.x.x
Firmware version #(s): Vault: 1.x.x, 3.x.x, 4.x.x, 11.x.x, 12.x.x, AppM: 1.x.x; 3.x.x; 4.x.x;
5.x.x, 5A.x.x, 6.x.x, SRED: 1.x.x, 3.x.x; 4.x.x; 5.x.x, OP: 1.x.x,
3.x.x; 4.x.x; 7.x.x, SRED 5.x.x.xxx, Vault: 13.x.x, AppM: 7.x.x,
Vault: 17.x.x, AppM: 10.x.x, SRED: 7.x.x, OP: 7.x.x
PCI PTS Approval #(s): 4-10110
POI device vendor: Verifone
POI device model name and number: MX915: P177-40x-xx-xxx
Hardware version #(s): 4.x
Firmware version #(s): Vault: 12.x.x, AppM: 6.x.x, SRED: 4.x.x, OP: 7.x.x
PCI PTS Approval #(s): 4-10177
POI device vendor: Verifone
POI device model name and number: MX925: P177-50x-xx-xxx
Hardware version #(s): 4.x
Firmware version #(s): Vault: 12.x.x, AppM: 6.x.x, SRED: 4.x.x, OP: 7.x.x
PCI PTS Approval #(s): 4-10177