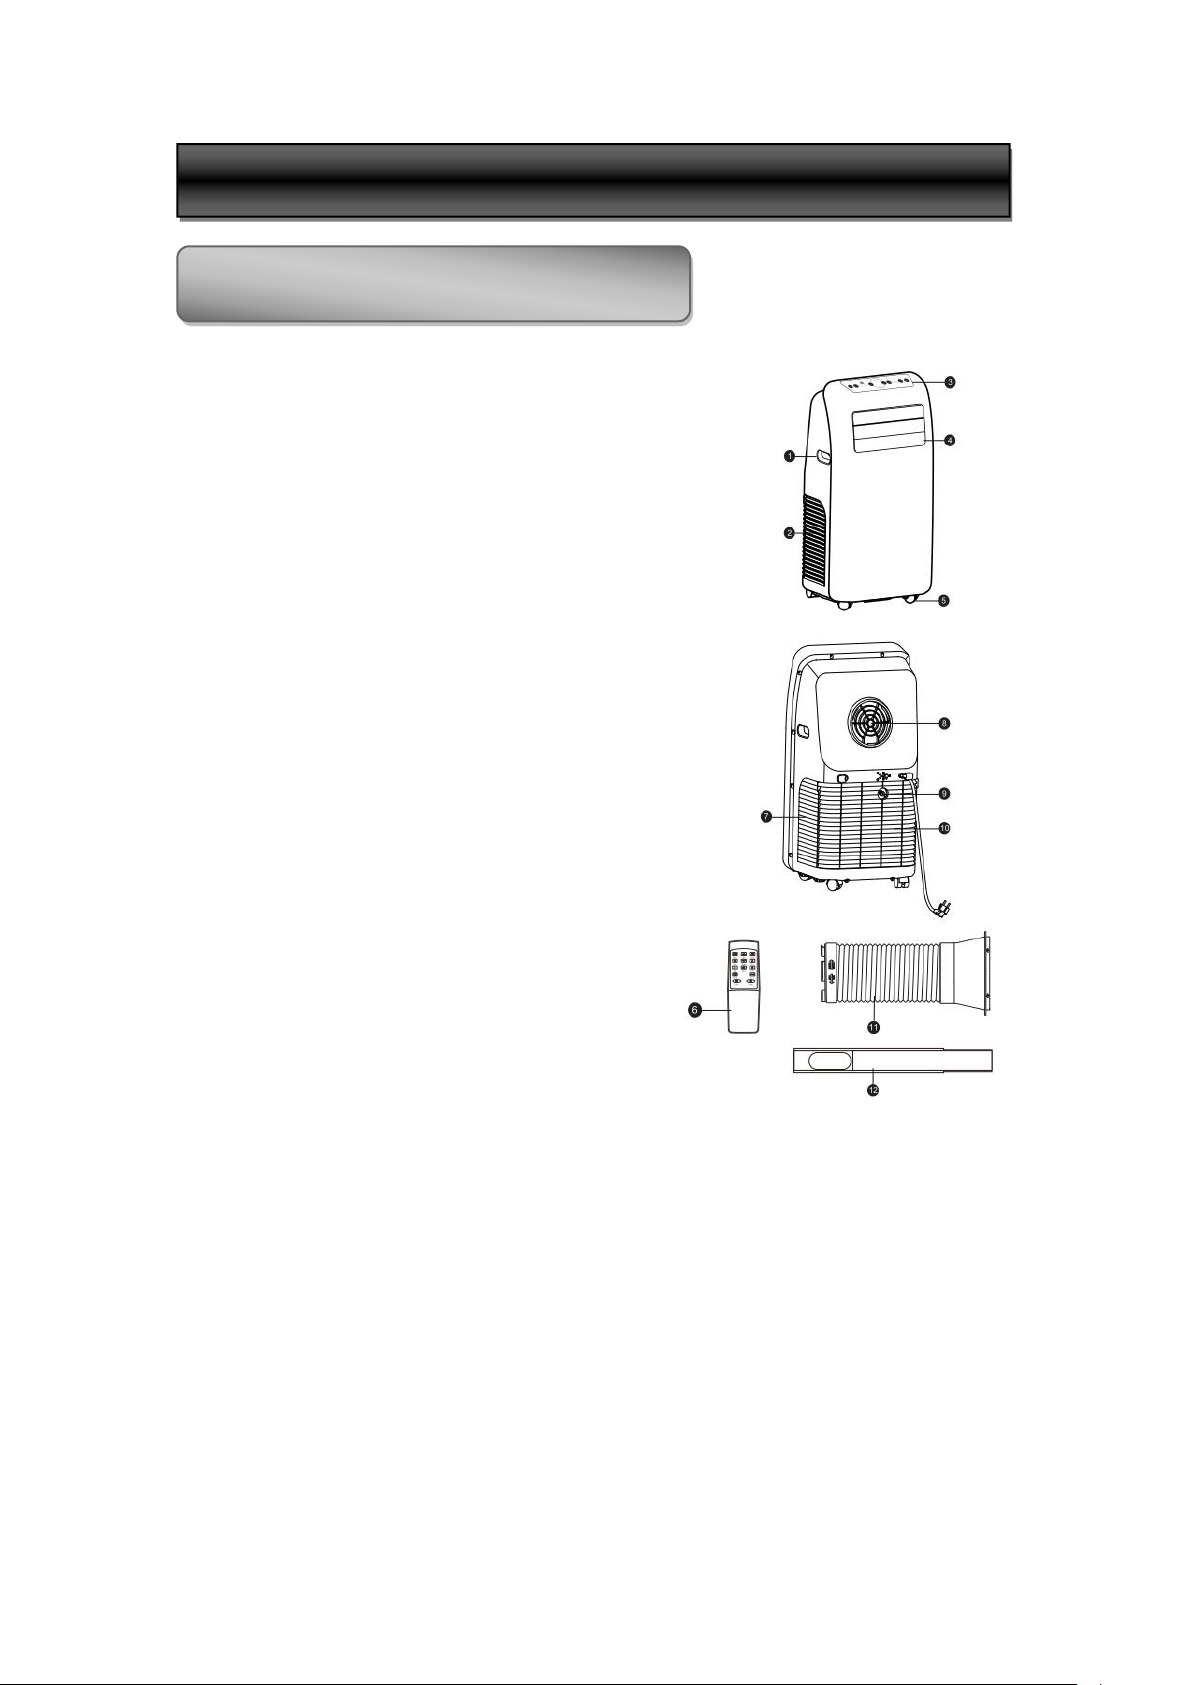
CCH YPF2-12C User manual

YPF2-12C
Portable Air Conditioner
User Manual
Thank you for selecting this super quality air conditioner. Please be sure to read this
manual carefully before using it.

CONTENT
Important Safety Tips
Precautions........................................................1
Product Introduction
Main Parts and Components...............................3
Control Panel and Remote Controller..................4
Product Operation
Placement and Installation..................................5
Operation Method...............................................7
Clean and Maintenance
Drainage Method................................................8
Maintenance......................................................8
Common Failures and Diagnosis
Intelligent Error Detection..................................10
Fuse Parameters..............................................10
Trouble-shooting..............................................10

Please read the Manual carefully before operating the machine:
This machine is for household use only.
This machine is for indoor use only. Please place it in dry environment.
Check power cord frequently. When power cord, plug or A/C is damaged, please
don’t operate.
If the power cord is not long enough, power extension cable can be used. Cable
should not scatter at places where power cord may be pulled out or people may be
stumbled.
The A/C should be away from heat source and avoid direct sunlight.
Turn off the A/C before unplugging.
Turn off and unplug the A/C before removing or cleaning it, or replacing its parts or
when it is not used.
Clean the A/C according to the Manual.
Voltage of the A/C should meet requirements. Any damage incurred by incorrect
power isn’t included in the warranty.
Children are not allowed to play with the A/C.
This appliance is not intended for use by persons (including children) with reduced
physical, sensory or mental capabilities, or lack of experience and knowledge, unless
they have been given supervision or instruction concerning use of the appliance by a
person responsible for their safety.
Don’t insert your fingers or any hard object to wind guide bar of the air outlet.
Don’t place the A/C at any place with water or other liquid. Prevent water or liquid
from entering the A/C.
Don’t repair the A/C by yourself. Any possible hazard incurred by maintenance of
laypeople will violate the warranty. If the supply cord is damaged, it must
be replaced by professional maintenance personnel.
Please use the accessories provided by the A/C manufacturer; otherwise, the A/C
may be damaged.
Suggest using environmental temperature for the air conditioner (Cooling/heating ):
15-35℃/5-27℃.
This appliance can be used by children aged from 8 years and above and persons
with reduced physical, sensory or mental capabilities or lack of experience and
knowledge if they have been given supervision or instruction concerning use of the
appliance in a safe way and understand the hazards involved. Children shall not play
with the appliance. Cleaning and user maintenance shall not be made by children
without supervision.
PRECAUTIONS
IMPORTANT SAFETY TIPS
PRECAUTION

Special warning:
Place the A/C on even ground and install it vertically, so as to ensure normal
operation of the compressor.
The A/C should be at least 50cm away from surrounding objects. Keep air inlet and
outlet smooth.
Don’t use the A/C beside gasoline or any other inflammable liquid.
Don’t use spraying agent and other solvent or flammable substances near the A/C;
otherwise, its plastic may deform and electric parts may be damaged.
Power
The plug should be in good condition and can’t be damaged. Don’t replace the plug
with power lug.
In order to run the A/C, plug the power cord first, and then press the power key.

1. Handle
2. Air inlet (L)
3. Control panel
4. Wind guide bar
5. Caster
6. Remote controller
7. Air inlet (R)
8. Air outlet
9. Dehumidification drainage nozzle
10. Air inlet grille
11. Exhaust duct assembly
12. Window sealing plate assembly
PRODUCT INTRODUCTION
MAIN PARTS AND COMPONENTS

Cooling model Cooling & heating model
1. Power key
Press the key to turn ON/OFF the A/C.
2. Swing key
Press this key at any time after turning on the A/C to swing
the wind guide bar automatically.
3. Speed key
Press the key to choose high/ low gear wind speed.
4. Temperature/ time adjusting key
Press the key at cooling mode to increase/reduce the
setting temperature; press it at timing mode to adjust timing
ON/OFF time; press Up and Down keys simultaneously to
switch Fahrenheit and Centigrade degree temperature.
5. Mode key
Press the key to choose cooling, wind, dehumidification
and automatic (or heating for cooling/heating model) mode.
6. Timer key
Press the key at standby mode to set ON time.
Press this key at ON mode to set OFF time.
7. Temperature/ time display window
This window displays the adjusted temperature and time.
8. Remote controller receiving window
This window is used to receive signal of the remote
controller.
9. ℃/℉switching key
Press the key to switch ℃and ℉.
CONTROL PANEL AND REMOTE CONTROLLER

Placement
Place it at even and dry place, and keep it at least 50cm away from its surrounding
object.
Installation
Screw the exhaust duct assembly in the air outlet behind the panel (anticlockwise).
PRODUCT OPERATION
PLACEMENT AND INSTALLATION

Insert the air exhaust hose into the window sealing plate, adjust opening width of
window so that the window can match with the sealing plate properly; length of the
sealing plate is adjustable.
Incorrect installation
It’s important to keep the exhaust duct smooth. Incorrect installation will affect work of
the A/C.
Prevent the exhaust duct from seriously bending.
Ensure air can flow smoothly in the duct.
Warning:
The exhaust duct is designed especially for this model.
Don’t replace or lengthen it; otherwise, it will result in
failure.
Notice:
Max. developed length of the exhaust duct is 1,500mm. It’s better to shorten it while use
and keep it horizontal while installation.

Cooling mode
When the A/C enters cooling mode automatically or cooling mode is selected after
power ON, the cooling indicator lamp lights up.
Press Up/Down key to adjust setting temperature (17℃~30℃).
Press Speed key to choose High/Mid/Low speed.
Fan mode
When pressing mode key or choosing Fan mode by pressing the remote controller,
the wind indicator lamp lights up.
Press Speed key to choose High/Mid/Low speed.
Temperature can’t be set.
Dehumidification mode
When pressing mode key or choosing dehumidification
mode by pressing the remote controller, the
dehumidification indicator lamp lights up.
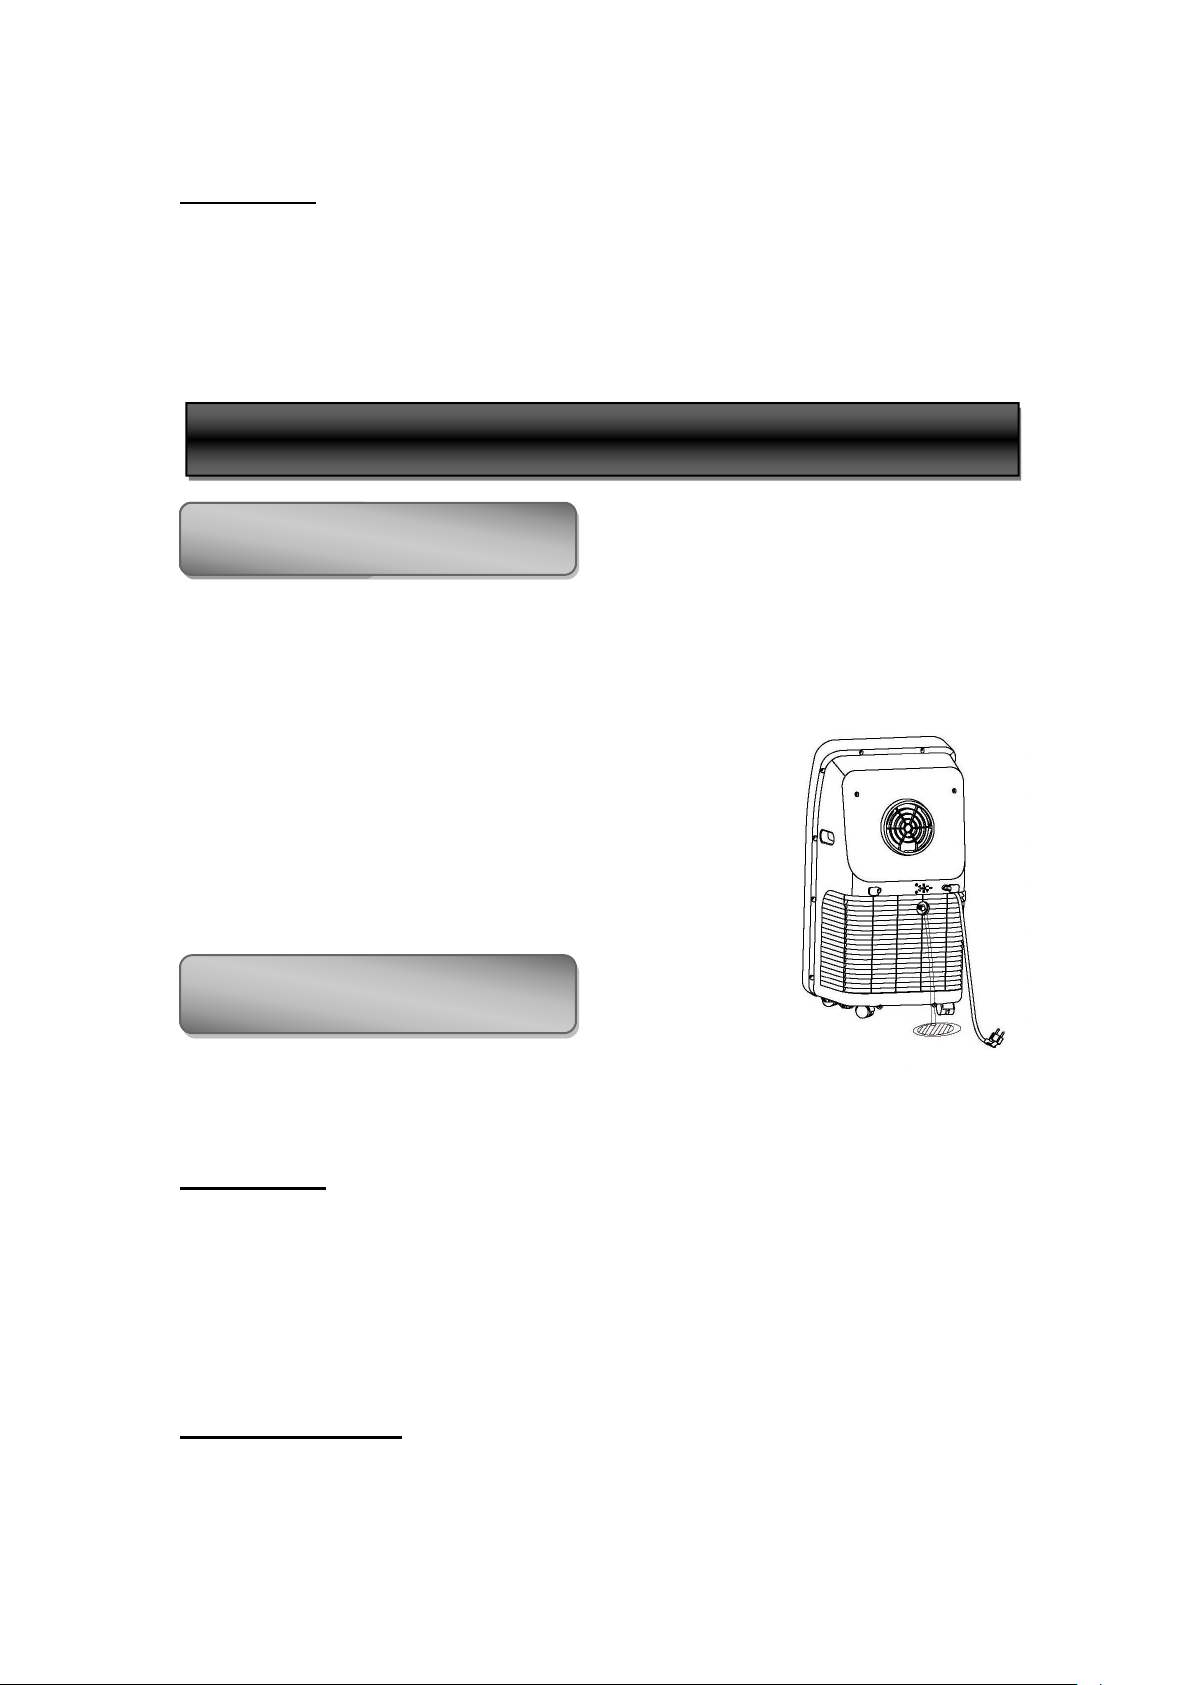
Remove the dehumidification water wedge, insert water
manifold, place the other end of the water manifold into
the water vessel or drainage passage, as shown in the
right figure.
After entering the dehumidification mode, if room
tempearture≥15℃(59℉), the compressor is ON. Then
control as follows: when room temperature ≤13℃(55℉),
the compressor is OFF; when temperature increases to room temperature≥15℃, the
compressor is started again (in order to protect the compressor, it will be restarted
3min. later).
In dehumidification mode, the fan is defaulted to run at low speed, and wind speed
can’t be adjusted.
Temperature can’t be set. (Note : when use dehumidify function, should remove
exit pipe components, otherwise, it will cause worse dehumidify performance,
and appear “FL” water full alarm )
Auto mode (for cooling model only)
When pressing mode key or choosing auto mode by pressing the remote controller,
the auto indicator lamp lights up.
After choosing Auto mode, operation state is determined by environmental
temperature: when environmental temperature is higher than 25℃, the operation
state is the same as that of cooling mode; when environmental temperature is lower
than 25℃, the operation state is the same as that of fan mode.
Heating mode (for cooling and heating model only)
When pressing mode key or choosing heating mode by pressing the remote
controller, the heating indicator lamp lights up.
Press Up/Down key to adjust setting temperature (17℃~30℃).
Press Speed key to choose High/Mid/Low speed.
OPERATION METHOD

Timer mode
In standby state, press the Timer key to set ON time. Press Up and Down keys to set
ON time (0~24H), and the timer indicator lamp lights up.
In ON state, pressure the timer key to set OFF time. Press Up and Down keys to set
OFF time (0~24H), and the timer indicator lamp lights up.
This product is equipped with automatic water vaporization system. The condenser
is cooled with the circulating of condensing water, so as to improve cooling
efficiency and save energy.
If the internal vessel is full of water, the display screen will
display “FL”, and the compressor stops working
automatically. After power off, unscrew the water cover,
pull out the water wedge to drain off water, and it will
become normal after being restarted.
Notice: in order to avoid electric shock, please turn off the A/C and unplug before
maintenance or repair.
CLEANING
Unplug before cleaning.
Wipe with soft semi-dry cloth. Don’t use chemical reagent, such as benzene, alcohol
and gasoline etc; otherwise surface of the A/C and even the whole A/C will be
damaged.
Prevent water from spattering in the A/C.
FILTER SCREEN
Wash the filter screen once every two weeks. If it is blocked by dust, efficiency of the
A/C will be reduced.
CLEAN AND MAINTENANCE
DRAINAGE
DRAINAGE METHOD
MAINTENANCECE

Take out the air inlet grille and pull out the filter screen at both sides according to the
direction shown in the following figures.
Put the filter screen into the warm water (about 40℃) added with neutral detergent,
dry it at a shady place after cleaning.
SEASONAL CLEANING
If the A/C will not be used for a long time:
Pull out the water wedge to drain.
Run the A/C in fan mode for 2H till its inside is dry.
Turn off the A/C and unplug.
Wash the filter screen and reassemble it.
Dismantle the exhaust duct and keep it properly.
Cover the A/C with a plastic bag and place it at a dry place.
COMMON FAILURES AND DIAGNOSIS
INTELLIGENT ERROR DETECTION

Error-detecting code
Multi-functional defection
E1
Error of the coil’s temperature sensor
E2
Error of indoor temperature sensor
E4
Anti-freezing protection: temperature of the coil is too low and
the whole A/C is off. When temperature excesses 8℃, the
protection is released and previous working state is recovered.
Specification: Φ5×20mm
Voltage: 250VAC
Current: 3.15A
In case of any of the following trouble, please contact professional maintenance personnel
in time.
TROUBLE
CAUSE
SOLUTION
The A/C doesn’t
work
Not plug in
Plug in
The display panel displays
“FL”
Restart the A/C after power off and
draining, then it will become normal
Time OFF function is started
The A/C can be restarted 3 minutes
after being turning off.
The A/C starts
frequently
Direct sunlight
Draw the curtain
Doors and windows keep
open; there are lots of people
or heat source in room
Close doors and windows, remove
heat source
Filter screen is very dirty
Clean or replace it
Air inlet or air outlet is blocked
Remove the stem
Big noise of the
A/C
The A/C is placed unevenly
Place it at even and firm ground,
avoid shaking
The compressor
doesn’t work
Its delay protection is started
Wait for 3min., turn on it after
temperature decreases
Notice: When there is any abnormal to the A/C, turn it off and unplug, and then
contact professional maintenance personnel.
The above technical parameters are subject to change without notice.
FUSE PARAMETERS
TROUBLE-SHOOTING

Meaning of crossed –out wheeled dustbin:
Do not dispose of electrical appliances as unsorted municipal waste, use separate collection
facilities.
Contact you local government for information regarding the collection systems available.
If electrical appliances are disposed of in landfills or dumps, hazardous substances can
leak into the groundwater and get into the food chain, damaging your health and
well-being.
When replacing old appliances with new ones, the retailer is legally obligated to take
back your old appliance for disposals at least free of charge.

Tel : (888)470-7342
Fax: 909- 974-2865
Hours : 8: 30AM -5: 00PM PST
Contact CCH Technical Support
Email:[email protected]
Phone:(888)470-7342
From 8:30AM to 5:00PM Monday through Friday Pacific Time.
WARRANTY PERIOD:
TO OBTAIN WARRANTY SERVICE:
SERVICE CENTER:
Labor: 1 Year from the Date of Purchase.
Parts: 1 Year from the Date of Purchase.
Compressor: 3 Years from the Date of Purchase.
1941 S. Vineyard Ave unit 6 ,
Ontario, CA 91761
Table of contents
Other CCH Air Conditioner manuals
Popular Air Conditioner manuals by other brands

intensity
intensity IDUFCI60KC-3 installation manual

Mitsubishi Electric
Mitsubishi Electric PUHZ-RP50VHA4 Service manual

Panasonic
Panasonic CS-E15NKE3 operating instructions

Toshiba
Toshiba RAS-13SKHP-E Service manual

Daikin
Daikin FTKS50EV1B Operation manual

Frigidaire
Frigidaire FFRE0533S1E0 Use & care guide

Daikin
Daikin ERLQ004CAV3 installation manual

Frigidaire
Frigidaire FAA063P7A16 Use & care manual

Mitsubishi Electric
Mitsubishi Electric MSZ-SF25VE Service manual

LG
LG LW1221IVSM owner's manual

Mitsubishi Electric
Mitsubishi Electric City Multi PLFY-WL-VEM-E Series installation manual

Fujitsu
Fujitsu AUXG18KVLA Design & technical manual