Cellar Cool 9000TWIN-S H.E. User manual

9000TWIN-S H.E.
OWNER'S MANUAL
WM/FD 9000 Twin-S H.E.
NOTICE: To activate the split system
warranty, the installing certified HVAC/R
service tech must complete the split system
warranty checklist and send back to
CellarCool

We manufacture, test and certify 100% of our wine cooling units in
the USA. By sourcing the best components and closely controlling our
manufacturing processes, we can assure the highest-quality,
lowest defect manufacturing rates in the industry.
Conforms to ANSI/UL Std 427
Certified to CAN/CSA Std C22.2 No. 120
Copyright © 2022. CellarCool. All rights reserved.
CellarCool copyrights this manual, the product design, and the design concepts, with all rights reserved. Your rights with
regard to the hardware and manual are subject to the restrictions and limitations imposed by the copyright laws of the
USA. Under copyright laws, this manual may not be copied, reproduced, translated, transmitted, or reduced to any
printed or electronic medium or to any machine-readable form, for any purpose, in whole or in part, without the written
consent of CellarCool.
Every effort has been made to ensure that the information in this manual is accurate. CellarCool is not responsible for
printing or clerical errors.
CellarCool reserves the right to make corrections or improvements to the information provided and to the related
hardware at any time, without notice.
Vinothèque and CellarCool are registered trademarks, and ECE is a trademark of CellarCool. All rights reserved.
Mention of third-party products is for informational purposes only and constitutes neither an endorsement nor
a recommendation. CellarCool assumes no liability with regard to the performance or use of these products.

Introduction……………………………………………………………………………………...
Before You Start …………………………………………………………………………………
Preparing The Wine Cellar……………………………………………………………………...
Receiving & Inspecting The System……………………………………………………………
Quick Reference Guide………………………………………………………………………….
Liquid-Measuring Thermostat System( Bottle Probe)-KDT………………………………….
Items To Route Before Installing The Evaporator Unit-KDT…………………………………..
24V Thermostat Conversion Kit Wiring Instructions…………………………………………
Preparing The Wall Mounted Evaporator Units…………………...………………………....
Installing The Wall Mounted Evaporator Units………………………………………………
Preparing The Fully Ducted Evaporator Units………………………………………………..…
Installing The Fully Ducted Evaporator………………………………………………………..
Connecting The Lineset………………………………………………………………………….
Installing The Wall Mount Kit…………………………………………………………………...
Installing The Ducted Plenum………………………………………………………………….
Drain Line………………………………………………………………………………………..
Wall Mount Bracket Installation………………………………………………………………..
Flush Mount Bracket Installation………………………………………………………………
WM/FD 9000 Twin-S Evaporator Wiring Diagram – KDT……….......………………………..
WM/FD 9000 Twin-S Evaporator Wiring Diagram – 24V…………………...………………..
Condensing Unit Wiring Diagram………………………………………………………………
Line Set Piping Diagram…………………………………………………………………………
Preparing The Condensing Unit………………………………………………………………...
Condensing Unit Wiring…………………………………………………………………………
Installing The Condensing Unit…………………………………………………………………
Wall Mounted Unit Specifications………………………………………………………………
Fully Ducted Unit Specifications………………………………………………………………..
Display Layout……………………………………………………………………………………
Controller Functions……………………………………………………………………………..
Icon Glossary……………………………………………………………………………………...
Alarm Codes………………………………………………………………………………………
User Menu…………………………………………………………………………………………
Troubleshooting Guide………………………………………………………………………….
System Operation – KDT…………………………………………………………………………
System Operation – 24V…………………………………………………………………………
Maintenance Schedule…………………………………………………………………………..
Technical Assistance……………………………………………………………………………..
Warranty Information……………………………………………………………………………
Page 2
Page 3
Page 4
Page 7
Page 8
Page 10
Page 11
Page 12
Page 13
Page 14
Page 16
Page 17
Page 18
Page 20
Page 20
Page 23
Page 24
Page 27
Page 30
Page 31
Page 32
Page 33
Page 34
Page 35
Page 36
Page 41
Page 42
Page 43
Page 44
Page 45
Page 46
Page 47
Page 48
Page 50
Page 51
Page 52
Page 53
Page 54
Table Of Contents
Warranty Registration…………………………………………………………………………... Page 58
Ducting Overview………………………………………………………………………………....
Ducting Configurations..............………………………………………………………………..
Page 21
Page 22

Page 2
01/26/22
INTRODUCTION
Customer Service
Thank you for purchasing a CellarCool cooling system. We strive to provide the highest-quality products and the best
possible customer service. If you have any questions about your system, please visit
CellarCool.com.
Using the Manual
This manual is intended to assist in the proper maintenance and installation of the cooling system. In order to ensure the
longevity of your cooling unit, the equipment should be installed as outlined. It is also vital to establish a proper care and
maintenance schedule. Please read and review this manual carefully and keep it for future reference.
What is the CellarCool Cooling System?
The CellarCool cooling system is a specialized refrigeration system designed for one purpose only: to maintain the optimal
temperature and humidity levels conducive to the proper storage and aging of fine wines. This system produces minimal in-
cellar noise and has the most lenient exhaust requirements.
How Does the Cooling System Work?
Similar to the air conditioning systems used for homes, the evaporator unit (fan coil unit) and condensing units are installed
in separate locations. The units are connected by a refrigerant line set and communication cable. The evaporator portion is
commonly installed in the wine cellar, with the condensing unit is located either outside or in a remote indoor location that is
properly ventilated.
Temperature Setting
The system is designed to maintain a cellar temperature of 55°F as long as the ambient temperature does not exceed 120°F.

BEFORE YOU START
1. Inspect all components prior to installation. If damage or missing components are found, please notify CellarCool
Customer Service at support@CellarCool.com within 30 days.
2. Each evaporator unit requires a dedicated 120V, 15-amp circuit. The condensing unit requires a dedicated 220V single-
phase 15-amp circuit. Use a surge protector with the system. Do not use a GFI outlet or breaker.
3. Communication cable (18-5 thermostat wire) must be ran between the condensing unit and the evaporator unit. Only 2 of
the communication wires will be used. For 24V thermostat equipped systems an 18-5 cable must be used to connect the
thermostat to the evaporator unit.
4. You are REQUIRED to install a drain line to remove condensation from each evaporator unit.
5. The warranty is not active until a warranty checklist has been received, reviewed, and approved.
6. The system is intended for use in properly designed and constructed wine cellars. Hire a professional wine storage
consultant with a valid contractor's license to build your wine cellar.
7. CellarCool requires that all split systems be installed by a certified HVAC-R technician. NATE or equivalent is recommended.
8. It is vital that the units be set apart and oriented so that the supply air from one unit does not recirculate into the return
air of the other unit.
If you encounter a problem with your CellarCool system, please refer to the Troubleshooting Guide. If you have any further
questions or concerns, or need assistance, please contact CellarCool's Customer Service at support@CellarCool.com. Please be
sure all testing has been completed prior to contacting Customer Service. Please have your results ready for your
representative.
Page 3
01/26/22

PREPARING THE WINE CELLAR
The performance and life of your system is contingent upon the steps you take in
preparing the wine cellar. Improp-erly preparing your enclosure or incorrectly installing
your unit may cause unit failure, leaking of condensation, and other negative side effects.
It is highly recommended that you obtain the assistance of a wine storage professional.
Wine storage professionals work with licensed contractors, refrigeration technicians, and racking companies to build
well-insulated, beautiful, and protective wine cellars. We have put together some useful tips to assist in the
installation process. Our recommendations are meant to act as a guide in the process of building a proper enclosure.
Your intended location may have specific needs which we do not address.
Wall & Ceiling Framing
Build wine cellar walls using standard 2x4 or 2x6 boards and ceiling joists without violating local or state codes in
your area. As a general rule, the thicker the walls and the higher the insulation value, the more consistent your cellar
temperature will be.
Insulation
Insulation is REQUIRED in order to properly use our products. It is vital that all walls and ceilings be insulated to
keep the cellar temperature as consistent as possible during the summer and winter months. Standard fiberglass or
rigid foam insulation is normally used in cellar construction in some cases, blown-in” insulation is used. The R-value,
or quality of insulation, is determined by the rate at which heat passes through the insulation. The higher the R-
value, the more resistant the insulation is to conducting heat, and the more consistent your wine cellar’s
temperature will be. Using higher R-values in insulation will lower your operating costs and unit run time. (R-13 is
the recommended minimum R-19 is preferred for interior cellar walls, and R-30 for ceilings and exterior walls.)
Vapor Barrier
Water vapor creates its own pressure, separate from the ambient air pressure, and will intrude into colder/drier areas.
A vapor barrier is REQUIRED in order to prevent the intrusion of water vapor and maintain the correct cellar
temperature and humidity. It is recommended that 6-millimeter plastic sheeting be applied to the warm side of the
cellar walls. The vapor barrier must also be applied to the outside walls and ceiling. If it is impossible to reach the
outside, then the plastic must be applied from within the cellar. The most common method is to wrap the entire
interior, leaving the plastic loose in the stud cavity so the insulation can be placed between each stud. All of the
walls and ceiling must be wrapped in plastic for a complete vapor barrier.
In areas of high humidity, such as Southern and Gulf States, the vapor barrier will prevent infiltration of warm moist
air. The moist air can cause mold to form, and standing water in drain pans promote microbial and fungal growth
that cause unpleasant odors and indoor air quality problems. If mold is found, remove it immediately and sanitize
that portion of the unit.
Note: High humidity significantly increases the heat load on the cooling system.
Any break in the vapor barriers (cut, nail hole, over-lapping, etc.) will cause a moisture leak and must be sealed. The
electric conduit is a "duct” for vapor to travel in. The conduit should be caulked and sealed on the warm air end.
Page 4
01/26/22

Unobstructed Airflow
Unobstructed airflow to and from the system is critical for the evaporator unit and condensing units overall performance
and lifespan. A minimum of 3 feet of clearance (5 feet is ideal) on all sides is crucial. The air the fans blow needs to
circulate and either dissipate or absorb heat from the space. The more air to exchange, the more efficient the system will operate.
Note: Avoid attempting to camouflage the unit. This will restrict airflow and thus the systems ability to work efficiently.
Mounting the Evaporator Unit
The evaporator unit must be mounted within 18' of the top of the room in order to achieve sufficient cooling. As the
room cools down, the warm air will rise to the ceiling. Mounting the unit high in the room will create a consistently cool
environment by capturing the warm air and replacing it with cool air. Mounting the unit low in the room will result in a
temperature variation in the room due to the unit’s inability to draw warm air from the ceiling of the cellar to the unit itself,
and cold air settling to the floor.
Door and Door Seal
An exterior grade (1-3/4") door must be installed as a cellar
door. It is essential that weather stripping is attached to all 4
sides of the doorjamb. A bottom “sweep” or threshold is also
required. The door must have a very good vapor seal to
prevent warmer moist air from leaking into the cellar. One of
the most common problems with cooling systems running
continually is due to the door not sealing properly. In cases
where glass doors are used and the room size is close to
the recommended system size, the next larger size system
should be used. This will compensate for the insulation loss
due to the lower insulating rating of glass.
Wine Cellar
Keep Clear
Page 5
01/26/22

Ambient Temperature Factor
The cooling system has the ability to cool a wine cellar efficiently to 55°F as long as the ambient temperature of the
area that it is exhausting to does not exceed 120°F. Therefore, you want to exhaust the condensing unit in a space which will
not exceed 120°F. Otherwise the system will not have the capacity to keep the wine at a desirable 55°F.
Ventilation
The necessity of dissipating heat away from the condensing unit is critical to the unit’s performance and cannot be overstated. As
the system operates and cools, a greater amount of heat is generated on the condensing side of the system. Adequate
ventilation is required in order to dissipate heat away from the condensing unit. If ventilation is inadequate, the exhaust will heat
up the area or room and adversely affect the system’s ability to cool. Avoid installing the condenser in a closet or other small
rooms and spaces. This will cause the system to overheat and void the warranty.
Note: If you are unsure about having adequate ventilation in your install location, please
contact us to assess your specific installation
WARNING! Allowing your system to operate in temperatures of 120° or above for
extended periods of time will greatly decrease the life of your system and void
your warranty. The cooler the temperature of the air entering the condenser coil,
the more cooling capacity the system has. The less heat gain through the
common wall, the less the electricity consumption.
BACK - EXHAUST SIDE
FRONT - WINE CELLAR
Exterior cellar wall
Evaporator Unit
Condensing unit
120°F
55°F
Page 6
01/26/22

•(2) 1/2" x 1/2" 90° Nylon barbed fitting
•(1) 1/2" Barbed tee
•(1) Double-D strain relief
•(4) 3/4" Adhesive cable tie mounts
•(2) Small cable ties
•(4) #8 x 1-3/4" Hex head screw
RECEIVING & INSPECTING THE SYSTEM
Please leave the unit in its original box until you are ready for installation. This will allow you to move the product safely without damaging
it. When you are ready to remove the product from the box, refer to the installation instructions.
TIP: Save your box and all packaging materials. They provide the only safe means of transporting/shipping the unit.
Wall-Mounted Primary Accessory Kit BoxDucted Primary Accessory Kit Box
Primary Evaporator Box
•Use caution when lifting and check package for damage.
•Lift only at the designated hand-hold locations on the shipping container, or fully support the unit from underneath. A shipment
may include one or more boxes containing accessories.
•Before opening the container, inspect the packaging for any obvious signs of damage or mishandling.
•Write any discrepancy or visual damage on the bill of lading before signing.
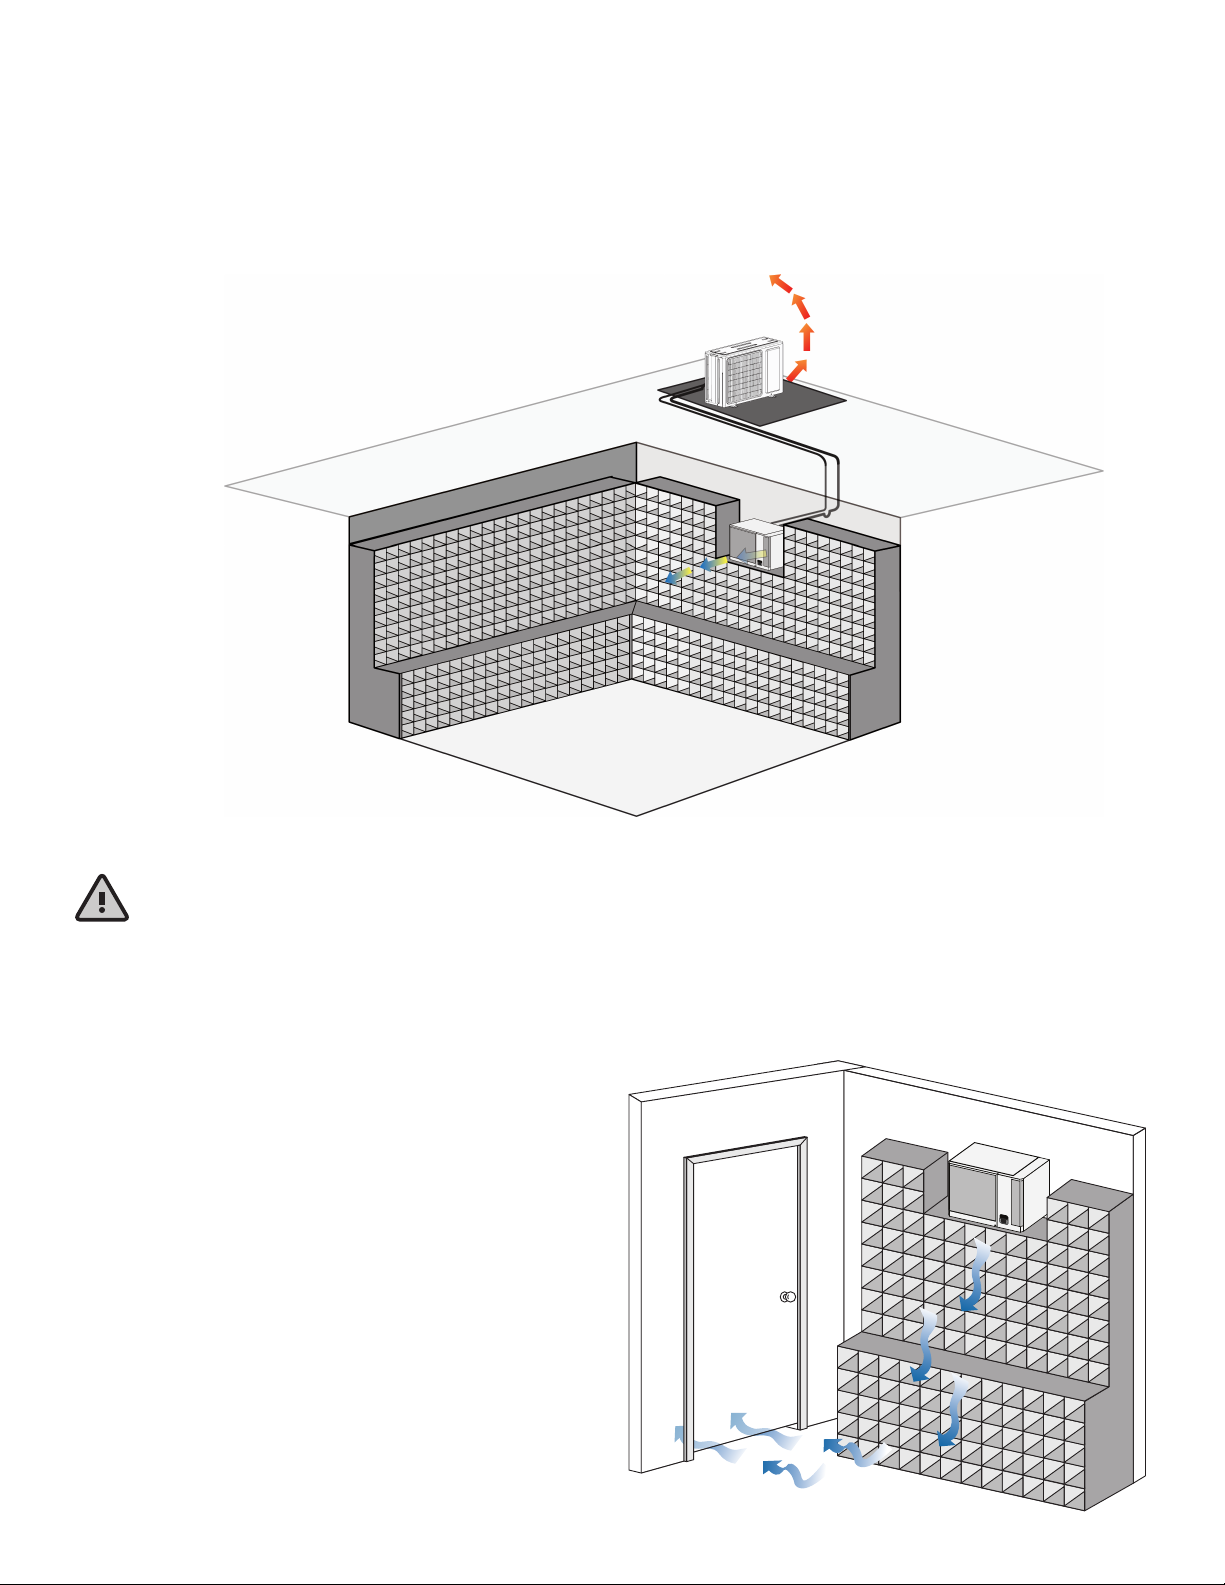
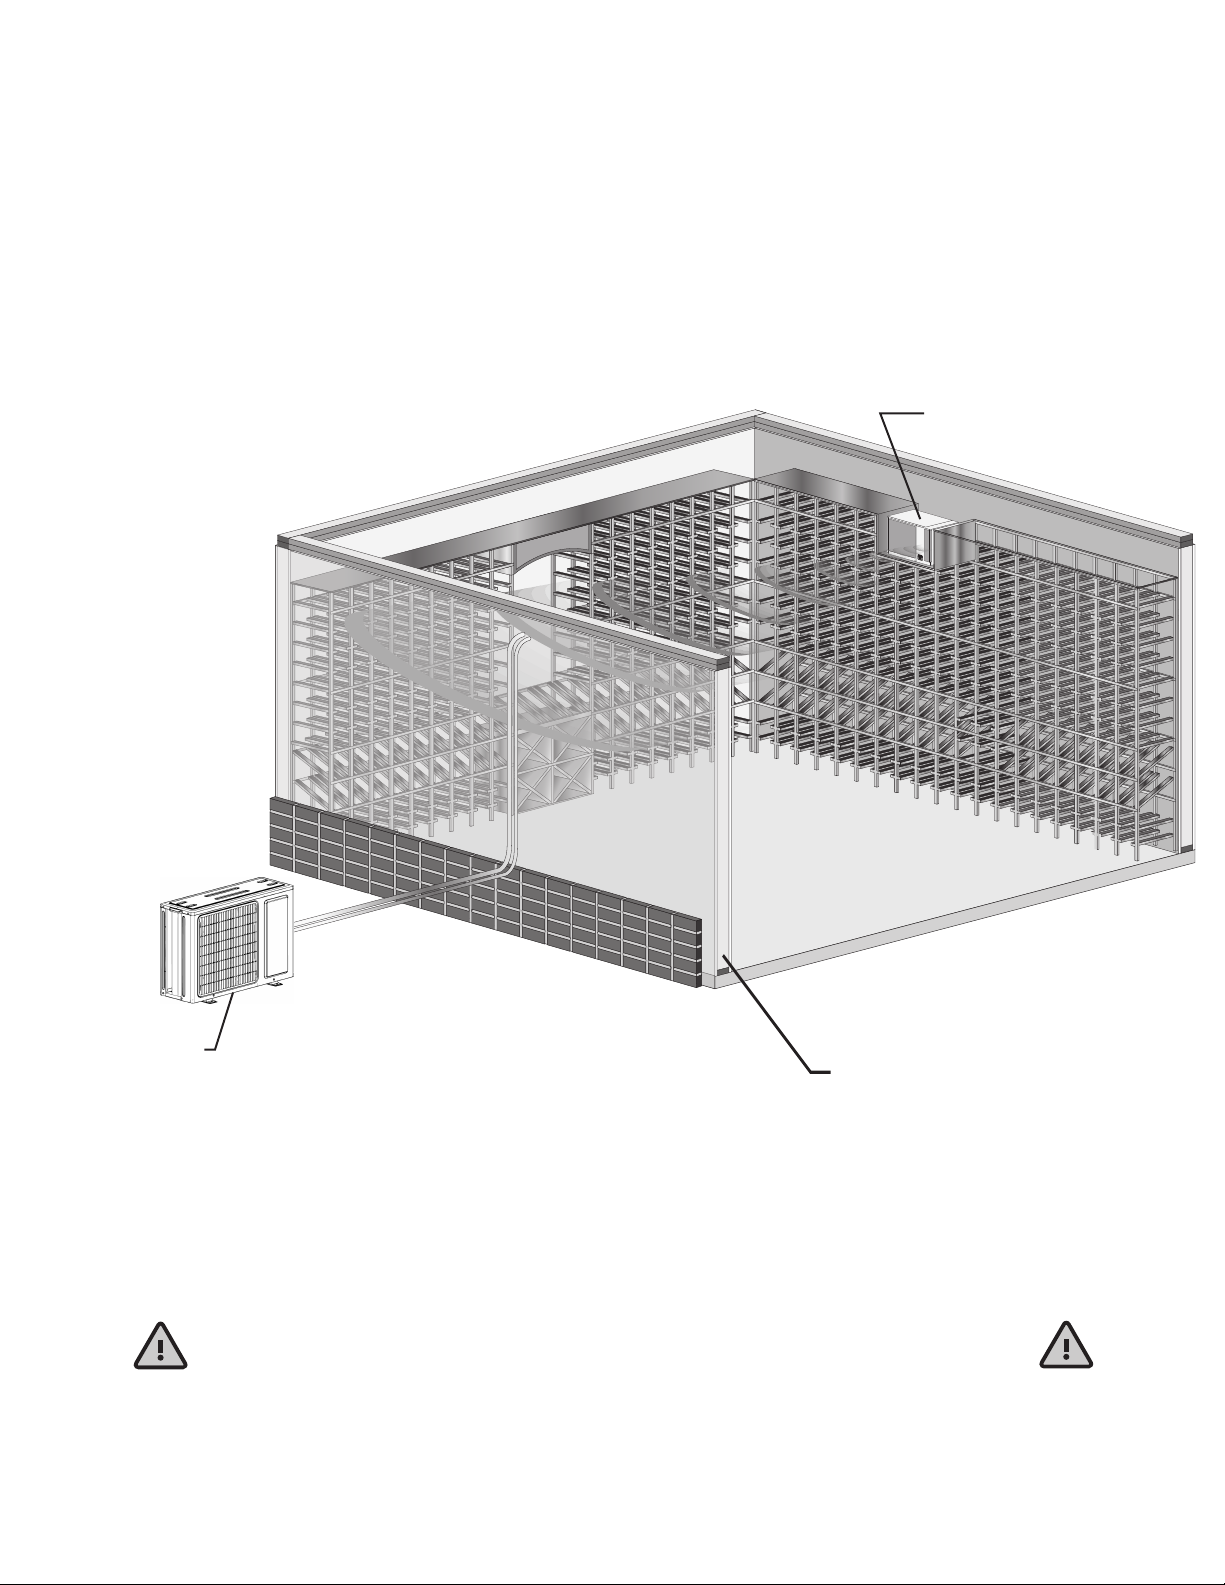
•Allow the condensing unit to sit for 24 hours prior to start-up. The condensing unit can be placed in the installation location, piped,
and evacuated during this time.
NOTE: CellarCool units are manufactured in the USA and tested prior to shipment.
•Review the packing slip to verify contents.
•Check the model number to ensure it is correct.
•Check that all factory options ordered are listed.
If any items listed on the packing slip do not match your order
information, contact CellarCool Customer Service immediately.
Documentation bag (primary):
•9000 Twin-S Twin owner’s manual
•9000 Twin-S Twin technician’s manual
•R-134a split system warranty checklist
•(1) Retractable bottle probe
•(1) Filter grille
•(1) Stainless steel bottle probe (50-ft cord)
•(1) Duct plenum
Accessory kit bag (primary):
•KDT Plus display cable (50 feet)
•KDT Plus wall mount bracket assembly
•KDT Plus flush mount bracket assembly
•KDT Plus display assembly
•Flush mount template
•Black strain relief bushing
•Evaporator installation hardware bag
•KDT Plus hardware bag
•(1) 11/16” OD Grommet
•(2) 1/2” Nylon hole plug
•(4) #6 x 1” PHP zinc Type A screws
•(4) 8-10 x 7/8" blue plastic screw anchors
•(2) 1/2" x 1/2" 90° Nylon barbed fitting
•(1) 1/2" Barbed tee
•(1) Double-D strain relief
•(4) 3/4" Adhesive cable tie mounts
•(2) Small cable ties
•(4) #8 x 1-3/4" Hex head screw
Secondary Evaporator Box
Check all shipped boxes for the following contents:
Wall-Mounted Secondary Accessory Kit Box
Ducted Secondary Accessory Kit Box
•(1) Duct plenum
OR
OR
•(1) H.E. Condensing unit
(1) Secondary 9000 Twin-S Twin unit evaporator
(1) Wall-mounted evaporator install template
(1)Evaporator installation hardware bag
•
•(1)Primary 9000 Twin-S Twin
evaporator unit
(1) Wall-mounted evaporator
installation template
•
•
•
•(1) Filter grille
Condensing Unit Box
Page 7
01/26/22

Filter grille
Evaporator unit
INSIDE CELLAR
THROUGH THE WALL
Option 1 Knockout
for wiring
Option 2
Knockout for drain line
Knockout for wiring
Line set knockout
Mounting keyholes (4)
Line set knockout
Knockout for drain line
QUICK REFERENCE GUIDE
Wall-Mounted — Front / Side View
Wall-Mounted — Rear / Side View
REAR VIEW
Return air
Supply air
Page 8
01/26/22

Duct plenum
Return air
Supply air
Fully Ducted — Front / Side View
INSIDE CELLAR
THROUGH THE WALL
Option 1 Knockout
for wiring
Option 2
Knockout for drain line
Knockout for wiring
Line set knockout
Mounting keyholes (4)
Line set knockout
Knockout for drain line
Fully Ducted — Rear / Side View
REAR VIEW
Page 9
01/26/22

LIQUID-MEASURING THERMOSTAT SYSTEM (BOTTLE PROBE) - KDT
Our cooling units come with a liquid-temperature-measuring thermostat. The self-calibrating probe con-tains a sensor
chip, which communicates back and forth with the thermostat. This results in a consistent temperature setting and
accuracy. Wine should be kept at a very precise, controlled temperature and humidity.
Setting up the Bottle Probe:
1. Locate an empty wine bottle.
2. Fill it 75% full with room-temperature tap water.
3. Place bottle probe securely into bottle as seen in Figure 1.
4. Place the wine bottle in your wine cellar. Ensure sensor tip is fully
submerged.
5. To ensure a consistent temperature, place bottle probe approximately three
(3) feet away from the air output and not in the flow of the air.
It is recommended that the bottle be placed in a central location of
your wine cellar. Avoid pulling too much on the probe cord. It may become
disconnected resulting in limited functionality of the unit.
Note: The thermostat can be set between 50–70°F.
Remember: The unit operates based on the temperature of the water.
Do not be misled by thermostats reading air temperature. The air temperature
in the cellar will be cooler than the liquid temperature of the wine while it is
reaching the optimum balanced temperature.
Figure 1
Page 10
01/26/22

ITEMS TO ROUTE BEFORE INSTALLING THE EVAPORATOR UNITS
1. Route the refrigerant lines from each evaporator unit toward each other using 1/2” OD copper tubing for the suction line and 1/4”
OD tubing for the liquid lines.
2. Join both suction lines together using a 1/2” T-fitting. Install a 1/2” to 5/8” reducer at the outlet of the T-fitting. The remainder of the
suction line from the T-fitting to the condensing unit will need to be 5/8” OD copper tubing.
3. Join both liquid lines together using a 1/4” T-fitting. Install a 3/8” to 1/4” reducer at the inlet of the T-fitting. The remainder of the
liquid line from the T-fitting to the condensing unit will need to be 3/8” OD copper tubing.
4. Route the display cable from the desired location to the desired master evaporator unit installation location.
5. Route the bottle probe cable from the desired thermostat bottle location to desired master evaporator unit installation location.
6. Route the drain lines from a proper discharge location to the desired evaporator unit installation locations.
7. Route the power cable wiring to the desired evaporator unit installation locations.
8. Route an 18-5 thermostat wire between the desired evaporator unit installation locations.
1/2" suction line
SECONDARY EVAPORATOR UNIT
DISCHARGE LOCATION
CONDENSING UNIT
BOTTLE PROBE
DISPLAY CABLE
PRIMARY EVAPORATOR UNIT
DISCHARGE LOCATION
18-5 THERMOSTAT
WIRE
5/8" suction line 3/8" liquid line
1/4" liquid line
1/2" suction line
1/4" liquid line
55°
F
24V COMMUNICTION CABLE
POWER CABLE
Page 11
01/26/22

24V WIRING CONNECTIONS (EVAPORATOR UNITS)
1. Route a standard 18-5 thermostat wire from the secondary unit installation location to the primary evaporator unit.
2. Route a standard 18-5 thermostat wire from the primary unit installation location to the thermostat installation
location.
3. Locate the 18-5 thermostat wires inside of the primary evaporator unit.
4. Connect all wires according to color: yellow to yellow, green to green, blue to blue, and red to red.
5. Locate the 18-5 thermostat wires inside of the secondary evaporator unit.
6. Connect the wires according to color: yellow to yellow, green to green, and blue to blue.
Thermostat Wiring Connections
1. At the thermostat terminal block, connect the wires according to color: yellow to Y, blue to C, green to G, and red to R.
18-5 THERMOSTAT
WIRE
24V THERMOSTAT
(NOT INCLUDED)
F
1/2” suction line
SECONDARY EVAPORATOR UNIT
POWER CABLE
DISCHARGE LOCATION
CONDENSING UNIT
PRIMARY EVAPORATOR UNIT
DISCHARGE LOCATION
55°F
5/8” suction
line
3/8” liquid
line
1/4" liquid line
1/2” suction line
1/4” liquid line
POWER CABLE
POWER CABLE
NOTE: To ensure correct system
operation, the 24V thermostat
must be placed inside the
wine cellar, preferably in a
central location away from any
airflow.
24V COMMUNICTION
CABLE
Page 12
01/26/22

PREPARING THE WALL-MOUNTED EVAPORATOR (FAN COIL) UNITS
1. Remove the knockouts that you will be using to route
the line set, power wires, display cable, bottle probe,
and drain line.
2. Remove the insulation from the knockout holes.
3. For ease of installation, remove the nine (9) screws
securing the top and remove the top.
Bottle probe connector routing location
Power
Line set
Drain line
•Drill
•5/32" drill bit
•1/4" socket drill bit
•1/4" wrench
•Phillips-head screwdriver
•Tape measure
•Drywall saw
•Ladder
•Level
•Pliers
•Pencil
Required Tools:
Drain Pan
Page 13
01/26/22

1/8”
WALL
STUD
1. Locate two (2) wall studs in the desired mounting location spaced 16” on center.
2. Mark vertical lines on each stud 16” apart.
3. Mark an intersecting horizontal line at the desired height of the unit.
4. Make a mark on each stud 13-1/2" down from the intersection of the horizontal and vertical lines
NOTE: The top of the unit must be installed a minimum of 6” and
a maximum of 18” from the ceiling.
5. Install the four (4) supplied 1-3/4" hex-head
screws into the studs at the locations marked
leaving 1/8' between the wall surface and the
screw head.
6. If routing through a wall, cut out an access
hole for the line set, drain line, display cable,
and power wires.
7. Raise the evaporator to the installation location. Align the rear
keyholes with the mounting screws and mount the unit.
8. Using a 1/4” wrench or socket, tighten the top mounting screws.
9. Route the liquid and suction lines through the knockouts in the
housing.
10. Connect line set to the unit using the line set connection
instructions
INSTALLING THE WALL-MOUNTED EVAPORATOR UNITS
Refer to the Wall-Mounted Evaporator Unit Installation Template for more information about mounting the wall-
mounted evaporator unit.
°
F
11. Insulate the suction line using Armaflex or similar insulation.
12. Using the cable ties and cable tie mounts provided, secure the drain line to the bottom of the
housing to ensure a downward slope.
13. Route the power wire, bottle probe connector, and display cable into the unit through the
knockouts.
14. Connect the green wire to the green wire, the black wire to the black wire, and the white wire
to the white wire.
15. Locate the thermostat wire connections inside of the master unit.
16. Connect the 18-5 wire that was routed between the evaporators according to color (yellow to
yellow, red to red, and green to green).
17. Install the supplied black strain relief to secure the power supply wires in the housing.
18. Connect the display cable labeled “UNIT” to the wire labeled “UNIT” located in the bottom of
the evaporator compartment.
19. Attach the supplied bottle probe to the circular connector
20. Secure all wiring neatly and as close to the left wall as possible in order to minimize airflow
obstruction.
UNIT
UNIT
Page 14
01/26/22

www.CellarCool.com | Page 15
21. Seal the gaps around the display cable, bottle probe cable, and power wire knockouts using the supplied three-inch pieces of cork
tape. (For best results, install the cork tape inside of the unit.)
22. Repeat steps 1-21with the second evaporator unit.
(Steps 18 and 19 do not apply to the secondary unit.)
23. Follow the directions for correct installation of the wall mount grille.
INSTALLING THE WALL-MOUNTED EVAPORATOR UNITS
Page 15
01/26/22

PREPARING THE FULLY DUCTED EVAPORATOR UNITS
1. Remove the knockouts that you will be using to
route the line set, power wires, display cable,
bottle probe, and drain line.
2. Remove the insulation from the knockout holes.
3. For ease of installation, remove the nine (9)
screws securing the top and remove the top.
4. Mount the remote display and run the display
cable to the evaporator unit.
Power
Line set
Drain line
Bottle probe connector routing location
Rear panel
Thermostat wire routing for 24V
thermostat (NOT INCLUDED)
NOTE: For every 90° bend in the
ducting, the system loses 13 CFM of
airflow.
Page 16
01/26/22
Fan Speed Switch
The cooling system comes equipped with a
variable fan speed switch. Increasing the fan
speed increases the volume of cool air blown
from the system. It is set by the factory to MED.
To access the fan speed switch it is necessary to
remove the front grille.

INSTALLING THE FULLY DUCTED EVAPORATOR UNITS
1. Using 1/4" and 3/8" copper tubing, route the liquid and suction lines through the knockouts in the housing. Be sure to extend
the tubing far enough outside of the housing to extend through the wall if necessary.
2. Wrap both sides of the copper tubing to prevent overheating.
3. To prevent oxidation, purge the system with nitrogen.
4. Braze the copper tubing to the connections on the evaporator unit.
5. Insulate the suction line using Armaflex or similar insulation.
6. Using the cable ties and cable tie mounts provided, secure the drain line to the bottom of the housing to ensure a downward
slope.
7. Route the power wire, display cable, and the bottle connector through the knockouts.
8. Connect the power wires according to color: connect the ground wire to the green wire, the hot wire to the black wire, and
the neutral wire to the white wire.
9. Locate the thermostat wire connections inside of the primary unit.
10.Connect the 18-5 wire that was routed between the evaporators according to color (yellow to yellow, red to red, and green to
green.)
11.Install the supplied black strain relief to secure the power supply wires and bottle probe wire in the housing.
12.Connect the display cable labeled “UNIT” to the wire labeled “UNIT” located in the bottom of the evaporator compartment.
13.Attach the supplied bottle probe to the circular connector
14.Secure all wiring neatly and as close to the left wall as possible in order to minimize airflow obstruction.
15.Seal the air gaps around the display cable, bottle probe cable, and power wire knockouts by installing the supplied three-
inch pieces of cork tape. (For best results, install the cork tape inside of the unit.)
16.Repeat steps 1-15 with the second evaporator unit. (Steps 12 and 13 do not apply to the secondary unit.)
17.Follow the directions for correct installation of the ducted plenum.
UNIT
UNIT
Page 17
01/26/22

1. Cut the pipes
When cutting the pipes make sure to take extra care and cut and flare them properly. This will ensure a proper connection
and minimize the need for maintenance
a. Measure the distance between the indoor and outdoor units
b. Using a pipe cutter, cut the pipe a little bit longer than the measured distance
c. Make sure that the pipe is cut at a perfect 90° angle. Refer to the example
2. Remove Burrs
Burrs can affect the air tight seal of refrigerant piping connection. They must be completely removed
a. Hold the pipe at a downward angle to prevent burrs from falling into the pipe
b. Using a reamer or deburring tool, remove all burrs from the cut section of the pipe
°
F
°
F
°
F
Oblique Rough Warped
90°
CONNECTING THE LINESET
3. Flare pipe ends
Proper flaring is essential to achieve an airtight seal
a. After Removing burrs from cut pipe, seal the ends with PVC tape to prevent foreign materials from entering the
pipe
b. Sheath the pipe with insulating material
c. Place flare nuts on both ends of pipe. (Flare nuts provided with lineset.) Make sure they are facing the right
direction. After flaring the pipe the nuts will not be removable. Remove PVC tape ends of pipe when ready to
perform flare work
d. Clamp flare form on end of pipe must extend beyond the edge of the flare form in accordance with the
dimensions in the table below
Connect the refrigerant piping according to these instructions
Page 18
01/26/22
Table of contents
Other Cellar Cool Wine Cooler manuals

Cellar Cool
Cellar Cool WM 2500 User manual

Cellar Cool
Cellar Cool WM series User manual

Cellar Cool
Cellar Cool SL2500 User manual

Cellar Cool
Cellar Cool SL Series User manual

Cellar Cool
Cellar Cool ADDENDUM CM Series User manual

Cellar Cool
Cellar Cool HM&VM TWIN S User manual

Cellar Cool
Cellar Cool CM 2500 User manual

Cellar Cool
Cellar Cool OPTIMUM Series User manual

Cellar Cool
Cellar Cool CM Series User manual

Cellar Cool
Cellar Cool WM 2500 H.E. User manual