Cellinx CamPilot STH900 User manual

1
CamPilot STH900
Full HD 1ch. Network Video Transmitter
User Manual
Before installing and using the product,
please read this manual carefully.
Be sure to keep it handy for later reference.
The adaptor and LAN cable are sold separately.

2
Precaution
WARNING
TO PREVENT THE RISK OF FIRE OR ELECTRIC SHOCK,
DO NOT EXPOSE THIS APPLIANCE TO RAIN OR MOISTURE.
CAUTIONS
■ Do not open or modify
Do not open the case, as it may be dangerous and cause damages.
■ Do not put objects inside the unit
Make sure that no metal objects or flammable substances get inside the camera. It could cause
fire, short-circuits or damages.
■ Be careful when handling the unit.
To prevent damage, do not drop the camera or subject it to strong shock or vibration.
■ Install away from electric or magnetic fields.
■ Protect from humidity, dust and high temperature.
An additional case that is temperature-controllable, damp-proof and waterproof is required for
outdoor use.
■ Cleaning
Dirt can be removed from the case only by wiping it with a soft cloth moistened with a soft
detergent solution.
■ Mounting Surface
The mounting surface material must be strong enough to support the product.
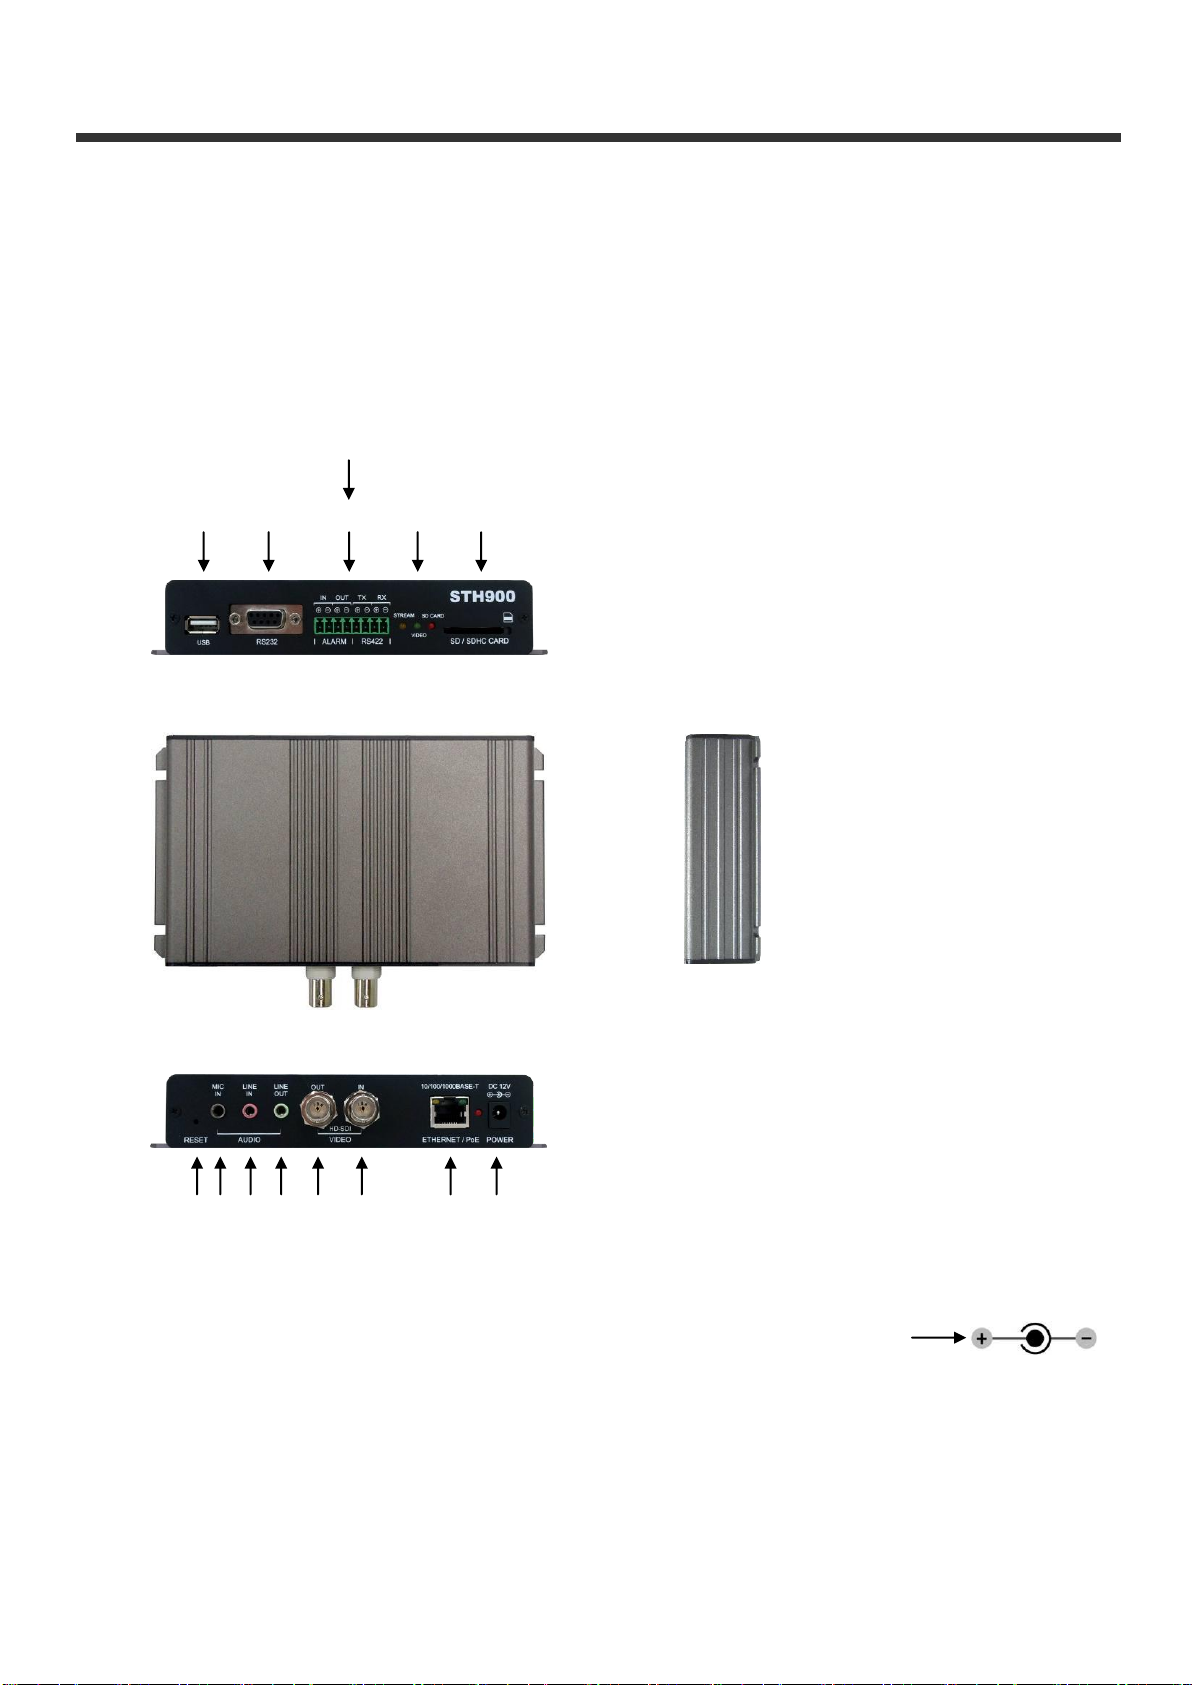
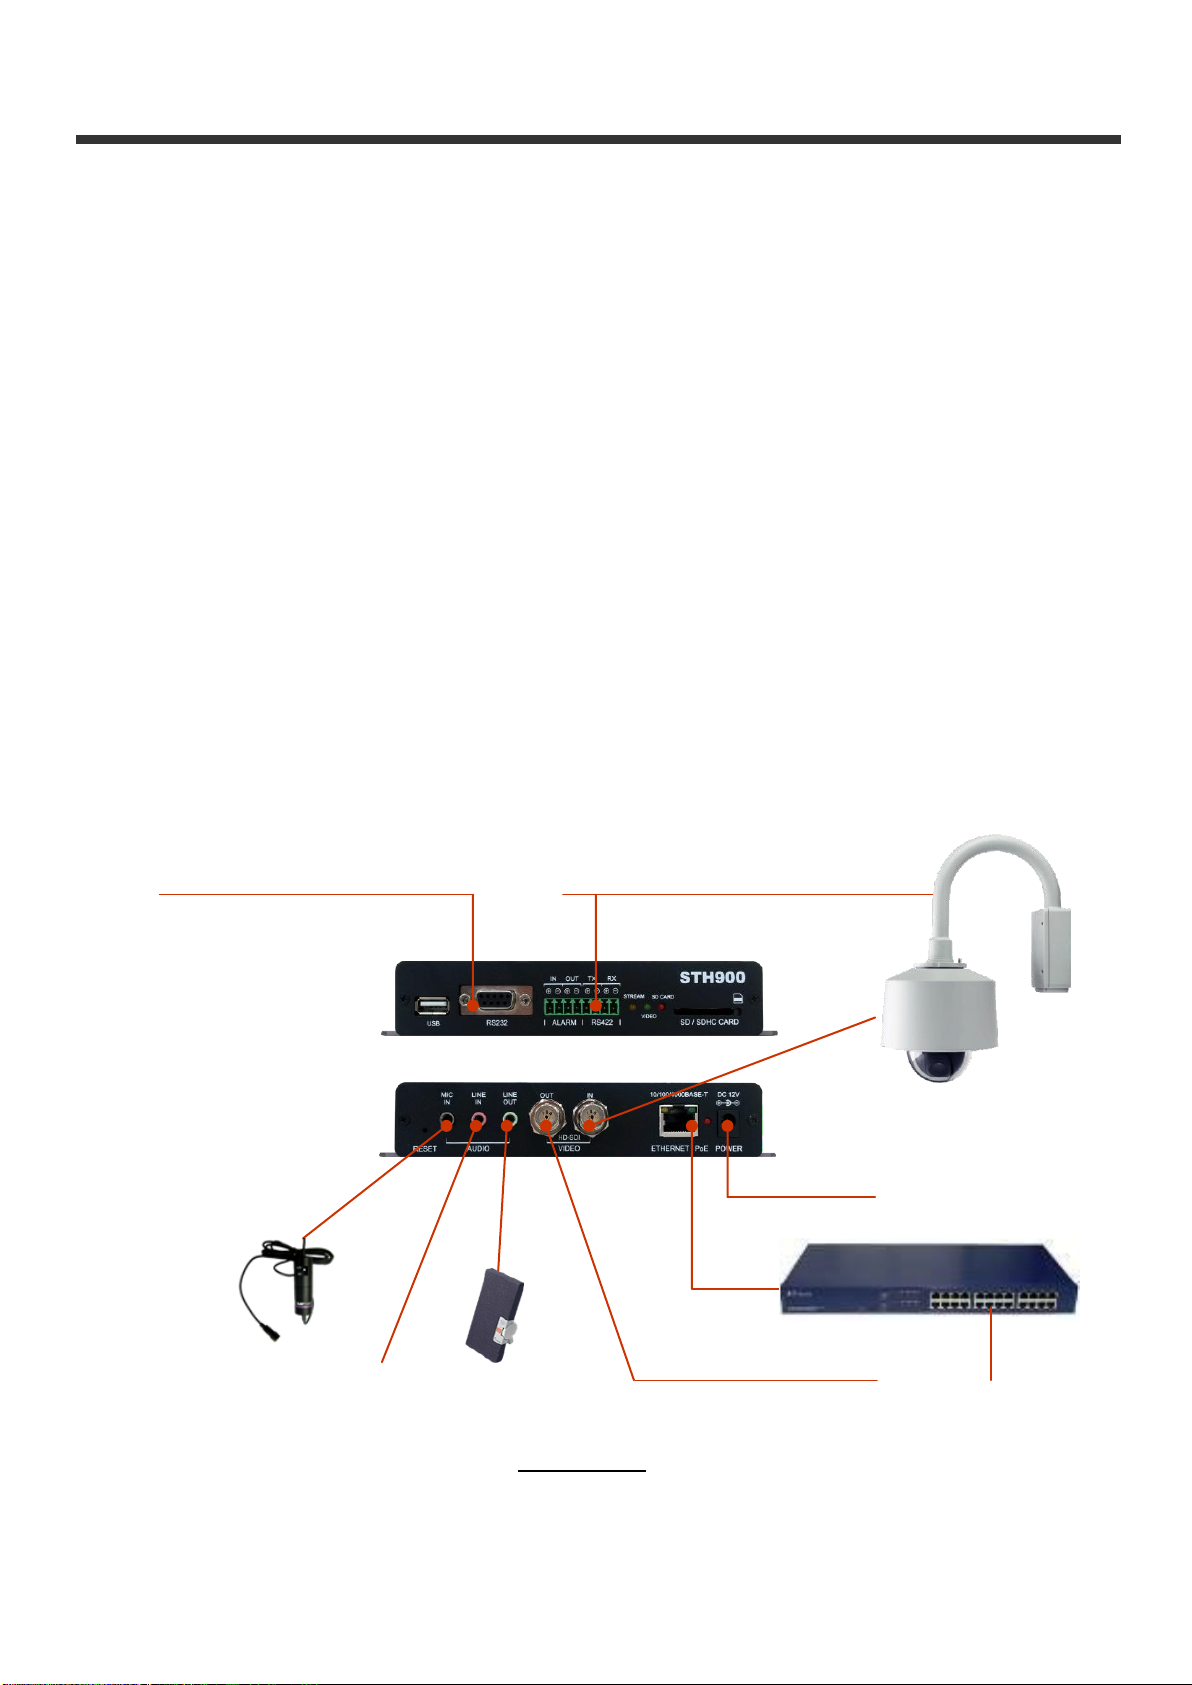
■ CamPilot STH900 can be used for surveillance purpose.
Be thoroughly informed of related regulations prior to installation to ensure compliance with such
regulations.

3
Overview
Features and Appearance
CamPilot STH900 is a Network Video Transmitter that transmits real-time high-
resolution digital video and audio data with H.264 high compression rate over Internet or
Intranet.
1. Reset (factory Default switch)
2. Audio –MIC IN (Ø 3.5 stereo jack)
3. Audio –LINE IN (Ø 3.5 stereo jack)
4. Audio –LINE OUT (Ø 3.5 stereo jack)
5. Video output (HD-SDI, BNC connector)
6. Video input (HD-SDI, BNC connector)
7. Ethernet (10/100/1000 Base-T LAN)
8. Power (Ø 5.5x2.1,12V 1A)
< 8 Pin
connector
>
▶Front
▶Top
▶Side
▶Rear
1 2 3
4
5
6 7 8
1. USB : Reserved
2. RS232
3. ALARM IN / OUT, RS422
4. LED (STREAM, VIDEO, SD CARD)
- STREAM (Yellow) : ON on the accessing status
- VIDEO (Green) : ON when the HD-SDI is inputted.
- SD (Red) : ON when the local storage is detected.
5. SD / SDHC CARD (slot)
1
2 3
4 5

4
Specification
Specifications
Input HD-SDI
Compression Type H.264(MPEG4 AVC) / MJPEG / MPEG-4
Resolutions 1080p, 720p, D1 ~ QCIF
Bitrate 32Kbps ~ 6Mbps
Frame Rate 30/25(NTSC/PAL) fps @ all resolutions
Streaming Triple Stream (H.264 and/or MJPEG and/or MPEG-4)
Output HD-SDI repeated Video Out
Bi-Directional Audio Two way, full duplex
Audio Input Compression G.711 / G.726
Audio Line Input Line level input.Nominal 0-dB input level is 1.0 VRMS.
Audio MIC Input Condensor Mic Input
Audio Output Compression G.711 / G.726
Audio Line Output Line level output.Nominal output level is 1.0 VRMS.
Alarm Input (Digital Input) 1ch
Alarm Output (Digital Output) 1ch
FactoryDefault Button Restore to default setting (Network, Password and etc.)
RS232 RS232C Level
SD Card SD Card Interface Support
USB Host USB 2.0 MemoryStick
Ethernet Ethernet(10/100/1000 Based-T),Auto MDI
Protocol
TCP, IP, HTTP, DHCP, FTP, DNS, DDNS, NTP, ICMP,
SMTPE, UPnP, RTP, RTSP, Onvif
Web Browser IE 8.0 or above
SDK CellinxSDK 4.0
Security MD5 Password / iptables (firewall)
Operating Temperature 0°C ~ 40°C / 32°F ~ 104°F
Power Requirement DC 12V/ 1.0A
Power Consumption 450mA(Nominal)
Dimensions 169(W) x117(D) x31(H) mm
Weight 400g
Case Material Aluminum
Video
Items
Power
Physical
Audio
External I/O
Network
Software
▶Top Dim
.
▶Section Dim
.

5
Connection
Basic connection
(1) POWER –DC 12V 1A
(2) ETHERNET - LAN cable (RJ45 jack), The opposite side is connected to the PC or network
device like HUB.
(3) Video Input –video signal by HD-SDI output (coaxial cable, BNC jack)
Expert connection
(1) RS232 : an external device control (ex. electronic display (board))
(2) Sensor (Alarm Input) : dry contact (N.O or N.C are available.)
(3) Alarm (Alarm Output) : relay switch (Nominal Voltage 5VDC, 1A)
(4) SD / SDHC card slot : 4GB~16GB SD / SDHC is available
(5) RS422 (RS485) : an external device control (PTZ driver
▶
TX + / - is used)
(6) MIC IN : microphone input
(7) LINE IN : Line Level input (Ø 3.5 stereo jack, use amplified mic.)
(8) LINE OUT : Line Level ouput (Ø 3.5 stereo jack, 8Ω)
(9) Video Output : for maintenance (BNC jack)
Device control (ex. Electronic)
display)
PTZ camera (HD-SDI output)
Speaker
Mic.
Power
HUB
Video Output: for maintenance
Network
PTZ control by RS422 (485)
)
Front ◀
Rear ◀
Connection
CamPilot STH900
Amplified Mic.

6
인터넷
또는
인트라넷
Connection
Connection Example
REF Monitoring PC Requirements
Item
Specification
Monitoring
PC
Processor
Pentium Core2 Duo or more
RAM
2GB or more
Graphic Card
512MB or more
OS
Windows 2003 / XP / Vista / 7
Monitor Resolution
1024 X 768 pixels or more
Network
10/100 Base-T LAN
Camera (HD-SDI output)
HUB
CamPilot STH900
PTZ Camera (HD-SDI output)
CamPilot STH900
Local Network
Public Network
Monitoring PC
LAN Cable
Router
Monitoring PC
Connection Example

7
Network
Setting an IP address
Change the network setting value with the program “NVTManagement”
1. NVTManagement execution
• Execute the file “NVTManagement.exe”
2. IP address set-up
• Click the button “NVT Scan”, select the model.
• Input the IP address, Subnet Mask, Gateway and DNS Server IP address, click the button
“Apply”
• If you don’t have a proper IP address, ask the network administrator.

8
Network
3. Accessing to CamPilot STH900 with a web browser
Open a web browser on a monitoring PC and enter the IP address assigned to a CamPilot
STH900 as following
Example> http://192.168.1.2
• The page as below shows up after the connection is completed.
ID / Password :
root / pass (Initial Value)
Login button :
it enables you to move to the Web
Monitoring Page. On checking the
Setting box and clicking the button, you
can move to the Web Setting Page.
Guest Login :
you can move to the Web Monitoring
Page as “guest”
Refer to the document “STH900_Web_Manual.pdf” for the Web server.
< 초기 접속화면 >
< 영상 모니터링>
▶The Initial Page
▶Web Monitoring Page
Table of contents
Other Cellinx Transmitter manuals