Central Forge 41711 Quick reference guide

3 IN 1 HEAVY DUTY
TILE CUTTER
Model
41711
ASSEMBLY OPERATING INSTRUCTIONS
Visit our website at: http://www.harborfreight.com
Read this material before using this product.
Failure to do so can result in serious injury.
SAVE THIS MANUAL.
Copyright©2000 by Harbor Freight Tools®. All rights reserved. No portion of this manual or any artwork con-
tained herein may be reproduced in any shape or form without the express written consent of Harbor Freight
Tools. Diagrams within this manual may not be drawn proportionally. Due to continuing improvements, actual
product may differ slightly from the product described herein. Tools required for assembly and service may not
be included.
For technical questions or replacement parts, please call 1-800-444-3353.
Revised Manual 10c

SPECIFICATIONS MODEL # 41711 TILE CUTTER
FEATURES OF THIS TOOL
Sturdy cast aluminum and steel construction will deliver a long service life.1.
Large capacity straight cuts up to 17” long and circles up to 3-1/4”.2.
Convenient built-in breaker.3.
Handy circle cutter will cut circles as small as 1-3/16” and as large as 3-1/4”.4.
Built in measurement scales for tile width, cut angle, and circle cut dimension.5.
SAVE THIS MANUAL
You will need this manual for the safety warnings and cautions, assembly instructions, operating procedures,
maintenance procedures, trouble shooting, parts list, and diagram. Keep your invoice with this manual. Write
the invoice number on the inside of the front cover. Keep both this manual and your invoice in a safe, dry
place for future reference.
Page 2 SKU # 41711
NOTICE
The Warnings, Cautions, and Instructions discussed in this instruction manual cannot cover all
possible conditions and situations that may occur. It must be understood by the operator that common
sense and caution are factors which cannot be built into this product, but must be supplied by the
operator.
Base Material Steel Place, 13 ga.
Base Size 7-3/4”W x 27-1/2”L
Guide Support Cast Aluminum
Guide Bars 3/4” Steel Tube
Guide Bar Length 25-1/2”
Cutter Fixture Cast Aluminum (3 pcs.)
Straight Cutter Wheel Hardened Steel
Straight Capacity 15-3/4”
Cutter Handle 1/2” Steel Tube x 12”L
Circle Cutter Cast Aluminum
Circle Dimension 1-3/16” Min., 3-1/4” Max.
Cutting Tip Carbide
Miter and Fence Cast Aluminum
Adjustment 0° to 45° (5° increments)
New Weight 11.4 Lbs.
REV 10c

SAFETY WARNING & CAUTIONS
READ ALL INSTRUCTIONS BEFORE USING THIS TOOL!
KEEP WORK AREA CLEAN.1. Cluttered areas invite injuries.
OBSERVE WORK AREA CONDITIONS.2. Do not use tools in damp, wet, or poorly lit locations. Do not
expose to rain. Keep work area well lit. Do not use electrically powered equipment in the presence of
ammable gases or liquids.
KEEP CHILDREN AWAY.3. Children must never be allowed in the work area. Do not let them handle
machines, tools, or equipment.
STORE IDLE EQUIPMENT.4. When not in use, tools must be locked up in a dry location to inhibit rust.
Always lock up tools and keep out of reach of children.
DO NOT FORCE THE TOOL.5. It will do the job better and more safely at the rate for which it was
intended. Do not use inappropriate attachments in an attempt to exceed the tool’s capacities.
USE THE RIGHT TOOL FOR THE JOB.6. Do not use a tool for a purpose for which it was not intended.
DRESS PROPERLY.7. Do not wear loose clothing or jewelry, as they can be caught in moving parts.
Non-skid footwear is recommended. Wear restrictive hair covering to contain long hair. Always wear
appropriate work clothing.
USE EYE, EAR8. AND BREATHING PROTECTION. Always wear ANSI approved impact safety goggles
if you are producing metal lings or wood chips. Wear an ANSI approved dust mask or respirator when
working around metal, wood, and chemical dusts and mists. Use ANSI approved ear protection when
working in a loud or noisy environment.
DO NOT OVERREACH.9. Keep proper footing and balance at all times. Do not reach over or across
running machines.
MAINTAIN TOOLS WITH CARE.10. Keep tools sharp and clean for better and safer performance. Follow
instructions for lubricating and changing accessories. Control handles must be kept clean, dry, and
free from oil and grease at all times.
Page 3 SKU # 41711
WARNING: When using shop equipment, basic safety precautions should always be followed to reduce the
risk of personal injury and hazards.

STAY ALERT.11.
Watch what you are doing. Do not operate any machinery when you are tired.
DO NOT OPERATE MACHINERY WHILE UNDER THE INFLUENCE OF ALCOHOL, DRUGS, OR12.
PRESCRIPTION MEDICINES.
CHECK FOR DAMAGED PARTS.13. Before using any tool, any part that appears damaged should be
carefully checked to determine that it will operate properly and perform its intended function. Check for
alignment and binding of moving parts, any broken parts or mounting xtures, and any other condition
that may affect proper operation. Any part that is damaged should be properly repaired or replaced by a
qualied technician.
REPLACEMENT PARTS AND ACCESSORIES.14. When servicing, use only identical replacement parts,
available from Harbor Freight Tools. Use of any other parts will void the warranty.
Page 4 SKU # 41711
NOTICE: No list of warnings can be all inclusive. The operator must
supply common sense, and operate this tool in a safe manner.
SPECIAL WARNINGS WHEN USING THIS TILE CUTTER
Using this Tool may create special hazards.
Take particular care to safeguard yourself and those around you.
Do not exceed the material thickness limitation. You can make straight cuts in tiles up to 5/8” thick, and
cut holes in tiles up to 3/8” thick with this machine. Attempting to cut thicker material may cause damage to
the machine and potential personal injury.
Crushing and Marring. Using excessive force on the lever, or using dull or dirty cutter wheels can
cause damage to your workpiece. Before cutting any material with this tool, assure that the cutting wheel
or tip is in good condition. When moving the handle, assure that the pressure applied is appropriate to the
thickness and hardness of the tile being scored.
Guiding and Supporting Materials. Materials must be supported while scoring, or breaking.
Wear Eye protective glasses when operating this tool. Occasionally splinters or shards may split off and
be ejected whil using this tool. Protect your eyes to prevent injury.
Avoid injury to your hands and ngers. Keep your hands away from the moving and cutting parts of this
tool during operation.

Page 5 SKU # 41711
ASSEMBLY
Your Tile Cutter is mostly assembled when you receive it. Please complete the assembly as follows.
Install the Bottom Feet.
Slide each Bottom Foot (#T) onto the lower corners of1.
the Base (#V). Attach each one with the bolts, nuts, and
washers supplied. Tighten the fasteners rmly.
Install the Circle Cutter.
Your tile cutter comes set up for making straight cuts.
Whenever you wish to make circle cuts, you must install the
circle cutter. Remove the circle cutter when nished.
Raise the Handle (#H) and slide the mechanism away1.
from the circle cutter area towards the Buffer Sleeves (#L).
Remove the nut and washer from the Pressing Plate (#E),2.
be careful not to lose these parts.
Place the circle cutter mechanism onto the Tracks (#M)3.
with the Press Handle (#A) pointed to the right, away from
the Buffer Sleeve portion of the tool. Align the drill point of
the circle cutter with the center of the hole in the Base.
Place the Pressing Plate (#E) under the tracks and circle4.
cutter assembly, with the threaded rod inserted upward
through the hole in the base of the circle cutting assembly.
Re-install the nut and washer and tighten.
Install the try square.
Depending on the model you purchased, the try square
may install with the arm extension of the try square either to the
front of the tool, or to the rear. Both versions work equally well.
The measuring scales on your tool also may be marked either in
millimeters or inches.
1. Position the try square (#U) with the molded-in scale
markings upward. Place the slotted arm of the try square
over the guide on the base of the tool. Secure the try
square in place with the Wing Nut (#Q).
OPERATION
The basic cutting operation is accomplished by scoring the tile in the desired location, and breaking it.
This process is similar to scoring and cutting glass.
NOTE: It’s a good idea to make a few practice cuts on your tile before attempting to make nish cuts.
Use a sturdy workbench, or else place the machine on the oor to increase your leverage.
Figure 1. Foot Assembly.
Figure 2. Hole Cutter Assembly.

Making a straight cut.
Mark the desired cut on each tile piece using a grease pencil or washable marker.1.
Lift the Handle (#H), and place the tile on the EVA Cushion (#W) against the Graduation Ruler (#R) and2.
Try Square (#U).
Align the mark on the tile with the direction of movement3.
of the cutting wheel, and position the tile so the cutting
wheel will move along the mark.
Lift the handle until the Cutting Wheel contacts the tile at4.
one edge of the tile. While pulling up, move the handle so
the cutting wheel rolls along the tile from edge to edge,
scoring the tile along the marked line.
After scoring the tile, slide the handle back until the5.
Breaking Part (#K) is centered over the tile, and lower the
handle to press the Breaking Part (#K) onto the tile. Be
sure that the score is aligned with the center line of the tile
cutter, and the breaking part is in approximately the center
of the tile, straddling the score.
Press the Handle down in a steady pressure until the tile6.
breaks. Remove the broken pieces from the tile cutter.
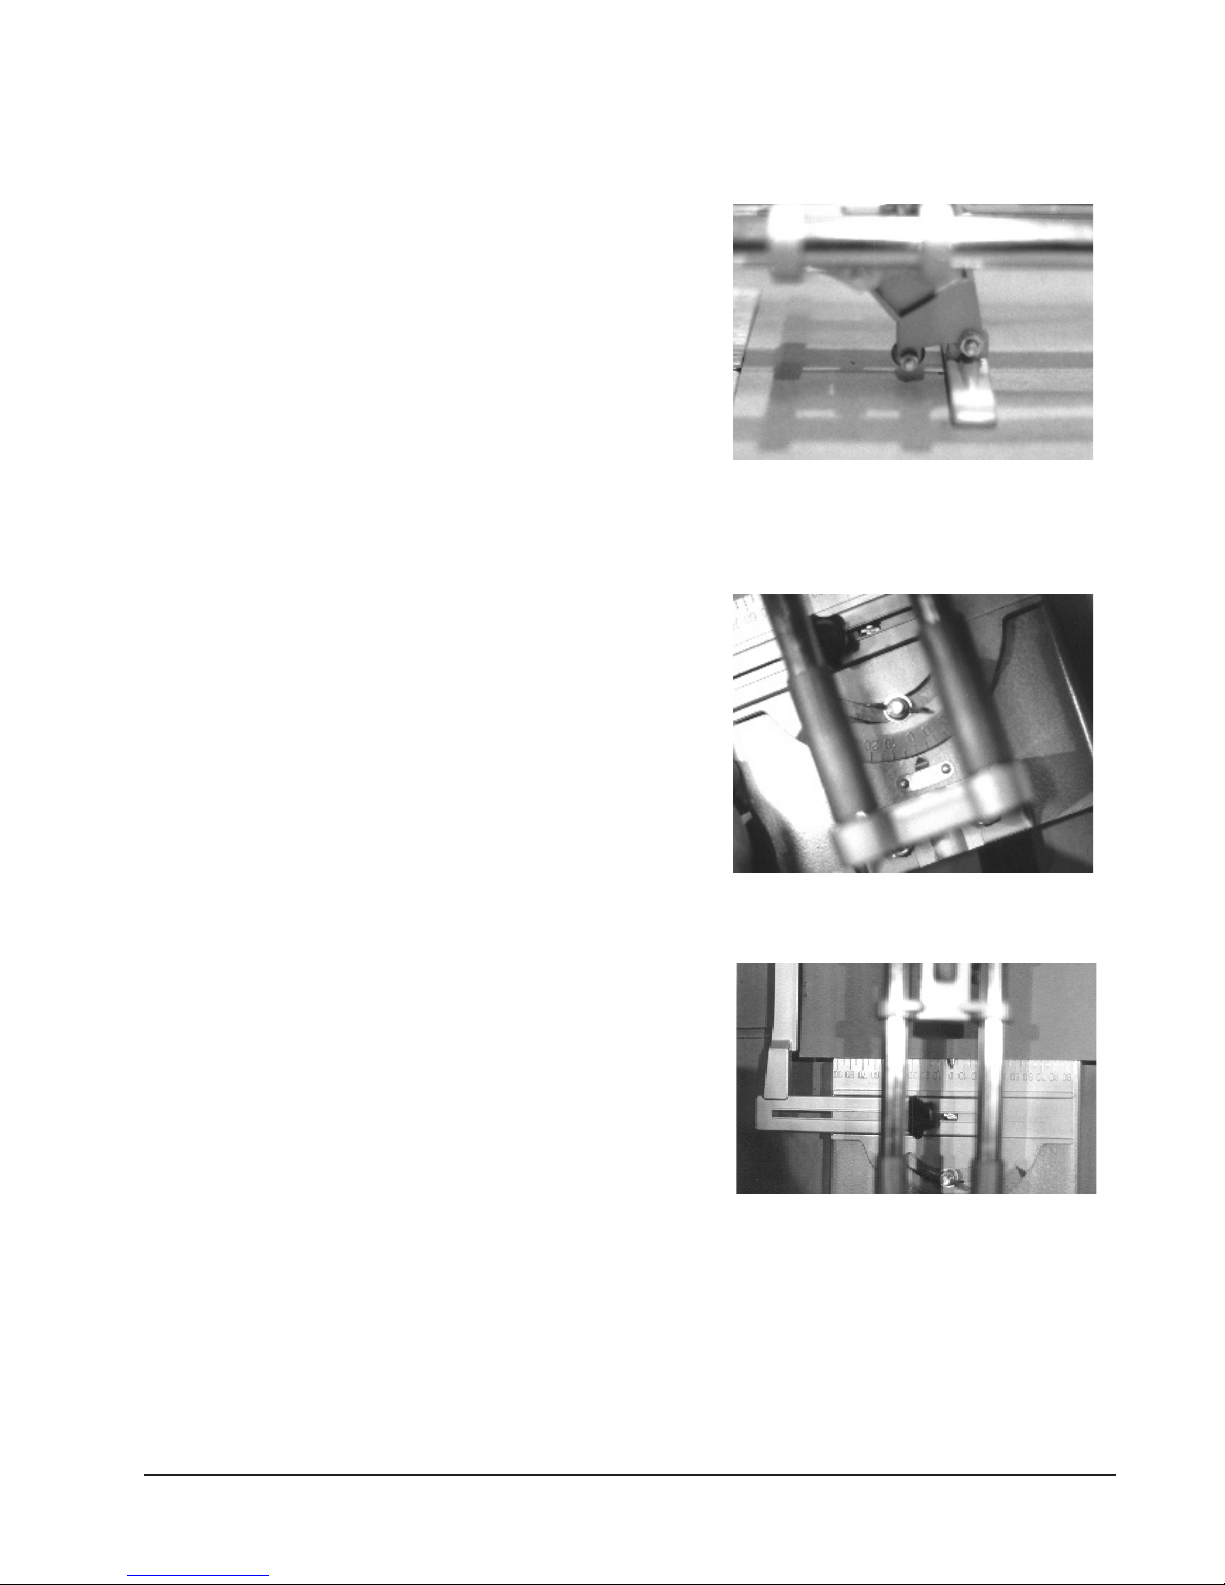
Using the Graduated Rule to Make Angled Cuts.
Lift the Handle. Loosen the Wing Nut (#Q) on the1.
Graduated Ruler (#R). Turn the Graduated Ruler to the
desired cutting angle. Read the angle by comparing the
markings on the ruler with the arrow marker.
When the desired angle has been set, re-tighten the Wing2.
Nut.
Place the tile against the graduated ruler, and proceed to3.
cut as described above. The resulting cut will be at the pre-set
angle.
Using the Try Square to Cut Tiles to a Measured Width, and
to Make Repeatable Cuts of the Same Width.
Loosen the Clamp (#S), and slide the Try Square (#U) to1.
the desired width of the nished cut tile. You may read
the nished dimension by comparing the scale markings
on the Try Square to the arrow on the tool. Retighten the
Clamp.
Place the tile against the Graduation Ruler, and against2.
the Try Square. Cut the tile in the usual way. You can
make repeated cuts of the same size, if desired.
You may also mark a tile for a desired width, place it on3.
the cutter, and adjust the try square against the edge
of the tile. Additional tiles may then be cut to the same
dimension.
TIP: Do not cut too many tiles to the same size without test installing them in your workplace. Small variations
in actual construction of walls, oors, and counter tops which may not be immediately apparent may require
you to adjust the cut dimension of tiles as you work.
Page 6 SKU # 41711
Figure 3. Cutting Wheel & Tile Breaker.
Figure 4. Setting the Graduated Rule.
Figure 5. Using the Try Square.

Making a Circle Cut.
Assemble the circle cutter assembly onto the tool as1.
previously discussed.
On the tile, mark the center point of the circle, and2.
measure or mark the circumference of the intended circle
cut.
Squeeze the Press Handle (#A) downward, lifting the drill3.
point and knife body above the level of the cutter base.
Place the tile on the EVA cushion, with the centerpoint of4.
the circle directly under the center drill of the circle cutter.
Release the Press Handle slowly, and adjust the tile to
carefully align the Triangle Drill (#G) with the enter point of
the hole marked on your tile.
Loosen the nut on the Knife Body (#F), and slide the knife5.
body until the knife point aligns with the circumference you
have marked on the tile. Retighten the nut.
Holding the tile rmly onto the EVA Cushion, rotate the 6.
Crank (#B) clockwise to drill into the tile, and cut the
circle. Continue rotating the crank until the circle has been
completely cut through the tile.
Page 7 SKU # 41711
PLEASE READ THE FOLLOWING CAREFULLY
THE MANUFACTURER AND/OR DISTRIBUTOR HAS
PROVIDED THE PARTS DIAGRAM IN THIS MANUAL
AS A REFERENCE TOOL ONLY: NEITHER THE
MANUFACTURER NOR DISTRIBUTOR MAKES ANY
REPRESENTATION OR WARRANTY OF ANY KIND
TO THE BUYER THAT HE OR SHE IS QUALIFIED TO
MAKE ANY REPAIRS TO THE PRODUCT OR THAT
HE OR SHE IS QUALIFIED TO REPLACE ANY PARTS
OF THE PRODUCT: IN FACT THE MANUFACTURER A
ND/OR DISTRIBUTOR EXPRESSLY STATES THATALL
REPAIRS AND PARTS REPLACEMENTS SHOULD
BE UNDERTAKEN BY CERTIFIED AND LICENSED
TECHNICIANS AND NOT BY THE BUYER. THE BUYER
ASSUMES ALL RISK AND LIABILITY ARISING OUT OF
HIS OR HER REPAIRS TO THE ORIGINAL PRODUCT OR
REPLACEMENT PARTS THERETO, OR ARISING OUT
OF HIS OR HER INSTALLATION OF REPLACEMENT
PARTS THERETO.
Figure 6. Adjusting the Circle Scale.
Figure 7. Locating the Tile Before Re-
leasing the Press Handle.
Figure 8. Turning the Crank to
Cut a Circle Hole.

MODEL # 41711 TILE CUTTER
MODEL # 41711 TILE CUTTER PARTS LIST
Page 8 SKU # 41711 Rev 03a, REV 07j
A
E
D
B
C
F
G
H
X
I
L
O
P
N
T
S
Q
R
U
V
W
M
J
K
Part No. Description QTY
A Press Handle 1
B Crank 1
C Housing 1
D Hole Cutter 1
E Pressing Plate 1
F Knife Body 1
G Triangle Drill 1
H Handle Rod 1
I Sliding Frame 1
J Cutting Wheel 1
K Breaking Part 1
L Buffer Sleeve 2
Part No. Description QTY
M Tracks 2
N Track Holders 2
O Hex Head Bolts 4
P Washer Sets 4
Q Wing Nut 1
R Graduation Ruler 1
S Clamp 1
T Bottom Feet w/hardware 4
U Try Square 1
V Base 1
W EVA Cushion 2
X Cutting Wheel Frame 1
Table of contents
Other Central Forge Cutter manuals