Central Pneumatic 95923 Assembly instructions

!"#"$%&'(%)*+#"$*%,$-%.$$/-00)))1.,(+&(2(*"3.$14&5
65,"7%&'(%$*4.8"4,7%#'//&($%,$-%/(&9'4$#'//&($:.,(+&(2(*"3.$14&5
NOTICE
;7*,8%$.*%<"(+('#.%=>>6?=<@6AB%,2$*(%'#*1%
?*7,C*9%&(%"8,9*D',$*%47*,8"83%)"77%/*(5,8*8$7C%47&3%$.*%<"(+('#.1
Owner’s Manual & Safety Instructions
Save This Manual Keep this manual for the safety warnings and precautions, assembly,
operating, inspection, maintenance and cleaning procedures. Write the product’s serial number in the
back of the manual near the assembly diagram (or month and year of purchase if product has no number).
Keep this manual and the receipt in a safe and dry place for future reference. 20i
When unpacking, make sure that the product is intact
and undamaged. If any parts are missing or broken,
please call 1-888-866-5797 as soon as possible.
Copyright© 2012 by Harbor Freight Tools®. All rights reserved.
No portion of this manual or any artwork contained herein may be reproduced in
any shape or form without the express written consent of Harbor Freight Tools.
Diagrams within this manual may not be drawn proportionally. Due to continuing
improvements, actual product may differ slightly from the product described herein.
To ol s r eq ui r ed f o r as s em bl y a nd se rvice m ay not be in cluded.
Read this material before using this product.
Failure to do so can result in serious injury.
SAVE THIS MANUAL.
NOTICE
Clean the Airbrush IMMEDIATELY after use.
Delayed or inadequate cleaning will permanently clog the Airbrush.
Page 2 E&(%$*4.8"4,7%D'*#$"&8#F%/7*,#*%4,77%GHIIIHIJJHKLML1 Item 95923
N<E6@B OP6Q<@=OR ><=R@6R<R;6N6@SP
@,+7*%&2%;&8$*8$#
Safety .................................................2
Specifications .....................................5
Setup ..................................................6
Operation ...........................................11
Maintenance ......................................13
Parts Lists and Diagram ....................18
Warranty ............................................20
T<QR=RU%NB>VOAN%<R?%?6E=R=@=ORN
This is the safety alert symbol. It is used to alert you to
potential personal injury hazards. Obey all safety messages
that follow this symbol to avoid possible injury or death.
Indicates a hazardous situation which, if not avoided,
will result in death or serious injury.
Indicates a hazardous situation which, if not avoided,
could result in death or serious injury.
Indicates a hazardous situation which, if not avoided,
could result in minor or moderate injury.
Addresses practices not related to personal injury.
=>POQ@<R@%N<E6@B%=RN@QS;@=ORN
=RN@QS;@=ORN%P6Q@<=R=RU%@O%<%Q=NW%OE%E=Q6F%
6A6;@Q=;%NXO;WF%OQ%=RYSQB%@O%P6QNORN
The warnings and precautions discussed in this manual cannot cover all possible conditions
and situations that may occur. It must be understood by the operator that common sense and
caution are factors which cannot be built into this product, but must be supplied by the operator.
T<QR=RU – When using tools, basic precautions should always be followed, including the following:
T&(Z%<(*,
a. W**/%$.*%)&(Z%,(*,%47*,8%,89%)*77%7"3.$*91%%
Cluttered benches and dark areas
increase the risks of electric shock,
fire, and injury to persons.
b. W**/%+C#$,89*(#F%4."79(*8F%,89%
["#"$&(#%,),C%)."7*%&/*(,$"83%$.*%$&&71%%
Distractions are able to result in
the loss of control of the tool.

NOTICE
Clean the Airbrush IMMEDIATELY after use.
Delayed or inadequate cleaning will permanently clog the Airbrush.
Page 3E&(%$*4.8"4,7%D'*#$"&8#F%/7*,#*%4,77%GHIIIHIJJHKLML1Item 95923
N<E6@BOP6Q<@=OR><=R@6R<R;6 N6@SP
P*(#&8,7%N,2*$C
a. N$,C%,7*($1%%T,$4.%).,$%C&'%,(*%
9&"83%,89%'#*%4&55&8%#*8#*%).*8%
&/*(,$"83%$.*%$&&71%%?&%8&$%'#*%$.*%
$&&7%)."7*%$"(*9%&(%'89*(%$.*%"827'*84*%
&2%9('3#F%,74&.&7F%&(%5*9"4,$"&81%%
A moment of inattention while operating the
tool increases the risk of injury to persons.
b. ?(*##%/(&/*(7C1%%?&%8&$%)*,(%
7&&#*%47&$."83%&(%\*)*7(C1%%;&8$,"8%
7&83%.,"(1%%W**/%.,"(F%47&$."83F%,89%
37&[*#%,),C%2(&5%5&["83%/,($#1%%
Loose clothes, jewelry, or long hair
increases the risk of injury to persons as
a result of being caught in moving parts.
c. ?&%8&$%&[*((*,4.1%%W**/%/(&/*(%
2&&$"83%,89%+,7,84*%,$%,77%$"5*#1%%
Proper footing and balance enables better
control of the tool in unexpected situations.
d. S#*%#,2*$C%*D'"/5*8$1
Wear heavy-duty work gloves
and a NIOSH-approved
respirator during use.
Non-skid safety shoes and a hard hat must
be used for the applicable conditions.
e. <7),C#%)*,(%*C*%/(&$*4$"&81
Wear ANSI-approved
safety goggles.
@&&7%S#*%,89%;,(*
a. ?&%8&$%2&(4*%$.*%$&&71 Use the correct
tool for the application. The correct tool
will do the job better and safer at the
rate for which the tool is designed.
b. ?"#4&88*4$%$.*%$&&7%2(&5%$.*%,"(%#&'(4*%
+*2&(*%5,Z"83%,8C%,9\'#$5*8$#F%
4.,83"83%,44*##&("*#F%&(%#$&("83%$.*%$&&71
Such preventive safety measures reduce
the risk of starting the tool unintentionally.
Turn off and detach the air supply, safely
discharge any residual air pressure, and
release the throttle and/or turn the switch to
its off position before leaving the work area.
c. N$&(*%$.*%$&&7%).*8%"$%"#%"97*%&'$%&2%(*,4.%
&2%4."79(*8%,89%&$.*(%'8$(,"8*9%/*(#&8#1%%
A tool is dangerous in the
hands of untrained users.
d. ;.*4Z%2&(%5"#,7"385*8$%&(%+"89"83%
&2%5&["83%/,($#F%+(*,Z,3*%&2%/,($#F%
,89%,8C%&$.*(%4&89"$"&8%$.,$%,22*4$#%
$.*%$&&7]#%&/*(,$"&81%%If damaged,
have the tool serviced before using.
Many accidents are caused by poorly
maintained tools. There is a risk of
bursting if the tool is damaged.
e. S#*%&87C%,44*##&("*#%$.,$%,(*%"9*8$"2"*9%
+C%$.*%5,8'2,4$'(*(%2&(%$.*%#/*4"2"4%
$&&7%5&9*71 Use of an accessory not
intended for use with the specific tool model,
increases the risk of injury to persons.
N*(["4*
a. @&&7%#*(["4*%5'#$%+*%/*(2&(5*9%&87C%
+C%D',7"2"*9%(*/,"(%/*(#&88*71
b. T.*8%#*(["4"83%,%$&&7F%'#*%&87C%
"9*8$"4,7%(*/7,4*5*8$%/,($#1%%
S#*%&87C%,'$.&("^*9%/,($#1
c. S#*%&87C%7'+("4,8$#%#'//7"*9%)"$.%$.*%
$&&7%&(%#/*4"2"*9%+C%$.*%5,8'2,4$'(*(1

NOTICE
Clean the Airbrush IMMEDIATELY after use.
Delayed or inadequate cleaning will permanently clog the Airbrush.
Page 4 E&(%$*4.8"4,7%D'*#$"&8#F%/7*,#*%4,77%GHIIIHIJJHKLML1 Item 95923
N<E6@B OP6Q<@=OR ><=R@6R<R;6N6@SP
<"(%N&'(4*
a. %R*[*(%4&88*4$%$&%,8%,"(%%
% #&'(4*%$.,$%"#%4,/,+7*%&2%%
% *_4**9"83%IK%/#"1%%%
%Over pressurizing the tool
may cause bursting, abnormal
operation, breakage of the tool or serious
injury to persons. Use only clean, dry,
regulated compressed air at the rated
pressure or within the rated pressure range
as marked on the tool. Always verify prior
to using the tool that the air source has
been adjusted to the rated air pressure
or within the rated air-pressure range.
b. R*[*(%'#*%&_C3*8F%4,(+&8%9"&_"9*F%
4&5+'#$"+7*%3,#*#%&(%,8C%+&$$7*9%
3,#%,#%,8%,"(%#&'(4*%2&(%$.*%$&&71%%
Such gases are capable of explosion
and serious injury to persons.
%N<!6%@X6N6%=RN@QS;@=ORN1
NC5+&7%?*2"8"$"&8#
NC5+&7 P(&/*($C%&(%N$,$*5*8$
PN= Pounds per square inch of pressure
;E> Cubic Feet per Minute flow
N;E> Cubic Feet per Minute flow
at standard conditions
RP@ National pipe thread, tapered
RPN National pipe thread, straight
NC5+&7 P(&/*($C%&(%N$,$*5*8$
WARNING marking
concerning Risk of Eye Injury.
Wear ANSI-approved eye protection.
WARNING marking concerning
Risk of Respiratory Injury.
Wear NIOSH-approved respirator.
WARNING marking concerning
Risk of Explosion.

NOTICE
Clean the Airbrush IMMEDIATELY after use.
Delayed or inadequate cleaning will permanently clog the Airbrush.
Page 5E&(%$*4.8"4,7%D'*#$"&8#F%/7*,#*%4,77%GHIIIHIJJHKLML1Item 95923
N<E6@BOP6Q<@=OR><=R@6R<R;6 N6@SP
N/*4"2"4%N,2*$C%=8#$('4$"&8#
1. Do not direct spray at people or animals.
2. Do not exceed maximum air pressure.
3. Do not spray near open flames, pilot lights,
stoves, heaters, the air compressor, or
any other heat source. Most solvents
and coatings are highly flammable,
particularly when sprayed. Maintain
a distance of at least 25 feet from the
air compressor. If possible, locate the
air compressor in a separate room.
4. Read all of the information concerning
coating products and cleaning solvents.
?&%8&$%'#*%4.7&("8,$*9%#&7[*8$#%
`*131%GHGHG%$("4.7&(&*$.C7*8*%,89%
9"4.7&(&5*$.,8*F%,7#&%Z8&)8%,#%
5*$.C7*8*%4.7&("9*a%$&%47*,8%,"(+('#.*#1%%
>,8C%,"(+('#.*#%4&8$,"8%,7'5"8'5F%
)."4.%(*,4$#%#$(&837C%$&%4.7&("8,$*9%
#&7[*8$#1%%Contact the solvent or coating
manufacturer as needed regarding
potential chemical reactions.
5. Industrial applications must
follow OSHA requirements.
6. Spraying hazardous materials may
result in serious injury or death.
Do not spray pesticide, acid, corrosive
material, fertilizer, or toxic chemicals.
7. Paints and solvents may be harmful or fatal if
swallowed or inhaled. Avoid prolonged skin
contact with solvents or paints as they will
irritate skin. After any contact, immediately
wash off exposed area with hot, soapy water.
8. Attach all accessories properly to the
tool before connecting the air supply.
A loose accessory may detach
or break during operation.
9. Install an in-line shutoff valve
to allow immediate control over
the air supply in an emergency,
even if a hose is ruptured.
10. Air hose fittings may get hot during use.
Allow fittings to cool before disconnecting.
N/*4"2"4,$"&8#
Air Pressure 15 - 50 PSI
Air Inlet 1/8" - 28 NPS
Nozzle Size .35mm
Spray Pattern Hairline to 1-1/2″ Wide
Cup Capacity 3/4 oz. (22cc)
Air Consumption <4 CFM @ 50 PSI

NOTICE
Clean the Airbrush IMMEDIATELY after use.
Delayed or inadequate cleaning will permanently clog the Airbrush.
Page 6 E&(%$*4.8"4,7%D'*#$"&8#F%/7*,#*%4,77%GHIIIHIJJHKLML1 Item 95923
N<E6@B OP6Q<@=OR ><=R@6R<R;6N6@SP
E'84$"&8#
<"(%=87*$
A"9
E"$$"83
;&7&(%
N$*5
A"9
<"(%;,/
R&^^7*
`R&$%!"#"+7*a
<9\'#$5*8$%
N4(*)
@("33*(
=87*$0O'$7*$%
;&88*4$&(
<"(%X&#*
<"(+('#.%
X&79*(
<"(%
=87*$
<"(%P(*##'(*%
!,7[*
E"3'(*%<%
U7,##%
Y,(

NOTICE
Clean the Airbrush IMMEDIATELY after use.
Delayed or inadequate cleaning will permanently clog the Airbrush.
Page 7E&(%$*4.8"4,7%D'*#$"&8#F%/7*,#*%4,77%GHIIIHIJJHKLML1Item 95923
N<E6@BOP6Q<@=OR><=R@6R<R;6 N6@SP
=8"$",7%N*$%S/
Q*,9%$.*%6R@=Q6%=>POQ@<R@%N<E6@B%=REOQ><@=OR%#*4$"&8%,$%$.*%+*3"88"83%&2%
$."#%5,8',7%"847'9"83%,77%$*_$%'89*(%#'+.*,9"83#%$.*(*"8%+*2&(*%#*$%'/%&(%'#*%&2%
$."#%/(&9'4$1
R&$*- For additional information regarding the parts listed in the following
pages, refer to the Assembly Diagram near the end of this manual.
V*2&(*%N*$'/
1. This air tool may be shipped with
protective plugs covering the air inlets.
Remove these plugs before set up.
2. The Metal Cup (28) may be used for excess
correctly thinned paint, and also for solvent
when it is time to clean the Airbrush.
3. The Metal Hanger (30) can be attached to a
secure surface and used to hang the Airbrush
for drying, or when it is not being used.
<"(+('#.%X&79*(%N*$'/
1. Thread Air Hoses (52) onto the
Inlet/Outlet Connectors (43).
2. Designate one Air Hose for the Air Supply
Inlet. Use the Adapter (54) to make the
connection from the Air Hose to the Air
Supply, if necessary. N**%E"3'(*%V1
<"(%N'//7C%
=87*$
E"3'(*%V
R&$*- Each connection has its
own Air Pressure Valve.

NOTICE
Clean the Airbrush IMMEDIATELY after use.
Delayed or inadequate cleaning will permanently clog the Airbrush.
Page 8 E&(%$*4.8"4,7%D'*#$"&8#F%/7*,#*%4,77%GHIIIHIJJHKLML1 Item 95923
N<E6@B OP6Q<@=OR ><=R@6R<R;6N6@SP
<"(%N'//7C%N*$'/
@O%PQ6!6R@%N6Q=OSN%=RYSQB%EQO>%6bPAON=OR-%
S#*%&87C%47*,8F%9(CF%(*3'7,$*9F%4&5/(*##*9%,"(%$&%/&)*(%$."#%$&&71%%?&%8&$%'#*%
&_C3*8F%4,(+&8%9"&_"9*F%4&5+'#$"+7*%3,#*#F%&(%,8C%&$.*(%+&$$7*9%3,#%,#%,%/&)*(%
#&'(4*%2&(%$."#%$&&71
1. Incorporate a filter, regulator with pressure
gauge, in-line shutoff valve, and quick
coupler for best service, as shown on
Figure C on page 9 and Figure D
on page 10. %<8%"8H7"8*%#.'$&22%+,77%
[,7[*%"#%,8%"5/&($,8$%#,2*$C%9*["4*%
+*4,'#*%"$%4&8$(&7#%$.*%,"(%#'//7C%
*[*8%"2%$.*%,"(%.&#*%"#%('/$'(*91%%@.*%
#.'$&22%[,7[*%#.&'79%+*%,%+,77%[,7[*%
+*4,'#*%"$%4,8%+*%47&#*9%D'"4Z7C1
R&$*-%%Do not use an automatic oiler system or
add oil to airline. The oil will contaminate the
material being propelled, ruining the final result.
2. Attach an air hose to the
compressor’s air outlet. Connect the
air hose to the air inlet of the tool.
Other components, such as a coupler plug
and quick coupler, will make operation
more efficient, but are not required.
T<QR=RUc%%@O%PQ6!6R@%N6Q=OSN%
=RYSQB%EQO>%<;;=?6R@<A%OP6Q<@=OR-%
?&%8&$%"8#$,77%,%2*5,7*%D'"4Z%4&'/7*(%
&8%$.*%$&&71 Such a coupler contains
an air valve that will allow the air tool to
retain pressure and operate accidentally
after the air supply is disconnected.
R&$*-%%Air flow, and therefore tool
performance, can be hindered by
undersized air supply components.
3. The air hose must be long enough to reach
the work area with enough extra length
to allow free movement while working.
4. Close the in-line shutoff valve between
the compressor and the tool.
5. Turn on the air compressor according to
the manufacturer’s directions and allow
it to build up pressure until it cycles off.
6. Adjust the air compressor’s output
regulator so that the air output is enough
to properly power the tool, but the output
will not exceed the tool’s maximum air
pressure at any time. Adjust the pressure
gradually, while checking the air output
gauge to set the right pressure range.
7. Inspect the air connections for leaks.
Repair any leaks found.
8. If the tool will not be used at this time,
turn off and detach the air supply and
safely discharge any residual air pressure
to prevent accidental operation.
9. Note: Residual air pressure should not be
present after the tool is disconnected from
the air supply. However, it is a good safety
measure to attempt to discharge the tool in
a safe fashion after disconnecting to ensure
that the tool is disconnected and unpowered.

NOTICE
Clean the Airbrush IMMEDIATELY after use.
Delayed or inadequate cleaning will permanently clog the Airbrush.
Page 9E&(%$*4.8"4,7%D'*#$"&8#F%/7*,#*%4,77%GHIIIHIJJHKLML1Item 95923
N<E6@BOP6Q<@=OR><=R@6R<R;6 N6@SP
E"3'(*%;-%%P&($,+7*%<"(%N'//7C%N*$'/
C
A
E F
A
B
D
?*#4("/$"&8 E'84$"&8
A Air Hose Connects air to tool
B Filter Prevents dirt and condensation from damaging tool or workpiece
D Regulator Adjusts air pressure to tool
E Coupler and Plug Provides quick connection and release
C Air Cleaner / DryerdPrevents water vapor from damaging workpiece
F Air Adjusting ValvedFor fine tuning airflow at tool
dO/$"&8,7%4&5/&8*8$#1
NOTICE
Clean the Airbrush IMMEDIATELY after use.
Delayed or inadequate cleaning will permanently clog the Airbrush.
Page 10 E&(%$*4.8"4,7%D'*#$"&8#F%/7*,#*%4,77%GHIIIHIJJHKLML1 Item 95923
N<E6@B OP6Q<@=OR ><=R@6R<R;6N6@SP
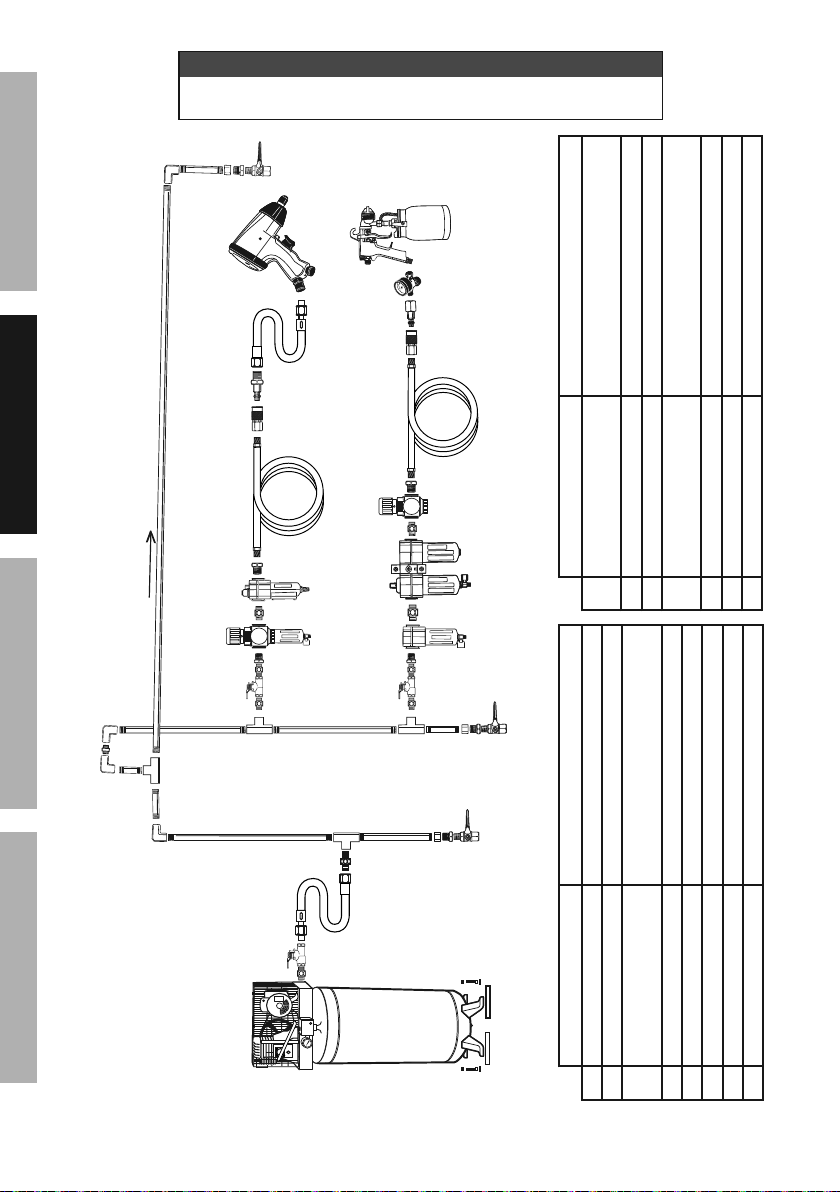
E"3'(*%?-%%N$,$"&8,(C%<"(%N'//7C%N*$'/
N
L
L O
M
C
C
Non-lubricated
Tools
Lubricated
Tools
H
I
I
J
JKH
F
G
E
Slope
F
F
B B
A
A
CD
?*#4("/$"&8 E'84$"&8
A Vibration Pads For noise and vibration reduction
B Anchor Bolts Secures air compressor in place
C Ball Valve Isolates sections of system
for maintenance
D Isolation Hose For vibration reduction
EMain Air Line - 3/4″ min. Distributes air to branch lines
F Ball Valve To drain moisture from system
GBranch Air Line -1/2″ min. Brings air to point of use
H Air Hose Connects air to tool
?*#4("/$"&8 E'84$"&8
I Filter Prevents dirt and condensation
contamination
J Regulator Adjusts air pressure to tool
K LubricatordFor air tool lubrication
L Coupler and Plug Provides quick connection
and release
M Leader HosedIncreases coupler life
N Air Cleaner / DryerdPrevents moisture contamination
O Air Adjusting ValvedFor fine tuning airflow at tool
dO/$"&8,7%4&5/&8*8$#1
This manual suits for next models
1
Table of contents
Other Central Pneumatic Airbrush manuals


