Centron Technologies CM735 User manual

USER’S MANUAL
BLOOD COLLECTION MIXER
Model CM735
No. CAT.CM73522Ce
Centron Technologies Corporation
319-25 Sadang-4-dong, Dongjak-ku
Seoul, Korea 156-823
Tel. +82-2.522.7807 Fax +82-2.522.7806

1
CM73522UMC.0112
Table of Contents
Page
Important Notes 2
1. Scope 3
1-1. Features 3
1-2. Accessories 5
2. Specifications 6
3. Views and Locations 7
3-1. Top View 7
3-2. Rear View 8
3-3. Control Panel 9
3-4. LCD Display Panel 10
3-5. Tube Clamp Module 11
3-6. Battery Charger and Adaptor 12
4. Functional Descriptions 13
5. How to Use Equipment 16
5-1. Preparation before Use 16
5-2. Operating Procedures 17
5-3. Audible Alarm Signals 19
5-4. Recharging the Battery 21
5-5. Moving the Clamp Module 23
6. Maintenance 24
6-1. Troubleshooting 24
6-2. Calibration 25
6-3. Leveling the Tray 26
6-4. Service Call 27

2
CM73522UMC.0112
Important Notes
Power Source
The Blood Collection Mixer model CM735 is operated by either a battery pack or an
AC power adaptor.
Caution
Do not put excessive weight on or push the tray downward in a forceful manner.
(This avoids damage to the weight-sensitive device under the tray.)
Do not place weights over 2 Kg on the tray.
Battery Capacity
Turn power switch off to save the battery when the machine is not to be used for
hours. If a machine, with a fully charged battery pack is left in but unused, the
battery will be exhausted in about 15-20 hours. A machine with a fully charged
battery can operate continuously for approximately 8 hours.
Battery Recharging
A low-voltage symbol flashes on the display panel and an alarm will sound when the
battery voltage gets low. To recharge the battery, just plug the AC power adaptor in
the rear panel jack, or take out battery and put it on the battery charger unit.
Cleaning Instructions
Use a soft cloth and mild detergent to clean the equipment. DO NOT use paint
thinner, benzene, solvent or strong detergent.
Keeping
Avoid using or leaving the machine in a location where the temperature is higher
than 122 °F (50 °C). Keep it away from any heating source or direct sunlight.

3
CM73522UMC.0112
1. Scope
1-1. Features
•The Blood Collection Mixer CM735 provides efficient mixing of the blood with the
anticoagulant in the blood bags.
•It is a lightweight mobile unit with maximum portability.
•The panel display indicates the net volume of blood collected in the blood bag. It
automatically closes the tube clamp when the collected volume reaches the preset
selected figure. The display shows the total weight on the tray at the end of the
donation and elapsed collection time.
•Various audible and visual alarms are provided to ensure accurate and safe collection
and mixing.
The mixing motion is controlled by a microcomputer. When the blood collection is
started, the tray rocks for 3 cycles and pauses for 2 seconds, then resumes rocking. As
the collection approaches the preset donation amount, the tray stops rocking to ensure an
accurate donation. When the preset amount is reached, the clamp closes and tray resumes
rocking.
The Blood Collection Mixer monitors blood flow rate during the collection and donation
draw time. When the draw is less than 30 ml/minutes, the machine will alarm. The alarm
is both audible and visual. The alarm repeats every 60 seconds if blood flow remains low.
The LCD panel displays pertinent information.
The following information can be viewed on the LCD:
- total weight [gram] of blood and blood bags
- collected volume [ml] of blood
- target volume to collect [ml]
- elapsed time [min : sec]
- low battery voltage condition
- unit of displayed figure ([ml] or [gram])
- alarming condition
The unit can be powered by either a battery pack or an AC power adaptor.
A Nickel-Cadmium battery pack of 12 Volts/2AH capacity is used. It is replaceable and
rechargeable. An audible alarm sounds when battery voltage drops to its lower limit.
The battery can be recharged while in the mixer or with a separate battery charger unit.
The battery can be recharged while the mixer is in use if the AC power adaptor is
attached at rear panel jack of main unit. The battery can also be recharged by removing it
from the mixer and connecting it to a separate battery charger unit.

4
CM73522UMC.0112
(A large battery charger, model BC162, which charges 6 battery packs same time, is
available for purchase from your distributor. With this charger, one pack among 6 is
recharged fast in 3 hours, and other 5 packs in 10 hours.)
It takes about 10 hours to recharge a pack from exhausted level to fully charged level.
A fully charged battery will operate the mixer continuously for approximately 8 hours.
The blood collection mixer unit can also be powered directly by using the AC power
adaptor. When both a battery pack and a power adaptor are connected at the same time,
the power adaptor supplies operating power and the battery is under recharging.
The tube clamp module can be positioned on either the left side or the right side of the
tray. It can easily be remounted on either side of the tray by the user.
The equipment is stored in a soft carrying bag, and weighs less than 4 kilograms.
When the power switch is turned on, the machine requires 30 seconds to stabilize
weight-sensing circuits. During this time the display shows a 30-second count down.
The Blood Collection Mixer is a unit designed with solid-state electronics and advanced
technology.

5
CM73522UMC.0112
1-2. Accessories included with each unit
The Blood Collection Mixer CM735 includes the items shown below.
(Quantity - 1 each)
CollectionMixerBase Collection/WeighingTray
BatteryPack BatteryChargerUnit ACPowerAdaptor
And,
Carrying/Transportation Case
User's Manual

6
CM73522UMC.0112
2. Specifications
a. Collection volume display ; 0 ~ 999 ml, with 1 ml increments
b. Total weight display ; 0 ~ 999 grams, with 1 gram increments
c. Elapsed time display ; 0 ~ 19 min 59 sec
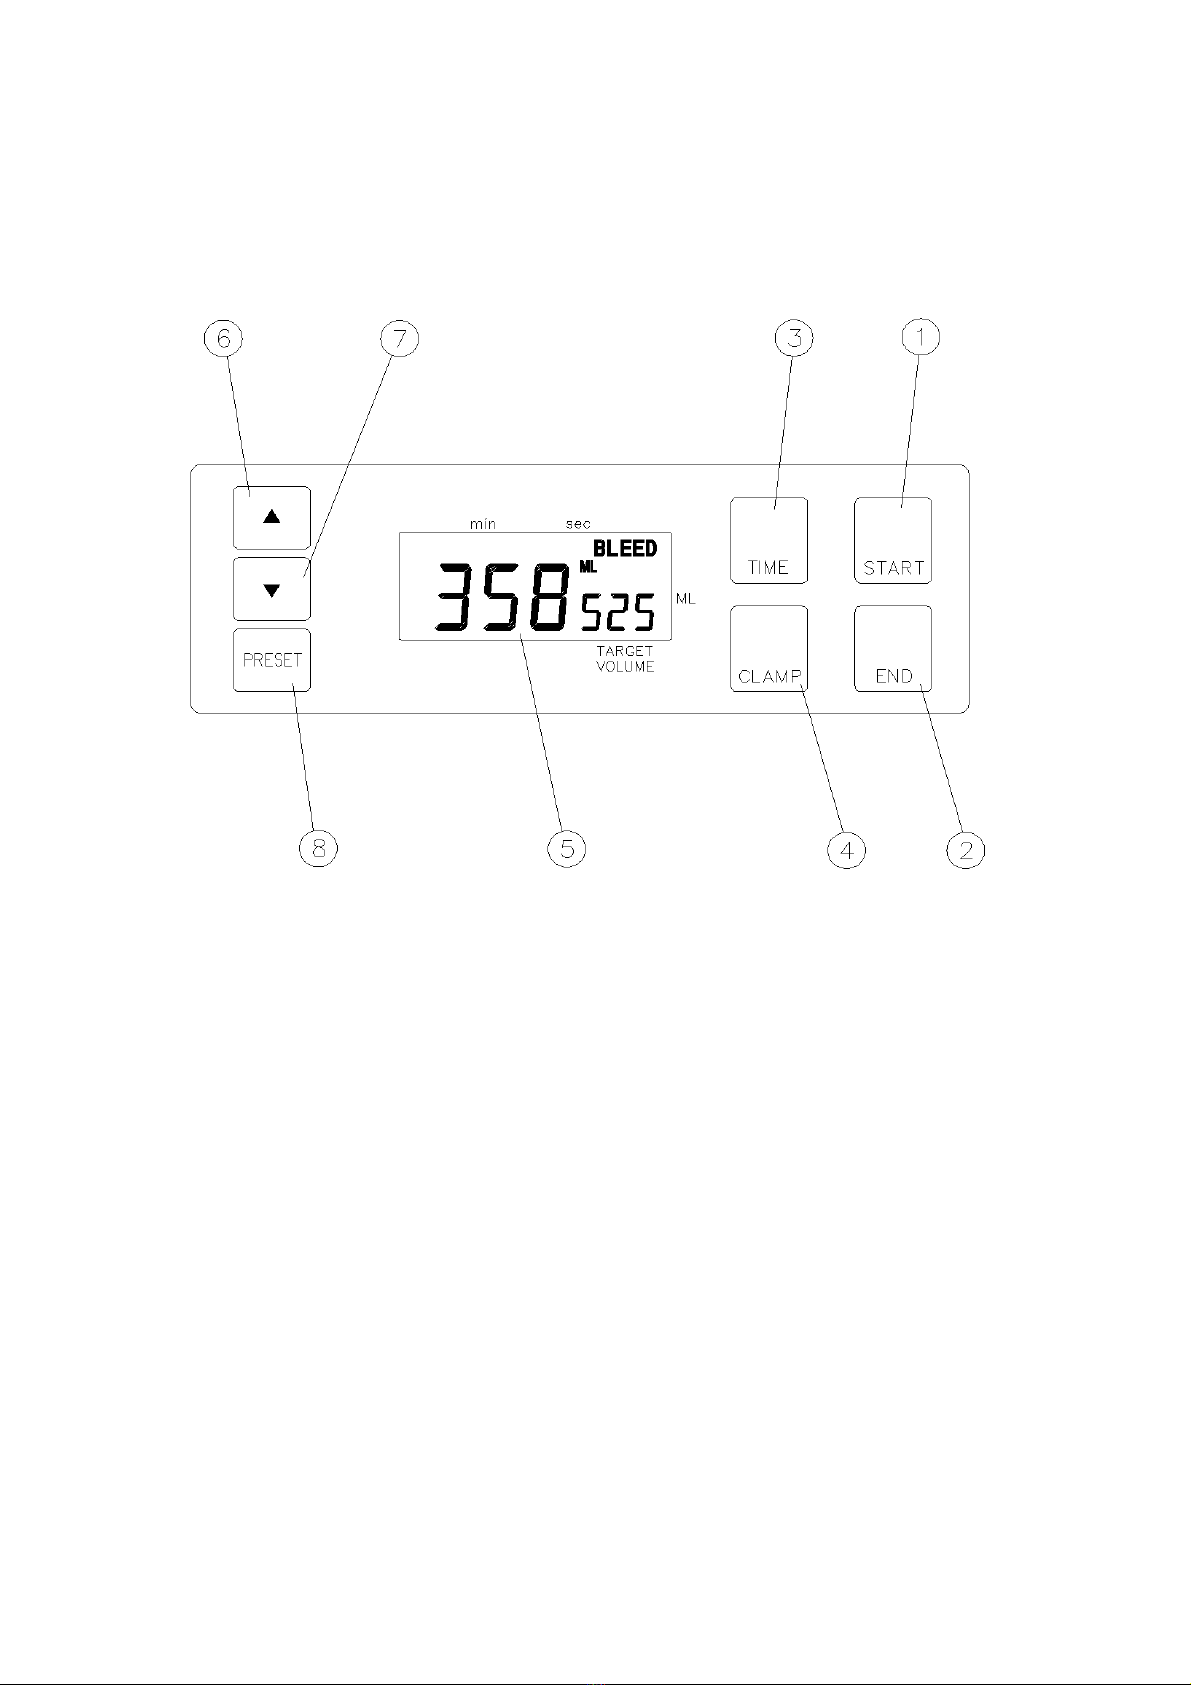
d. Target volume set
(1) Range ; 0 ~ 995 ml, with 5 ml steps
(2) Set method ; up/down and preset buttons
(3) Preset values
(*1) ; 350, 400, 450, 500 ml
(4) Default value
(*1) ; 450 ml
e. Alarms
(*2)
(1) Low battery voltage ; audible, visual alarms at low battery voltage
(2) Low flow rate ; audible, visual alarms at 30 ml/min or lower
(3) Tray removal ; audible, visual alarms at tray removal
(4) Long collection time ; beeps at 10 and 20 minutes after start
f. Tray moving
(1) Speed ; 60 RPM speed nominal, with +/- 12.5 degrees
(2) Motion mode ; 3 cycles moving - 2 seconds pause
g. Accuracy
(1) Weight calibration tolerance ; +/- 1 gram
(2) Decimal truncation error ; 1 gram/ml/sec maximum
(3) Clamp closing time delay error ; 1 gram maximum
(4) Collection volume accuracy ; - 0 ml to + 3 ml
(5) Total weight accuracy ; - 0 gram to + 3 grams
(6) Time display accuracy ; 1 second maximum
h. Controls ; POWER,START,END,TIME,CLAMP,PRESET,UP,DOWN
i. Indication panel ; custom-designed composite LCD display
j. Operating power source ; 12 volts DC battery pack or AC power adaptor
k. Battery pack ; Nickel-Cadmium rechargeable, 12 Volts DC/2AH
l. Power adaptor ; 220-240 VAC (*3), 50-60 Hz In, 18 VDC/1 Ampere Out
m. Battery charging ; by built-in charging circuit, or by separate charger unit
n. Power consumption ; 2 watts maximum
o. Dimensions ;
Equipment 11.5 L x8.0 W x5.5 H inches
29.2 L x20.3 W x14 H cm
p. Weight ;
Equipment with battery 3.2 Kg (7.0 lbs)
q. Temperature characteristics ;
Operating 0 ~ 40
oC (32 ~ 104
oF)
Storage - 20 ~ 70
oC (- 4 ~ 158 oF)
Note : (*1) These figures may vary upon user’s request.
(*2) Certain version doesn’t have 10 & 20 minutes and/or tray removal alarms.
(*3) A power adaptor of 110-120 VAC input is available as necessary.

7
CM73522UMC.0112
3. Views and Locations
3-1. Top View
(1) Control Panel
(2) LCD Display Panel
(3) Power Switch
(4) Tube Clamp Module (now mounted at left side)
(5) Tray
(6) Handle
(7) Weight Calibration Hole
(8) Tray Leveling Screw
(9) Clamp Module Connection Hole
(10) LED lamp

8
CM73522UMC.0112
3-2. Rear View
(1) Battery Pack
(2) Battery Compartment Door
(3) Power Adaptor Inlet
(4) Tray
(5) Tray Mount
(6) Handle
(7) Tube Clamp Module

9
CM73522UMC.0112
3-3. Control Panel
(1) [START] Switch
(2) [END] Switch
(3) [TIME] Switch
(4) [CLAMP] Switch
(5) LCD Display Panel
(6) [UP] Switch
(7) [DOWN] Switch
(8) [PRESET] Switch

10
CM73522UMC.0112
3-4. LCD Display Panel
(1) Main Display (Volume/Weight)
(2) Preset Target Volume Display
(3) Low Battery Indicator
(4) [ALARM] Indicator
(5) [TIME] Indicator
(6) [BLEED] Indicator
(7) [END] Indicator
(8) [ML] Indicator
(9) [GRAM] Indicator

11
CM73522UMC.0112
3-5. Tube Clamp Module
(1) Tube Clamp
(2) Guide Pin
(3) Connection Plug
(4) Mounting Screws

12
CM73522UMC.0112
3-6. Battery Charger and Adaptor
(1) Battery Charger Unit
(2) Adaptor Inlet
(3) Charging Indicator Lamp
(4) AC Power Adaptor
(5) Output Plug
(6) AC Cord Plug

13
CM73522UMC.0112
4. Functional Descriptions
[The figure in Section 3-1. Top View]
(1) Control Panel - has seven control switches and an LCD display panel.
(2) LCD Display Panel - is a custom-designed display panel on which all information
is shown.
(3) Power Switch - turns the power on and off.
(4) Tube Clamp Module - is detachable, it can be mounted at either the left or right
side of the tray. A screwdriver is necessary to move the module.
(5) Tray - is plastic molded on which blood collection bags are loaded. Tray should
be detached when mixer is stored in the carrying/transportation case.
(6) Handle - is retractable.
(7) Weight Calibration Hole - In this hole is an adjustment screw to calibrate weight
and volume as necessary.
(8) Tray Leveling Screw - makes the tray rotate.
(9) Clamp Module Connection Hole - is used when user wants to install the tube
clamp module at the right side.
(10) LED Lamp - is illuminated when the power switch is on. The LED lamp starts
flashing when collection volume reaches the preset volume at the end of normal
collection process.
[The figure in Section 3-2. Rear View]
(1) Battery Pack - is rechargeable and replaceable Nickel-Cadmium 12 VDC/2 AH.
(2) Battery Compartment Door - is opened by placing a finger in the hole and
pushing the door plate down.
(3) Power Adaptor Inlet - takes power directly from the AC power adaptor. When the
adaptor is plugged in, it supplies power to the equipment and the battery pack
will be recharged.
(4) Tray - is detachable. At the bottom of the tray attached is a magnetic pad, which
sticks to the metal Tray Mount (5).
[The figure in Section 3-3. Control Panel]
(1) [START] Switch - starts collection process. Tray starts rocking, clamp is opened,
main display shows collected blood volume in [ML].
(2) [END] Switch - completes collection process and returns machine to initial state.
Tray stops rocking, main display shows total weight on the tray in [GRAM].
(3) [TIME] Switch - When depressed, it displays elapsed time of the collection.
Time memory is cleared by pressing [START] switch to begin next collection.
(4) [CLAMP] Switch - opens and closes tube clamp. This switch does not work at the
end of a normal collection until [END] switch is pressed.
(5) LCD Display Panel - shows all figures and symbols. Refer to the Section 3-4 for
details.

14
CM73522UMC.0112
(6) [UP] Switch - increases the preset target volume by 5 ml each time pressed.
(7) [DOWN] Switch - decreases the preset target volume by 5 ml each time pressed.
(8) [PRESET] Switch - recalls one of the numbers that were factory-set. If the preset
numbers are 450 and 500 ml, the target volume displayed toggles as 500 - 450 -
500 - 450 - ... each time this switch is pressed. Power-on default figure is 500.
These preset numbers and default figure may be changed upon user’s request.
[The figure in Section 3-4. LCD Display Panel]
(1) Main Display - displays either total weight, blood volume or elapsed time. [ML],
[GRAM] or [TIME] is displayed to indicate what is being displayed.
(2) Preset Target Volume Display - has three digits. This figure is controlled by [UP],
[DOWN] or [PRESET] switch.
(3) Low Battery Indicator - is illuminated when battery requires recharging. Beep
tone sounds when this symbol is first activated.
(4) [ALARM] indicator - is illuminated when an abnormal condition occurs, such as a
slow draw. Refer to the Section 5-3 for details.
(5) [TIME] indicator - is illuminated only when the [TIME] switch is depressed. The
main display shows the elapsed time in [min : sec].
(6) [BLEED] indicator - is illuminated while blood collection is in progress. When the
[START] button is depressed, this indicator is on and [ML] is on too. This indicator
goes off and [GRAM] is on when the [END] button is depressed.
(7) [END] indicator - is illuminated when the collection is completed. When the
collected volume reaches the preset target volume, this indicator is illuminated.
The tube clamp closes and beeps sound. The front LED lamp also flashes.
(8) [ML] indicator - is illuminated when the [START] button is depressed. It means the
main display is now showing ‘net’ volume of blood collected in the blood bag in
milliliters.
(9) [GRAM] indicator - is illuminated when the machine is not in collection process. It
means the main display is now showing total weight loaded on the tray in grams.
[The figure in Section 3-5. Tube Clamp Module]
(1) Tube Clamp - presses blood bag tubing to stop blood flow. This clamp is opened
and closed by [CLAMP] switch except at the end of a normal collection. The
[END] switch must be pressed to indicate completion of the collection cycle, then
[CLAMP] switch is enabled to work. The clamp is automatically opened when the
[START] switch is pressed to start collection. It is automatically closed at the end
of collection, or when the [END] switch is pressed.
(2) Guide Pins - keep the blood bag tubing in proper position.
(3) Connection Plug - is a circular connector.
(4) Screws - should be removed to move the module to the other side.

15
CM73522UMC.0112
[The figure in Section 3-6. Battery Charger and Adaptor]
(1) Battery Charger Unit - is a power supply source to recharge the battery pack. The
Output Plug (5) of the AC Power Adaptor (4) is plugged in the Adaptor Inlet (2).
(3) Charging Indicator Lamp - is on during recharging. If the battery is removed from
the charger unit, the lamp will be off.
(4) AC Power Adaptor - converts the AC main line voltage to 18 VDC output.

16
CM73522UMC.0112
5. How to Use Equipment
5-1. Preparation before Use
(1) Open carrying bag and unpack mixer, tray, battery and AC adaptor.
(2) Insert battery pack into the compartment and close the door.
To operate the equipment by AC power, plug the AC power adaptor in the inlet
on the rear panel.
[Note 1] When both the battery and the AC power adaptor are connected together,
the adaptor supplies operating power and the battery is under recharging.
(3) Put the tray onto tray mount.
(4) Empty the tray, then turn power on.
* The tray rocks once.
* LED lamp is lit.
* LCD panel displays ‘29’ or ‘28’, then it counts down to ‘0’.
[Note 2] If anything is put on the tray when power is turned on, it is tared at zero
count. Tared weights must remain on the tray throughout the procedures.
If any weight is removed, total weight will have an error of an equal
amount.
(5) Wait for 30 seconds until main display registers ‘0’.
* [GRAM] appears to indicate the number displayed is weight in grams.
(6) Equipment is now ready to use.

17
CM73522UMC.0112
5-2. Operating Procedures
(1) Set target collection volume with the [PRESET]-[UP]-[DOWN] buttons.
(2) Place blood collection bag on tray.
(3) Route blood collection bag tubing through tube clamp.
[Note 3] The tubing length from the clamping point to the blood bag should not
be shorter than 30 centimeters (1 ft) to ensure proper rocking movement.
(4) Press [CLAMP] button to close tube clamp.
(5) Prepare phlebotomy site and stick donor.
(6) Press [START] button.
* Tube clamp is opened and the blood begins to flow into blood bag.
* Tray starts rocking.
* [BLEED] indicator is on.
* [ML] appears to indicate the number displayed is ‘net’ volume of
blood collected in blood collection bag, represented in milliliters.
[Note 4] Weight of blood bags and anti-coagulant, and any weights put on
tray are tared when [START] is pressed. All tared weights must remain
on the tray until the collection cycle ends. If any weights are removed,
blood volume will have an error of an equal amount.
[Note 5] Do not touch the tray or blood collection bags during the collection.
If the tray is pushed down, sensed weight may exceed the preset target
volume, then the clamp will close. When this happens, press [CLAMP]
button to re-open the clamp and continue collection. DO NOT press
[END] button, as it will clear the volume previously collected.
[Note 6] When the collected blood volume reaches 20 ml below the preset
target volume, the tray stops rocking until the preset target volume is
reached. This process assures accurate collection with a 1-2 ml tolerance.
For example, if the target volume is set at 500 ml, the tray stops rocking
at 480 ml and resumes rocking when the tubing is clamped at 500ml.

18
CM73522UMC.0112
[Note 7] If blood flow rate is slow, lower than 30 ml per minute, and remains
low for 1 minute, audible beeps will sound and the [ALARM] indicator
will be activated. Check donor phlebotomy site to ensure blood flow is
adequate. The beep will repeat once every minute until the flow is
higher than 30 ml per minute.
When the collected volume reaches the preset target volume, the collection
ends.
* The tube clamp closes.
* The tray resumes rocking.
* LED lamp starts flashing.
* The [END] indicator appears to show that the collection is finished.
* The [ML] indicator remains on to show the main display indicates
the net volume of blood in milliliters.
* Beeps sound. The beeps will repeat once every 30 seconds until
[END] button is pressed.
* The [CLAMP] button will not work until [END] button is pressed.
(7) Press [END] button.
* The tray stops rocking.
* The LED lamp stops flashing and remains lit.
* The [GRAM] indicator appears again to indicate the number displayed
is total weight loaded on the tray, represented in grams.
[Note 8] Depressing [TIME] button displays donation draw time on main display.
(8) Crimp blood bag tubing and remove phlebotomy needle from the donor.
(9) Press [CLAMP] button to open clamp and remove blood bags.

19
CM73522UMC.0112
5-3. Audible Alarm Signals
Different audible alarms are generated by a buzzer to indicate that the attention of the
phlebotomist is required.
A. End of normal collection:
----- activated when collection ends normally.
FollowSection5-2-(7).
----- Three long beeps (1 second long each) each 30 second interval
* Press [END] button. Beeps stop and LED lamp stops flashing.
* Crimp blood bag tubing and remove phlebotomy needle.
* Press [CLAMP] button to open clamp and remove blood bags.
B. Slowbleed:
----- activated when blood flow is slower than 30 ml/minute.
Refer to Section 5-2-[Note 7].
----- Five short beeps (once a second, half second long) each 1 minute interval
* Check needling and phlebotomy site to ensure flow is adequate.
* To continue collection, do not press any button. DO NOT press
[END] button as it will clear the volume previously collected.
Remove the reason of slow bleed.
* To end collection, press [END] button.
C. Lowbattery:
----- activated when battery is exhausted.
RefertoSection5-4.
----- One very long beep (5 second long) only once
* Recharge the battery, or connect the AC power adaptor.
Table of contents