manuals.online logo
Brands
  1. Home
  2. •
  3. Brands
  4. •
  5. Century Hearth
  6. •
  7. Wood Stove
  8. •
  9. Century Hearth FW270007NB User manual

Century Hearth FW270007NB User manual

Tuyau de cheminée 6 po
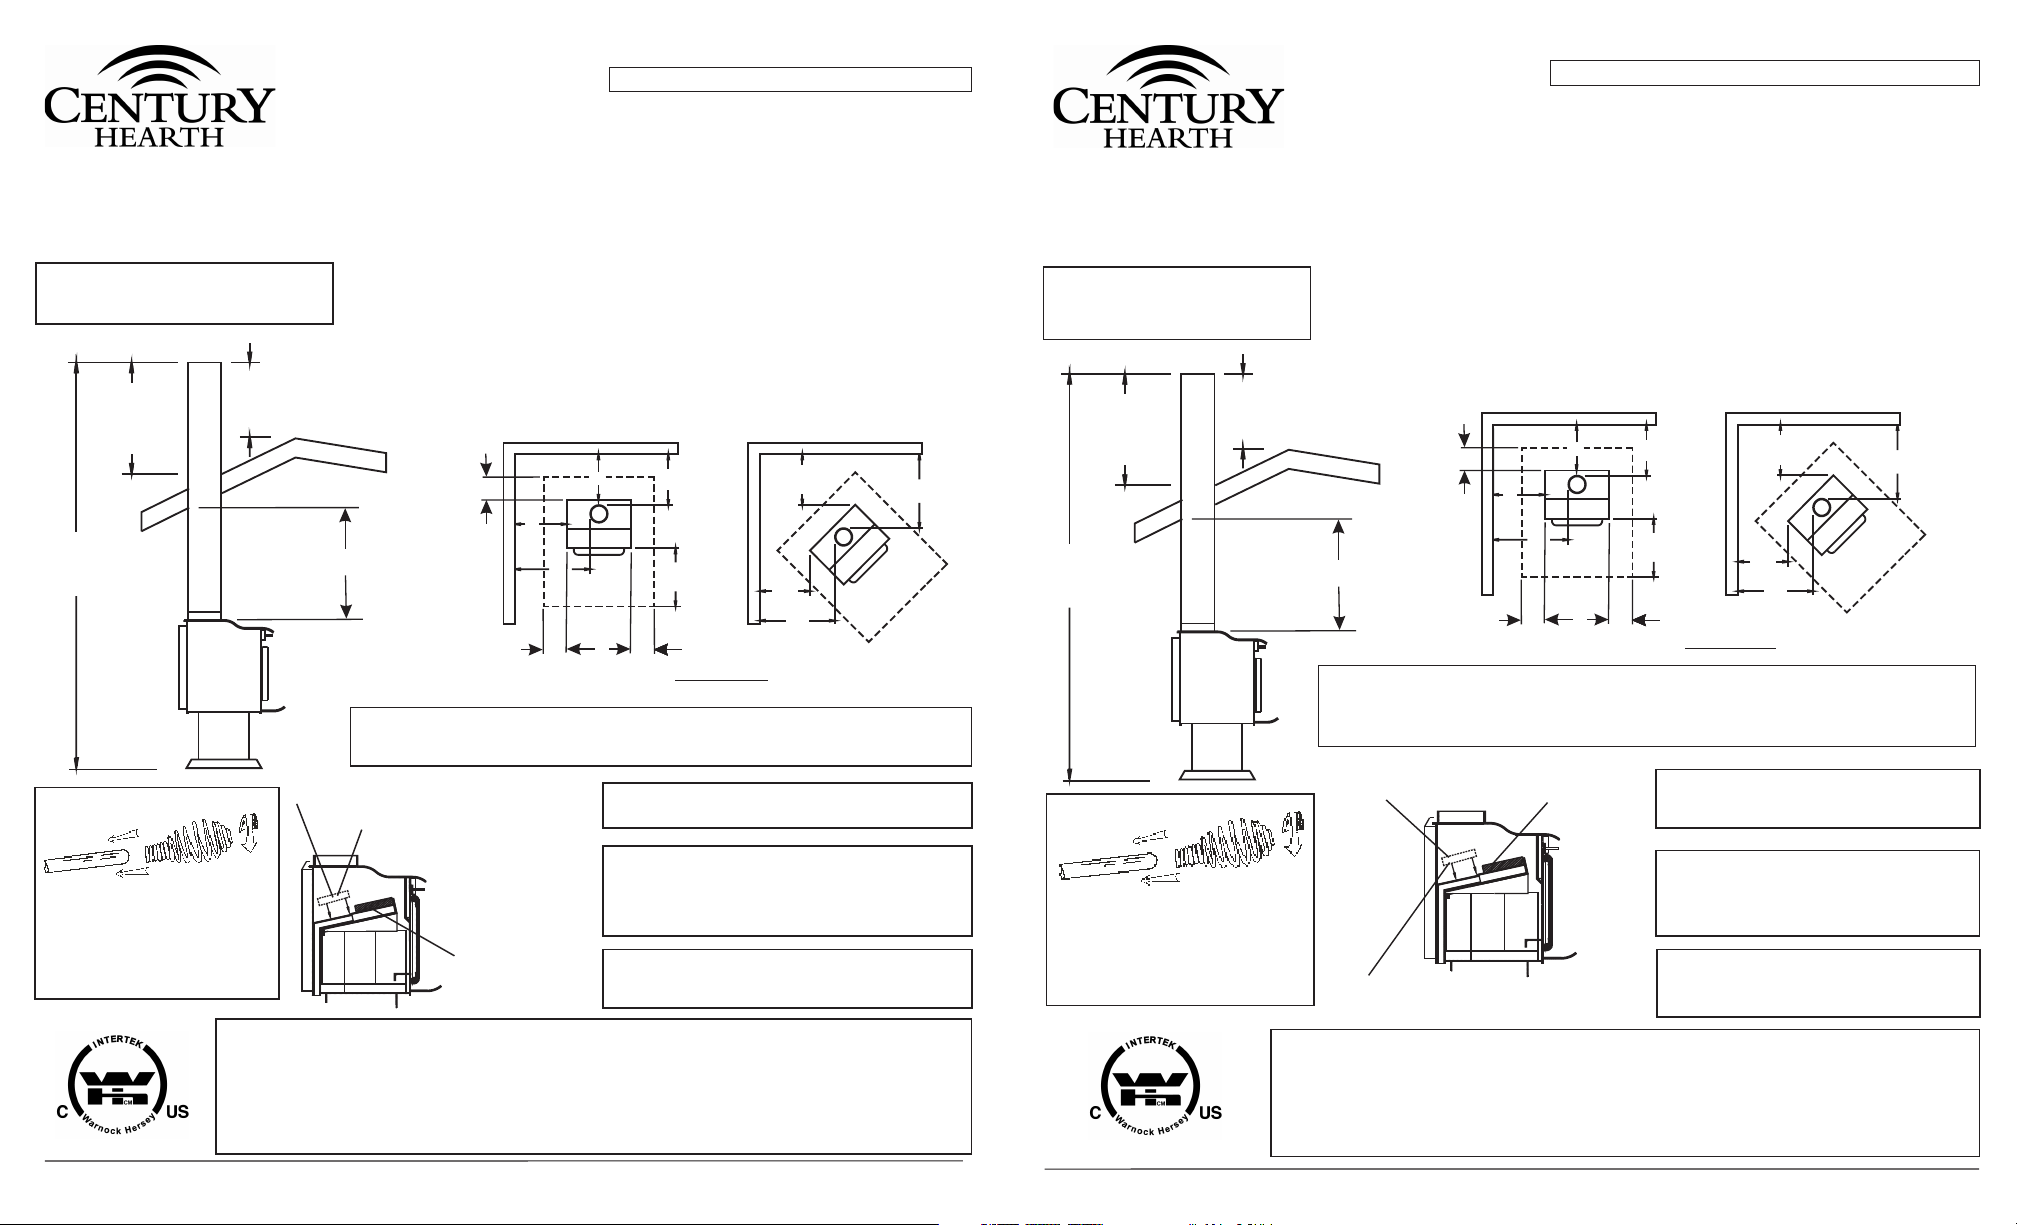
S c h é m a A :
D é g a g e m e n t e n t r e l e p o ê l e e t l e s matériaux combustibles.
Depuis le poêle Depuis le manchon de raccord
Mur latéral.........17-1/2po (444 mm) Mur latéral...................28po (711 mm)
Mur arrière...............13po (330 mm) Mur arrière.............15-1/2po (394 mm)
Coin..........................11po (279 mm) Coin..............................22po (559 mm)
Plafond...................54-1/2po (1422 mm)
A D
B E
C F
G
Modèle No. FW270007NB
Cet appareil a été enregistré Warnock Hersey
Ltée comme respectant ou dépassant les
normes ULC S-627 Canada et UL 1482 U.S.
Lire avec soin les instructions suivantes avant d’installer le poêle Modèle FW270007NB
non catalytique. Ce poêle respecte les limites d’émission pour les poêles à bois fixées par
l’agence Américaine de protection de l’environnement.Dans des conditions spécifiques, ce
poêle dégage entre 10,370 et 29,301 BTU à l’heure.
Une espace de 18 po (457 mm) jusqu’au reccord de la cheminée peut
être éxigé par le corps constitute ayant jurisdiction.
No De Piéce 90000159 Rev. 01
NOTA: Gardez cette feuille pour consultation future.
Informez-vous auprès de l’inspecteur en
bâtiment de votre localité pour savoir si
un permis est requis.
BE
*16
**18”
A
D
8” 8”
8”
Mur Arrière
Mur Latéral
Mur Arrière
CF
C
F
Mur Latéral
Shéma “A”
* États-unis
** Canada
3pi(1M)min. Du
point de
pénétration
dans le toit
2pi (635mm) min. plus élevé que
le point le plus proche du toit dans
un rayon de 10 pi(3M).
Hauteur min. De
15 pi (5M) à partir
du plancher
G
Le poêle doit être installé sur un plancher ininflammable, équivalent a 3/8 po “millboard”.
Protecteur pour le plancher faut etre une minimal R evaluer de .893 Informezvuos auprès de
l’inspecteur en bâtiment de batiment de votre localité pour determiner si un permis est requis.
MISE EN GARDE: Ne pas ouvrir la porte pare-feu à un
endroit où elle toucherait le mur latéral combustable.
VENTILATEUR FACULTATIF
Il est possible d’obtenir un ventilateur servant à l’échange
de chaleur avec cet appareil de chauffage au bois. Pour
le commander, voyez le distributeur local auprès de qui
vous avez acheté votre appareil.
ATTENTION: UNE BRIQUE SPÉCIALE POUR
LE CENDRIER DOIT ÊTRE INSTALLÉE AVANT
L’UTILISATION DU P0ÊLE
POIGNÉE Â RESSORT
Visser la poign ée à ressort dans le
sens contraire des aiguilles d’une
monte tout en poussant; la poignée
bloquera à la position voulue.
FABRIQUÉ AU CANADA PAR CFM Corporation, 410 Admiral Boulevard, Mississauga, ON L5T 2N6 800-668-5323 www.cfmcorp.com
ASSUREZ VOUS DE BIEN INSTALLER
DEUX BRIQUES ENTIÈRES DANS LE
DÉFLECTEUR TEL QUE MONTRÉ CI
DESSUS (S16040)
2 BRIQUES COMPLÈTES
DÉFLECTEUR
Réglages Du Volet D’admission D’air
Taux de combustion désiré Reglage du volet d’admission d’air **Chaleur dégagée en BTU (approx.)
Faible Fermé 10,370
Moy. / Faible Ouvert ¼ po 12,420
Moy. / fort Ouvert ¾ po 15,676
Fort rande Ouvert 29,301
**La performance peut varier selon les conditions réelles d’utilisation dans la maison.
Este manual describe la instalación y el funcionamiento de los modelos FW270007NB
de los calefactores a leña no cateraliticos. Este calefactor cumple con lo establecido
por la Agencia Federal Protección Ambiental de EE UU sobre los limites de emisións
de los calefactores a leña. Se ha demostrado que, en condiciones especificas, este
calefactor irradia calor a razón de entre 10.370 y 29.301 btu por hora.
Modelo No. FW270007NB
Warnock Hersey Limited ha incluido esta
unidad en la lista de calefactores que
cumplen o superan los requisitos de las
normas S-627 de ULC de Canadá y 1482
de UL de EE UU.
Art No S90000159 Rev 01
NOTA: Conserve este hoja para consultarla en el futuro
Antes de la instalación, conslte con la
inspecttoría de construcción civil local.
Es posible que en su zona se necesite
obtener un permiso.
Figura A: Espacio libre para construcciones de material combustible
De Calentadora De Conectorde Chimenea
Rincón..........................11” (279 mm) Rincón............................22” (559 mm)
Techo........................54-1/2” (1384 mm)
A D
B E
Pared lateral..........17-1/2” (444 mm) Pared lateral....................28” (711 mm)
Pared posterior............13” (330 mm) Pared posterior..........15-1/2” (394 mm)
C F
G
ES POSIBLE QUE LAS NORMAS DE LAS AUTORIDADES CORRESPONIENTES EXIJAN DEJAR
UN ESPACIO LIBRE 18” (457mm) AL TUBO DE EMPALME DE LA CHIMENEA.
Se necesita un humero de 6”
* Estados unidos
** Canadá
BE
*16
**18”
A
D
8” 8”
8” CF
C
F
PARED POSTERIOR
PARED LATERAL
PARED POSTERIOR
PARED LATERERAL
Figura “A”
La unidad dede ser colocada sobre un protector incombustible para el piso, equivalente a un cartón de
pasta de pasta de madera 3/8”.
El protector del piso dede tener un valor R mínimo de 0,893.
Para mayor información, consulte con la inspectoría de construcción civil local.
Advertencia: No abra la puerta cortafuego
hasta un punto tal que entre en contacto con
la pared lateral de material combustible.
VENTILADOR OPCIONAL
Disponemos de un ventilador de intercambiador
de calor, opcional, para este calefactor a leña.
Si desea pedirlo, sírvase comunicarse con el
distribuidor local donde adquirió este aparato
MOLDURA ORNAMENTAL DE NICKEL
Recuerde que debe retirar el revestimiento
plástico una vez instalado una vez instalado el
cafefactor a leña.
HECHO EN CANADA POR CFM Corporation, 410 Admiral Boulevard, Mississauga, ON L5T 2N6 800-668-5323 www.cfmcorp.com
MANGO
MANGOGire el resorte para el en
sentido contrario a las agujas del reloj,
a la vez que lo presiona contra éste. El
resorte el mango se enroscará hasta la
posicion deseada.
Graduación de los Reguladores de Entrada de Aire
Nivel deseado de combustión Graduación de la entrada de aire Salida aproximada on BTU**
Bajo Totalmente cerrada 10.370
Mediano / bajo Abierta en 1/4 12.420
Mediano / alto Abierta en 3/4 15.676
Ato Totalmente abierta 29.301
**El rendimiento puede variar, dependiendo de las condiciones de funcionamento reales de la casa.
2 ladrillos enteros Unidad del deflector
Recuerde que debe instalar 2 ladrillos enteros
(S16040) en el deflector, como se ilustra.
Distancia mínima
de 3 pies (1m)
desde el punto
de penrtratión en
el techo.
2 pies (610mm) por encima del
punto más alto más cercano al
techo, en un radio de 10 pies (3m).
Altura total mimima
desde el pisco:
15pies (5m)
G
This manual describes the installation and operation of the Model FW270007NB non-catalytic wood
heater. This heater meets US Environmental Protection Agency’s emission limits for wood heaters.
Under specific conditions this heater has been shown to deliver heat at rates ranging from 10,370 to
29,301 BTU per hour.
6” Flue Required
Figure A: Clearance from combustible constructions
From Heater From Chimney Connector
Sidewall..........17-1/2” (444 mm) Sidewall.................28” (711 mm)
Backwall...............13” (330 mm) Backwall................15-1/2” (394 mm)
Corner...................11” (279 mm) Corner....................22” (559 mm)
Ceiling....................54-1/2” (1384 mm)
A D
B E
C F
G
Model No. FW270007NB
This unit has been listed by Warnock Hersey
Limited to meet or exceed ULC S-627
Canada and UL 1482 U.S.
Part No 90000159 Rev 01
NOTE: Retain this sheet for future reference
A minimum clearance of 18” (457mm) to the chimney connector
may be required by the authority having jurisdiction.
MADE IN CANADA BY CFM Corporation, 410 Admiral Boulevard, Mississauga, ON L5T 2N6 800-668-5323 www.cfmcorp.com
Unit must be placed on a noncombustible floor protection equivalent to 3/8” millboard.
Floor protector must have min. R value of .893
Consult your local building authorities for further information.
Contact your local building inspector
prior to installation.
A permit maybe required in your area.
HANDLE
Twist spring handle in counter
clockwise motion while pushing on to handle;
spring handle will “thread” down to desired
location.
SPRING CAUTION: BRICK FOR ASH DRAWER
MUST BE INSTALLED BEFORE
OPERATION OF WOOD HEATER
OPTIONAL FAN
An optional heat exchange blower is available for this
wood burning appliance. To order please see the local
dealer where you purchased your appliance.
CAUTION: Do not open fire-door to a point where it
would be in contact with the combustible sidewall.
3FT(1M) MIN
FROM ROOF
PENETRATION
MINIMUM OVERALL
HEIGHT FROM FLOOR
15FT(5M)
G
2ft(635mm) HIGHER THAN
NEAREST POINT OF
ROOF WITHIN 10ft(3M)
BE
A
D
8”(203mm)
BACK WALL
SIDE WALL
BACK WALL
C
F
C
F
SIDE WALL
Figure “A”
*16
**18
*16”(406mm) U.S.A.
**18”(457mm) Canada
8”(203mm)
8”(203mm)
Inlet Air Control Settings
Desired Burn Setting Inlet Air Setting **Approx. BTU Output
Low Closed Fully 10,370
Med / Low ¼ Open 12,420
Med / High ¾ Open 15,676
High Fully Open 29,301
**Performance may vary depending on actual home operating conditions
2 FULL BRICKS
BAFFLE ASSEMBLY
BE SURE TO INSTALL TWO
FULL BRICKS (S16040) IN
BAFFLE AS SHOWN
DESCRIPTION
PARTS LIST
1
DOOR ASSEMBLY
1
DOOR - NO GLASS
2&3
GLASS AND GASKET
31/8” GLASS GASKET
4
SPRING HANDLE
5
AIR CONTROL SPRING HANDLE
6
5/8” DOOR GASKET
7
GLASS CLIP
SCREW
9
HINGE PIN
10
PUSH NUT
11
FIREBRICK LT 9”x4-7/16”x1-1/4”
12
FIREBRICK LT 4-1/2”x4-7/16”x1-1/4”
13
FIREBRICK LT - ANGLED
14
15
ITEM NO. QTY
DESCRIPTION
NO. LISTE DES PIÉCES
PORTE MONTÉE
PORTE - SANS LA VITRE
VITRE DE JOINT D’ÉTANCHEITÉ
JOINT DE LA VITRE 1/8po
POIGNÉE À RESSORT
POIGNÉE POUR L’ADMISSION D’AIR
JOINT DE LA PORTE 5/8po
FERRURE POUR LA VITRE
VIS
GOUPILLE DE CHARNIÈRE
ÉCROU À RESSORT
BRIQUE 9”x4-7/16”x1-1/4”
BRIQUE 7-1/4”x4-7/16”x1-1/4”
BRIQUE - COUPLÉE EN ANGLE
LEYENDA NO.
DESCRIPCIÓN
NO.de PC
LISTA DE PIEZAS
1
UNIDAD DE PUERTA S31139
1
UNIDAD DE PUERTO SIN VIDRIO S41091
1
VIDRIO Y EMPAQUETADURA S31141
4.3’
EMPAQUETADURA DE 1/8” PARA EL VIDRO S15001
1
MANGO CON RESORTE 90000069
1
MANGO CON RESORTE PARA EL REGULADOR DEL AIRE 90000070
5.1’
EMPAQUETADURA DE 5/8” PARA LA PUERTA S15011
1
PRESILLA PARA EL VIDRIO
S37026
7
TORNILLO S11086
2
PASADOR DE BISAGRA S11005
2
UNIDAD DEL DEFLECTOR S11090
LADRILLO REFRACTARIO LT 9”x4-7/16”x1-1/4”
LADRILLO REFRACTARIO LT 7-1/4”x4-7/16”x1-1/4” 4
LADRILLO REFRACTARIO LT - ANGULADO
S16043
12
S16040
S16042
2
QTÉE
CANT.
ART NO.
PART NO.
8
GLASS CLIP
FIREBRICK LT 7-1/4”x4-7/16”x1-1/4”
FIREBRICK LT 4-7/16”x2-3/4”x1-1/4”
FIREBRICK FOR ASH DRAWER
ASH DRAWER ASSEMBLY
FERRURE POUR LA VITRE
PRESILLA PARA EL VIDRIO
2 S37018
BRIQUE 4-1/2”x4-7/16”x1-1/4”
BRIQUE 4-7/16”x2-3/4”x1-1/4”
LADRILLO REFRACTARIO LT 4-1/2”x4-7/16”x1-1/4”
LADRILLO REFRACTARIO LT 4-7/16”x2-3/4”x1-1/4”
BRIQUE POUR LE CENDRIER
LADRILLO PARA DEPÓSITO DE CENIZAS
L’ASSEMBLEE DE TROIR DE CENDRE ASAMBLEA DE CAJON DE CENIZA
S16046
S16224
S16214
90000110
1
1
1
1
16
17
18
12 12 12 12
12 12
12 12
13 13 13 13
14
15 15
17
16
Brick Pattern
Disposition Des Briques
Diseño De Colocación De Los Ladrillos
123
7
54
8
9
1
10
11
19
20
NICKEL BODY TRIM
NICKEL ASH FENDER TRIM
GARANTURE DU BOÎTIER EN NICKEL
GARANTURE DU GARDE-FEU EN NICKEL
MOLURA DE NÍQUEL PARAEL CUEPO DEL CALEFACTOR
MOLURA DE NÍQUEL DEL PROTECTOR CONTRA LA CENIZA
90000112
90000113
1
1
6
18
20
19
Complete Brick pack part number - S16054 & S16039

Other Century Hearth Wood Stove manuals

Century Hearth S241EP User manual

Century Hearth

Century Hearth S241EP User manual

Century Hearth FW270029 User manual

Century Hearth

Century Hearth FW270029 User manual

Century Hearth S244E User manual

Century Hearth

Century Hearth S244E User manual

Century Hearth FW350016 User manual

Century Hearth

Century Hearth FW350016 User manual

Popular Wood Stove manuals by other brands

Heta SCAN-Line 1000 Series Operating and installation instructions

Heta

Heta SCAN-Line 1000 Series Operating and installation instructions

Cast Tec ALBERG 7 Installation and operating instructions

Cast Tec

Cast Tec ALBERG 7 Installation and operating instructions

LINE STOVES X101 SL instruction manual

LINE STOVES

LINE STOVES X101 SL instruction manual

Panadero BRIC-50 Usage and maintenance instructions

Panadero

Panadero BRIC-50 Usage and maintenance instructions

Eureka 2572200 instruction manual

Eureka

Eureka 2572200 instruction manual

HASE MERIDA - Instructions for use

HASE

HASE MERIDA - Instructions for use

Vermont Castings WR1000L02 owner's manual

Vermont Castings

Vermont Castings WR1000L02 owner's manual

Regency F2400 Brochure & specs

Regency

Regency F2400 Brochure & specs

Travis Industries Lopi Answer installation instructions

Travis Industries

Travis Industries Lopi Answer installation instructions

Osburn OB01613 Installation and operation manual

Osburn

Osburn OB01613 Installation and operation manual

barbas UNILUX-6 70 Instructions for use & maintenance manual

barbas

barbas UNILUX-6 70 Instructions for use & maintenance manual

Nibe Contura C 720T installation instructions

Nibe

Nibe Contura C 720T installation instructions

Drolet DECO II Installation and operation manual

Drolet

Drolet DECO II Installation and operation manual

RAIS Q-TEE user manual

RAIS

RAIS Q-TEE user manual

Nibe Contura C 570 installation instructions

Nibe

Nibe Contura C 570 installation instructions

Invicta OVATIO Installation and user guide

Invicta

Invicta OVATIO Installation and user guide

Jolly Mec MATISSE 6 kW Instructions for installation, use and maintenance manual

Jolly Mec

Jolly Mec MATISSE 6 kW Instructions for installation, use and maintenance manual

Quadra-Fire 3100 Series owner's manual

Quadra-Fire

Quadra-Fire 3100 Series owner's manual

manuals.online logo
manuals.online logoBrands
  • About & Mission
  • Contact us
  • Privacy Policy
  • Terms and Conditions

Copyright 2025 Manuals.Online. All Rights Reserved.