CES 4700VP User manual

Model 4700VP
Versatile Telephone Interconnect
CES Wireless Technologies
925-122 South Semoran Blvd., Winter Park, FL 32792
(407) 679-9440
MAN71 Version 1.6
Friday, August 20, 2010
Printed in USA

CES SUPPORT 407-679-9440 Page 2MAN71© CES 2010
Table of Contents
INTRODUCTION........................................................................................................................................................................... 5
1.0 GENERAL DESCRIPTION .................................................................................................................................................. 6
2.0 INSTALLATION INSTRUCTIONS .................................................................................................................................... 7
2.1 GENERAL INFORMATION......................................................................................................................................................... 7
2.2 MATERIAL AND EQUIPMENT REQUIRED FOR INSTALLATION................................................................................................. 7
2.3 MECHANICAL INSTALLATION................................................................................................................................................. 7
2.4 ELECTRICAL INSTALLATION................................................................................................................................................... 7
2.5 COMPONENT LAYOUT............................................................................................................................................................. 8
2.6 RADIO INTERFACE CONNECTION............................................................................................................................................ 9
2.7 JUMPER SELECTIONS............................................................................................................................................................... 9
Internal COR Mobile Detector (R55)..................................................................................................................................11
DTMF RX (R51).................................................................................................................................................................... 11
Receive Audio (R50).............................................................................................................................................................. 11
Transmit Audio (R43) ........................................................................................................................................................... 11
Repeat Audio (R52)............................................................................................................................................................... 11
VOX (R42)............................................................................................................................................................................. 11
Regenerated DTMF -Phone Tone (R53)............................................................................................................................. 11
Ringout and Beeps -Radio Tone (R54) .............................................................................................................................. 11
3.0 PROGRAMMING PROCEDURES...................................................................................................................................12
3.1 PROGRAMMING THE 4700VP............................................................................................................................................... 12
3.2 LOCAL PROGRAMMING ........................................................................................................................................................ 12
3.3 PROGRAMMING PARAMETERS EXPLAINED........................................................................................................................... 12
Speed Dial Locations (01# through 25#)............................................................................................................................. 12
Factory Defaults Settings (30#)............................................................................................................................................ 12
Lead in Delay (31#).............................................................................................................................................................. 12
Mobile Activity Timer (32#).................................................................................................................................................. 13
Call Limit Timer (33#).......................................................................................................................................................... 13
CWID Time Interval (34#).................................................................................................................................................... 13
Repeater Hang Time (35#)................................................................................................................................................... 13
COR (40#) ............................................................................................................................................................................. 13
External COR Polarity (41#)................................................................................................................................................ 14
CTCSS Polarity Logic Input (42#)....................................................................................................................................... 14
Gate COR with CTCSS (43#)................................................................................................................................................ 14
DTMF Regeneration (45#)................................................................................................................................................... 14
Repeat Mode Enable (46#)................................................................................................................................................... 15
Rroger Beep (47#).................................................................................................................................................................15
CW ID Interval (49#)............................................................................................................................................................ 15
Mode of Operation (50#)...................................................................................................................................................... 15
Sample Rate for Sample Mode and for VOX active (51#)................................................................................................... 16
Sample Rate for VOX Inactive (52#).................................................................................................................................... 16
Maximum Vox Timer (53#)................................................................................................................................................... 16
Vox Hang Time (54#)............................................................................................................................................................ 16
Sampling Window Setup (55#) ............................................................................................................................................. 16
Dialing mode (56#)............................................................................................................................................................... 17
Ignore COR to Ring Out (57#)............................................................................................................................................ 17
Answering a Call (58#)........................................................................................................................................................ 17
Hook Flash Period (59#)...................................................................................................................................................... 17
Connect / Access Code (60#)................................................................................................................................................ 17
Toll Restrict Override Code (61#)........................................................................................................................................ 17
Remote Programming Code (62#) ....................................................................................................................................... 18
Speed Dial Remote Program Code (63#)............................................................................................................................. 18
CW ID Call Letters (64#)...................................................................................................................................................... 18
Toll Restrict (70# ~ 79#)....................................................................................................................................................... 18

CES SUPPORT 407-679-9440 Page 3MAN71© CES 2010
Last Number Re-dial (0#)..................................................................................................................................................... 19
4.1 CIRCUIT DIAGRAM............................................................................................................................................................ 22
5.1 USER CODE CHART............................................................................................................................................................23
6.2 AMENDMENTS....................................................................................................ERROR! BOOKMARK NOT DEFINED.

CES SUPPORT 407-679-9440 Page 4MAN71© CES 2010
Warranty
CES Wireless Technologies warrants this product to be free from defects in material and workmanship for three
years from date of shipment. If such malfunction occurs, it will be repaired or replaced (at our option) without
charge for materials or labor if returned to the factory. This warranty does not apply to parts damaged due to
improper use-including accident, neglect, unreasonable use, and improper installation -or to unauthorized
alterations or modifications of the equipment. It does not extend to damage incurred by natural causes such as
lightening, fire, floods, or other such catastrophes, nor to damage caused by environmental extremes, such as power
surges and or transients. It does not extend to microprocessors if is determined that the failure of a micro is due to
static damage, application of improper voltages to the unit, or other problems nor related to circuit design. In such
case or in the case of a desire to update the micro to a different version of software, such request must be specified
in writing, and there will be a charge agreed upon by both parties.
This product is warranted to meet published specification and to operate as specified only when properly installed in
radio equipment which complies with US FCC specification and the applicable radio manufacturer’s specifications.
CES is not responsible for any operational problems caused by system design, outside interference, or improper
installation. Installation and programming of this CES product must be completed by a qualified two-way radio
technician or engineer.
Equipment for repair may be returned to the factory, freight prepaid, only with prior authorization. Please call 407-
679-9440 for an RMA number. A brief letter describing the nature of the defect should be included with the
merchandise. Repair by other than CES will void this guarantee. In-warranty merchandise must be shipped, freight
prepaid, to CES. CES will return the repaired or replaced equipment to purchaser, within the United States.
This warranty applies to the original purchaser of the equipment only. CES is not liable under this warranty, or any
implied warranty, for loss of use or for other consequential loss or damage experienced by the purchaser. Some
states do not permit the exclusion or limitation of implied warranties or consequential damages. This warranty
provides special legal rights, and the purchaser may have other rights that vary from state to state.
Copyright
The information in this manual, and any software in this product remains the property of CES. Reproduction,
duplication, or disclosure is not permitted without the prior written consent of CES. CES reserves the right to
change products, specifications, and installations data at any time, without notice.
All information contained in this document is carefully prepared and offered in good faith as a guide in the
installation, operation, use and servicing of our products. Installers must insure that the final installation operates
satisfactory, within relevant regulatory requirements. We accept no responsibility for incorrect installation.
ARIS™, autoCALL™, Smart Sampling™ and Veratec™ are trademarks of CES
LTR™ is a registered trademark of E.F. Johnson Company
Smartnet™ is a trademark of Motorola Communications
Windows and Windows ‘95 is a registered trademark of Microsoft
IBM is a trademark of International Business Machines
Call Waiting is a registered trademark of Bell South
A CES PUBLICATION Copyright CES 1996-2010

CES SUPPORT 407-679-9440 Page 5MAN71© CES 2010
Introduction
Thank you for choosing the 4700VP Telephone Interconnect.
The 4700VP is but one of a range of premium telephone interconnect products from CES. This product family
offers a complete suite of devices to choose from in order to provide the necessary level of functionality for a given
system requirement.
This product has been carefully engineered and manufactured to provide reliable service in virtually any wireless
communications system. Occasionally, particular systems may require special functions not available in standard
products. Please call your CES Applications Engineer to discuss special applications to meet other needs.
Because we are engaged in a program of continual product development, the specifications and descriptions outlined
in this manual are subject to change. Please consult the amendment section for changes.
When you call CES for support, you will be asked for the version number of this manual. A manual is shipped free
with each 4700VP. If you do not have a manual, we are unable to provide telephone support. Manuals can be
ordered from the CES Sales Department.
At CES, we strive to bring you products that meet your needs. If you have any comments about our products,
manuals or service please call CES at 407 -679-9440, and thank you for your continued support.

CES SUPPORT 407-679-9440 Page 6MAN71© CES 2010
1.0 General Description
This service manual provides detailed information regarding the installation, operation, and maintenance of the
CES model 4700VP telephone interconnect.
The simplex or semi-duplex 4700VP was designed specifically for two way radio applications. The unit is
controlled by DTMF (Dual Tone Multi Frequency) audio from mobiles, and contains exclusive interface circuitry
and operating software which allows for operation with a wide variety of radio and telephone systems.
The 4700VP has a number of other useful features, including:
User Programmable Toll Restriction with Allow & Deny Table.
Toll Restriction Override Code
User Programmable CWID
User Programmable Connect / Access code
Local or Over the Air Programming
25 Speed Dial Locations
Last Number Re-dial
Factory Default Settings
Hook Flash Feature for use with Call Waiting™ Services
Enhanced Sampling or VOX with VeraTec™ Smart Sampling
Half Duplex Operation
Automatic Setup (sampling window)
Roger Beep
Internal & External COR, and CTCSS Logic Input
User Programmable Call Limit & Activity Timers
Repeat Mode
Regenerated DTMF & Pulse Dial
Busy Channel Inhibit
High Intensity LED Front Panel Indicators for DC Power, Mobile Detection, DTMF
Detection, Transmitter PTT, and Telephone Line Connection
9-pin “D” connector on rear panel for easy installation and maintenance

CES SUPPORT 407-679-9440 Page 7MAN71© CES 2010
2.0 Installation Instructions
2.1 General Information
Installation of the model 4700VP should be performed by a qualified two-way radio or communications technician.
Ensure that static precautions are observed and that power is not applied during installation.
Shielded audio cable should be used for all audio signal line connections to the transmitter-receiver combination.
Terminate ground shields at the DB9 connector only to prevent hum and noise due to ground loops. The shield at
the other end of the cable must be left unconnected. The best location for the interconnect is as close as possible to
the transmitter-receiver combination, thus allowing the shielded cables and wires to be as short as possible.
2.2 Material and Equipment Required for Installation
The following items are needed in order to install the 4700VP:
# 2 Phillips Screwdriver
Solder and Soldering Iron
Service Monitor or Deviation Meter (optional, for transmitter deviation adjustments)
1/8” flat blade adjustment tool (or a jeweler’s screwdriver).
Digital Multimeter (recommended)
Radio Transceiver (in addition to the radio (s) being used for the interconnect itself)
2.3 Mechanical Installation
Place the 4700VP on any surface away from sources of extreme heat or cold. The 4700VP should be located close to
a good grounding system (cold water pipe or grounded metal cabinet) if at all possible for maximum lightning
protection.
2.4 Electrical Installation
Electrical installation of the model 4700VP involves connection to the radio (s) by supply cable, and connection to
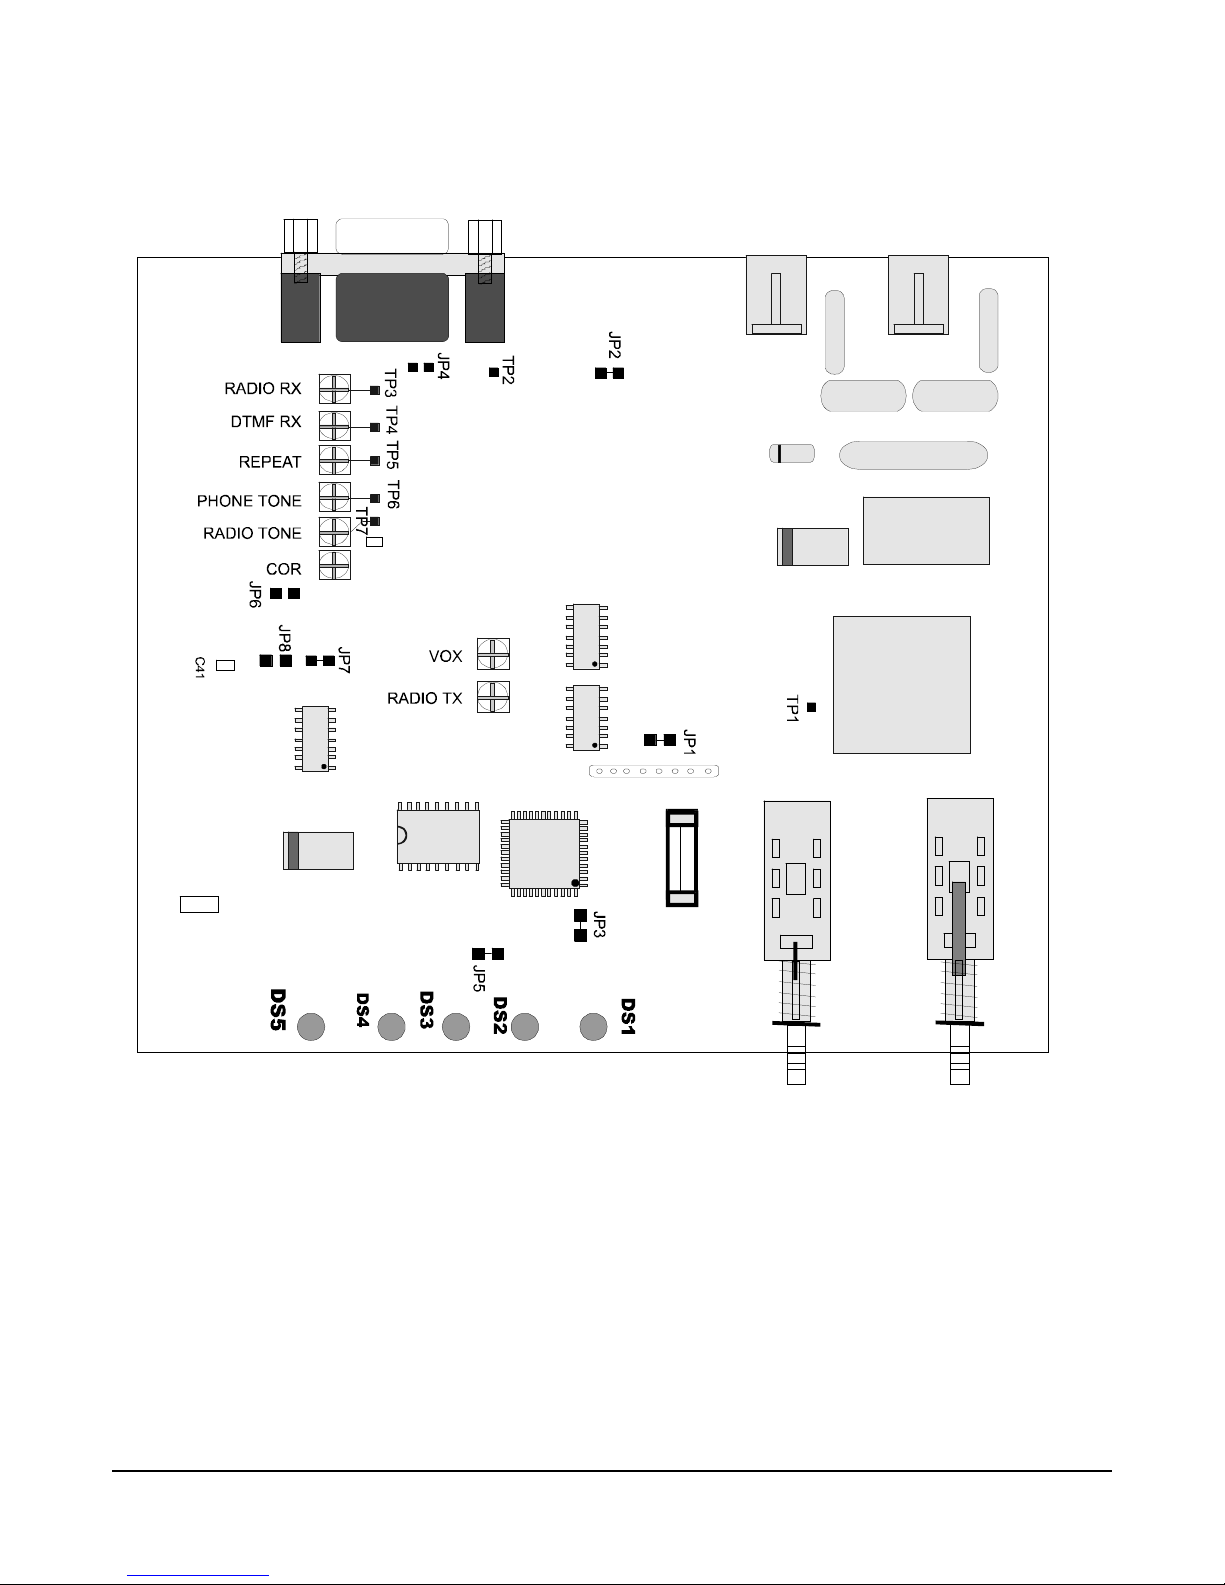
the telephone line via supplied modular cord. Fig. 2.4.1 shows the rear panel of the 4700VP. Table 2.6.1 shows
functional information for each pin of the DB-9 (Radio Interface Connector) on the rear panel. Table 2.7.1 shows
the internal jumper selections, and Figure 2.5.1 shows the internal component layout and test point locations.
Fig. 2.4.1 4700VP Rear Panel Diagram
RADO INTERFACE
J4 PROGRAM
J2 PHONE
J1
CES SUPPORT 407-679-9440 Page 8MAN71© CES 2010
2.5 Component Layout
Fig. 2.5.1 4700VP Component Layout
CES SUPPORT 407-679-9440 Page 9MAN71© CES 2010
2.6 Radio Interface Connection
Table 2.6.1 DB-9 Radio Interface Connector
Pin Function Signal Description
1PTT output Digital.
Open
Collector
Connect to the radios Push to Talk input to control the radio transmit function.
2RX Audio Analog Connect to the radios discriminator or detector. Although NOT recommended,
squelched/speaker audio can be used.
******SEE NOTE ON FOLLOWING PAGE******
3N/C N/A
4CTCSS logic i/p Digital This input is normally connected to a radio or external CTCSS/DPL decoder output to
provide additional system security. When installed, the 4700VP will only connect when
the proper CTCSS/DPL is detected by the decoder and its output changes state. This input
is user programmable for active high or active low.
5Ground Power Connect to a suitable ground point in the radio
6TX Audio Analog Connect to the microphone/audio input of the transceiver / transmitter.
7N/C N/A
8External COR Digital Use this pin on applications where discriminator audio is not used (squelched audio is
used). This input is user programmable for active high or active low, and can also be
connected to an external CTCSS/DCS decoder output.
9Power (12vdc) Power Connect to switched radio voltage. Range 10 - 15 V DC.
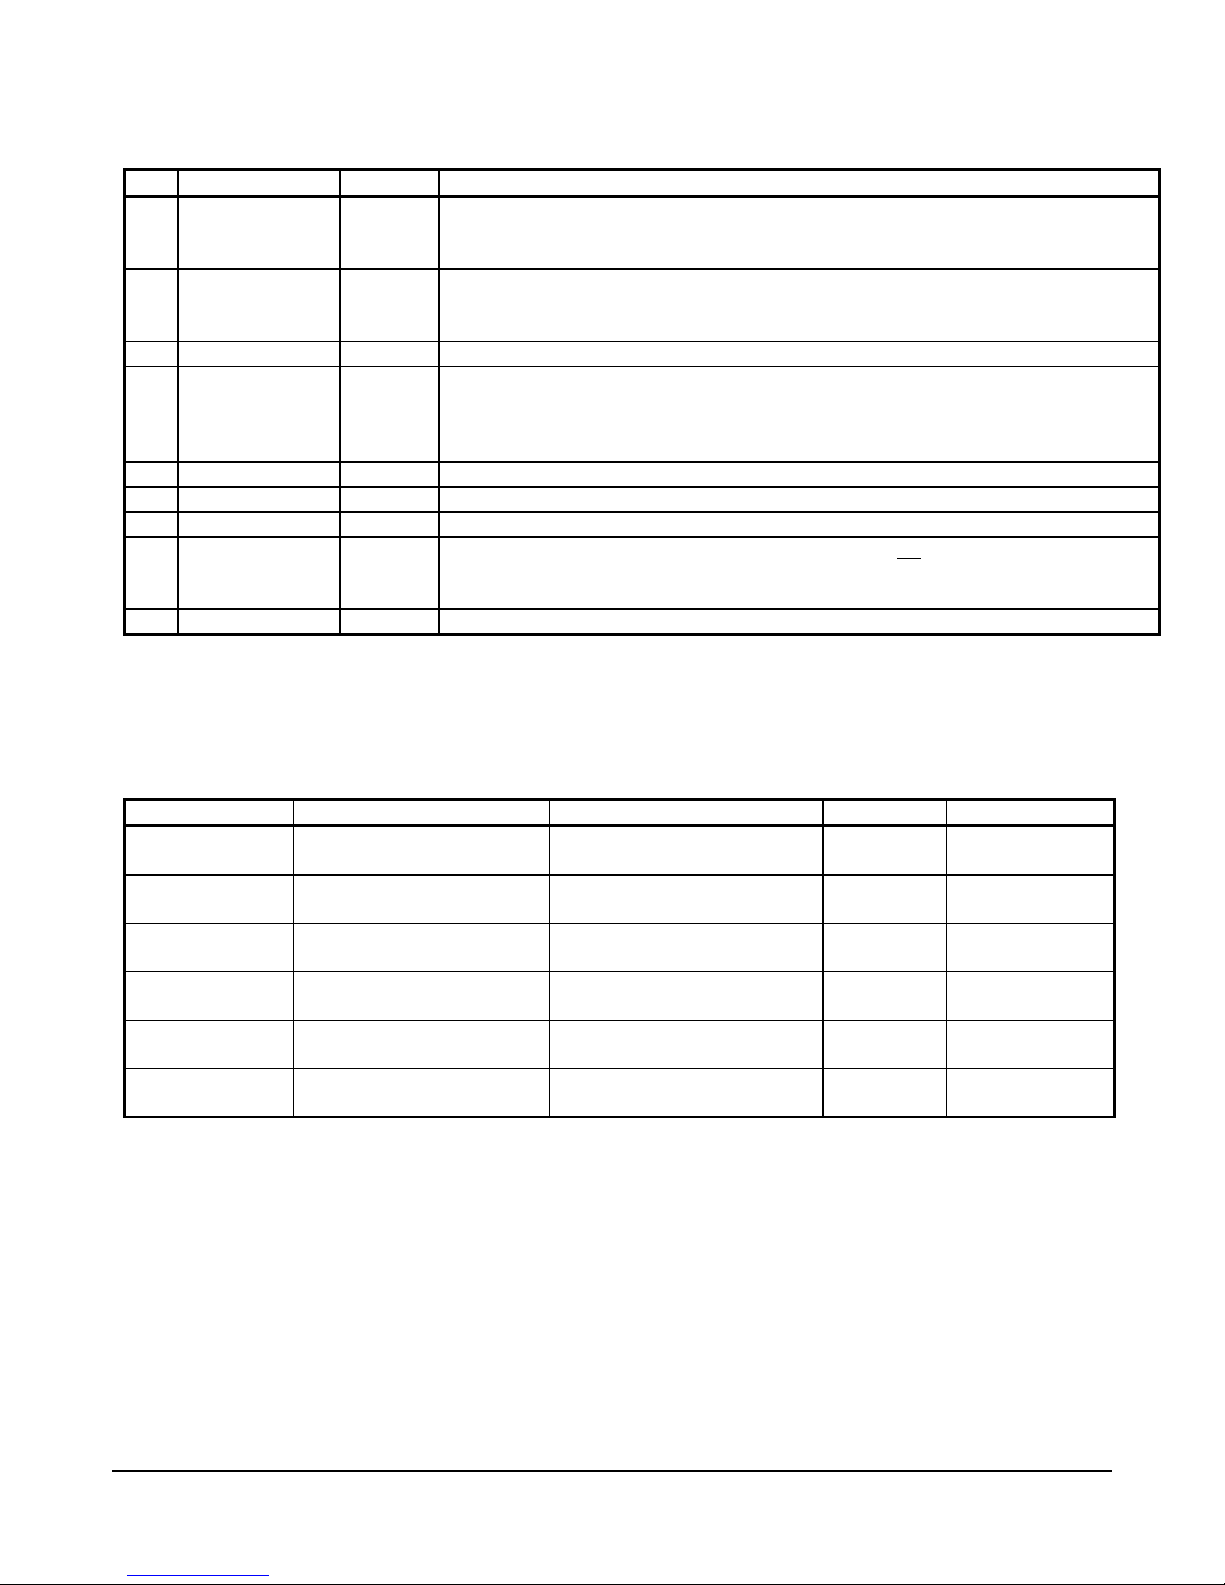
2.7 Jumper Selections Table 2.7.1 Jumper Configuration
Jumper No. Function Description Default Position
JP1 Voice audio delay (optional) No voice audio delay installed
Voice audio delay installed IN IN
OUT
JP2 Emphasize audio Discriminator audio
Squelched audio ( speaker) IN IN
OUT
JP3 CTCSS logic input Active Low
Active High IN IN
OUT
JP4 TX audio output High Z
Low ZOUT OUT
IN
JP5 External COR Active Low
Active High IN IN
OUT
JP6 RX audio input High Z
Low ZOUT OUT
IN

CES SUPPORT 407-679-9440 Page 10 MAN71© CES 2010
Important Note
The 4700VP requires a signal from the radio receiver to determine the presents or absence of a mobile carrier, i.e. when the
channel is busy or not. This is accomplished in one of two ways.
1. The 4700 has an internal squelch circuit to determine channel activity. This circuitry only functions if the receive audio
connection (pin 2) is connected to the discriminator of the radio. The discriminator provides un-squelched and unfiltered
audio for the 4700’s squelch circuitry and audio that is fed to the phone line. This setting is factory default and is referred
to as internal COR operation. See page 11 for COR adjustment.
2. If a squelched audio source (speaker audio) is used for pin 2, then an additional wire called External COR (pin 8) MUST
BE CONNECTED. This signal is a DC signal that changes in level when the squelch control of the radio is opened or
CTCSS is decoded. This signal can usually be obtained from the radios squelch circuitry or busy channel indicator. This
signal can also be obtained from the CTCSS decoder if so equipped. When this connection is used, the 4700VP must be
programmed for External COR (program code 40) and the correct active state set (code 41). See page 18 for External COR
polarity.
Both of the connections talked about above are very often not available from a radios accessory jack and usually requires an
internal connection to the radio. Correct operation of DS5 (4700VP COR /channel activity LED) is essential for proper
operation.
In Short, the COR LED must be normally OFF, and only come on when the radios receiver is actively receiving a
signal / carrier.

CES SUPPORT 407-679-9440 Page 11 MAN71© CES 2010
2.8 Internal Adjustments
Internal COR Mobile Detector (R55)
(not required if External COR is used)
(1) Apply power to the 4700VP and the base station or repeater.
(2) Rotate R55 clockwise until “COR” led DS5 illuminates. Rotate R55 counter clockwise until led DS5 extinguishes.
(3) Generate carrier to the base station or repeater and verify that DS5 illuminates when carrier is present and extinguishes
when carrier is removed.
DTMF RX (R51)
(1) Send a DTMF tone from the mobile and rotate R51 clockwise until the DTMF LED (DS4) illuminates. Press all the keys
on the DTMF mic or encoder and verify that DS4 illuminates every time each key is pressed. Send the connect and
disconnect code and verify that the mobile can access the 4700VP reliably.
Receive Audio (R50)
(1) Call the 4700VP telephone line from another telephone or mobile.
(2) Manually answer the line by pressing the connect switch on the front panel.
(3) Have the mobile make a test transmission. Using an AC voltmeter or scope monitor TP1 and set R50 to approximately
500mV (-4 dBm) on voice peaks from the mobile. If the levels cannot be reached, install JP6.
Transmit Audio (R43)
(1) Set the service monitor to receive on the transmitter frequency.
(2) With the telephone line plugged into connector J1, press the front panel switch to manually connect. A dial tone will be
transmitted.
(3) Adjust R43 to 4.0 kHz deviation as observed on the service monitor. Modulation should not be clipped or distorted. If level
cannot be reached or the range is inadequate, install JP4.
(4) Press the front panel switch to disconnect the telephone line.
Repeat Audio (R52)
(1) Set up the monitor in the Duplex mode (simultaneous receive and carrier generation) on the
respective repeater. Modulate a 1000 Hz tone at 4.0 kHz deviation on the receive frequency and adjust
R52 to deviation as monitored in the transmit frequency.
VOX (R42)
(1) Program the 4700VP for Simplex Smart Sampling, i.e. 50# 2#.
(2) Call the 4700VP telephone line from the mobile. While speaking adjust R42 until DS2 illuminates (illuminates only when
audio is present on the telephone line and extinguish when no audio is present and the Vox hang-time has expired.
Regenerated DTMF -Phone Tone (R53)
(1) Send the connect code and release PTT. Wait for dial tone, press and hold a DTMF tone and adjust
R53 to 500 mVpp at TP1
Ring-out and Beeps -Radio Tone (R54)
(1) Set up the service monitor to receive the transmitter frequency.
(2) Call the 4700VP telephone line from another telephone.
(3) Adjust the radio tone R54 to 4.0 kHz as monitored in the transmitter frequency.

CES SUPPORT 407-679-9440 Page 12 MAN71© CES 2010
3.0 Programming Procedure
3.1 Programming the 4700VP
The 4700VP can be easily programmed locally with a standard DTMF telephone. (Using a telephone with the
DTMF keypad incorporated on the handset can make it difficult to dial and listen at the same time). Programming
can also be achieved “over the air” with a DTMF microphone. The Remote Programming Code must be
programmed locally before over the air programming can be accomplished.
3.2 Local Programming
Local programming is accessed by plugging a DTMF telephone into the programming jack (J2) on the back of the
4700VP. Turn the power “On” and within 2 seconds press the * (asterisk) on the telephone keypad. The unit will
emit five beeps when the program mode is accessed. 00 # will exit the program mode.
To assist the programming process, a number of confidence tones will be heard. They are:
Valid Parameter Beep One 1 kHz tone (e.g. 33#)
Program Accepted Five 1 kHz tones generated rapidly (e.g. 33#0#)
Error beep Three 400 Hz tones generated rapidly (e.g. 95#)
3.3 Programming Parameters Explained
The following is a list of available programmable features. Parameters in bold letters denote the factory default
settings.
Speed Dial Locations (01# through 25#)
Locations 01 through 25 are the speed dial locations. Acceptable characters are 0 ~ 9, 15 digits long. To program a
speed dial location, enter the location number followed by the # (pound key) followed by the phone number to be
stored in that location.
Example: to program 679-9440 in location number 1, enter the following sequence: 01# 6799440#
Factory Defaults Settings (30#)
The 4700VP can be set (or reset) to factory default settings by pressing 30 #. This command does not require data.
Example: To set factory default settings, press 30#, wait approximately 3 seconds and the Program Accept tone
will be heard.
Lead in Delay (31#)
This delay is the time which the 4700VP will key the transmitter prior to sending any signals to the mobile. (CWID,
Telephone Ring-out etc.). This command is user programmable in ten steps.
0=60ms 1=70 ms 2=80 ms 3=100 ms 4=150 ms
5=200ms 6=350 ms 7=500 ms 8=750 ms 9=1 sec
Example: To program this delay for 350 ms enter the following sequence: 31# 6#

CES SUPPORT 407-679-9440 Page 13 MAN71© CES 2010
Mobile Activity Timer (32#)
If the 4700VP does not detect a carrier (transmission from the mobile operator) within a programmable period of
time, the call will be terminated. Warning beeps will be generated 10 seconds prior to the disconnect. The timer will
be reset every time the unit detects carrier from the mobile. The Mobile Activity Timer is programmable in 10 steps.
0=15 sec 1=20 sec 2= 30 sec 3=40 sec 4=50 sec
5=1 min 6=1.5 min 7=2 min 8=3 min 9=4 min
Example: To program the activity timer for 20 seconds enter the following sequence: 32# 1#
Call Limit Timer (33#)
This timer controls the total duration of a call. Warning beeps will generated 30 seconds prior to disconnect. This
feature is user programmable in 10 steps.
0=2 min 1=3 min 2=5 min 3=10 min 4=15 min
5=20 min 6=30 min 7=45 min 8=60 min 9=4 hrs
Example: To program the call limit timer for 2 minutes enter the following sequence: 33# 0#
CWID Time Interval (34#)
When enabled, a user programmable CW-ID is transmitted based on the CWID Time Interval programmed. The
4700VP will not transmit the station ID on a busy channel or when a call is in process. This command is user
programmable in ten steps.
0=5 min 1=10 min 2=15 min 3=20 min 4=25 min
5=30 min 6=45 min 7=1 hr 8=1.5 hrs 9=2 hrs
Example: To program time period to ID every 25 minutes enter the following sequence: 34# 4#
Repeater Hang Time (35#)
When the 4700VP Repeat Mode has been enabled, the repeat hang-time is controlled by this value. The hang-time is
the period of time the transmitter remains on after a mobile has finished talking.
This command is user programmable in ten steps.
0=500 ms 1=1 sec 2=1.5 sec 3=2 sec 4=2.5 sec
5=3 sec 6=4 sec 7=5 sec 8=7 sec 9=10 sec
Example: To program the repeater hang time to 1 second enter the following sequence: 35# 1#
COR (40#)
The 4700VP can be programmed for internal COR (discriminator) or external (logic input) COR operation. Internal
COR is normally connected to the discriminator output of the receiver. The model 4700VP will look for the absence
of noise from the discriminator to determine if there is carrier present or not. This signal must be at least 500mvpp
of un-squelched noise. If un-squelched noise is not available, and squelched audio such as speaker audio is used, the
interconnect must be programmed for external COR operation.
0 = internal 1 = external
Example: To program the 4700VP for external COR enter the following sequence: 40# 1#

CES SUPPORT 407-679-9440 Page 14 MAN71© CES 2010
External COR Polarity (41#)
The COR input can be programmed for active high or active low polarity. On active high, the input to the 4700VP
should be in the low condition (zero volts) with no carrier present and change to a high condition (normally 5vdc)
with carrier. This voltage swing must be greater than 2.5V DC. In the active low polarity, the input must be 5V DC
with no carrier and 0V DC with carrier, the voltage swing must be greater than 2.5V DC. This logic signal is
normally connected to squelch detector, CTCSS/DCS decoder output or from a point within the receiver which
changes states when carrier is present.
0 = active low 1 = active high
Example: To program COR for active high, enter the following sequence: 41# 1#
CTCSS Polarity Logic Input (42#)
The CTCSS logic input can be used as a mobile signal or to add security to the interconnect. This logic input is user
programmable for active high or active low polarity and should be connected to the output of a CTCSS/DCS tone
decoder. This logic signal should only change when the proper tone has been detected by the CTCSS/DCS tone
decoder. If the output voltage of the decoder is normally low and goes high with the proper tone, program the
4700VP for active high operation. If the output of the CTCSS tone decoder is normally high and goes low with the
proper tone, program the 4700VP for active low operation.
0 = active low 1 = active high
Example: To program the CTCSS polarity for active high, enter the following sequence: 42# 1#
Gate COR with CTCSS (43#)
This code when enabled will look for a logic change in both the COR and CTCSS inputs. If only one of these signals
is used, then this code must be turned off.
0 = no 1 = yes
Example: To enable this feature enter the following sequence: 43# 1#
Accept Pound Only (#) for Disconnect (44#)
The 4700VP can be programmed for global disconnect (# only) or a multiple digit disconnect code.
0 = no 1 = yes
Example: To program the 4700VP for a single digit (#) to disconnect, when a multiple digit connect code is being
used, enter the following sequence: 44# 1#.
Note: If no multi digit connect code is programmed, the 4700VP will automatically use the global disconnect.
DTMF Regeneration (45#)
The 4700VP may be programmed for regenerated DTMF or non regenerated DTMF. In the regeneration mode, the
4700VP will receive DTMF from the mobile and regenerate them at a constant level into the phone line. This feature
is useful when the receive signal to the receiver is weak or inconsistent. Regeneration will be cease after less than 7
digits are dialed and COR goes inactive for 4 seconds or 7 or more digits are dialed and COR goes inactive. The
regeneration mode can be re-entered using with the following sequence: activate 4700VP COR, press the star (*)
key, deactivate 4700VP COR. In the non regenerated mode, DTMF is sent to the phone line as it is received by the
4700VP.
0 = non regenerated 1 = regenerated
Example : To program the 4700VP for non regenerated DTMF enter the following sequence: 45# 0#

CES SUPPORT 407-679-9440 Page 15 MAN71© CES 2010
Repeat Mode Enable (46#)
This programming code enables the repeat mode. The repeat mode allows receive audio to be passed to a transmitter
for mobile to mobile communications. This mode should only be enabled if the receiver and transmitter are
independent of each other. This will not work on a Push to Talk/Release to Listen transceiver.
0 = off 1 = on
Example: To enable the repeat audio function enter the following sequence: 46# 1#
Roger Beep (47#)
The 4700 provides a short audible beep into the telephone line each time the mobile user un-keys. This gives an
audible indication to the telephone party that they may now begin to talk.
0 = off 1 = On
Example : To enable courtesy beep function enter the following sequence: 47# 1#
Toll Restriction on speed dial location (48#)
Speed call locations can be toll restricted by enabling this command. When enabled, this will prevent dialing of
digits entered in the toll restrict locations.
0 = no 1 = yes
Example: To disable this feature enter the following sequence: 48# 0#
CW ID Interval (49#)
The CW ID feature can be programmed to transmit the Station Identification at pre-programmed CWID Time
Interval, connect, connect & interval time, disconnect, interval time & disconnect, connect /disconnect, interval time
& connect / disconnect, or it may be disabled. The CW ID will not be transmitted if the system is busy.
0 = off 1 = timer 2 = connect 3 = timer & connect 4 = disconnect
5 = timer & disconnect 6 = connect/disconnect 7 = timer, connect/disconnect
Mode of Operation (50#)
The model 4700VP can operate in three different modes; Half Duplex, Simplex Sampling or Simplex with
VeraTec™ Smart Sampling.
Half Duplex
In Half Duplex the 4700VP will keep the transmitter keyed for the duration of the call. When programmed for half
duplex operation it must be installed on arepeater or two radios using different frequencies.
Simplex Sampling
In the Simplex Sampling mode the 4700VP will sample at the programmed rate looking for a mobile carrier. If there
is a carrier present it will stay in the receive mode until carrier goes away. If the carrier is not present, the 4700VP
will go back to transmit mode until the next sample interval.
Simplex with VeraTec™ Smart Sampling
In the Simplex mode with VeraTec™, (CES proprietary smart sampling protocol), the 4700VP mixes Vox and
Sampling modes. When audio is present on the telephone line, the 4700VP will operate in Vox mode until the
maximum Vox timer ends. The maximum Vox timer controls how long the 4700VP will stay keyed continuously.
The unit will then enter sampling mode allowing the mobile operator to take control of the unit. This feature is very

CES SUPPORT 407-679-9440 Page 16 MAN71© CES 2010
useful if the interconnected call is put on hold, particularly “music on hold”. When the mobile gains control, Vox
mode is disabled until the mobile releases PTT.
0 = Half Duplex 1 = Simplex, Sampling 2 = Simplex, Smart Sampling
Example : To program Simplex Smart Sampling enter the following sequence: 50# 2#
Sample Rate for Sample Mode and for VOX active (51#)
When in Simplex Enhanced Mode the 4700VP detects the presence of audio and automatically switches to enhanced
mode, decreasing sampling to the pre-programmed rate. This rate is user programmable from 1 second ~ 30 seconds
in ten steps.
0 = 1 sec 1 = 2 sec 2 = 4 sec 3 = 5 sec 4 = 8 sec
5 = 10 sec 6 = 15 sec 7 = 20 sec 8 = 25 sec 9 = 30 sec
Example: To change the enhanced sampling rate to 5 seconds enter the following sequence: 51# 3#
Sample Rate for VOX Inactive (52#)
The sample rate for Vox Inactive code controls the normal sampling rate (no audio present on the phone line). This
feature is user programmable from 500ms ~ 15 s.
0 = 500 ms 1 = 1 sec 2 = 1.5 sec 3 = 2 sec 4 = 3 sec
5 = 4 sec 6 = 5 sec 7 = 7 sec 8 = 10 sec 9 = 15 sec
Example: To program the model 4700VP for 1 second interval, enter the following: 52# 1#
Maximum Vox Timer (53#)
This timer controls the length of time which the 4700VP will keep the transmitter continuously keyed. Then the unit
will switch to sample mode allowing the mobile operator to take control of the unit. This feature is very useful if the
interconnected call is put on hold particularly on “music on hold”. Factory default is 12 seconds and is user
programmable up to 25 seconds or turned of.
0 = off 1 = 3 sec 2 = 4 sec 3 = 6 sec 4 = 8 sec
5 = 10 sec 6 = 12 sec 7 = 15 sec 8 = 20 sec 9 = 30 sec
Example: To program the maximum Vox timer to 3 seconds enter the following sequence: 53# 1#
Vox Hang Time (54#)
Vox Hang Time is the amount of time which the interconnect stays on the air after the telephone line audio was last
detected. The 4700VP is shipped from the factory with 1 second Vox hang time. This means that the Vox hang time
will keep the transmitter keyed for at least one second after the telephone audio ceased.
0 = 200 ms 1 = 500 ms 2 = 1 sec 3 = 1.5 sec 4 = 2 sec
5 = 3 sec 6 = 4 sec 7 = 5 sec 8 = 7 sec 9 = 10 sec
Example: To program this timer for 1.5 seconds enter the following sequence: 54# 3#
Sampling Window Setup (55#)
The sampling window duration is the period of time required for the 4700VP to switch the base station radio from
transmit to receive to determine whether a mobile is transmitting or not. while observing COR. The sampling
window period can be easily adjusted by pressing digits 0 ~ 9 while observing COR. When the proper window
timing is set, the COR LED will flash when the 4700VP samples. Pressing the pound key (#) will accept the code
and exit the sampling window setup mode. Star key (*) will abort the last digit entered. 95 ms is the factory default
but it is not necessarily the appropriate setting for your transceiver. Performing this procedure is essential for proper
operation.
0 = 50 ms 1 = 80 ms 2 = 95 ms 3 = 115 ms 4 = 125 ms 5 = 135 ms 6 = 150 ms

CES SUPPORT 407-679-9440 Page 17 MAN71© CES 2010
7 = 200 ms 8 = 250 ms 9 = 300ms
Example: To program the sampling window to 95ms enter the following sequence: 55# 3#
Dialing mode (56#)
The method of dialing the phone line may be changed by using the 56# command. The choices available include
regenerated DTMF or pulse dialing at the rate of 10 or 20 pulses per second.
0 = DTMF 1 = Pulse (10 per second) 2 = Pulse (20 per seconds)
Example: To program DTMF dialing mode enter the following sequence: 56# 0#
Ignore COR to Ring Out (57#)
When set to 0 (factory default) the 4700VP will not Ring Out if the channel is busy (COR LED On). If answering
mode is set for COR only, this feature should be turned off. When programmed to ignore COR, the 4700VP will
ring out one time (if busy) alerting the mobile operator of an incoming call.
0 = no 1 = yes
Example: To turn the ignore COR off, enter the following sequence: 57# 0#
Answering a Call (58#)
For more flexibility, the 4700VP can be programmed to answer a call in 4 different ways or can be programmed to
ignore ring voltage for mobile initiated calls only.
0 = Ignore phone line 1 = Connect Code with COR 2 = Connect Code with COR & CTCSS
3 = COR & CTCSS 4 = COR only
Example: To program 4700VP to ignore the phone line ringing, enter the following sequence: 58# 0#
Hook Flash Period (59#)
This feature is used in conjunction with call waiting offered in some markets by the telephone company. This allows
the mobile user to answer a second call without disconnecting call in progress. The user can flash between calls by
momentarily activating the star (*) key plus 2 digits. The flash time period is programmable from 200ms ~ 800ms
or it may be turned off.
0 = off 1 = 200ms 2 = 250ms 3 = 300ms 4 = 350ms
5 = 400ms 6 = 450ms 7 = 500ms 8 = 550ms 9 = 800ms
Example: To enable hook flash enter the following sequence: 59# 1#
Connect / Access Code (60#)
Up to a 10 digit access code can be programmed in the model 4700VP (only characters 0 ~ 9 will be accepted, 3 or
more digits recommended). With no multi-digit code programmed, the default code is a single star (*) and single
pound (#) for disconnect. NOTE: The * will always proceed the connect code and the # will always proceed the
disconnect code
Example: To program the 4700VP for a connect code of *123 enter the following sequence: 60# 123#
Toll Restrict Override Code (61#)
The Toll Restrict Override Code will give privileged users the ability to bypass the toll restriction table. The code
can be programmed for up to 10 digits string. This code must be different from the Connect code and other control
codes.

CES SUPPORT 407-679-9440 Page 18 MAN71© CES 2010
Example: To program the toll override code to *1234 enter the following sequence: 61# 1234#
Remote Programming Code (62#)
The 4700VP can be programmed easily over the air by the use of a Remote Programming code. The factory default
for this code is none. This means that a code must be programmed into the 4700VP during initial setup (only
characters 0 through 9 will be accepted). To enter the remote programming mode, the remote programming code
must be sent within 2 seconds after receiving the connect code. If no digits are received within 30 seconds of each
other once a command has began, the last command entered will be aborted. Program mode aborts after 2 minutes of
no activity.
Example: To program the remote code of *4321 enter the following sequence: 62# 4321#
Speed Dial Remote Program Code (63#)
This code will allow the mobile operator to program the speed dial locations over the air. This code must also be
sent within 2seconds after receiving the connect code (only the speed dial locations will be accessible through this
code).
Example: To program the speed dial locations to *1212 enter the following sequence: 63# 1212#
CW ID Call Letters (64#)
Up to 15 characters can be programmed into the 4700VP as a station ID. Each character is entered with a 2 digit
code as shown below. Table 3.1.1 Call letters programming chart
Char Code Char Code Char Code Char Code Char Code
0 00 A 21 K 52 U 82 Ñ 44
1 10 B 22 L 53 V 83 Ö 45
2 20 C 23 M 61 W 91 CH,S 35
3 30 D 31 N 62 X 92 AR 07
4 40 E 32 O 63 Y 93 ERR 48
5 50 F 33 P 71 Z 03 , 16
6 60 G 41 Q 02 Ä 37 - 66
7 70 H 42 R 72 Å 38 . 46
8 80 I 43 S 73 É 39 / 36
9 90 J 51 T 81 Ü 47 ? 94
SPACE 05
Toll Restrict (70# ~ 79#)
The toll restriction mode of the 4700VP consist of an deny table (codes 70 through 79) and a allow table (codes
80 through 89). Up to 15 digits can be programmed in each of these locations. Wild card (*) may also be used. If no
data is entered in the deny table, toll restriction is disabled. This is also true if only wild cards are entered in the
allow table.
A wild card (*) at the end of the deny string means that an exception may exist, enter these digits in the allow table.
If no wild card (*) is entered at the end of the deny string and an exact match occurs, the number is denied. If only
wild cards (*) are entered in the deny table, only speed dial locations may be dialed, and only if code 48 is
programmed to bypass toll restriction (0).

CES SUPPORT 407-679-9440 Page 19 MAN71© CES 2010
Last Number Re-dial (0#)
To re-dial the last number entered, press *0 within 5 seconds of receiving the connect code.
Table 3.1.2 Valid combinations
Comments Deny Allow
Deny all calls beginning with 1 1
Deny all calls beginning with 1 except 1800 1* 1800
Deny all calls beginning with 1 except 1800, also deny the number 1800123 1*
1800123 1800
Deny all calls beginning with 1 except 1800 and 1888, also deny calls beginning with
0, the number 5551212 and numbers beginning with 9 except 911. 1*
0
5551212
9*
1800*
1888
911
Table 3.1.3 Invalid combinations:
Comments Deny Allow
1800 is not allowed because no wild card (*) followed in the deny string. 1 1800
1800123 will not be denied because no wild card (*) followed the 1800 in the allow
string. 1*
1800123 1800
1800123 will not be denied because a wild card (*) did followed the 1800123 in the
deny string. 1*
1800123* 1800*
Table 3.1.4 Summary of Programming Commands
Code Function Factory Default
*0 Last Number re-dial N/A
00 # Exit Program Mode N/A
01 # Speed Dial Location 1Off
02 # Speed Dial Location 2Off
03 # Speed Dial Location 3Off
04 # Speed Dial Location 4Off
05 # Speed Dial Location 5Off
06 # Speed Dial Location 6Off
07 # Speed Dial Location 7Off
08 # Speed Dial Location 8Off
09 # Speed Dial Location 9Off
10 # Speed Dial Location 10 Off
11 # Speed Dial Location 11 Off
12 # Speed Dial Location 12 Off
13 # Speed Dial Location 13 Off
14 # Speed Dial Location 14 Off
15 # Speed Dial Location 15 Off
16 # Speed Dial Location 16 Off
17 # Speed Dial Location 17 Off
18 # Speed Dial Location 18 Off
19 # Speed Dial Location 19 Off
20 # Speed Dial Location 20 Off
21 # Speed Dial Location 21 Off
22 # Speed Dial Location 22 Off
23 # Speed Dial Location 23 Off
24 # Speed Dial Location 24 Off
25 # Speed Dial Location 25 Off
30 # Set Factory Defaults N/A
31 # Lead in Delay 500 ms

CES SUPPORT 407-679-9440 Page 20 MAN71© CES 2010
Code Function Factory Default
32 # Mobile Activity Timer 30 sec
33 # Call Limit Timer 3 min
34 # CWID Time Interval 30 min
35 # Repeater Hang Time 1.5 sec
40 # Internal/External COR Internal
41 # External COR Polarity Active low
42 # CTCSS Polarity Active low
43 # Gate COR w/ CTCSS Off
44 # Pound Disconnect Off
45 # DTMF Regeneration On
46 # Repeat Mode Enable Off
47 # Courtesy Beep Off
48 # Speed Dial Toll Restrict On
49 # Auto CWID Off
50 # Operation Mode Simplex, Sampling
51 # Sampling Rate for Sample Mode and
VOX Active 4 sec
52 # Sample Rate for VOX inactive 1.5 sec
53 # Maximum VOX Timer 12 sec
54 # VOX Hang Time 1 sec
55 # Sample Window Setup 95 ms
56 # Dialing Mode DTMF
57 # Ignore COR to Ring Out Off
58 # Answering a Call Connect Code w/
COR
59 # Hook Flash Pulse Length 0 ms
60 # Connect / Access Code ( * )
61 # Toll Restrict Override Code None
62 # Remote Program Code None
63 # Speed Dial Remote Program Code None
64 # CWID Programming None
70 # Toll Restriction Deny String 1None
71 # Toll Restriction Deny String 2None
72 # Toll Restriction Deny String 3None
73 # Toll Restriction Deny String 4None
74 # Toll Restriction Deny String 5None
75 # Toll Restriction Deny String 6None
76 # Toll Restriction Deny String 7None
77 # Toll Restriction Deny String 8None
78 # Toll Restriction Deny String 9None
79 # Toll Restriction Deny String 10 None
80 # Toll Restriction Allow String 1None
81 # Toll Restriction Allow String 2None
82 # Toll Restriction Allow String 3None
83 # Toll Restriction Allow String 4None
84 # Toll Restriction Allow String 5None
85 # Toll Restriction Allow String 6None
86 # Toll Restriction Allow String 7None
87 # Toll Restriction Allow String 8None
88 # Toll Restriction Allow String 9None
89 # Toll Restriction Allow String 10 None
99 # Hook Flash
Table of contents
Popular Telephone Accessories manuals by other brands


Grandstream Networks
Grandstream Networks HT-286 Technical specifications

On-Hold Plus
On-Hold Plus OHP-3000A Owner's manual & operating instructions

NEC
NEC Xen IPK II user guide

Interalia
Interalia iProMOH V5-SU Installation and user manual

Yealink
Yealink EXP39 quick start guide

trueCall
trueCall Secure Getting started guide


