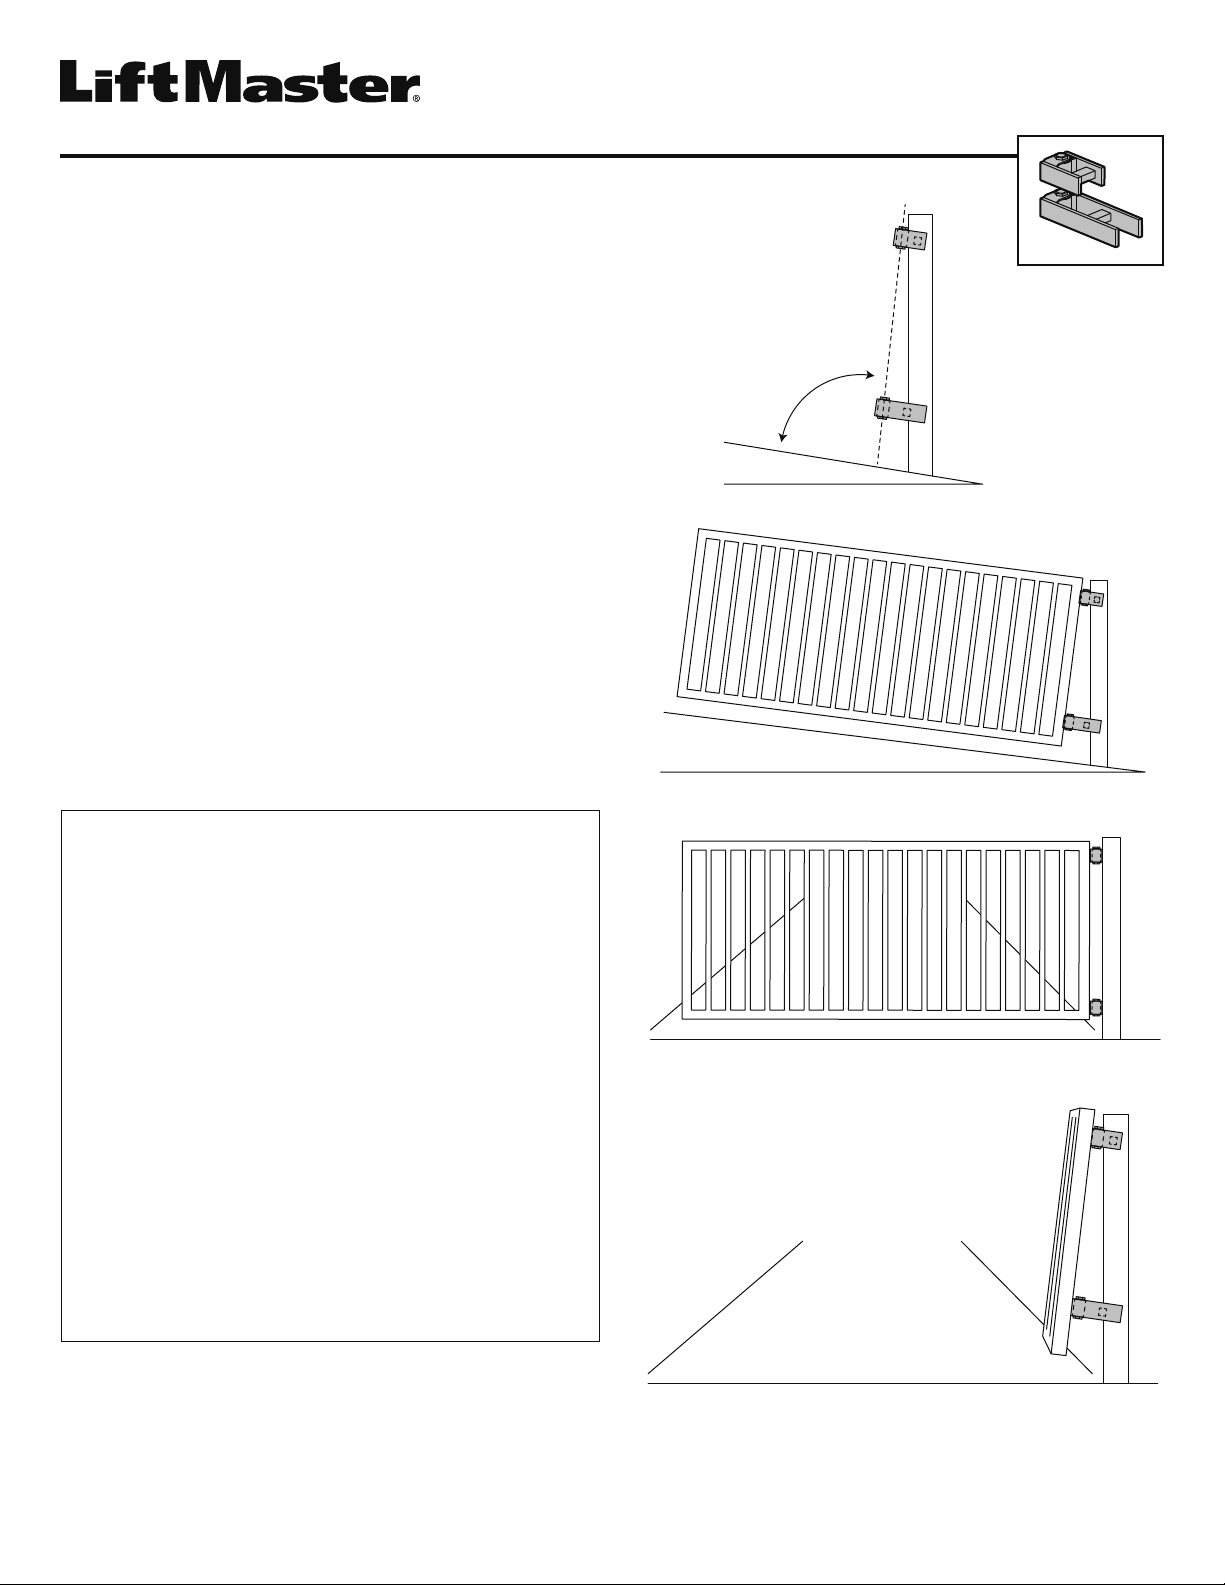
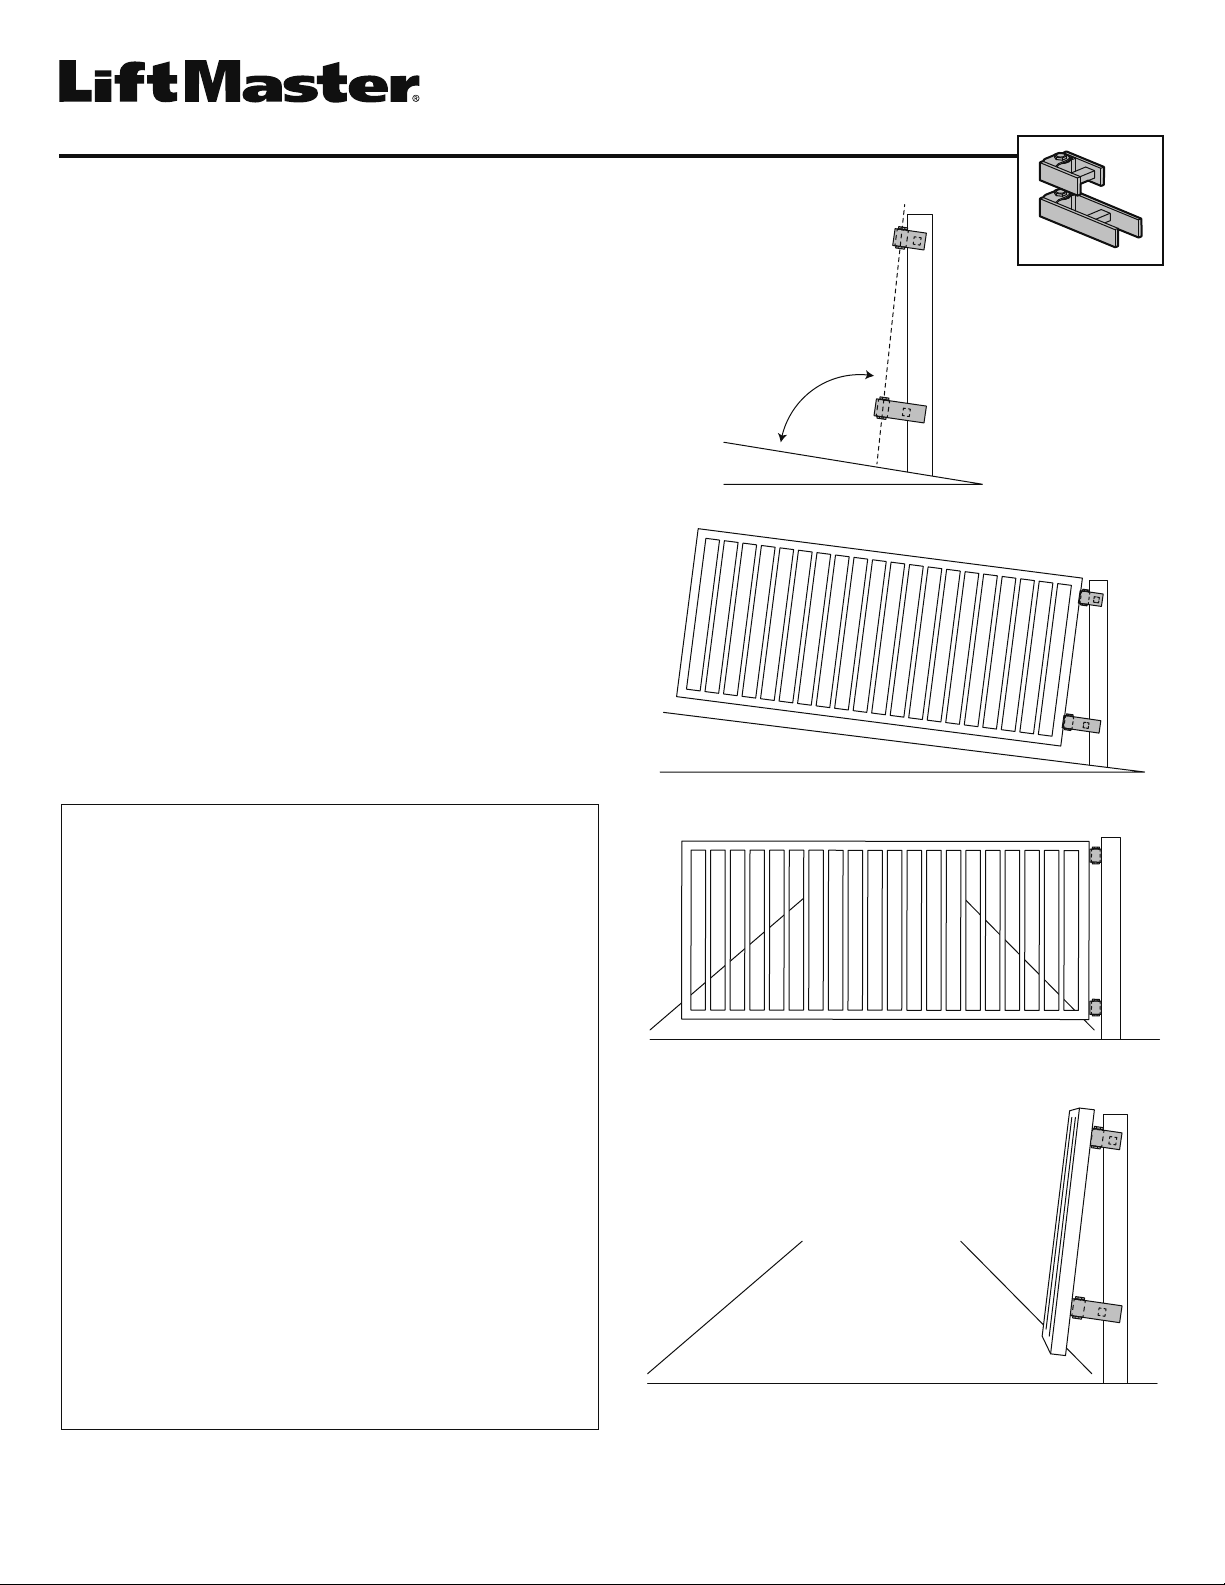
Chamberlain 2190P User manual

UPHILL HINGES
MODELS 2190P AND 2195P
INSTALLATION
The uphill hinges will be perpendicular to the road surface when properly
installed. There will be an imaginary line running through the center of both
hinges (Figure 1).
1. Stand the gate in the open position (Figure 2). Open hinges 90 degrees
with the yoke extensions flat against the post and the gate extensions
flat against the end rails of the gate (Figure 2). Tack weld the yoke
extensions to the gate post. DO NOT tack weld the gate extensions.
NOTE: It may be necessary to elevate the far end of the gate to allow for
the weight of the suspended gate after installation.
2. Tack weld the gate extensions to the gate with the gate in the closed
position (Figure 3).
3. Verify the gate opens and closes as desired. Adjust as necessary
to achieve proper gate movement and alignment. Securely weld
extensions to the post and gate after gate movement and alignment
have been confirmed.
4. Remove any excess material form the extensions. Grind all sharp
edges. Paint all bare metal and welds as necessary. Lubricate both
hinges prior to use. One pump of a high quality, multi-purpose grease
every 3 months should be sufficient under normal operating conditions.
More frequent maintenance is necessary under severe operating
conditions. Do not over lubricate. Gate will be slightly canted when gate
is in the open position (Figure 4).
LiftMaster.com
LIMITED LIFETIME WARRANTY
LiftMaster®warrants that the LiftMaster Gate Hinges shall be free from all
defects in materials and workmanship for the lifetime of the original gate it
is installed on, by the original end user, under normal use and service, and
when installed and maintained according to manufacturer specifications and
instructions. LiftMaster’s obligation under this warranty is specifically limited
to repairing or replacing, at its option, any defective part during the warranty
period. This warranty shall not apply to any part which has been altered,
damaged, improperly installed or maintained, or repaired by any person not
expressly authorized by LiftMaster in writing to perform the repair. The warranty
will not apply to parts which have been damaged by accident or improper use,
nor to non-defect damage. All other warranties, including but not limited to any
warranty of merchantability or fitness for any particular purpose, or otherwise
expressed or implied, are hereby disclaimed, except as specifically stated above.
LiftMaster shall in no event be liable either for incidental or consequential
damages or for any special damages of further loss, which may arise in
connection with any claim. However, if LiftMaster is held liable, whether directly
or indirectly, for any loss or damage arising under this limited warranty or
otherwise, regardless of the cause or origin, LiftMaster’s maximum liability shall
not in any case exceed the purchase price of the individual product or products,
refund of which shall be the complete and exclusive remedy against LiftMaster.
This warranty gives the owner specific legal rights, and owner may have other
rights, which vary from state to state. Some states do not allow limitations or
exclusions or implied warranties for incidental or consequential damages so the
foregoing limitations or exclusions may not apply.
Figure 1
Figure 2
Figure 3
Figure 4
90°

CHARNIÈRES AMONT
MODÈLES 2190P ET 2195P
INSTALLATION
Les charnières amont seront perpendiculaires à la chaussée lorsqu’elles
sont correctement installées. Une ligne imaginaire passera au centre des
deux charnières (figure 1).
1. Tenir la barrière en position d’ouverture (figure 2). Ouvrir les charnières
à 90 degrés, les rallonges de fourche étant à plat contre le poteau et
les rallonges de barrière étant à plat contre les rails d’extrémité de
la barrière (figure 2). Souder par pointage les rallonges de fourche
au poteau de la barrière. NE PAS souder par pointage les rallonges
de barrière.
REMARQUE : Il peut être nécessaire d’élever l’extrémité la plus éloignée
de la barrière pour compenser le poids de la barrière suspendue
après l’installation.
2. Souder par pointage les rallonges de barrière à la barrière en position
fermée (figure 3).
3. Vérifier que la barrière s’ouvre et se ferme comme désiré. Faire un
ajustement au besoin pour obtenir un mouvement et un alignement
adéquats de la barrière. Bien souder les rallonges au poteau et à la
barrière après avoir confirmé le mouvement et l’alignement corrects de
la barrière.
4. Éliminer tout résidu de matériau des rallonges. Meuler tous les bords
acérés. Peinturer toute pièce de métal nu et les soudures au besoin.
Lubrifier les deux charnières avant usage. Un coup de pompe d’une
graisse de haute qualité à usage multiple tous les trois mois devrait
suffire dans des conditions de fonctionnement normales. Un entretien
plus fréquent est nécessaire dans des conditions de fonctionnement
sévères. Ne pas lubrifier excessivement. La barrière sera légèrement
inclinée en position ouverte (figure 4).
01-38800B
GARANTIE LIMITÉE À VIE
LiftMaster®garantit les charnières de barrière LiftMaster contre tout défaut
matériel et de fabrication pour la vie utile de la barrière originale sur laquelle
elles sont installées par l’utilisateur final original, dans des conditions normales
d’utilisation et de service, et lorsqu’elles sont entretenues et maintenues selon
les spécifications et instructions du fabricant. L’obligation de LiftMaster en vertu
de cette garantie se limite spécifiquement à la réparation ou au remplacement,
à son choix, de toute pièce défectueuse pendant la période de garantie. Cette
garantie ne s’applique à aucune pièce ayant été modifiée, endommagée,
incorrectement installée ou entretenue, ou réparée par toute personne non
expressément autorisée par écrit par LiftMaster pour effectuer la réparation.
La garantie ne s’appliquera pas aux pièces qui ont été endommagées par un
accident ou un usage inapproprié, ou aux dommages qui ne sont pas dus à
une défectuosité. Toutes les autres garanties, y compris, sans toutefois s’y
limiter, les garanties expresses ou implicites, les garanties de qualité marchande
ou d’adéquation à un usage particulier, font l’objet d’une renonciation
aux présentes, à l’exception des garanties stipulées ci-dessus. En aucune
circonstance LiftMaster ne sera pas responsable des dommages accessoires
ou immatériels, ou des dommages-intérêts particuliers pour perte, qui peuvent
découler d’une réclamation. Toutefois, si LiftMaster est tenue responsable,
de manière directe ou indirecte, pour toute perte ou tout dommage en vertu
de cette garantie limitée ou autre, quelle qu’en soit la cause ou l’origine, la
responsabilité maximale de LiftMaster ne dépassera pas le prix d’achat du
ou des produits individuels, dont le remboursement constituera le recours
complet et exclusif contre LiftMaster. La présente garantie limitée vous confère
certains droits légaux particuliers et il se peut que vous ayez d’autres droits
qui varient d’une province ou d’un État à l’autre. Certains États ou provinces ne
permettent pas les limites ou exclusions ou encore, les garanties implicites pour
dommages accessoires ou immatériels; il est donc possible que les limites ou
exclusions stipulées aux présentes ne s’appliquent pas à vous.
Figure 1
Figure 2
Figure 3
Figure 4
90°
LiftMaster.com
© 2016, LiftMaster
All Rights Reserved
Tous droits réservés
This manual suits for next models
1
Table of contents
Languages:
Other Chamberlain Lifting System manuals
Popular Lifting System manuals by other brands

Audipack
Audipack FFCL-90100 installation manual

ACCO Brands
ACCO Brands ACCOLIFT series instruction manual

Autoquip
Autoquip American Lifts P-25-005 Installation, operation and service manual

pewag
pewag Levo Clamp LC Original operating manual

AAT
AAT ESCALINO G1201 user manual

Ravaglioli
Ravaglioli KPN250LIK manual

Golden
Golden Tornado 4-CYLINDER installation manual

Palfinger
Palfinger LIFTGATES ILM plus Series Troubleshooting

Golden
Golden Tornado 1-CYLINDER installation manual

ShoreStation
ShoreStation SSV30120EDC Service manual

John Bean
John Bean 410E6M instruction manual

Vestil
Vestil FMDL Series Use and maintenance manual