manuals.online logo
Brands
  1. Home
  2. •
  3. Brands
  4. •
  5. FSA
  6. •
  7. Water Filtration System
  8. •
  9. FSA GT1-38THFCC User manual

FSA GT1-38THFCC User manual

Triple Under Sink Water Filter System
With Hollow Fibre & pH Neutralizer
WARNING:
For correct operation of this appliance it is essential to observe the manufacturer’s instructions.
This system is not UV resistant. Install only out of direct sunlight.
Sediment Cartridge = Housing 1 (Incoming)
Hollow Fibre Cartridge = Housing 2 (Center Housing)
Carbon Cartridge = Housing 3 (Final Outgoing)
You MUST flush this cartridge before use. This will release any carbon and calcite fines as these are a dry
packed cartridge. This must be flushed until the water runs clear. Please ensure once this is complete that you
then attach the cartridge correctly and check for any leaks.
This system must be mounted in a vertical position and must be positioned to allow access for service and
filter cartridge changing. At the same time, the assembly should be relatively near the faucet to maximize flow
rate.
On fittings where thread tape is required, we recommend 6 full rounds of thread tape per thread.
Water Tubing (hose) should be cut with a sharp, clean knife in a straight line to ensure correct seating into the
quick connect fittings/components.
Once installation is complete the installer should inspect for leaks.
PLEASE NOTE –All components that come pre-assembled will require tightening and checking before
installation. The housings are only firmly hand tightened and will require tightening upon installation. Due to
transit, fittings and other components may be loosened or unseated from vibrations so please go along and
check all things including but not limited to: Tubing, Fittings, Tubing connections (between tube and fitting),
O-rings, housings and filters.
Hollow UF (Ultra Fine) Fibre Filtration for Drinking Water
Ultra-fine filtration is here and changing the way we filter water. The ability to filter water right down to 0.1
micron, takes away the need for powered U/V appliances. This is of particular relevance in older homes where
power points are not readily found under sinks.
UF - HF (Ultra Fine Hollow Fibre) filtration is wide spread in commercial applications, where they can be
backwashed and re-used. However given the domestic nature of residential drinking water filtration,
backwashing isn’t viable - particularly now that the prices for this type of filtration have dropped to
reasonable values. The price drop is all thanks to the ever growing demand of this revolutionary new filtration
option.
The in-line version has a multitude of applications from retrofitting to standard twin system or stand-alone
filtering for camper van, caravan, and motor homes. This filter delivers safe water regardless of the water
supply it is being used on at the time. This is not reverse osmosis so there is no waste water but you still
obtain 0.1 micron filtering.
We have designed these in an "outside -in” direction so the life of the filter is enormously extended, but like
all filtration the dirtier the water, the faster the cartridge will expire.
Features:
Filters to 0.1 Micron
Blocks Giardia and Crypto (which are commonly found in tank & non-municipal supplies)
Available to fit 10" x 2.5" Housings (Standard Aus. size)
May eliminate the need for costly U/V Light Systems
No waste water produced (unlike Reverse Osmosis Systems)
Disclaimer....
Although every effort has been made to qualify the manufactures claims of a 0.1 micron rating.
We need to advise that this is an uncertified nominal rating, and as such, re-sellers, agents and distributors
are not to be held responsible for ill health relating to a performance of this hollow fibre cartridge when used
as the sole defence against bacteria, viruses or cysts.
Installation of Water Supply Connector
NB. Any connection put into a mains supply should be done by a licensed plumber.
1. Turn off the water connection under your sink or the main water supply. Open the tap to release the
pressure.
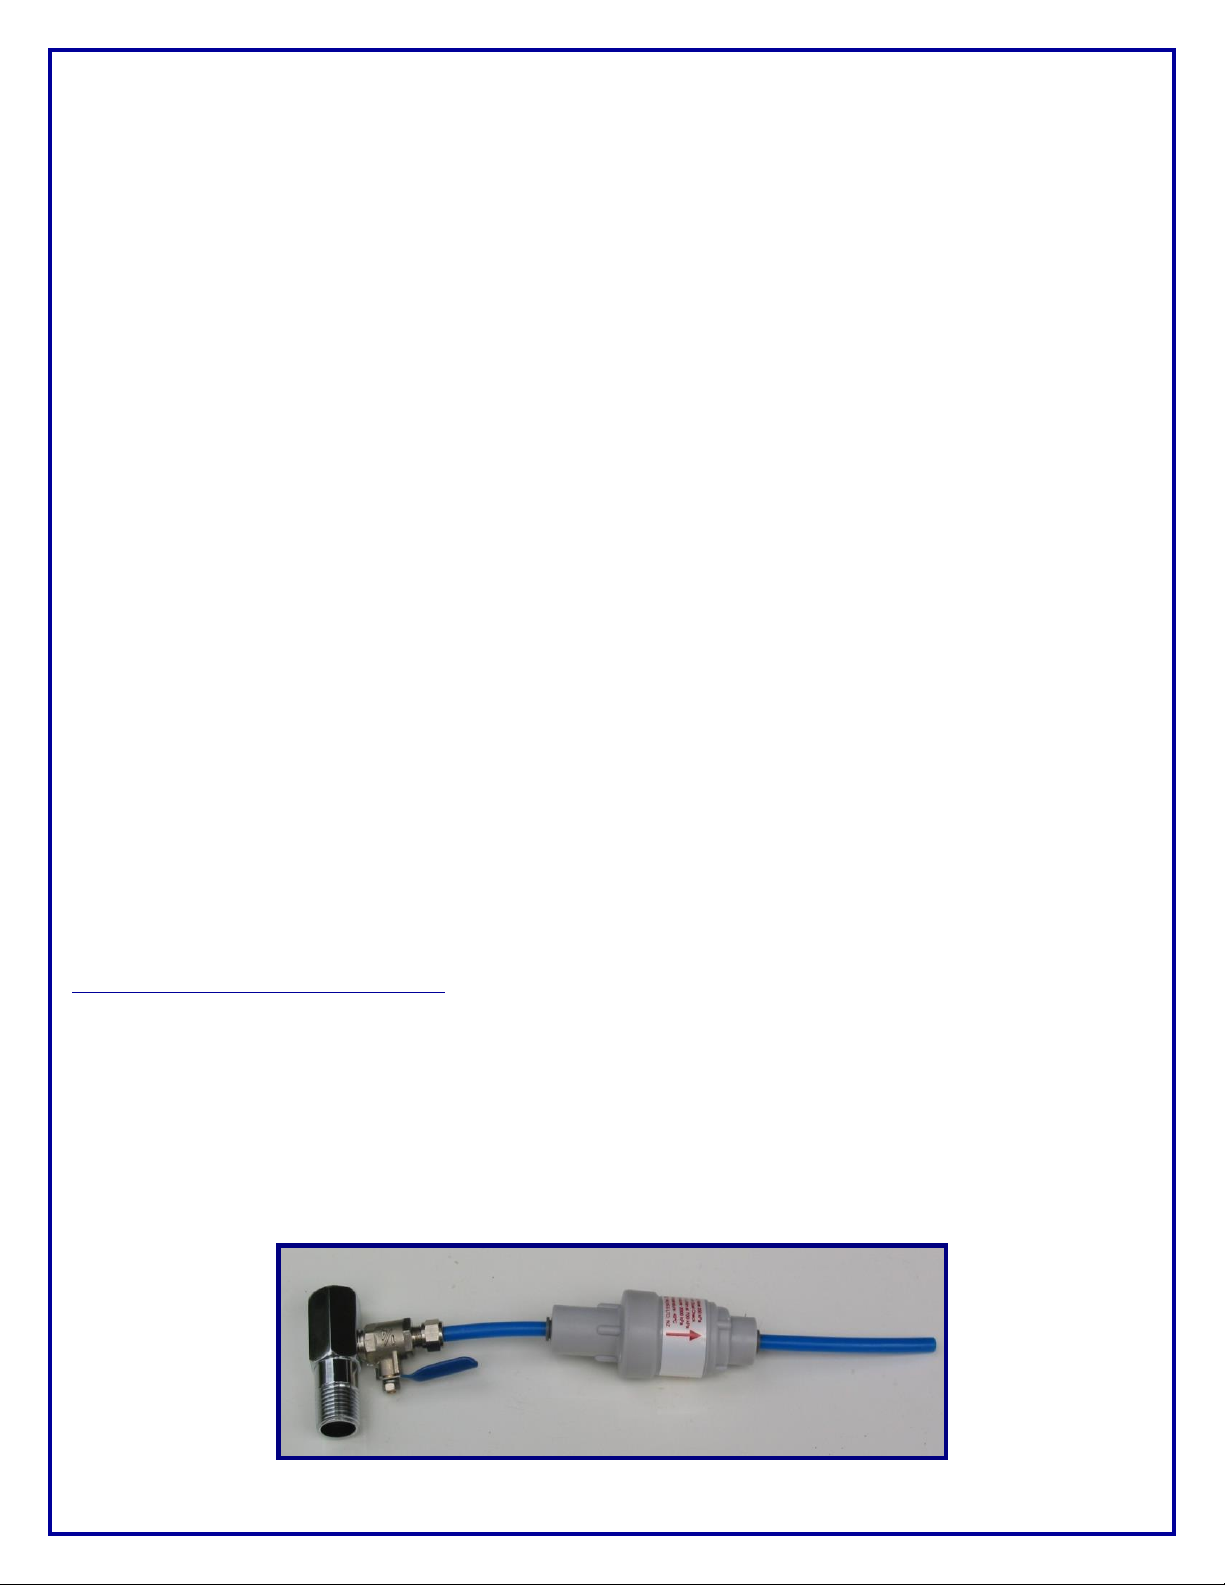
2 The PLV is an inline application. Place the PLV inline from the water supply to the first filter. This will provide
480 kpa protection to the filter system.
(Refer to the picture provided below that shows the chrome adaptor block with the brass ball valve tap
screwed into it –then leading to a PLV if supplied)
Note: Parts & Components may vary. This picture is for display purposes only.
Note: Some models may include this fitting:
Working with Quick Connect Fittings
Quick connect fittings are very quick and extremely easy to use once you know how. Ensure all water tubing is
cut with a clean straight edge so it does not damage the quick connect fitting once inserted. To install simply
push the water line firmly into the quick connect fitting. To remove water line from quick connect fitting
simply depress the outer collar on the fitting and pull the water line out. If you do not depress the collar you
WILL NOT remove the water line.
Note: Parts and components will vary.
This picture is for display purposes only
Mounting the Purification System
1. Mark screw locations at the desired positions. Use the two holes on back of purification assembly mounting
bracket for marker guides.
2. Screw wood screws - Not supplied with unit, into marked positions. Leave screw heads out a little.
3. Mount purification system onto screws
Installation of Faucet
1. Using a small drill bit, drill a pilot hole.
2. Using the 11mm drill bit, drill a hole through the base metal. Operate the drill slowly and carefully,
especially when the drill is about to penetrate the metal. If necessary use a drop or two of oil in the hole.
If so –this fitting is designed to replace
the chrome adaptor block and chrome
ball valve tap pictured above.
3. Mount the sink top faucet in the hole and using an adjustable wrench (or hand) to hold the faucet, tighten
the 9/16" nut.
4. Connect the tube from the outlet side of the pH neutralizing cartridge to the faucet.
Start Up Procedure:
1. With everything connected, turn on the water check for leaks.
2. Let the water run for at least 5-10 minutes. This flushes the system on first time use.
3. Close the sink tap faucet. Check the system for leaks.
The system is now ready for use.
Caution for Your Safety
�Change filters regularly every 6 to 12 months.
�Use only cartridges suitable for this appliance.
�Flush system for 5 minutes after a period of non-use exceeding 30 days.
FILTER CHANGING PROCEDURES
All filters should be changed every 12 months at the latest or 8,000 litres. Not changing your filters regularly
can cause bacteria to grow and contaminate the water.
Sediment and Carbon Filters
1. Turn inline ball valve off.
2. Open faucet to help de-pressurize system.
Note: Lay a towel down to catch any small water spillage.
3. Unscrew filter housings by turning counter clockwise.
4. Remove old filters and discard. Then follow sanitizing procedure.
5. Insert new filters into appropriate housings.
6. Replace "O" rings as necessary. Be sure "O" ring is clean, lubricated and seated properly when tightening.
Never use Vaseline or any other petroleum based sealant. It may breakdown the "O" ring or the seat of the
filter housing and cause a failure (leak).
7. Flush the system for 5 –10 minutes to get rid of any carbon fines. Then follow normal system start up
procedures.
RECOMMENDED SANITISING PROCEDURE
The best time to sanitize is when changing the filters. It is recommended to sanitize the whole system a
minimum of once a year.
1. Shut off water inlet tap valve. Remove old filters. We recommend you use a product called HydraSil Water
Sanitizer. It is a food grade water sanitizer. Follow the sanitizer instructions and place liquid into each of the
empty filter housings. Reassemble the filter housings without filters.
2. Turn water supply back on to about 30% of maximum flow rate.
3. Shut off water supply. Let entire system sit for about 2 hours to thoroughly sanitize.
4. Shut off the incoming tap valve.
5. Open faucet to release pressure. Turn on inlet water at ball valve. Flush the system for 10 –15 minutes.
PERFORMANCE SHEET –Relating to Carbon
Production rate 1.5 Lpm for best results.
Contaminant
Organic
Chlorine Over 95% Herbicides Over 95%
Pesticides Over 95% DDT Over 95%
Endrin Over 95% Lindane Over 95%
Aldrin Over 95% Benzene Over 95%
VOCs Over 95% Adrazin Over 95%
Fluorathene Over 95% Phenol Over 95%
Trihalomethanes Over 95% Toxaphene Over 95%
Dichloromethane Over 95% Chloroform Over 95%
Trichlorethylene Over 95% Perchlorethylene Over 95%
Tannic Acids Over 95% Cryptosporidium Over 99%
950PL Only
Giardia Cysts Over 99% Lead To 2000 Gallons
CAUTION: Do not use with water that is microbiologically unsafe or with water of unknown quality without
adequate disinfection before or after the system. Systems certified for cyst reduction may be used on
disinfected water that may contain filterable cysts.

Other FSA Water Filtration System manuals

FSA GT1-26-4 User manual

FSA

FSA GT1-26-4 User manual

FSA GT1-23LS User manual

FSA

FSA GT1-23LS User manual

FSA GT1-100 User manual

FSA

FSA GT1-100 User manual

FSA GT1-20LS User manual

FSA

FSA GT1-20LS User manual

FSA H1-EQ5AN User manual

FSA

FSA H1-EQ5AN User manual

FSA GT1-70B User manual

FSA

FSA GT1-70B User manual

FSA GT1-18 User manual

FSA

FSA GT1-18 User manual

FSA GT1-13 User manual

FSA

FSA GT1-13 User manual

FSA GT1-26-4SCC User manual

FSA

FSA GT1-26-4SCC User manual

FSA GT1-70 User manual

FSA

FSA GT1-70 User manual

FSA GT1-39RODI User manual

FSA

FSA GT1-39RODI User manual

FSA GT1-70CC User manual

FSA

FSA GT1-70CC User manual

FSA GT39-18 User manual

FSA

FSA GT39-18 User manual

FSA GT1-26-7 User manual

FSA

FSA GT1-26-7 User manual

FSA GT1-70DIALK User manual

FSA

FSA GT1-70DIALK User manual

FSA GT1-98 User manual

FSA

FSA GT1-98 User manual

FSA GT1-12LS User manual

FSA

FSA GT1-12LS User manual

FSA SHUTTLE User manual

FSA

FSA SHUTTLE User manual

FSA GT1-26-5 User manual

FSA

FSA GT1-26-5 User manual

Popular Water Filtration System manuals by other brands

Hayward Salt & Swim 3C owner's manual

Hayward

Hayward Salt & Swim 3C owner's manual

Hydrotech UVB1 Installation manual & owner's guide

Hydrotech

Hydrotech UVB1 Installation manual & owner's guide

Wateranywhere AAA-RO50UVW MANUAL FOR INSTALLATION, OPERATION AND MAINTENANCE

Wateranywhere

Wateranywhere AAA-RO50UVW MANUAL FOR INSTALLATION, OPERATION AND MAINTENANCE

Zenith HydroTap installation instructions

Zenith

Zenith HydroTap installation instructions

Rozone ROWASHER operating manual

Rozone

Rozone ROWASHER operating manual

SpectraPure CSPDI-180 Installation and operating manual

SpectraPure

SpectraPure CSPDI-180 Installation and operating manual

Katadyn 2040000 manual

Katadyn

Katadyn 2040000 manual

PREMIER TECH Ecoflo STB-650B owner's manual

PREMIER TECH

PREMIER TECH Ecoflo STB-650B owner's manual

Sony VF-30CPKXS operating instructions

Sony

Sony VF-30CPKXS operating instructions

Hydac OLS 10-Z Series Installation and maintenance instructions

Hydac

Hydac OLS 10-Z Series Installation and maintenance instructions

Hommix BMB-1000 Pro Nano Home installation guide

Hommix

Hommix BMB-1000 Pro Nano Home installation guide

Watts PWRO4 Installation, operation and maintenance manual

Watts

Watts PWRO4 Installation, operation and maintenance manual

Hozelock Cyprio Trinamic 12,500 Installation and operating instructions

Hozelock Cyprio

Hozelock Cyprio Trinamic 12,500 Installation and operating instructions

Boge BEKOMAT 32 Instructions for operation

Boge

Boge BEKOMAT 32 Instructions for operation

AEM EASY DRUM manual

AEM

AEM EASY DRUM manual

Dell OptiPlex 3080 install guide

Dell

Dell OptiPlex 3080 install guide

UV Dynamics UVD600/S Installation and maintenance manual

UV Dynamics

UV Dynamics UVD600/S Installation and maintenance manual

Moen MicroTech 9000 Replacement instructions

Moen

Moen MicroTech 9000 Replacement instructions

manuals.online logo
manuals.online logoBrands
  • About & Mission
  • Contact us
  • Privacy Policy
  • Terms and Conditions

Copyright 2025 Manuals.Online. All Rights Reserved.