manuals.online logo
Brands
  1. Home
  2. •
  3. Brands
  4. •
  5. Chargetek
  6. •
  7. Batteries Charger
  8. •
  9. Chargetek CT500-5 User manual

Chargetek CT500-5 User manual

Chargetek
409 Calle San Pablo, Unit 104, Camarillo, CA 93012 ~ Phone: (866) 482-7930 ~ Fax: (805) 482-7936

CT500-5 operation

indicator lights inform the user of the progress of the charging

CT500-5 LED indicators
The dual color charging mode light indicates the state of charge





Please read the entire installation manual

are any questions or concerns, please email


     
        
permanently mounted on almost any type

    
  
product line is particularly suited for storage,
    
The charger can be left connected to the bat-

The CT500-5 is a three stage charger that
      
        -
      


CT500-5


PARAMETER DESCRIPTION / CONDITIONS MIN NOM MAX UNITS
VFSTERM Fast charge voltage, 25C 14.4 14.5 14.6 VDC
VFLOAT Float voltage, IOUT < 1.0 A, 25 C 13.4 13.5 13.6 VDC
IFS Fast charge, VBATTERY = 12V 5.0 5.2 5.4 Amps
IFLTERM Float charge termination current 0.8 1.2 1.5 Amps
VAC RMS AC voltage range 180 240 264 VAC
ISBY Standby current, AC off 0.5 ma
Outline and mounting
LIMITED WARRANTY

at its discretion repair or replace for the original consumer,
free of charge, any part or parts found to be defective by






This is the exclusive remedy and consequential damages

The CT500-5 must be connected to the battery in order for the


-


to check to be certain that the green light is on and the battery






ever illuminates, the unit should be removed and returned to
        

6.000
3.170
5.250
.21 x 2
.21 x 2
.44 x 2
1.750
6.000
2.580
.160
4.544
DC Output
Cord
AC Input
Cord
3.170
2.580
2.764
1.590

Installation
Location
           


hot surfaces such as exhaust pipes and moving parts such

        

Provide as much surrounding cooling clearance as possible

At a minimum, maintain a 3 inch clearance around the

Never mount in the vicinity of explosives, pressurized cans

Mounting




For extreme vibration conditions common in ATV and PWC
applications, added security such as crossed shock cords

Electrical
AC wire connections


It is extremely important that
only grounded electrical outlets or extension cords with
a ground connection should be used when operating this
charger.
Never connect the AC plug into an electrical outlet if you are

        





DC wire connections






When installing in the bilge of boats or any battery compart-

operating for ten minutes to remove any fumes and hydrogen





       


current source and additional protection is needed in the

        

positive battery charger lead and the battery positive terminal
-



-
tive terminal of the battery and the black lead is connected

volt batteries connected in a series, connect the red lead of

 




the amount of charge and discharge be equal for both bat-

-



Safety instructions
CAUTION: The following are important safety instructions.
Save these instructions.

       

           












         
       






        
         

When using an extension cord, the CT500-5 requires a quality



    

       



is visibly damaged, disconnect the charger and consult the

      

  


Good battery maintenance procedures dictate that the battery





       
       


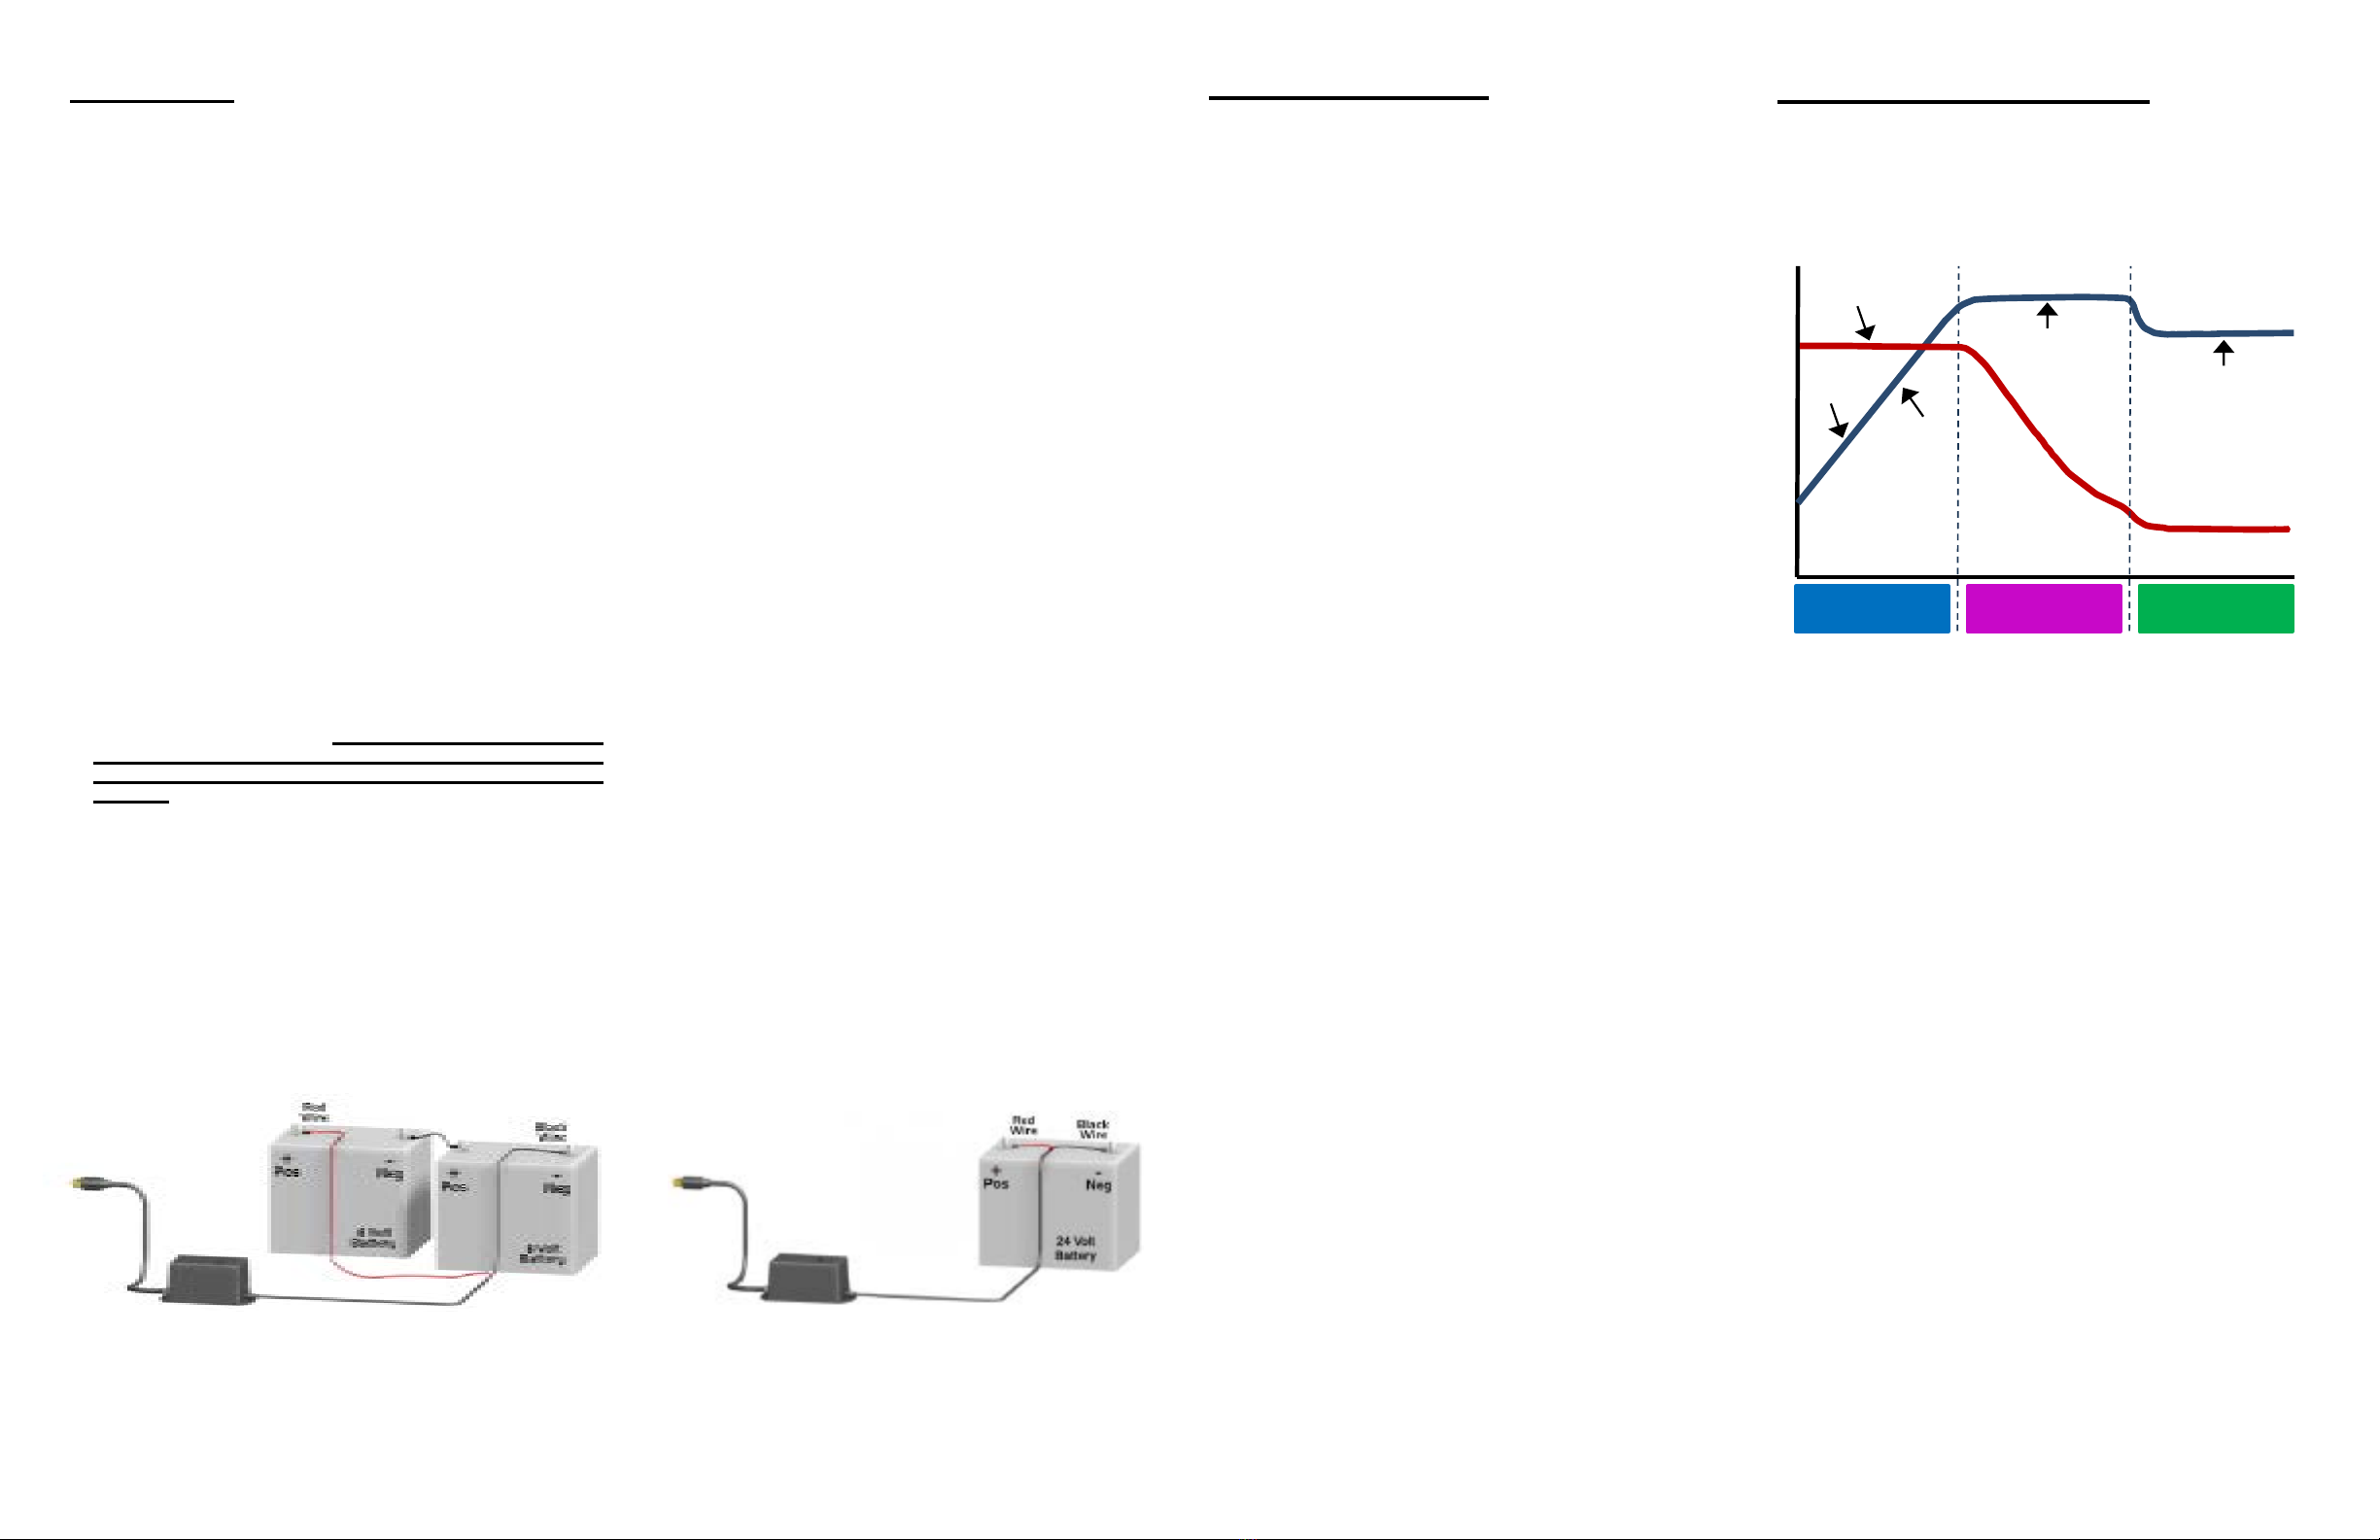
Stage 1: Constant current or bulk charge mode
Assuming that the battery is starting in a discharged state, the
 
current is maintained at a constant value and the battery voltage


Stage 2: Absorption mode



This voltage is maintained until the charging current reduces


Stage 3: Float mode

mode, the voltage on the battery is maintained at approximately

-

Three stage charging curve
Three stage charge cycle

charging procedure most lead-acid battery manufacturers rec-

Single 24V battery connectionTwo 12V battery connections
Battery
voltage
Stage 1: Bulk
(constant current)
Stage 2: Absorption
(constant voltage)
Voltage constant,
current decreasing
Battery
current
Absorption
Voltage constant,
full charge maintained
Stage 3: Float
(constant voltage)
Float
Bulk

Other Chargetek Batteries Charger manuals

Chargetek CT500-3 User manual

Chargetek

Chargetek CT500-3 User manual

Chargetek CT500 - 1 User manual

Chargetek

Chargetek CT500 - 1 User manual

Chargetek RTIC 1120-WP User manual

Chargetek

Chargetek RTIC 1120-WP User manual

Chargetek CT500-2 User manual

Chargetek

Chargetek CT500-2 User manual

Chargetek CK150-4 User manual

Chargetek

Chargetek CK150-4 User manual

Chargetek RTIC 2405-WP User manual

Chargetek

Chargetek RTIC 2405-WP User manual

Chargetek RTIC-2307-FC User manual

Chargetek

Chargetek RTIC-2307-FC User manual

Chargetek RTIC-1405-WP User manual

Chargetek

Chargetek RTIC-1405-WP User manual

Chargetek RTIC-2307 User manual

Chargetek

Chargetek RTIC-2307 User manual

Chargetek RTIC-1120-FC User manual

Chargetek

Chargetek RTIC-1120-FC User manual

Chargetek RTIC-2405-FC User manual

Chargetek

Chargetek RTIC-2405-FC User manual

Chargetek RTIC-2120-WP User manual

Chargetek

Chargetek RTIC-2120-WP User manual

Chargetek RTIC-1120-W User manual

Chargetek

Chargetek RTIC-1120-W User manual

Chargetek CT500-6 User manual

Chargetek

Chargetek CT500-6 User manual

Chargetek RTIC-2210-WP User manual

Chargetek

Chargetek RTIC-2210-WP User manual

Chargetek RTIC-1405-FC User manual

Chargetek

Chargetek RTIC-1405-FC User manual

Chargetek RTIC-2120-FC User manual

Chargetek

Chargetek RTIC-2120-FC User manual

Chargetek RTIC-1210-FC User manual

Chargetek

Chargetek RTIC-1210-FC User manual

Chargetek RTIC-1210 User manual

Chargetek

Chargetek RTIC-1210 User manual

Chargetek RTIC-1120-WP User manual

Chargetek

Chargetek RTIC-1120-WP User manual

Chargetek TPRO-220 User manual

Chargetek

Chargetek TPRO-220 User manual

Chargetek TPRO-320 User manual

Chargetek

Chargetek TPRO-320 User manual

Chargetek RTIC-1307-WP User manual

Chargetek

Chargetek RTIC-1307-WP User manual

Chargetek CK150-2 User manual

Chargetek

Chargetek CK150-2 User manual

Popular Batteries Charger manuals by other brands

TecMate Optimate 6 TM180 Instructions for use

TecMate

TecMate Optimate 6 TM180 Instructions for use

TE Connectivity 2063870-1 instruction sheet

TE Connectivity

TE Connectivity 2063870-1 instruction sheet

SpectraLink NetLink i640 Configuration

SpectraLink

SpectraLink NetLink i640 Configuration

Sealey SUPERBOOST 140.V2 instructions

Sealey

Sealey SUPERBOOST 140.V2 instructions

Gardena 8833 Operator's manual

Gardena

Gardena 8833 Operator's manual

Petzl DUO Z1 TECHNICAL NOTICE

Petzl

Petzl DUO Z1 TECHNICAL NOTICE

PulseTech SC-6 instruction manual

PulseTech

PulseTech SC-6 instruction manual

Vector VEC1090 A Owner's manual & warranty information

Vector

Vector VEC1090 A Owner's manual & warranty information

HEIDELBERG Stele Solo operating instructions

HEIDELBERG

HEIDELBERG Stele Solo operating instructions

GRAUPNER S2007 Ultra DC Quad operating instructions

GRAUPNER

GRAUPNER S2007 Ultra DC Quad operating instructions

Lenmar BCR261 owner's manual

Lenmar

Lenmar BCR261 owner's manual

Enecharger ICS1 manual

Enecharger

Enecharger ICS1 manual

Powermat PMR-NOK1-EU owner's manual

Powermat

Powermat PMR-NOK1-EU owner's manual

CBE ENERGY CB516-3 user manual

CBE

CBE ENERGY CB516-3 user manual

Ripmax Pro-Peak Varipulse IP2500VP user guide

Ripmax

Ripmax Pro-Peak Varipulse IP2500VP user guide

West Marine Smart Battery Charger user manual

West Marine

West Marine Smart Battery Charger user manual

KREAFUNK wiTRAY Operation manual

KREAFUNK

KREAFUNK wiTRAY Operation manual

Mobee The Magic Feet MO4212 quick start guide

Mobee

Mobee The Magic Feet MO4212 quick start guide

manuals.online logo
manuals.online logoBrands
  • About & Mission
  • Contact us
  • Privacy Policy
  • Terms and Conditions

Copyright 2025 Manuals.Online. All Rights Reserved.