Chauvet DJ FESTOON 2 RGB User manual

User Manual

TABLE OF CONTENTS
Festoon 2 RGB User Manual Rev. 1
TABLE OF CONTENTS
1. Before You Begin ......................................................................................... 1
What Is Included ...................................................................................................... 1
Unpacking Instructions............................................................................................. 1
Claims ............................................................................................................................ 1
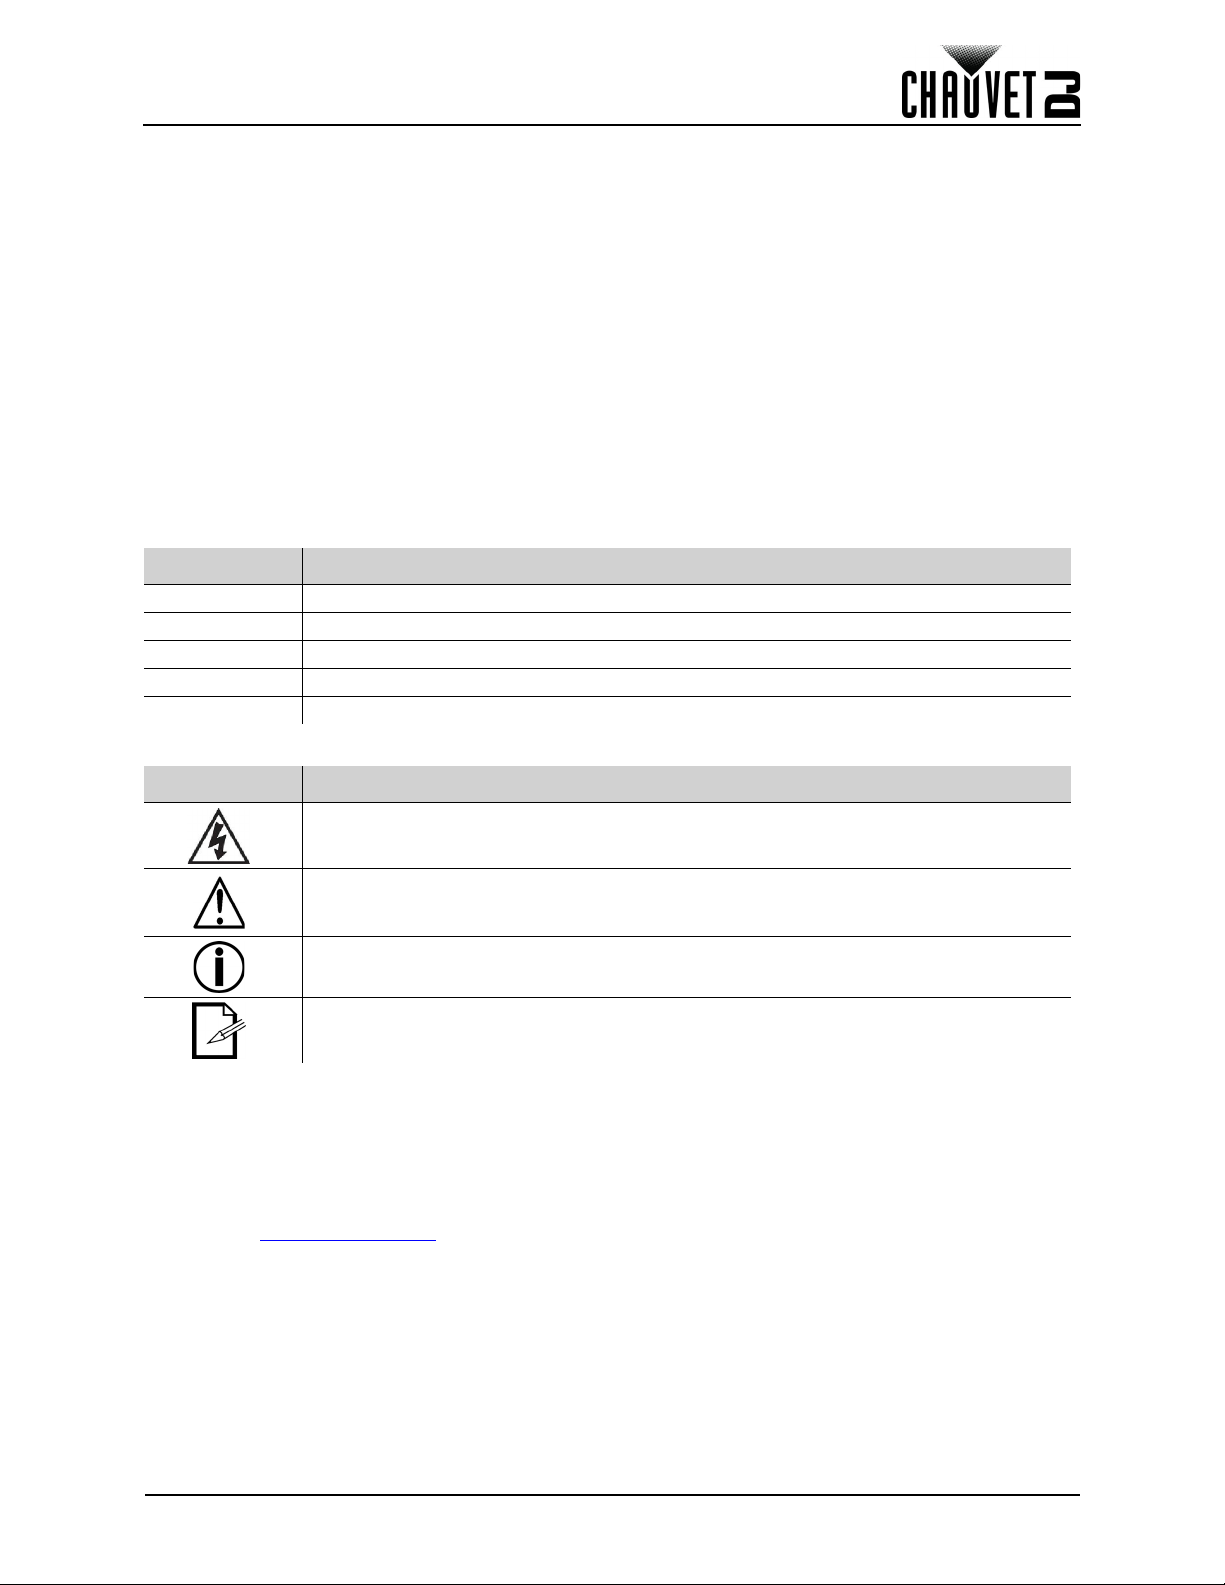
Text Conventions ..................................................................................................... 1
Symbols ................................................................................................................... 1
Disclaimer ................................................................................................................ 1
Intellectual Property ................................................................................................. 1
Safety Notes............................................................................................................. 2
2. Introduction................................................................................................... 3
Product Overview..................................................................................................... 3
Product Dimensions ................................................................................................. 4
3. Setup.............................................................................................................. 5
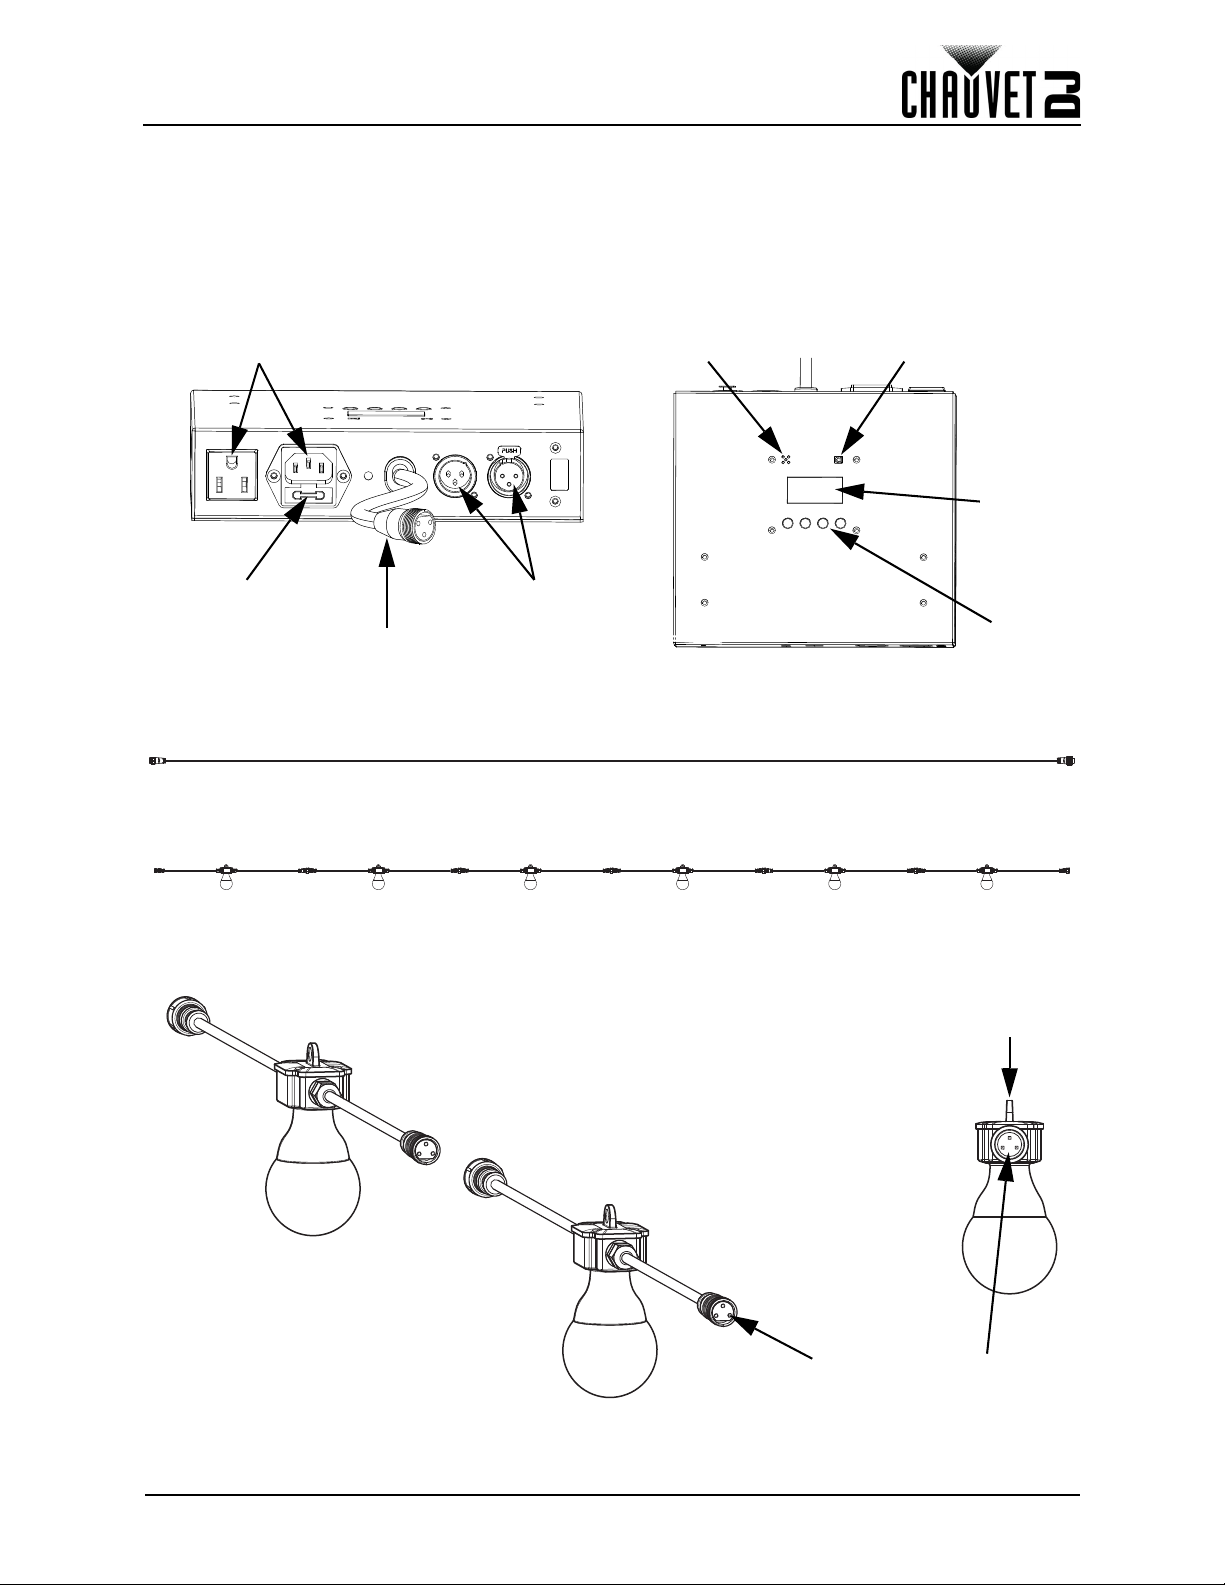
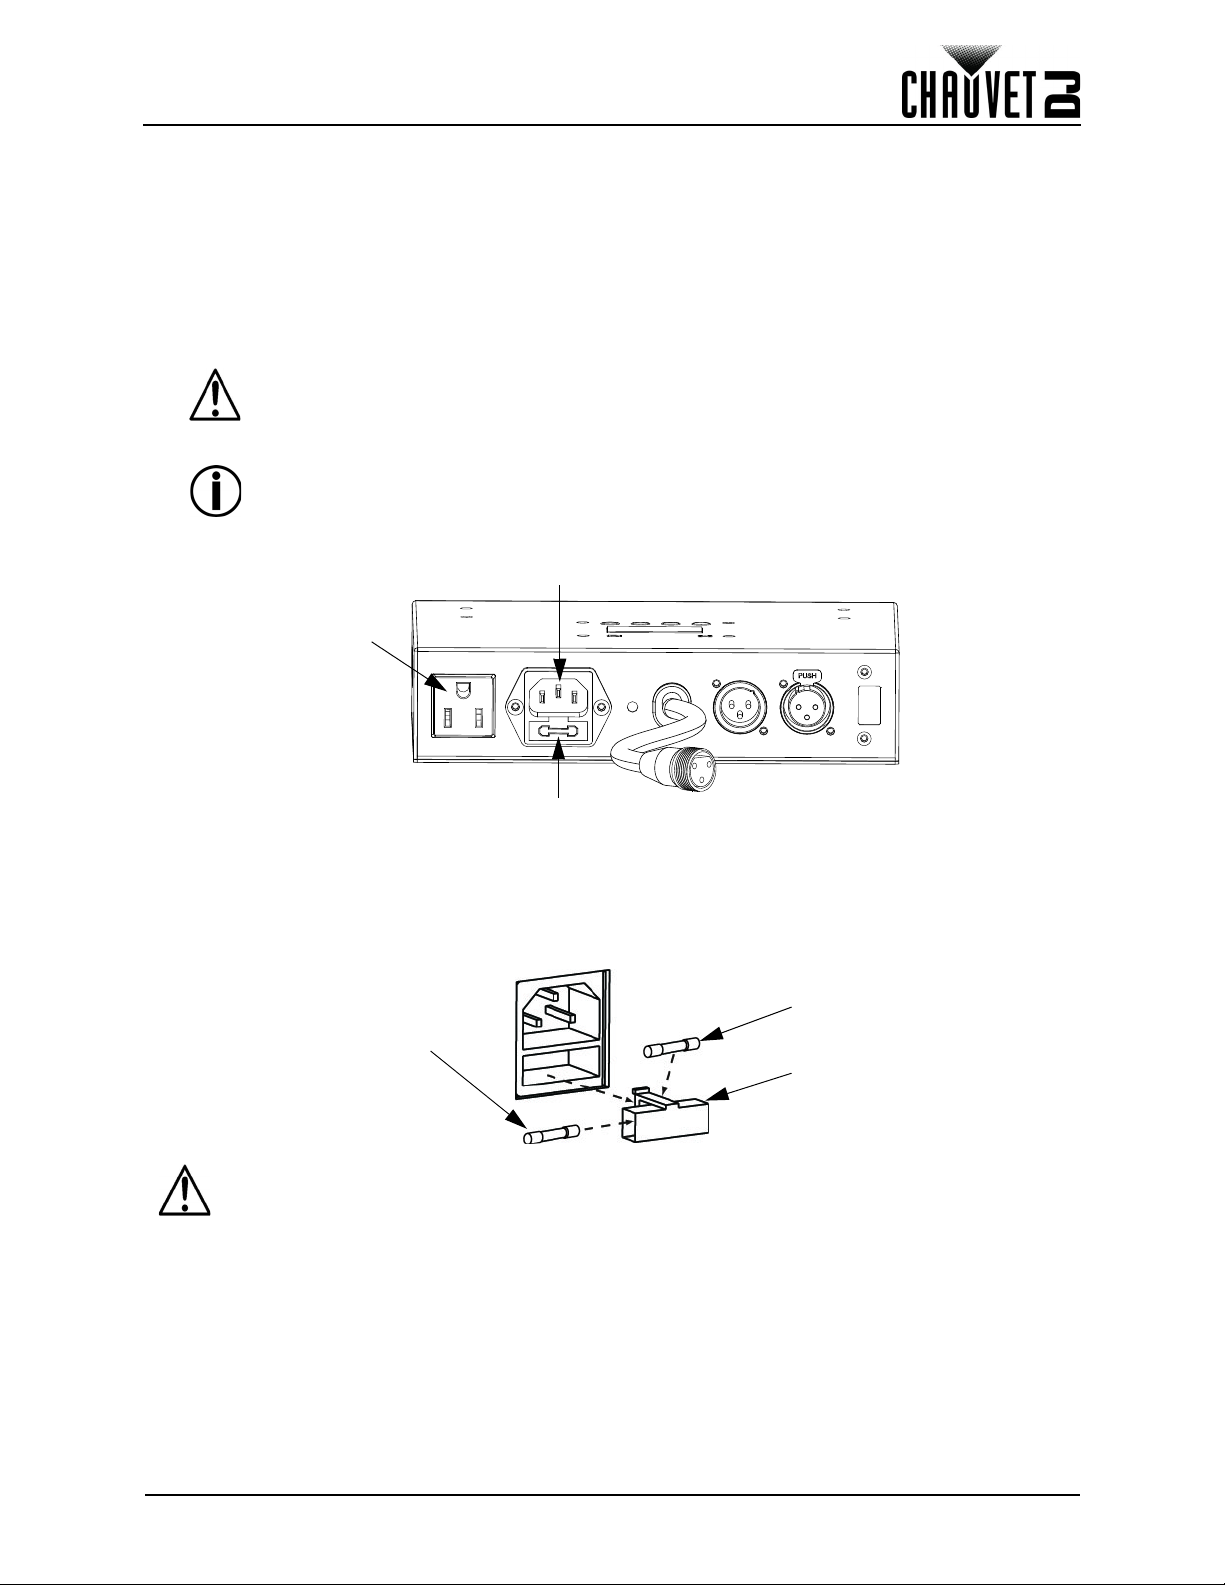
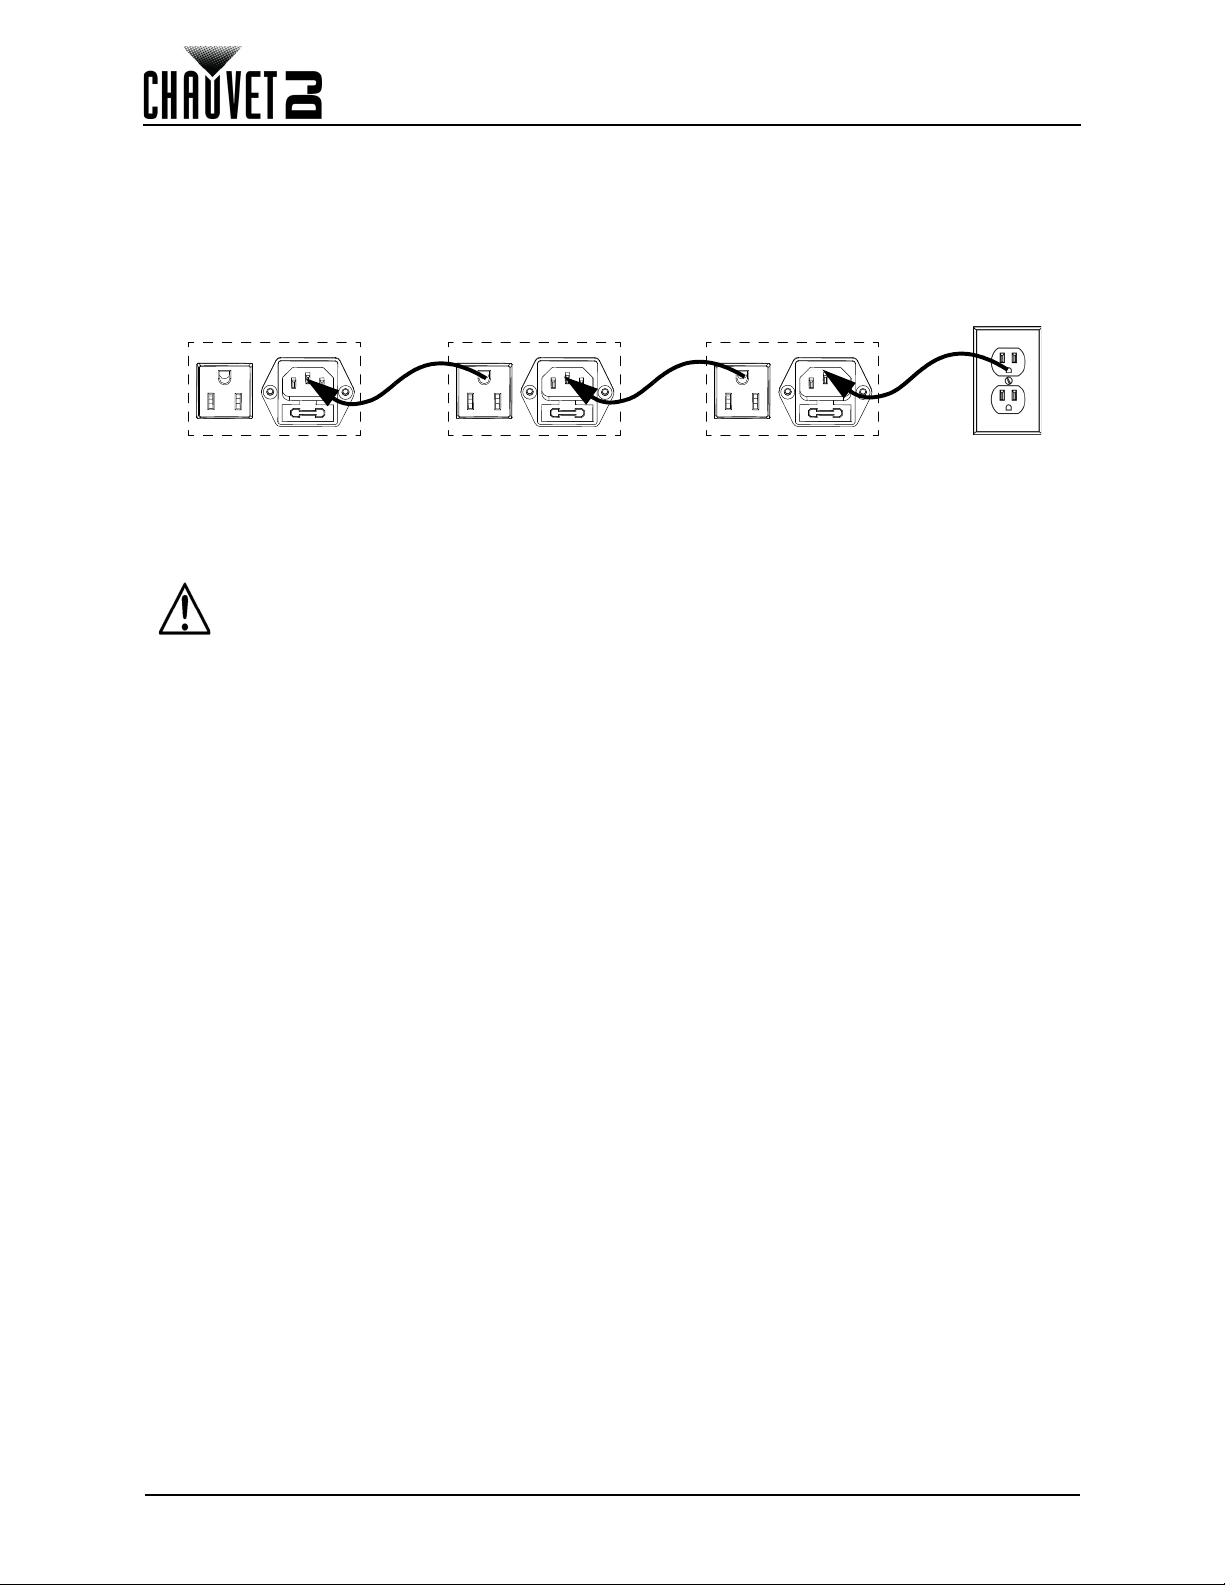
AC Power ................................................................................................................. 5
Fuse Replacement ......................................................................................................... 5
Power Linking................................................................................................................. 6
Mounting .................................................................................................................. 7
Controller........................................................................................................................ 7
Mounting .................................................................................................................. 8
Festoon String Linking ................................................................................................... 8
4. Operation....................................................................................................... 9
Control Panel Operation........................................................................................... 9
Menu Map ................................................................................................................ 9
Configuration (DMX) ................................................................................................ 10
DMX Personality and Starting Address.......................................................................... 10
Set # of Festoon 2 RGB Strings..................................................................................... 10
DMX Channel Assignments and Values ........................................................................ 11
Pixel Mapping Personalities ........................................................................................... 12
Configuration (Standalone) ...................................................................................... 18
Control Mode.................................................................................................................. 18
Static Colors................................................................................................................... 18
Automatic Programs....................................................................................................... 18
Sound Mode Sensitivity.................................................................................................. 18
Manual Color Mixing ...................................................................................................... 18
Dimmer Curve ................................................................................................................ 18
IRC-6 Infrared Remote Control ................................................................................ 19
IRC-6 Operation ............................................................................................................. 19
5. Maintenance.................................................................................................. 20
Product Maintenance ............................................................................................... 20
6. Technical Specifications.............................................................................. 21
Returns.............................................................................................................. 22
Contact Us......................................................................................................... 23

Page 1 of 23
Festoon 2 RGB User Manual Rev. 1
BEFORE YOU BEGIN
1. BEFORE YOU BEGIN
What Is Included
Unpacking Instructions
Carefully unpack the product immediately and check the container to make sure all the parts are in the
package and are in good condition.
Claims
If the box or the contents (the product and included accessories) appear damaged from shipping, or show
signs of mishandling, notify the carrier immediately, not Chauvet. Failure to report damage to the carrier
immediately may invalidate your claim. In addition, keep the box and contents for inspection.
For other issues, such as missing components or parts, damage not related to shipping, or concealed
damage, file a claim with Chauvet within 7 days of delivery.
Text Conventions
Symbols
Disclaimer
Chauvet believes that the information contained in this manual is accurate in all respects. However,
Chauvet assumes no responsibility and specifically disclaims any and all liability to any party for any loss,
damage or disruption caused by any errors or omissions in this document, whether such errors or
omissions result from negligence, accident or any other cause. Chauvet reserves the right to revise the
content of this document without any obligation to notify any person or company of such revision, however,
Chauvet has no obligation to make, and does not commit to make, any such revisions. Download the latest
version from www.chauvetdj.com.
Intellectual Property
The works of authorship contained in this manual, including, but not limited to, all design, text and images
are owned by Chauvet.
© Copyright 2020 Chauvet & Sons, LLC. All rights reserved.
Electronically published by Chauvet in the United States of America.
CHAUVET, the Chauvet logo, and Festoon 2 RGB are registered trademarks or trademarks of Chauvet &
Sons LLC. (d/b/a Chauvet and Chauvet Lighting) in the United States and other countries. Other company
and product names and logos referred to herein may be trademarks of their respective companies.
• Festoon 2 RGB Controller
•20RGBbulbs
• Extension Cable (5 m)
• Power Cord
• Quick Reference Guide
CONVENTION MEANING
1–512 A range of values
50/60 A set of values of which only one can be chosen
Settings A menu option not to be modified
<ENTER> A key to be pressed on the product’s control panel
ON A value to be entered or selected
SYMBOL MEANING
Electrical warning. Not following these instructions may cause electrical damage to
the product, accessories, or the user.
Critical installation, configuration, or operation information. Not following these
instructions may make the product not work, cause damage to the product, or cause
harm to the operator.
Important installation or configuration information. The product may not function
correctly if this information is not used.
Useful information.

Page 2 of 23
BEFORE YOU BEGIN
Festoon 2 RGB User Manual Rev. 1
Safety Notes
• Always connect the product to a grounded circuit to avoid the risk of electrocution.
•
Always disconnect the product from the power source before cleaning or replacing the fuse
.
• Avoid direct eye exposure to the light source while the product is on.
• Make sure the power cord is not crimped or damaged.
• Never disconnect the product from power cord by pulling or tugging on the cord.
•
If mounting the product overhead, always secure to a fastening device using a safety cable
.
• Make sure there are no flammable materials close to the product when operating.
• The bulbs can get hot with excessive use. Avoid touching them with bare hands, and
always allow the bulb to cool before handling.
• This product is not intended for permanent installation.
• Always make sure that the voltage of the outlet to which you are connecting the product
is within the range stated on the decal or rear panel of the product.
• The Festoon 2 RGB is for indoor or temporary outdoor use (IP54). Do not expose to harsh
or excessively corrosive environmental conditions (whether indoors or outdoors),
including, but not limited to, extreme temperatures, humidity, atmospheric conditions
(including salinity or pressure), radiation (UV, infrared or nuclear), shock and conditions
which exceed the product’s Ingress Protection (IP) rating.
•ALWAYS terminate the open end of your string when being used outdoors or near
moisture.
• Always install the product in a location with adequate ventilation, at least 20 in (50 cm)
from adjacent surfaces.
• Be sure that no ventilation slots on the product’s housing are blocked.
• Never connect the product to a dimmer.
• Make sure to replace the fuse with another of the same type and rating.
• Never carry the product from the power cord or any moving part. Always use the hanging/
mounting bracket.
• The maximum ambient temperature (Ta) is 104 °F (40 °C). Do not operate the product at
higher temperatures.
• In the event of a serious operating problem, stop using the product immediately.
•
Never try to repair the product. Repairs carried out by unskilled people can lead to damage
or malfunction. Please contact the nearest authorized technical assistance center
.
• To eliminate unnecessary wear and improve its lifespan, during periods of non-use
completely disconnect the product from power via breaker or by unplugging it.
Keep this User Manual for future use. If you sell the product, be sure that they receive this
document.

Page 3 of 23
Festoon 2 RGB User Manual Rev. 1
INTRODUCTION
2. INTRODUCTION
Product Overview
Festoon 2 RGB Controller
Extension Cable
Festoon 2 RGB String of Bulbs
Festoon 2 RGB Bulb (In Detail)
Fuse Holder
Festoon String Port Menu
Buttons
IR Receiver
DMX In/Out
Back Panel View
Mic
Top Panel View
Display
Power In/Out
Mounting
Eyelet
IP54 Rated Socket,
Cabling and Plug

Page 5 of 23
Festoon 2 RGB User Manual Rev. 1
SETUP
3. SETUP
AC Power
The Festoon 2 RGB has an auto-ranging power supply and it can work with an input voltage range of 100
to 240 VAC, 50/60 Hz. To determine the product’s power requirements (circuit breaker, power outlet, and
wiring), use the current value listed on the label affixed to the product’s back panel, or refer to the product’s
specifications chart. The listed current rating indicates the product’s average current draw under normal
conditions.
Fuse Replacement
1. Wedge the tip of a flat-head screwdriver into the slot of the fuse holder.
2. Pry the fuse holder out of the housing.
3. Remove the blown fuse from the holder and replace with a fuse of the exact same type and rating.
4. Insert the fuse holder back in place and reconnect power.
• Always connect the product to a protected circuit (circuit breaker or fuse).
Make sure the product has an appropriate electrical ground to avoid the risk of
electrocution or fire.
• To eliminate unnecessary wear and improve its lifespan, during periods of non-
use completely disconnect the product from power via breaker or by
unplugging it.
Never connect the product to a rheostat (variable resistor) or dimmer circuit, even if
the rheostat or dimmer channel serves only as a 0 to 100% switch.
Disconnect the product from the power outlet before replacing the fuse.
Fuse Holder
Power In
Power Out to
Next Product
Safety cap
Spare fuse holder
(inside safety cap)
Installed fuse
(held by plastic clip)

Page 6 of 23
SETUP
Festoon 2 RGB User Manual Rev. 1
Power Linking
The product provides power linking via the Edison outlet located in the back of the product. Please see the
diagram below for further explanation. The Festoon 2 RGB controller can each control up to 3 strings (60
bulbs)
Power Linking Diagram
The power linking diagram corresponds to the North American version of the product ONLY!
If using the product in other markets, you must consult with the local Chauvet distributor as
power linking connectors and requirements may differ in your country or region.
1st Product
2nd Product
Additional
Products

Page 7 of 23
Festoon 2 RGB User Manual Rev. 1
SETUP
Mounting
Controller
Before mounting the product, read and follow the safety recommendations indicated in the Safety Notes.
Orientation
The Festoon 2 RGB controller may be mounted in any position; however, make sure adequate ventilation
is provided around the product.
Rigging
• Before deciding on a location for the product, always make sure there is easy access to the product
for maintenance and IRC or programming purposes.
• Make sure that the structure onto which you are mounting the product can support the product’s
weight. See the Technical Specifications for weight information.
• When mounting the product overhead, always use a safety cable. Mount the product securely to a
rigging point, whether an elevated platform or a truss.
• When rigging the product onto a truss, use a mounting clamp of appropriate weight capacity.
• When power linking multiple products, mount the products close enough for power linking cables to
reach.
Mounting Diagram
Festoon 2 RGB Controller
Safety cable
(such as CH-05
from Chauvet)
M12 Mounting
Hole
Rear Keyhole Mounting

Page 8 of 23
SETUP
Festoon 2 RGB User Manual Rev. 1
Mounting
Festoon String Linking
The Festoon 2 RGB includes 20 RGB bulbs. These bulbs can be connected for a custom length. Every 20
bulbs are considered one LED string for Pixel and Pixel+ DMX personalities. Before mounting the product,
read and follow the safety recommendations indicated in the Safety Notes.
Orientation
The Festoon 2 RGB String may be installed using various ways to achieve a vintage look and feel. The
Festoon 2 RGB can be expendable up to 60 bulbs per controller.
Rigging
• Before deciding on a location for the product, always make sure there is adequate length/distance
to the controller and other strings. Use the extension string if necessary.
• Make sure that the structure onto which you are mounting the product can support the product’s
weight. See the Technical Specifications for weight information.
• Use the built-in eyelets to hang the Festoon/Festoon VW String. The extension string may be hung
with zip-ties or equivalent.
• To prevent line sagging, it is recommended to use every eyelet, or in open installation areas (such
as outdoors) it is recommended to run a guy line and attach the Festoon 2 RGB to the guy wire.
• Use support poles as necessary. Chauvet recommends a support pole every 8 m. If the support
poles are used as end or corner supports, they will need to be tied back.
•
The height of the attachment point should be at least 8 feet (2.4 m), or higher when deemed necessary
.
Mounting Diagram
Your Festoon 2 RGB string may be exposed to rain and moisture and comes with an IP
rated cap meant to terminate the end of the Festoon 2 RGB string. Retain this cap, and
ALWAYS terminate the open end of your string when being used outdoors or near
moisture.
This end goes to additional
Festoon 2 RGB Strings. If
not using additional
strings, terminate the end
of the cable with the
provided IP rated cap.
This end goes to the controller. Use
the extension string if more
distance is needed for mounting.
Festoon 2 RGB String

Page 9 of 23
Festoon 2 RGB User Manual Rev. 1
OPERATION
4. OPERATION
Control Panel Operation
To access the control panel functions, use the four buttons located underneath the display. Please refer to
the Product Overview to see the button locations on the control panel.
Menu Map
Button Function
<MENU> Press to find an operation mode or to back out of the current menu option
<UP> Press to scroll up the list of options or to find a higher value
<DOWN> Press to scroll down the list of options or to find a lower value
<ENTER> Press to activate a menu option or a selected value
Mode Programming Levels Description
Control
Mode Control
DMX
Set the control mode
Music
Auto
Manual
Preset
DMX
Address Address 001–512 Sets the DMX starting address
DMX
Channel Channel
03-CH
Select the DMX personality
09-CH
Pixel
Pixel+
Dimmer
Mode Dim Curve
OFF No dimming effect
Curve1
Sets the dimming speed, fast to slowCurve2
Curve3
Static Color Custom C-01–19 Static colors
Auto
Programs
Program P-01–38 Sp:000–100 Select auto program and speed
Sound
Active
Music 000–100 Select the sound active sensitivity
Manual
Color
Mixing
Manual Color
Red 000–255
Custom color mixing:
Combine red, green, and blue
Green 000–255
Blue 000–255
IR Setting Remote ON Turns IRC-6 control on or off
OFF
LED EXT Led Strg
1 strg Singular Festoon EXT string (20 bulbs)
2 strg + Festoon EXT strings (40 bulbs)
3 strg + 2 Festoon EXT strings (60 bulbs)
Back Light
Setting Backlight
ON LED display does not turn off
30S LED display turns off after 30 seconds
60S LED display turns off after 60 seconds
Factory
Default
Reset
Default
NO
Resets to factory default settings
YES
Information Version V_ _ Shows installed software version

Page 10 of 23
OPERATION
Festoon 2 RGB User Manual Rev. 1
Configuration (DMX)
The Festoon 2 RGB works with a DMX controller. If you are not familiar with the DMX protocol, information
about DMX is in the CHAUVET DMX Primer. Download the DMX Primer from http://
www.chauvetlighting.com/downloads/DMX_Primer_rev05_WO.pdf.
DMX Personality and Starting Address
When selecting a starting DMX address, always consider the number of DMX channels the selected DMX
mode uses. If you choose a starting address that is too high, you could restrict the access to some of the
product’s channels.
To select the starting address, do the following:
1. Press <MENU> repeatedly until 03-CH,09-CH,Pixel,or Pixel+ shows on the display.
2. Press <ENTER> and d 1 will show on the display.
3. Use <UP> or <DOWN> to select the starting address.
4. Press <ENTER>.
Set # of Festoon 2 RGB Strings
The Festoon 2 RGB controller can control up to 3 Festoon 2 RGB strings (60 bulbs). Follow the directions
below to setup your Festoon 2 RGB:
1. Press <MENU> repeatedly until Led Strg shows on the display.
2. Press <ENTER>.
3. Use <UP> or <DOWN> to select either 1 strg (20 bulbs), 2 strg (40 bulbs), or 3 strg (60 bulbs).
4. Press <ENTER>.
Your Festoon 2 RGB string comes with an IP rated cap meant to terminate the end of
the Festoon 2 RGB string. Retain this cap, and ALWAYS terminate the open end of
your string when being used outdoors or near moisture.

Page 11 of 23
Festoon 2 RGB User Manual Rev. 1
OPERATION
DMX Channel Assignments and Values
9Ch
Channel Function Value Percent/Setting
1 Dimmer 000 255 0–100%
2 Red 000 255 0–100%
3 Green 000 255 0–100%
4 Blue 000 255 0–100%
5 Color Macros 000 010 No function
011 255 Color Macros
6Strobe 000 010 No function
011 255 Strobe, slow to fast
7 Auto & Sound Programs
000 010 No function
011 016 Auto Program 1
017 022 Auto Program 2
023 028 Auto Program 3
029 034 Auto Program 4
035 040 Auto Program 5
041 046 Auto Program 6
047 052 Auto Program 7
053 058 Auto Program 8
059 064 Auto Program 9
065 070 Auto Program 10
071 076 Auto Program 11
077 082 Auto Program 12
083 088 Auto Program 13
089 094 Auto Program 14
095 100 Auto Program 15
101 106 Auto Program 16
107 112 Auto Program 17
113 118 Auto Program 18
119 124 Auto Program 19
125 130 Auto Program 20
131 136 Auto Program 21
137 142 Auto Program 22
143 148 Auto Program 23
149 154 Auto Program 24
155 160 Auto Program 25
161 166 Auto Program 26
167 172 Auto Program 27
173 178 Auto Program 28
179 184 Auto Program 29
185 190 Auto Program 30
191 196 Auto Program 31
197 202 Auto Program 32
203 208 Auto Program 33
209 214 Auto Program 34
215 220 Auto Program 35
221 226 Auto Program 36
227 232 Auto Program 37
233 238 Auto Program 38
239 255 Sound Active Program

Page 12 of 23
OPERATION
Festoon 2 RGB User Manual Rev. 1
3Ch
Pixel Mapping Personalities
DMX pixel mapping personalities assign individual DMX control to each bulb in the Festoon string/s. The
Pixel Mode will allow for custom color selection for each bulb. The Pixel+ Mode allows for custom color
control, dimmer control, strobe control, and auto/sound program control. Select Pixel or Pixel+ under the
Channel setting to use the Pixel Mapping Personalities. The pixel mapping personalities depends on the
number of festoon strings you have connected. Every 20 bulbs is considered one LED string.
Up to 2 festoon EXT strings can be connected to the first string of 20 bulbs. Set the amount of EXT strings
under the Led Strg setting.
8
Program Speed
(when Ch. 7 is 010
238)
000 255 Program speed, slow to fast
Sound Sensitivity
(when Ch. 1 is 239
255)
000 010 Sound sensitivity off
011 255 Sound sensitivity level
9 Dimmer Speed Mode
000 051 Dimmer Speed set by Display Menu
052 101 Dimmer Speed Mode Off
102 152 Dimmer Speed Mode 1 (fast)
153 203 Dimmer Speed Mode 2
204 255 Dimmer Speed Mode 3 (slow)
Channel Function Value Percent/Setting
1 Red 000 255 0–100%
2 Green 000 255 0–100%
3 Blue 000 255 0–100%
For example, if there is 1 festoon string of 20 bulbs and 1 festoon EXT string of 20 bulbs
connected, the Led Strg setting in the menu must have “2 strg” selected.
Channel Function Value Percent/Setting
1
2
3
4
5
6
7
8
9
10
11
12
13
14
15
16
17
18
19
20
21
R
G
B
22
23
24
25
26
27
28
29
30
31
32
33
34
35
36
37
38
39
40
41
42
43
44
45
46
47
48
49
50
51
52
53
54
55
56
57
58
59
60
Example Layout: 1 LED
String (20 bulbs)
Starts at 1
Ends at 60

Page 13 of 23
Festoon 2 RGB User Manual Rev. 1
OPERATION
Pixel Mode
Channel Function Value Percent/Setting
1 Pixel 1 Red 000 255 0-100%
2 Pixel 1 Green 000 255 0-100%
3 Pixel 1 Blue 000 255 0-100%
4 Pixel 2 Red 000 255 0-100%
5 Pixel 2 Green 000 255 0-100%
6 Pixel 2 Blue 000 255 0-100%
7 Pixel 3 Red 000 255 0-100%
8 Pixel 3 Green 000 255 0-100%
9 Pixel 3 Blue 000 255 0-100%
10 Pixel 4 Red 000 255 0-100%
11 Pixel 4 Green 000 255 0-100%
12 Pixel 4 Blue 000 255 0-100%
13 Pixel 5 Red 000 255 0-100%
14 Pixel 5 Green 000 255 0-100%
15 Pixel 5 Blue 000 255 0-100%
16 Pixel 6 Red 000 255 0-100%
17 Pixel 6 Green 000 255 0-100%
18 Pixel 6 Blue 000 255 0-100%
19 Pixel 7 Red 000 255 0-100%
20 Pixel 7 Green 000 255 0-100%
21 Pixel 7 Blue 000 255 0-100%
22 Pixel 8 Red 000 255 0-100%
23 Pixel 8 Green 000 255 0-100%
24 Pixel 8 Blue 000 255 0-100%
25 Pixel 9 Red 000 255 0-100%
26 Pixel 9 Green 000 255 0-100%
27 Pixel 9 Blue 000 255 0-100%
28 Pixel 10 Red 000 255 0-100%
29 Pixel 10 Green 000 255 0-100%
30 Pixel 10 Blue 000 255 0-100%
31 Pixel 11 Red 000 255 0-100%
32 Pixel 11 Green 000 255 0-100%
33 Pixel 11 Blue 000 255 0-100%
34 Pixel 12 Red 000 255 0-100%
35 Pixel 12 Green 000 255 0-100%
36 Pixel 12 Blue 000 255 0-100%
37 Pixel 13 Red 000 255 0-100%
38 Pixel 13 Green 000 255 0-100%
39 Pixel 13 Blue 000 255 0-100%
40 Pixel 14 Red 000 255 0-100%
41 Pixel 14 Green 000 255 0-100%
42 Pixel 14 Blue 000 255 0-100%
43 Pixel 15 Red 000 255 0-100%
44 Pixel 15 Green 000 255 0-100%
45 Pixel 15 Blue 000 255 0-100%
46 Pixel 16 Red 000 255 0-100%
47 Pixel 16 Green 000 255 0-100%
48 Pixel 16 Blue 000 255 0-100%

Page 14 of 23
OPERATION
Festoon 2 RGB User Manual Rev. 1
49 Pixel 17 Red 000 255 0-100%
50 Pixel 17 Green 000 255 0-100%
51 Pixel 17 Blue 000 255 0-100%
52 Pixel 18 Red 000 255 0-100%
53 Pixel 18 Green 000 255 0-100%
54 Pixel 18 Blue 000 255 0-100%
55 Pixel 19 Red 000 255 0-100%
56 Pixel 19 Green 000 255 0-100%
57 Pixel 19 Blue 000 255 0-100%
58 Pixel 20 Red 000 255 0-100%
59 Pixel 20 Green 000 255 0-100%
60 Pixel 20 Blue 000 255 0-100%
61 Pixel 21 Red 000 255 0-100%
... ... ... ...
121 Pixel 41 Red 000 255 0-100%
... ... ... ...
181 Pixel 61 Red 000 255 0-100%
Channel Function Value Percent/Setting

Page 15 of 23
Festoon 2 RGB User Manual Rev. 1
OPERATION
Pixel+ Mode
Channel Function Value Percent/Setting
1 Dimmer 000 255 0–100%
2Strobe 000 010 No function
011 255 Strobe, slow to fast
3Auto & Sound
Programs
000 010 No function
011 016 Auto Program 1
017 022 Auto Program 2
023 028 Auto Program 3
029 034 Auto Program 4
035 040 Auto Program 5
041 046 Auto Program 6
047 052 Auto Program 7
053 058 Auto Program 8
059 064 Auto Program 9
065 070 Auto Program 10
071 076 Auto Program 11
077 082 Auto Program 12
083 088 Auto Program 13
089 094 Auto Program 14
095 100 Auto Program 15
101 106 Auto Program 16
107 112 Auto Program 17
113 118 Auto Program 18
119 124 Auto Program 19
125 130 Auto Program 20
131 136 Auto Program 21
137 142 Auto Program 22
143 148 Auto Program 23
149 154 Auto Program 24
155 160 Auto Program 25
161 166 Auto Program 26
167 172 Auto Program 27
173 178 Auto Program 28
179 184 Auto Program 29
185 190 Auto Program 30
191 196 Auto Program 31
197 202 Auto Program 32
203 208 Auto Program 33
209 214 Auto Program 34
215 220 Auto Program 35
221 226 Auto Program 36
227 232 Auto Program 37
233 238 Auto Program 38
239 255 Sound Active Program
4
Program Speed
(
when Ch. 3 is 010
238
)
000 255 Program speed, slow to fast
Sound Sensitivity
(when Ch. 3 is 239
255)
000 010 Sound sensitivity off
011 255 Sound sensitivity level
5 Pixel 1 Red 000 255 0-100%

Page 16 of 23
OPERATION
Festoon 2 RGB User Manual Rev. 1
6 Pixel 1 Green 000 255 0-100%
7 Pixel 1 Blue 000 255 0-100%
8 Pixel 2 Red 000 255 0-100%
9 Pixel 2 Green 000 255 0-100%
10 Pixel 2 Blue 000 255 0-100%
11 Pixel 3 Red 000 255 0-100%
12 Pixel 3 Green 000 255 0-100%
13 Pixel 3 Blue 000 255 0-100%
14 Pixel 4 Red 000 255 0-100%
15 Pixel 4 Green 000 255 0-100%
16 Pixel 4 Blue 000 255 0-100%
17 Pixel 5 Red 000 255 0-100%
18 Pixel 5 Green 000 255 0-100%
19 Pixel 5 Blue 000 255 0-100%
20 Pixel 6 Red 000 255 0-100%
21 Pixel 6 Green 000 255 0-100%
22 Pixel 6 Blue 000 255 0-100%
23 Pixel 7 Red 000 255 0-100%
24 Pixel 7 Green 000 255 0-100%
25 Pixel 7 Blue 000 255 0-100%
26 Pixel 8 Red 000 255 0-100%
27 Pixel 8 Green 000 255 0-100%
28 Pixel 8 Blue 000 255 0-100%
29 Pixel 9 Red 000 255 0-100%
30 Pixel 9 Green 000 255 0-100%
31 Pixel 9 Blue 000 255 0-100%
32 Pixel 10 Red 000 255 0-100%
33 Pixel 10 Green 000 255 0-100%
34 Pixel 10 Blue 000 255 0-100%
35 Pixel 11 Red 000 255 0-100%
36 Pixel 11 Green 000 255 0-100%
37 Pixel 11 Blue 000 255 0-100%
38 Pixel 12 Red 000 255 0-100%
39 Pixel 12 Green 000 255 0-100%
40 Pixel 12 Blue 000 255 0-100%
41 Pixel 13 Red 000 255 0-100%
42 Pixel 13 Green 000 255 0-100%
43 Pixel 13 Blue 000 255 0-100%
44 Pixel 14 Red 000 255 0-100%
45 Pixel 14 Green 000 255 0-100%
46 Pixel 14 Blue 000 255 0-100%
47 Pixel 15 Red 000 255 0-100%
48 Pixel 15 Green 000 255 0-100%
49 Pixel 15 Blue 000 255 0-100%
50 Pixel 16 Red 000 255 0-100%
51 Pixel 16 Green 000 255 0-100%
52 Pixel 16 Blue 000 255 0-100%
53 Pixel 17 Red 000 255 0-100%
Channel Function Value Percent/Setting

Page 17 of 23
Festoon 2 RGB User Manual Rev. 1
OPERATION
54 Pixel 17 Green 000 255 0-100%
55 Pixel 17 Blue 000 255 0-100%
56 Pixel 18 Red 000 255 0-100%
57 Pixel 18 Green 000 255 0-100%
58 Pixel 18 Blue 000 255 0-100%
59 Pixel 19 Red 000 255 0-100%
60 Pixel 19 Green 000 255 0-100%
61 Pixel 19 Blue 000 255 0-100%
62 Pixel 20 Red 000 255 0-100%
63 Pixel 20 Green 000 255 0-100%
64 Pixel 20 Blue 000 255 0-100%
65 Pixel 21 Red 000 255 0-100%
... ... ... ...
125 Pixel 41 Red 000 255 0-100%
... ... ... ...
185 Pixel 61 Red 000 255 0-100%
Channel Function Value Percent/Setting

Page 18 of 23
OPERATION
Festoon 2 RGB User Manual Rev. 1
Configuration (Standalone)
Set the product in one of the standalone modes to control without a DMX controller.
Control Mode
To select the control mode for the Festoon 2 RGB, follow the instructions below:
1. Press <MENU> repeatedly until Control shows on the display.
2. Press <ENTER>.
3. Use <UP> or <DOWN> to select either DMX, Music,Auto,Manual, or Preset.
4. Press <ENTER> to confirm.
Static Colors
To select a static color for the Festoon 2 RGB, do the following:
1. Press <MENU> repeatedly until Custom shows on the display.
2. Press <ENTER>.
3. Use <UP> or <DOWN> to choose a static color C-01–C-19.
4. Press <ENTER> to confirm.
Automatic Programs
To run the Festoon 2 RGB in automatic mode, follow the instructions below:
1. Press <MENU> repeatedly until Program shows on the display.
2. Press <ENTER>.
3. Use <UP> or <DOWN> to select from the 38 auto programs (P-01–P-38).
4. Press <ENTER> to make your selection.
5. Use <UP> or <DOWN> to adjust the speed from slow to fast (Sp:000–100).
6. Press <ENTER> to confirm.
Sound Mode Sensitivity
To lower or heighten the sensitivity of the sound active mode, do the following:
1. Press <MENU> repeatedly until Music shows on the display.
2. Press <ENTER>.
3. Use <UP> or <DOWN> to adjust the sensitivity from low to high 000–100.
4. Press <ENTER>.
Manual Color Mixing
To manually adjust a static color, follow the instructions below:
1. Press <MENU> repeatedly until Manual shows on the display.
2. Press <ENTER>, Color should appear on the display.
3. Press <ENTER> to cycle through the following options:
•Red
•Green
•Blue
4. Press <ENTER> to select an option.
5. Use <UP> or <DOWN> to increase or decrease the selected value, from 000–255.
6. Repeat steps 3–5 for each color to set as desired.
Dimmer Curve
To set the dimmer curve, do the following:
1. Press <MENU> repeatedly until Dim Curve shows on the display.
2. Press <ENTER>.
3. Use <UP> or <DOWN> to select either OFF, Curve1, Curve2, or Curve3 (dimming speed, slow
to fast).
4. Press <ENTER> to confirm.
Never connect a product that is operating in any standalone mode to a DMX string
connected to a DMX controller. Products in standalone mode may transmit DMX
signals that could interfere with the DMX signals from the controller.
Other manuals for FESTOON 2 RGB
2
Table of contents
Other Chauvet DJ Controllers manuals
Popular Controllers manuals by other brands

Lake Lite
Lake Lite LL-REG-24v-5A quick start guide

Honeywell
Honeywell VC2 Series, VC4 Series, VC60 Series,... quick start guide

Smartgen
Smartgen FPC1700 user manual

Ametek
Ametek SHPF1 SCR Series Instruction, Operation and Maintenance Manual

Lunatico
Lunatico PocketCW2 user manual

FISNAR
FISNAR VC300 operating manual