Chef'sCholce 710 User manual

MODEL 710 InstructIOns
Marine Sharpening Station™
Read these instructions before use.
It is essential that you follow these
instructions to achieve optimum results.
© 2014 EdgeCraft Corp.
F
GB

IMPORTANT SAFEGUARDS
When using electrical appliances, basic safety precautions should always be followed including
the following:
1. Read all instructions.
2. Never power the Marine Sharpening Station™when it is being exposed to wet conditions.
•Alwaysmakesurethatthepowercordisdisconnectedandthepowerportcoverisin
place when the sharpener is exposed to wet conditions. Your Marine Sharpening Station
isonlywaterresistantwhenthepowerportcoverisinplace.
•Beforeyouconnecteitherpowercord,makesurethatthesharpenerisonastableand
dryworksurface.Althoughthesharpeneriswaterresistant,itisnotmeanttobeusedin
wet conditions
3. MakesurethatonlyitemstobesharpenedwiththeMarineSharpeningStation710are
clean and free of debris.
4. Unplugfromoutletandclosethepowerportcoverwhennotinuse,beforeputtingonor
takingoffpartsandbeforecleaning.
5. Avoidcontactingmovingparts.
6. Donotoperateanyappliancewithadamagedcordorplugoraftertheappliance
malfunctions,orisdroppedordamagedinanymanner.
U.S. customers:YoumayreturnyoursharpenertoEdgeCraft’sfactoryforservicewherethe
costofrepairorelectricalormechanicaladjustmentcanbeestimated.Whentheelectrical
cordonthisapplianceisdamaged,itmustbereplacedbytheChef’sChoicedistributoror
otherqualiedservicetoavoidthedangerofelectricalshock.
Outside the U.S.:Pleasereturnyoursharpenertoyourlocaldistributorwherethecostof
repairorelectricalormechanicaladjustmentcanbeestimated.Ifthesupplycordofthis
applianceisdamaged,itmustbereplacedbyarepairfacilityappointedbythemanufac-
turerbecausespecialtoolsarerequired.PleaseconsultyourChef’sChoicedistributor.
7. CAUTION!“Thisappliancemaybettedwithapolarizedplug(onebladeiswiderthan
theother).Toreducetheriskofelectricshock,thisplugwilltinapolarizedoutletonly
oneway.
Iftheplugdoesnottfullyintheoutlet,reversetheplug.Ifitstilldoesnott,contacta
qualified electrician. Do not modify the plug in anyway.”
8. TheuseofattachmentsnotrecommendedorsoldbyEdgeCraftCorporationmaycausere,
electricshock,orinjury.
9. TheknifesharpenerportionofChef’sChoice®Model710isdesignedtosharpenllet
knives,kitchenknives,pocketknivesandmostsportsknives.Donotattempttosharpenax
bladesoranybladethatdoesnottfreelyintheslots.
10. Do not let the cord hang over edge of table or counter or touch hot surfaces.
11.Wheninthe“ON”position(switchistotheleftwhen“on”)theChef’sChoice®Model710
shouldalwaysbeonastablecountertoportable.
2

3
12.WARNING:ITEMSPROPERLYSHARPENEDONYOURCHEF’SCHOICE®MODEL710WILLBE
SHARPERTHANYOUEXPECT.TOAVOIDINJURY,USEANDHANDLETHEMWITHEXTREME
CARE.DONOTCUTTOWARDANYPARTOFYOURFINGERS,HANDORBODY.DONOTRUN
FINGERALONGEDGE.STOREINASAFEMANNER.
13.Closesupervisionisnecessarywhenanyapplianceisusedbyornearchildren.
14.Donotusehoningoils,wateroranyotherlubricantwiththeChef’sChoice®Model710.
15.Forhouseholduseonly.
Hook Sharpener Safeguards:
•Donotoperateinexplosiveatmospheres,suchasinthepresenceofammableliquids,
gases,ordust.
•Thehooksharpenerincludedinthisunitutilizesarotatingabrasivesbittosharpenhooks.
Alwaysweareyeprotection(Safetyglasses)whenusingthehooksharpener.
•Donotwearlooseclothingorjewelry.Keepyourhair,clothingandlooseitemsawayfrom
movingparts
•Neverusedullordamagedabrasivebitsinthehooksharpener.Damagedbitscanbreak.
Dullbitscanrequireexcessforceduringuse,whichcanleadtobreakageorinjury.
•Thisproductisnotintendedforuseasadentaldrill,orinhumanorveterinarymedical
applications.Seriouspersonalinjurymayresult.
•Thehooksharpenerisnotwaterresistant.Itneedstobestoredinthecompartment
providedtoprotectfromexposuretomoistureandsaltwater.
16. SAVE THESE INSTRUCTIONS
UNPACKING YOUR MODEL 710
PleaserefertotheFigureabovewhenyouunpackyourMarineSharpeningStation™tomake
surethatyouhavelocatedalloftheincludedcomponents.
Hook
Sharpener
Knife
Sharpener
Hook Sharpener
Bits
Scissors
Sharpener
120 Volt AC
Adapter
12 Volt DC
Auto/Marine
Adapter

44
YOU MADE
A GOOD
CHOICE
YourMarineSharpeningStationModel710isanothertechnologicalbreakthrough
fromEdgeCraft,theWorldLeaderinCuttingEdgeTechnology®.Itisspecically
engineeredforthesherman,marineenthusiastandfortheharshenvironmentthey
mayencounter.Itsversatiledesignincorporatesthreeprofessionalsharpenersin
onecompact,waterresistantunit.
1. Professional Knife Sharpener
Themainbodyoftheunithouses aDiamondHone®KnifeSharpener:outdoor
enthusiast,professionalchefsandseriouscooksworld-widerelyonChef’sChoice®
DiamondHone®sharpenerstomaintainhighperformancemulti-beveledgeson
theirfavoritecutlery.NowwithyourModel710youwillsharetheprofessional
advantagewithknivesofastonishingsharpnessanddurability.TheChef’sChoice®
Model 710 incorporates the latest sharpening technology developed by
EdgeCraft® to create advanced performance edges on your ne-edge and
serratedknives.
TheChef’sChoice®DiamondHone®KnifeSharpenercreatesdemonstrablysuperior
multifacetedgesonknivesofanysteel-carbon,stainless,oralloyofanyhardness.
EdgessharpenedontheModel710aremuchsharperandstaysharplongerthan
conventional and hollow ground edges. Please follow the instructions detailed later
inthisbookletforproperuse.
2. Professional Scissors Sharpener
Located conveniently underneath the main unit for storage, is a Professional
Manual Scissors Sharpener that is specically designed to put a high quality
edge on all of your line cutters and shing utility scissors. Please follow the
instructionsdetailedinthisbookletforproperuse.
3. Professional Hook Sharpener
Stored inside of a watertight compartment, integral to the main unit, is a
batteryoperatedProfessionalHookSharpenerwithaccompanyingsharpeningbits.
Instructions of how to get the most out of your hook sharpener in a safe and
efcientmanneraredetailedinthisbooklet.

5
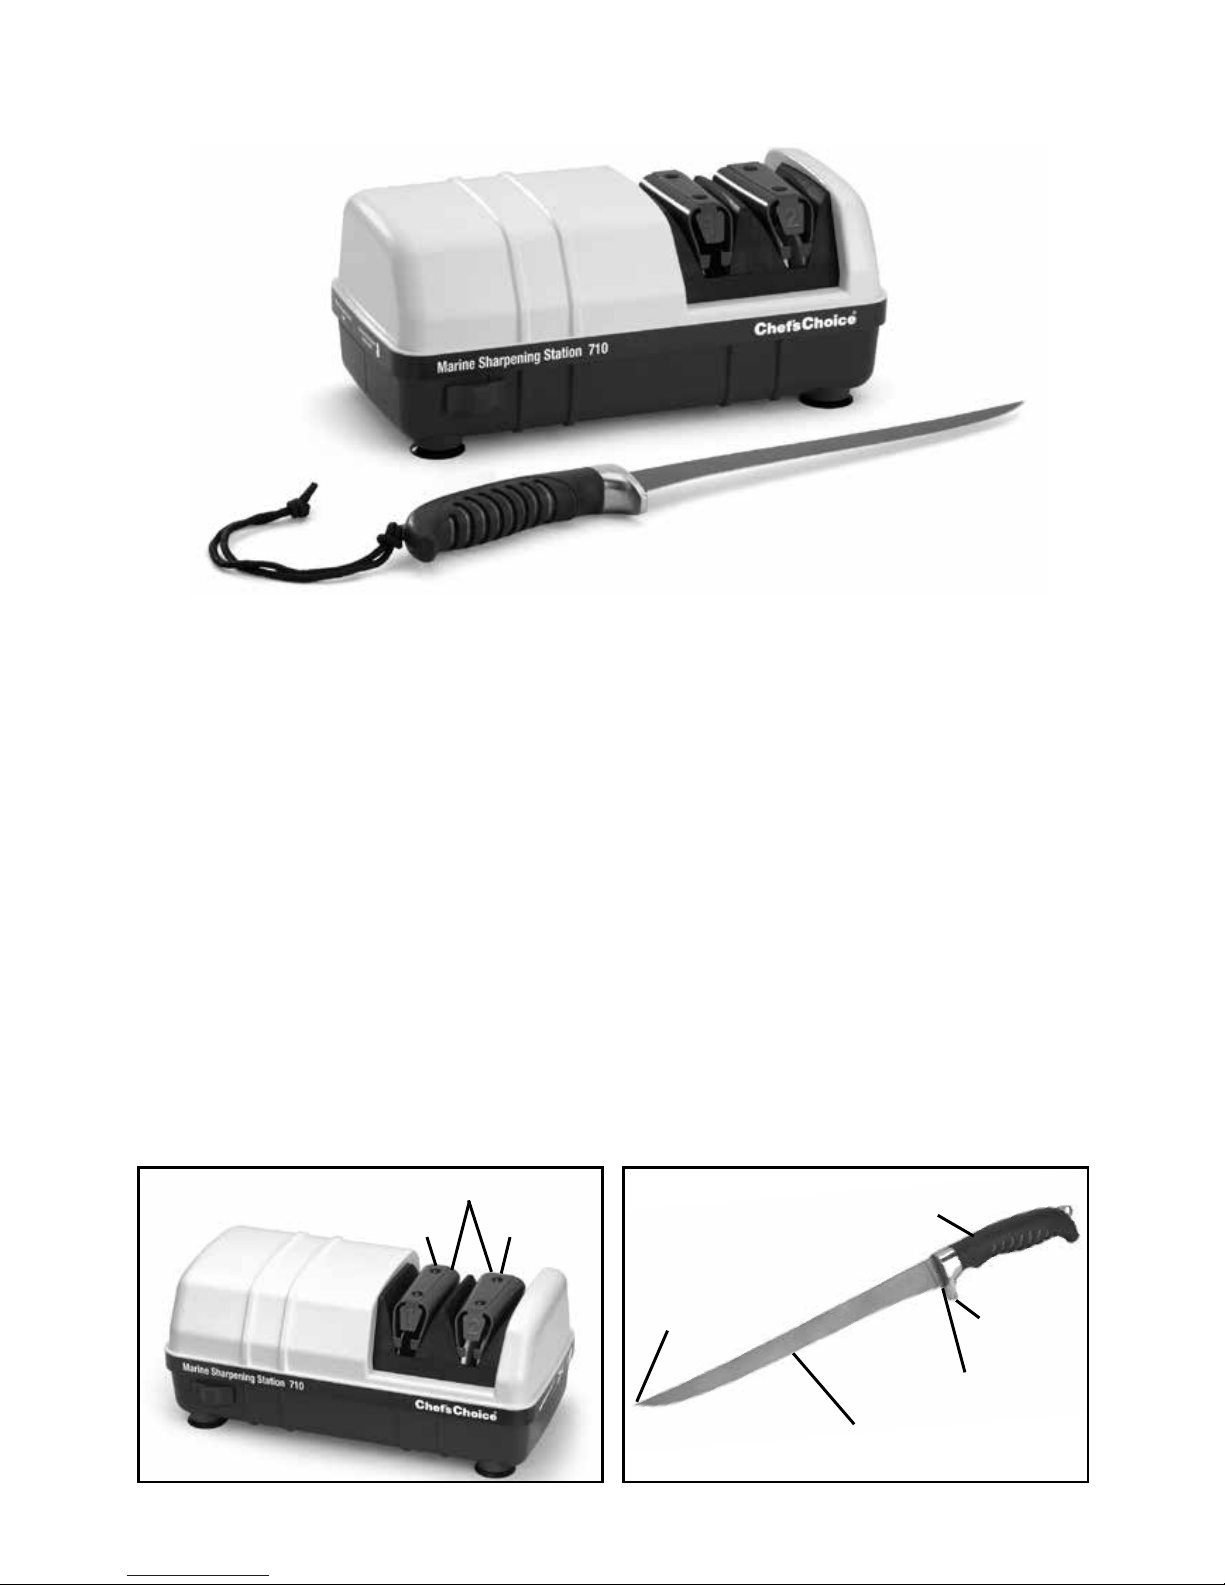
Figure 1. Model 710 Marine Knife Sharpener.
Stage 1 Stage 2
Flexible Spring Guides
UNDERSTANDING THE
KNIFE SHARPENER
TheuniqueChef’sChoice®DiamondHone®KnifeSharpener710isdesignedtosharpenknives
witheitherstraightorserratededges.Thistwo(2)stagesharpener(Figure1)hasaprecision
conicalsharpening/honingstagewithne100%diamondabrasivesandauniquepolishing/
stroppingstageusingproprietaryexibleabrasivedisks.Thiscombinationcanbeusedtocreate
eitheranastonishinglysharp,smoothfacetededgeforeffortlesscuttingoronewithaselected
amountofresidual“bite”alongthefacets.
Thesharpeningandhoningactionsarecontrolledbyusingpreciselyangledguidesforthe
bladeandpreciselymatchedconicallysurfacedabrasivedisks.Thesharpeningangleisslightly
larger in Stage 2 than in Stage 1.
Finediamond-coatedconicaldisksinStage1createmicrogroovesalongthefacetsoneach
side of the edge establishing the first angled bevel of the edge.
InStage2ultraneabrasivediskspolishandstropthefacetsimmediatelyadjacenttothe
edgecreatingamicrobevelandestablishamicroscopicallythinstraightandsuperpolished
edgeofastonishingsharpness.Thestroppingactionsimultaneouslypolishesandsharpensthe
boundariesofthosemicrogroovescreatedbythediamondabrasivesinStage1adjacenttothe
edgeuntiltheybecomesharpmicroutesthatwillassistthecuttingactionwith“difcultto
cut”items.
5
Figure 2. Typical fillet knife.
Heel
Bolster
Handle
Edge
Tip

66
Thisuniquetwostagedesigngivesyouanedgeofremarkablesharpnessandbecause
ofthesecondanglebevelitcreates,youwillnoteknivesstaysharplongerthanthosesharpened
by conventional methods. The following sections describe the general procedures for
optimalsharpening.
OneoftheimportantadvantagesofusingtheModel710isthatyoucanstropandpolishyour
knivestorazorsharpedgesasoftenasneededandyetexperiencelittleknifewearcompared
tooldersharpeningmethods.Resharpeningcancommonlybedonebyusingjustthestropping
actionofStage2(seeResharpeningSection).
TheChef’sChoice®Model710KnifeSharpenerisequippedwithmanuallyactivateddiamond
dressingpadsthatcanbeusedifnecessarytocleananyaccumulatedfoodorsharpeningdebris
offthesurfaceofthepolishing/stroppingdisks.Westronglyurgeyoutocleanknivesbefore
sharpeningthem.Youwillndyoucangomonthsoroverayearbeforeyouneedtodressthese
disks.Onlyifyousenseadistinctdecreaseinpolishingefciencywilltherebyanyneedtouse
this convenient feature described further in a subsequent section.
EachsharpeningStageisequippedwithaexiblespringguidepositionedoverthesharpening
diskstoprovideaspringactionthatholdsthefaceofyourknifesecurelyagainsttheprecision
guides in the right and left slots of each stage during sharpening.
Unlessyouhavespecialbladesdesignedtobesharpenedprimarilyononesideoftheedge
(suchasAsianKatabablades)youwillwanttosharpenequallyintherightandleftslotsofeach
stageyouuse.Thiswillensurethatthefacetsoneachsideoftheedgeareofequalsizeandthat
theedgewillcutstraightatalltimes.
Whensharpeningineitherstage,theknifeshould,onsequentialstrokes,bepulledalternately
throughtheleftslotandtherightslotofthatStage.Generallyonlyoneortwopairsofpulls
(alternatingintheleftandrightslots)willbeadequateineachstage(seesubsequentsectionsfor
moredetail).Alwaysoperatethesharpenerfromthefrontside.Holdthebladehorizontalandlevel
andslideitdownbetweentheplasticspringandtheguideplanewhilepullingittowardyouata
uniformrateasitcontactsthesharpeningorstroppingdisk.Youwillbeabletofeelandhearthe
contactwiththediskasitismade.Alwayskeeptheblademovinguniformlythrougheachstage;
donotstopthepullinmidstroke.Consistentlypullataspeedofabout5secondsperstrokefor
aneight(8)inchblade.Thetimecanbelessforshorterbladesandmoreforlongerblades.
Neveroperatethesharpenerfromthebackside.
Usejustenoughdownwardpressurewhensharpeningtoensureuniformandconsistentcon-
tactofthebladewiththeabrasivedisksoneachstroke.Additionalpressureisunnecessaryand
willnotspeedthesharpeningprocess.Avoidcuttingintotheplasticenclosure.Accidentalcutting
intotheenclosurewillnotfunctionallyimpactoperationsofthesharpenerordamagetheedge.
Figure1identieseachofthetwostagesasdescribedfurtherinthefollowingsections.
SHARPENING INSTRUCTIONS
READ THIS BEFORE YOU START TO SHARPEN
Your Marine Sharpening Station is supplied with two different detachable power cords for use
withdifferentpoweroutlets.Onceyouhavepositionedthesharpenerinadry,stablelocation,
makesuretheswitchisintheoffposition(totheright)andremovethepowerportcover.Plug
thepoweradapterintothesharpenerbeforeitisconnectedtoeitherawalloutlet(120VAC
adaptercord)oracigarettelightertypeoutlet(12VoltAuto/Marineadapter).

77
TheModel710knifesharpenerisdesignedtocreateafactorysharp,15°edgeoneachside
oftheblade,whichistypicallyusedbymanufacturersofqualityshlletknives.The15°edge
alsohappenstobethestandardfactoryedgeofmostAsianstylekitchenknives.Overthepast
fewyears,Europeanmanufacturersofkitchenandhouseholdkniveshavealsobroadlyadopted
the15°edgefortheirtraditionalEuropeanknifelines.
TheChef’sChoice®Model710isdesignedtosharpeneitherStraightedgeorSerratededge
knifeblades.
IfyouhaveanolderEuropean/Americanstyleknifethatwasoriginallysharpenedat20°,it
isrelativelysimpletoconvertitsedgetoa15°edge.However,itwilltakemorepassesinstage
one,thersttimetheknifeissharpened,tore-angletheedge.
1. Sharpen Serrated Blades - Only in Stage 2. Do not sharpen serrated blades in Stage 1
untilyoureadsectiontitledProcedureforSharpeningSerratedBlades.
2. Straight Edge Blades are sharpened in Stages 1 and 2.StartinStage1iftheknifeis
beingsharpenedforthersttimeoriftheknifeisverydull.SeefollowingSectionfor
moredetails.
PROCEDURE FOR SHARPENING STRAIGHT EDGE BLADES
Beforeyouturnonthepower,slipaknifebladesmoothlyintotheslotbetweentheleftangle
guideofStage1andtheexiblespringguide.Donottwisttheknife(seeFigure3.)
Movethebladedownintheslotuntilyoufeelitcontactthediamonddisk.Pullittowardsyou
liftingthehandleslightlyasyouapproachthetip.Thiswillgiveyouafeelforthespringtension.
Now,removetheknifeandturnonthesharpenerbyslidingthePowerSwitchtotheleft.
Stage 1:Ifyouaresharpeningastraight-edgeknifeforthersttime,startinStage1.Pull
theknifeoncethroughtheleftslotofStage1(Figure3)byslippingthebladebetweentheleft
angleguideandtheexiblespringguidewhilepullingthebladetowardyouandsimultaneously
movingthebladedownwardintheslotuntilitengagesthediamondcoateddisk.Youwillhear
itmakecontactwiththedisk.Insertthebladeascloseaspossibletoitsbolsterorhandle.If
thebladeiscurved,liftthehandleslightlyasyousharpennearthetipoftheknife,keepingthe
bladeedgeapproximatelyparalleltothetable.Sharpentheentirebladelength.Foraneight(8)
inchbladeeachpullshouldtakeabout5seconds.Pullshorterbladesthroughin2-3seconds
andlongerbladesin6seconds.Next,repeatwithonefulllengthpullintherightslotofStage1.
Note:Eachtimeyouinserttheblade,simultaneouslypullthebladetowardyou.Neverpush
thebladeawayfromyou.Applyjustenoughdownwardpressuretomakecontactwiththewheel
– added pressure does not speed up the sharpening process.
Figure 4. Inserting blade in right slot of Stage 1.Figure 3. Inserting blade in left slot of Stage 1.

88
Toensureuniformsharpeningalongtheentirebladelength,insertthebladenearitsbolster
orhandleandpullitatasteadyrateuntilitexitstheslot.Alwaysmakeanequalnumberofpulls
alternating one pull in the left slot and then one pull in the right slot of stage 1inordertokeep
theedgefacetssymmetrical.GenerallyinStage1youwillndthatonlyoneortwopairsofpulls
are adequate.
BeforemovingtoStage2youwillndithelpfultoconrmthataburr(seeFigure5)exists
alongonesideoftheedge.Tocheckfortheburr,moveyourforengercarefullyacrosstheedge
asshown.(Donotmoveyourngeralongtheedge–toavoidcuttingyournger).Ifthelast
pullwasintherightslot,theburrwillappearonlyontherightsideoftheblade(asyouholdit)
andviceversa.Theburr,whenpresent,feelslikearoughandbentextensionoftheedge;the
oppositesideoftheedgefeelsverysmoothbycomparison.Ifaburrexistsalong the entire edge,
proceed to Stage 2.
Ifnoburrexists,makeone(1)additionalpullintheleftandrightslotsofStage1.Slower
pullswillhelpyoudeveloptheburr.ConrmthepresenceoftheburrandproceedtoStage2.
ItisalwaysnecessarytocreatetheburrinStage1beforeproceedingtoStage2.
Iftheknifeisextremelydull,additionalpullsinStage1maybeneededtodevelopaburrand
proceeding to Stage 2.
Stage 2:IngeneralonlyoneortwopairsofpullsinStage2willbenecessarytoobtaina
razorsharpedge.Makealternatepullsinleft(Figure6)andrightslotspullingtheknifethrough
theslotsatthesamespeedusedinStage1.
AddedpullsinStage2willrenetheedgefurther,creatingaawlessultrasharpedge.
FewerpullsinStage2maybepreferableifyouwillbecuttingbrousfoodsasdiscussedin
moredetailinthefollowingsections.
OPTIMIZING THE KNIFE EDGE
FILLETING FISH AND GOURMET FOOD PREPARATION:
Wherethenestandsmoothestcutsarepreferredinpreparingsmooth,unmarkedshlletsor
sectionsoffruitsorvegetables,sharpeninStage1and2asdescribedaboveandmakeextra
pullsthroughStage2.Threeormorepairsofpullswitheachpullalternatingintheleftandright
slotsofStage2willrenethesecondfacetandcreateremarkablysmoothandsharpedges,
(Figure7)idealfortheshermanorgourmetchef.
Whenresharpeningthisedge,useonlyStage2,(alternatingleftandrightslots).Ifaftera
numberofresharpenings,itistaking toolong toresharpen,you canspeedtheprocessby
Figure 6. Inserting blade in left slot of Stage 2. Alternate
individual pulls in left and right slots.
Figure 5. Develop a distinct burr along knife edge before
stropping in stage 2. Burr can be detected by sliding
finger across and away from the edge.
Caution! See text.

9
Figure 7. A larger polished facet adjacent to edge is
ideal for gourmet preparations.
9
resharpeningrstinStage1followingtheprocedurespreviouslydetailed,andthenresharpen
inStage2.Thisprocedure,unlikeconventionalsharpening,willgiveyouextraordinarilysharp
kniveseverydaywhileremovingverylittlemetalandprolongingthelifeofyourknives.
FOR GAME, HARD SCALE FISH AND FIBROUS ITEMS
ForcuttingmorebrousitemsyoumaynditadvantageoustosharpeninStage1–followed
directlybyonlyonealternatingpairofpullsinStage2.Thiswillleavesharpenedmicroutesalong
thefacetsnearertoeachsideoftheedge(Figure8)thatwillassistinthecuttingofsuchitems.
Topreparethistypeedge,sharpeninStage1untilaburrisdevelopedalongtheentire edge.
ThenmovetoStage2andmakejustonepairofpulls.
Toresharpenthistypeofedge,sharpeninStage1untilyoudevelopaburrandthenmake
one pair of pulls in Stage 2.
PROCEDURE FOR SHARPENING SERRATED BLADES
Serratedbladesaresimilartosmallsawbladeswithscallopeddepressionsandaseriesof
pointedteeth.Innormalusethepointedteethdomostofthecutting.
SerratedbladesofalltypescanbesharpenedintheChef’sChoice®Model710.However,use
onlyStage2(Figure9),whichwillsharpentheteethoftheserrationsanddevelopmicroblades
alongtheedgeoftheseteeth.Generallyve(5)toten(10)pairsofalternatingpullsinStage2
willbeadequate.Iftheserratedknifeisverydullmorepullswillbeneeded.Iftheknifeedgehas
beenseverelydamagedthroughuse,makejustonefastpull(2-3secondsforan8”blade)in
eachoftherightandleftslotsinStage1,thenmakeaseriesofpullsinStage2,alternatingright
andleftslots.ExcessiveuseofStage1willremovemoremetalalongtheedgethanisnecessary
in order to sharpen the teeth.
Because serrated blades are saw-like structures, the edges will never appear to be as
“sharp”astheedgeonastraightedgeknife.However,theirtooth-likestructurecanhelpbreak
theskinonhardcrustyfoods.
Figure 8. Retention of larger microflutes adjacent to
edge helps when cutting fibrous foods.
Figure 9. Sharpen serrated blades only in Stage 2
(see instructions).

1010
RESHARPENING
ResharpenstraightedgekniveswheneverpracticalusingStage2.Whenthatfailstoquickly
resharpen,returntoStage1andmakeoneortwopairsofalternatingpulls.Checkforaburr
alongtheedgeandthenreturntoStage2whereonlyonetotwoalternatingpairofpullswillbe
adequatetoputanewrazor-likeedgeontheknife.
Resharpen serrated blades in Stage 2. See sections above.
DRESSING TOOL FOR CLEANING OF STROPPING/POLISHING DISKS – STAGE 2
TheChef’sChoice®Model710KnifeSharpenerisequippedwithabuilt-inaccessorytomanually
clean/dressthestroppingdisksinStage2.Intheeventthesedisksbecomeglazedwithgrease,
foodorsharpeningdebris,theycanbecleanedandreshapedbyactuatingthemanualleveron
therearofthesharpener.ThisleverislocatedwithinarecessasshowninFigure10ontheleft
lowercornerasyoufacetherearofModel710.
Toactuatethecleaning/dressingtool,makesurethepowerisonandsimplypressthesmall
leverintherecesstotherightorleftandholdfor3seconds.Thenpresstheleverinopposite
directionandholdfor3seconds.Whentheleverismovedinonedirection,thedressingtool
cleans and reshapes the active surface of one stropping/polishing disk. By moving in the
oppositedirectionyoucleantheotherdisk.
Usethisclean/dressaccessoryonlyifandwhenStage2nolongerappearstobesharpening
wellorwhenittakestoomanypullstoobtainarazorsharpedge.Usingthistoolremoves
materialfromthesurfaceoftheStage2diskandhenceifusedexcessivelywillunnecessarily
removetoomuchoftheabrasivesurface–wearingthedisksoutprematurely.Ifthatshould
occur,factoryreplacementofthediskswillbecomenecessary.
Ifyoucleanknivesregularlybeforesharpening,youwillneedtocleanordresstheStage2
disksonlyaboutonceayearorperhapslessfrequently.
SUGGESTIONS
1. Alwayscleanallfood,fat,andforeignmaterialsfromknifebeforesharpeningor
resharpening.Ifsoiled,washthebladebeforesharpening.
2. Useonlylightdownwardpressurewhensharpening–justenoughtoestablishsecure
contactwiththeabrasivedisk.
3. Alwayspullthebladesattherecommendedspeedandataconstantrateoverlengthof
blade.Neverinterruptorstopthemotionofthebladewhenincontactwiththeabrasivedisks.
4. Alwaysalternateindividualpullsinrightandleftslots(ofanystageused).Specialized
Japanesebladesareanexceptionandaresharpenedprimarilyononesideoftheblade.
5. Theedgeoftheknifeblade,whilesharpening,shouldbeheldinalevelpositionrelativeto
thetopofthecounterortable.Tosharpenthebladenearthetipofacurvedblade,liftthe
handleupslightlyasyouapproachthetipsothateachsectionalongthecurvedlengthof
theedgeasitisbeingsharpenedismaintained“level”tothetable.
6. Thereisnoneedoradvantagetousinga“sharpeningsteel”onknivessharpenedon
theChef’sChoice®Model710.Considerresharpeningwithoneofthemanymanual
Chef’sChoice®sharpenersifyouareusingknivesataremotelocationawayfromelectrical
power.ItisrecommendedthatyoukeeptheModel710readilyaccessibleandresharpen
often,asdescribedintheSectionsabove.

11
Figure 10. Stage 2 disks can be cleaned if necessary.
Use infrequently (see instructions).
Figure 11. Removing the clean-out cover.
11
7. Usedcorrectly,youwillndyoucansharpentheentirebladetowithin 1/8” of the bolster
orhandle.ThisisamajoradvantageoftheChef’sChoice®Model710comparedtoother
sharpeningmethods–especiallyimportantwhensharpeningchef’skniveswhereyou
needtosharpentheentirebladelengthinordertomaintainthecurvatureoftheedge
line.Ifyourchef’skniveshaveaheavybolsternearthehandleextendingtotheedge,a
commercialgrindercanmodifyorremovethelowerportionofthebolstersothatitwillnot
interferewiththesharpeningactionallowingyoutosharpentheentirebladelength.
8. ToincreaseyourprociencywiththeModel710,learnhowtodetectaburralongtheedge
(asdescribedabove).Whileyoucansharpenwellwithoutusingthistechnique,itisthe
bestandfastestwaytodeterminewhenyouhavesharpenedsufcientlyinStage1.This
willhelpyouavoidoversharpeningandensureincrediblysharpedgeseverytime.Cuttinga
tomatoorapieceofpaperisaconvenientmethodofcheckingforbladesharpness.
NORMAL MAINTENANCE FOR YOUR KNIFE SHARPENER
Aftereachuseofthesharpener,powercordshouldbedetachedandthepowerportcoverbeput
backintoplace.Thepowercordsshouldbestoredinasafe,dryplace.
NOlubricationisrequiredforanymovingparts,motor,bearingsorabrasivesurfaces.Theouter
parts of the unit as well as the sharpening section can be cleaned with a low pressure hose
sprayoffreshwater,shouldtheunithavebeenexposedtosaltwaterorcontaminants.Anysalt
residueshouldberemovedandtheunitfullydriedaftereachuse.
Once a year or so as needed, you can remove metal dust that will accumulate inside the
sharpener from repeated sharpenings. Remove the small rectangular clean-out cover that
coversanopeningontheundersideofthesharpener(seeFigure11).Youwillndmetalparticles
adheredtoamagnetattachedtotheinsideofthatcover.Simplyrubofforbrushoffaccumulated
lingsfromthemagnetwithapapertowelortoothbrushandreinsertthecoverintheopening.
IflargeramountsofmetaldusthavebeencreatedoriftheStage2diskhasbeencleaned(using
thecleaning/dressingtool)youcanshakeoutanyremainingdustthroughthebottomopening
whenthecoverisremoved.Thesharpeningsectioncanalsobecleanedwithalowpressure
hosespray.Useonlyfreshwaterandfullydrywhendone.Aftercleaning,replacethecover
securelywithitsmagnetinplace.

1212
SCISSOR SHARPENER
The Chef’sChoice®Scissor Sharpener is designed to sharpen scissors to professional
standards, simply and easily. It can put an exceptionally sharp edge on your line scissors,
braidcutters,andotherscissorsyoumaybeusingonyourboat.Thereareseveraldistinctly
differenttypesofscissors,consequently,itisimportanttoreadthisentirebooklettooptimize
yoursharpeningresults.
The Chef’sChoice® Scissor Sharpener owes much of its performance to its rotating
sharpenerbarrel, designed to keepthe scissor blade securely incontactwith the diamond
abrasivepadsatapreciseangle.Beforesharpeningyourrstscissorsitisimportanttoreadthe
followinginstructionscarefully.
ACCESSING YOUR SCISSOR SHARPENER
Yourscissorsharpenerislocatedinacompartmentunderneathofthemainsharpenerunit.
Toremovethescissorsharpener,holdthemainsharpenerunitupsidedowninonehand.With
theotherhand,placeyourngersintheedgeofthescissorsharpenerandyourthumbonthe
outsideofthemainunitandsqueeze(SeeFigure12).Thisshouldloosenthescissorssharpener
fromitslocationandenableyoutoremoveitfromthebaseoftheunit.
IMPORTANT INFORMATION
1. WARNING:EVENTHOUGHALLSCISSORSMAYAPPEARTOBESIMILAR,THEREARE
MAJORDIFFERENCESAMONGTHEMTHATMUSTBEUNDERSTOODBEFOREYOUUSETHIS
SHARPENER.THESCISSORSHARPENERWILLSHARPENMOST,BUTNOTALL,TYPESOF
SCISSORS.DONOTATTEMPTTOSHARPENKNIFEEDGESCISSORS,HAIRSTYLING
SCISSORS,PINKINGSHEARS,MANICURESCISSORS,SERRATEDBLADES,TINSNIPS,
ORSCISSORSMORETHAN10”INLENGTH.
TheChef’sChoice®ScissorSharpenerwillsharpenmostotherblades.Itisessential,
howeverthatyoufollowtheinstructionstooptimizeyourresults.
2. Itisnotentirelyobviousthatthetwobladesonmostscissorsaredifferent.Whenyoucut
withscissors,oneblade(theanvilblade),isbelowthematerialandtheotherblade
(thecutterblade),isabovethematerial,seeFigure13.Commonlythebladeontopofthe
material,thecutterblade,doesmostofthecutting.ReferringtotheFigure13,notethatthe
cutterbladeusuallyhastheoblongnger-holdandamoreroundedtip.Theanvilbladehas
amorepointedtipandaroundngerhold.
Figure 13. Typical right-handed scissors.Figure 12. Squeeze at arrows to remove scissors sharpener.
Cutting
Edges
Cutter
Blade
Adjustment Screw
Tensioner
Anvil
Blade
Oblong
Finger Hole
Round
Finger
Hole

13
Figure 14. Carefully feel for a burr along the entire back
of the blade. Note arrow for direction of finger movement
when in contact with blade.
13
3. Itisveryimportanttobeabletoidentifythespecialknife-edgetypescissorsusedprimarily
forcuttingfabrics.Theyhaveacutterbladethatisfactorysharpenedataverynarrow
angletoformaknife-likeedgethatisverysharp.THEKNIFE-EDGEBLADECANNOTBE
SHARPENEDPROPERLYWITHTHISMARINESCISSORSSHARPENER.Ifyouhaveanydoubt
aboutwhetheryouhavethistypeofscissors,askyournearestfabricorsewingcenterto
helpyouidentifythesespecialbladesbeforeyousharpenthem.(Mostlinecutters,general
purpose and lower cost scissors are notknifeedgescissors).
4. Duringthesharpeningprocessyouwillneedtoknowhowtofeelforaburronthescissors
bladesinordertoknowwhensharpeningiscomplete.Feelingforaburrinvolvesrunning
yourngercarefullyacross(NOTALONG)theback(atside)ofthebladeasshownin
Figure14.
Aburrisaroughandbentextensionoftheedgeproducedduringthesharpeningprocess
andlocatedundertheedgesoftheblade.Theburrcanbefeltbutisnotalwaysvisible.
Itwillfeelroughandjaggedcomparedtothesmoothnishonthebackoftheblade.
5. TheManualScissorSharpenerwillsharpeneitherrighthandorlefthandscissorswithout
theneedtodisassemblethem.Ifyouarelefthandedyouprobablyhavepurchasedleft
handscissors.Tosharpenrighthandscissors,turnthesharpenersothatthethumbwheel
istotheright(seeFigure15and16).Whensharpeninglefthandscissors,youshouldface
theoppositesideofthesharpener.Itisimportanttousethecorrectsideofthesharpener
foreachtypeofscissors.Notdoingsocandamagetheedge.Withrighthandscissors
holdthesharpenerinyourlefthand.Withlefthandscissorsholdthesharpenerinyour
right hand.
6. Beforesharpeningidentifythetypeofscissoryouhave.Unlessyouhavescissorsdesigned
forspecializedapplications,youwillhaveeither;(a)standardrighthandedscissorsor(b)
Figure 15. Getting to know the Scissors Sharpener. Figure 16. Proper placement of right hand scissors and
motion of scissors.
Guide Surface
Sharpening
Barrel
Thumb
Wheel

1414
standardlefthandedscissors.Byfarthemostpopularscissorisstandardrighthanded.
Followtheappropriateinstructionsbelowdependingonthetypeofscissorsyouhave.
GETTING TO KNOW THE CHEF’SCHOICE SCISSOR SHARPENER
PleaserefertoFigure15tobecomeacquaintedwiththesharpener’scomponents.
TheChef’sChoice®ScissorSharpenerisdesignedtosharpenscissorscommonlyusedin
shingandboatingandthemostpopulargeneralpurposescissors.
The Scissors Sharpener uses two (2) different diamond coated pads, Coarse and Fine,
mountedonarotatingSharpeningBarrelwhichiscontrolledbyaThumbWheel.Thevisiblepor-
tionoftherotatingthumbwheelindicateswhichdiamondpad(Stage1CoarseorStage2Fine)
isexposedinsidethesharpenerandavailableforsharpeningthescissors.TheFinediamond
padisusedforallsharpeningexceptwhenthebladeedgemustberesetasdescribedlater.
Pleasenotethatthescissorssharpeningbarrel,whichiscontrolledbythethumbwheel,can
rotateinbothdirections,butithasalimitstopafterseveralturnsineachdirection.Ifyouare
turningstagesinthesharpener,andthebarrelbecomesdifculttoturn,simplyturnthebarrel
in the other direction to get to the desired stage.
FollowtheDetailedInstructionscarefullytoinsureoptimalresults.
GENERAL SHARPENING PROCEDURES - FOR RIGHT HANDED SCISSORS
Regardlessofthetypeofscissors,eitherofthetwobladescanbesharpenedrst.Place
thesharpenerondry,stableworksurface.Rotatethebarreltotheappropriatestageonthe
sharpener.Youwillwanttormlyholdthehandleofthescissorbladebeingsharpenedinyour
righthandandresttheatfaceofthatscissorbladesecurelyagainsttheatGuideSurface
asshowninFigure16.OncethefaceofthebladeisatagainsttheGuideSurface,move
thebladesothatitsedgeisinfullcontactwiththeabrasivepad.Applyinglightpressureto
the right will rotate the sharpening barrel so that the blade is in full contact with the abrasive.
Beforeyoustartsharpening,makesurethattheatfaceofthebladeisincompletecontact
withtheGuideSurfaceandthecuttingedgeofthatbladeisingoodslidingcontactwiththe
diamondcoatedabrasivepad.
WiththescissorbladeproperlypositionedontheGuideSurfaceslidethebladeforward
andbackwardwithitsedge inslidingcontactwiththe abrasivepad(seeFigure16).While
sharpening,continuetomaintainpropercontactbetweentheGuideSurfaceandtheatfaceof
thebladebeingsharpened.Thissawing-likemotionbecomesnaturalwithjustalittlepractice.
Applyonlylightpressuresideways,sufcienttomaintainsolidcontactbetweentheedgebeing
sharpenedandthediamondsharpeningpad.Thescissorscanberotatedaroundthesharpening
barrel’spivotpointtondapositionthatcancomfortablysharpentheedgeclosesttothepivot
pointofthescissors.Continuethebackandforthsawing-likemotionuntilaburriscreated
alongtheentirelengthofthescissorblade’sedgeasoutlinedbelow.
A. DETAILED PROCEDURE FOR STANDARD RIGHT-HANDED SCISSORS
TosharpenStandardRightHandedScissors,proceedasfollows:
1. Holdthesharpenerwithyourlefthand,withthesharpeningbarrelpositionedontheright.
2. MakecertaintheFinegritdiamondpadisrotatedintotheproperposition.Thevisible
thumbwheellabelshouldread“Stage2Fine”.

1515
3. Holdonescissorbladermlybyitshandleinyourrighthandandplacetheatfaceofthe
bladeagainsttheguidesurfaceasshowninFigure16.Next,slidethebladetotherightto
bringitintofullcontactwiththediamondcoatedpad.(Note: The loose blade, that is not
being sharpened, should hang below the blade being sharpened. If it is located above
the blade being sharpened, this is most probably a left handed scissors and should be
sharpened accordingly to instructions for left handed scissors.)
4. HoldingtheinsideatfaceofthebladeconstantlyinintimatecontactwiththeGuide
Surfacewhilemaintainingtheedgeinsolidcontactwiththediamondabrasivepad,move
thescissorbladeforwardandbackwardinasawing-likemotion4or5times(SeeFigure
16).Stopandchecktodetermineifaburrhasformedontheatfacealongtheentire
length of the edge.
5. Ifaburrisdetectedalongtheentireedge,proceedtoStep6.Ifnoburrhasdeveloped
continuetosharpentheedgewiththebackandforthmotionuntilaburrispresent.
6. Whenaburrhasbeencreatedalongtheentirelengthoftherstblade,removethescissor
andopenandclosethebladesfullyve(5)ormoretimestocutofftheburr.Wipethe
blades off with a paper or cloth towel.
7. ThenrepeatSteps3thru6withthesecondscissorsblade.
8. Finishbyopeningandclosingthescissors5to10timesrapidlytocutoffanyresidual
burrsalongbothblades.Wipethebladesoffwithapaperorclothtowel.
9. Testthebladesforsharpnessusingathinsheetofpaper.Ifyouneedtofurtherimprove
sharpness,repeattheSteps3thru8.Yourscissorsshouldcutpaperveryeasilywhen
properlysharpened.Ifyourscissorshaveanadjustmentscrewmakecertainitistightened
untilbladefacescontactproperlywhenopenedandclosed(See“Suggestions”,Item11).
Aftermanyresharpeningsiftheaboveprocedurefailstogiveagoodedge,itmaybenecessary
toRE-ANGLETHEEDGEasdescribedbelow:
B. RE-ANGLING THE EDGE OF RIGHT-HANDED SCISSORS
Thisshouldbenecessaryonlyinfrequently,whentheprocedureofSectionAdoesnotsharpen
well.Whenthisisneeded,proceedasfollowsforRIGHT-HANDEDscissors:
1. Holdthesharpenerwithyourlefthandwiththebarreltotheright.
2. MakecertaintheCoarsegritdiamondpadisrotatedintotheproperposition.Thevisible
thumbwheellabelshouldread“Stage1Coarse”.
3. FollowStep3thru8ofSectionAabove.Becausemoremetalmustberemovedfromthe
edgefacetduringthere-angling,manystrokesmaybeneededtocreatetheburr.
4. ThenrotatethebarreltotheFinegrit(Stage2,Fine)positionandrepeatSteps2thru9of
SectionA.
C. PROCEDURE FOR SHARPENING LEFT-HANDED SCISSORS
TheprocedureforLEFT-HANDEDScissorsisthesameasforstandardrighthandedscissors,
(seeSectionsAandB,above)except:
• Holdthesharpenerhandlewithyourrighthand,andhavethescissorsharpeneroriented
withtheSharpeningBarrelontheleft.
• AfterplacingthebladeatagainsttheGuideSurface,slidethebladetotheleft – to ensure
contact with the abrasive pad.

1616
SUGGESTIONS
YourChef’sChoice®Manual Scissors Sharpener is designed to produce scissors edges that are
likenew,quicklyandeasily.Toinsurethatyougettheverybestscissorsedgeseverytime,take
timetocorrectlyidentifythetypeofscissorstobesharpened,and
1. Alwaysmakecertainthattheatfaceofthescissorbladeisinintimatecontactand
alignmentwiththeGuideSurface.
2. Use light pressure when the tip of the blade is near the end of the abrasive pad to prevent
thetipfrombindingintheopenslot.Itmayrequiresomepracticetokeepthebladetip
movingfreelyovertheabrasivepad.
3. Sharpenusingasmoothforwardandbackwardstrokekeepingthescissorblade’sedgein
solidslidingcontactwiththeproperdiamondpadduringtheentirestroke.
4. Thescissorscanberotatedtodifferentpositionsaroundthesharpeningbarrel’spivotpoint
toallowthemaximumbackandforthmotionalongtheedge.Itmayhelptorotatetothe
rightorleftbyafewdegreestoallowtheedgeofthescissorsnearitspivottocomein
contact with the abrasive pad.
5. UsingtheThumbWheeltorotatethebarrelineitherdirectioncausestheabrasivepadto
moveupordownslightly.Thismovementexposesfreshabrasivepad.Itisrecommended
toturnthebarrelallthewayineitherdirectioneveryfewsharpeningtoevenlywearthe
abrasive pads.
6. Donotattempttosharpenpinkingshears,serratedbladesorknivesinthescissorsharpener.
7. Makecertainthatthescissorsbladesarecleanbeforesharpening.
8. Itisessentialtolearnhowtofeelfortheburr.Thisisthebestindicationthatsharpeningin
agivenstageiscomplete.Makecertaintheburrhasformedalongtheentireblade…
frompivottotip.
9. Withpoultryshearsyouneedsharpenonlythesmoothconvexblade.Theconcave(usually
serrated) blade will not need sharpening.
10.Donotattempttosharpenserratedblades.However,whereonlyonebladeisserrated,
the other straight edge blade can be sharpened using the procedure for standard scissors.
Lookcarefullyforserrations.Theycanbeverysmallanddifculttosee.
11.ScissorsPivotScrewAdjustment:All“professional”scissorsandmanyotherscissorshave
ascrewtensioneratthepivot.Theperformanceofyourscissorsandyourscissorlifemay
beimprovedbyadjustingthispivottoestablishandmaintainasmoothedgecontactwhen
youclosethescissors.Properadjustmentisdeterminedbyopeningscissorsto50%of
bladelength,thentighteninguntilbladeloosenessisjustbarelyremoved.Itisimportant
that the pivot not be over tightened.
12.Donotusehoningoils,wateroranyotherlubricantonthesharpener’sdiamond
abrasive pads.
NORMAL MAINTENANCE FOR YOUR SCISSORS SHARPENER
NOlubricationisrequiredforanymovingparts,bearingsorsharpeningsurfaces.Thereisno
needforwateronabrasives.Tocleansharpener,shakeofforblowoffanyloosemetallings.
Wipepartswithadampcloth.Anysaltwaterresidueshouldberemovedandthesharpenerfully
dried after each use. Do not use detergents or abrasives.

1717
HOOK SHARPENER
ACCESSING YOUR HOOK SHARPENER:
Yourshhooksharpenerisstoredinawatertightcompartmentinsidethemainsharpeningunit.
Theaccesscoverforthehooksharpenerislocatedonthelowerleftsideofthesharpening
station.Toaccessthehooksharpener,pulltheedgeofthecoveroutasshowninFigure17a,
thenremovethecoverbyslidinginthedirectionofthearrowtoremove(Figure17b).Thehook
sharpenercanthenberemovedfromitscompartmentbygrippingthetipwithyourngersand
slowlyslidingitoutofitscompartment(Figure17c).Itmaybeeasiertotiltthesharpeningstation
sidewaysoncetheaccesscoverisremovedtomakethehooksharpenermoreeasilyaccessible.
BEFORE FIRST USE
TwoAAbatteriesneed tobe installedin thehooksharpenerbeforeuse.Holdingtheupper
(white)partofthehooksharpenerrmlyinonehand,twistthelowerpart(blue)half-waycoun-
ter-clockwiseandpulltoseparatethebatterycompartment.InserttwofreshAAbatteries**into
thecompartmentwiththepolarityasshowninFigure18.Reversetheprocesstore-assemble
thehooksharpener,usingthemarkingsontheunitasaguideforalignment.
**Please note: never mix old and new batteries. New alkaline batteries are recommended for best performance.
**Remove batteries from Hook Sharpener during extended periods of storage or non-use.
**AA batteries not included.
Figure 17a. Lift cover edge off. Figure 17c. Remove hook sharpener
from main unit.
Figure 17b. Slide to the left and
remove cover.
Figure 18. Correct battery insertion.

1818
INSERTING AN ABRASIVE BIT INTO THE HOOK SHARPENER:
Therearethreedifferentabrasivebitsstoredinsidethecovertothehooksharpener
compartment(Figure17b).
• Thediamondcylindricalbitisusedforgeneralhooksharpening.Itcanbeusedwithmost
hookshapes.
• Theconicaldiamondbitcanbeusedtosharpenmosthooks,butitisespeciallyuseful
inaccessingtightcurvesandsmallpoints.Usethisbitforsmallhooksandhookswith
curvesthataredifculttoreach.Thepointofthisbitcanbeusedwhenopeningtheholes
ofjigheads.
• Thestonebitisusedforasecondary,honingoperationaftersharpeningwithadiamond
bit.Honingfurtherrenesthepointtoensureaverysharptip.
Insertabitintothehooksharpenerbypressingitintotheholeintheendofthesharpeneras
showninFigure19.Amoderateamountofforceisrequiredtoinsertorremovetheabrasivebits.
SHARPENING:
Note: Before sharpening any hooks, wear appropriate eye protection
Therststepinsharpeningahookismakingsurethatthehookisheldrmlyandsecurely.
Forsmallanddifculttoholdhooks,asmallhobbyviseisrecommended.Otherwise,holdthe
hookrmlyinonehandwhileholdingthehooksharpenerintheotherhand(Figure20).
Depressthe“ON”buttonandapplytherotatingbittothetipofthehookusingverylight
pressureatrst,gentlyincreasingpressureasyoubecomemorecomfortablewiththeprocess.
Followingaresometipsforefcientandsafehooksharpening:
Figure 21. Parallel to the edge.
Figure 20. Sharpening a fishhook.
Figure 22. Perpendicular to the edge.
Figure 19. Inserting the abrasive bit into the
Hook Sharpener.
“ON”
Button

1919
• Onlymoderatepressureisnecessaryforsharpening,asthehooksharpenerismost
effectivewhileapplyinglightloadsathighspeeds.Toomuchpressurewillslowthehook
sharpenerdownandmakethehookdifculttoholdinplace.
• Alwaysmovethehooksharpenerintheoppositedirectionthatthebitisturning.Thiswill
allowthebittogetmaximum“bite”intothehook,andprovidethemoststableapplication
of force.
• Itisimportanttosharpentheverytipofthehookinordertogetasharp,piercingedge.
Applytheabrasivetoseveralpartsaroundtheperimeterofthetiptogetthebestedge.
• Positioningtherotatingbiteitherperpendicularorparalleltothehookpointcanbe
effectivedependingonpersonalpreferenceandtypeofhook.Experimentwithboth
techniquestondthemethodthatismosteffectiveforyourhooks(Figures21and22).
• Sharpenrstwithoneofthediamondbits,thenusethestonebittocompletelyhonethe
tip to a fine point.
• Bentordamagedhooksmaybedifculttosharpentotheiroriginalsharpness.Ifthetip
isbent,itmayneedtobeclippedshortorstraightenedbeforesharpening.Beawarethat
modifyingthelengthorshapeofthehooktipcanadverselyaffectitsabilitytohookash.
Keepthehooktipgeometryasclosetothefactorydesignaspossible.
Youcantestforsharpnessbygentlyslidingthepointofthehookoveryourngernail.Asharp
hookwillhavethetendencytograbandmarkthenail,whileadullpointwillslideeasilyovera
ngernail.Donottestforsharpnesswithyourngertipsoronyourskin.
NORMAL MAINTENANCE FOR YOUR HOOK SHARPENER
Thehooksharpenerisnotwaterresistant,andneedstobestoredinitswatertightcompartment
inthemainunittoprotectitfrommoistureandsaltwater.Wipetheunitcleanaftereachuse
andplaceitinthecompartmentoranothersafe,dryplace.Theexteriorofthesharpenermaybe
cleanedwithadampcloth.Donotusedetergentsorabrasives.

20
AssembledintheU.S.A. www.chefschoice.com
ThisproductmaybecoveredbyoneormoreEdgeCraftpatentsand/orpatentspendingasmarkedontheproduct.
Chef’sChoice®,EdgeCraft®,FlexHone/Strop®andDiamondHone®areregisteredtrademarksof
EdgeCraftCorporation,Avondale,PA.USA
ConformstoULStd.982 CertiedtoCAN/CSAStd.C22.2 No.64
© EdgeCraft Corporation 2014
H14 C7182A0
®
EdgeCraft Corporation
825 Southwood Road, Avondale, PA 19311 U.S.A.
Customer Service (800) 342-3255 or 610-268-0500
SERVICE FOR YOUR MARINE SHARPENING STATION™
Intheeventpost-warrantyserviceisneeded,returnyourMarineSharpeningStation™to the
EdgeCraftfactorywherethecostofrepaircanbeestimatedbeforetherepairisundertaken.
OutsidetheUSA,contactyourretailerornationaldistributor.
Pleaseincludeyourreturnaddress,daytimetelephonenumberandabriefdescriptionofthe
problemordamageonaseparatesheetinsidethebox.Retainashippingreceiptasevidenceof
shipmentandasyourprotectionagainstlossinshipment.
EdgeCraft Corporation
825 Southwood Road
Avondale, PA 19311 U.S.A.
Customer Service (800) 342-3255 or 610-268-0500
Table of contents
Languages:
Popular Tools manuals by other brands

Ingersoll-Rand
Ingersoll-Rand 2161P-EU Series instructions

Hitachi
Hitachi RB18DL parts list

Huskie Tools
Huskie Tools EP-510HK Operating instructions manual

Nordson
Nordson Z-AXIS HBM Series Operating and maintenance manual

Weir
Weir SPM Safety Hammer 2" 1502 Operating and maintenance instructions

Florida Pneumatic
Florida Pneumatic FP-780 instructions