Chefwave Swap Pot CW-AFPC01 User manual

SWAP POT
AIR FRYER
PRESSURE COOKER
MODEL CW-AFPC01
Please read this manual carefully before using the air fryer pressure cooker.
Save these instructions.

Dear ChefWave™ Customer,
Congratulations on your purchase of the ChefWave™ Swap
Pot Air Fryer Pressure Cooker. To ensure your safety and
many years of trouble-free operation, please read this manual
carefully before using this appliance and keep it in a safe place
for future reference.
We hope you enjoy your new ChefWave™ Swap Pot Air Fryer
Pressure Cooker.
Sincerely,
The ChefWave™ Team
WELCOME!
@ MYCHEFWAVE
@ CHEFWAVEKITCHEN

1
TABLE OF CONTENTS
Safety Instructions
Parts & Accessories
Using the Accessories
Air Fryer Digital Control Panel
Pressure Cooker Digital Control Panel
Before First Use
Cooking Tips
Instructions for Air Fryer Cooking
Instructions for Pressure Cooking
Pressure Cooking Settings
Pressure Release
Instructions for Non-Pressure Cooking Settings
Function Settings for Pressure Cooker
Function Settings for Air Fryer
Cooking Chart
Cleaning the Cooker
Error Codes
Troubleshooting
Technical Specifications
Guarantee
2
4
5
7
8
10
11
12
13
15
16
17
19
23
24
26
27
28
30
31

2
SAFETY INSTRUCTIONS
When using electrical appliances, basic safety precautions should be observed.
Please read and follow these warnings and instructions:
• This appliance is intended for household countertop use only. Do not use
this appliance for commercial purposes. Do not use it outdoors. Using it for
unintended purposes will invalidate the warranty.
• Keep the appliance and the cord out of the reach of children and pets. This
appliance is not intended for use by persons with reduced physical, sensory,
or mental capabilities.
• Always place the appliance on a dry, stable surface that can withstand high
heat. Do not place the appliance on a wood table. To prevent potential
damage to the surface, place an appropriate protective hot pad underneath
the appliance.
• Do not place the appliance on or near towels, paper, or other flammable
materials. Do not block the vents. When cooking, do not place the appliance
against a wall or any other appliance. Use the appliance only in a well-
ventilated area, and allow 5 inches of space on all sides of the appliance.
• Never place the appliance on or near stoves or burners or in an oven.
• Ensure that the voltage of the appliance is compatible with the voltage
in your home in order to avoid fire, injury, or damage. Plug the cord into a
properly grounded electrical outlet.
• First attach the plug to the appliance, and then plug the cord into the outlet.
Keep the cord away from hot surfaces. Do not touch the plug or operate the
unit with wet hands.
• This unit has a polarized plug (one blade is wider than the other). If the plug
does not fit fully into the outlet, reverse the plug. If it still does not fit, contact
an electrician. Never force the plug to fit.
• For safety purposes, this appliance comes with a short power cord. Plug the
appliance into wall sockets only. Use the appliance with an extension cord at
your own risk. Do not allow the cord to hang over the edge of the counter.
• Never connect this appliance to an external timer switch or separate remote
control system.
• If the appliance or its power cord has been damaged, it must be replaced
by the manufacturer, a service technician, or a similarly qualified person in
order to avoid a hazard. Do not attempt to modify this appliance in any way.

3
• The appliance should always remain unplugged from the outlet when not in
use. After using the appliance, turn off the power and gently unplug it from
the outlet. Do not jerk or pull the power cord. Unplug the unit and let it cool
down for 30 minutes before cleaning or storing it.
• To protect yourself from electric shock, do not immerse the base, cord, or
power plug in water or any other liquid.
• Before installing or removing any parts, be sure that the appliance has
cooled completely.
• Only use parts that are authorized by the manufacturer in order to avoid
injury or damage.
• Should theinnertemperaturecontrolsystemfail,theoverheatingprotection
system will be activated and the unit will not function. Should this happen,
unplug the power cord. Allow time for the unit to cool completely before
restarting or storing.
• While cooking, the appliance’s internal temperature reaches several
hundred degrees Fahrenheit. To avoid injury, never place hands inside the
unit unless it is fully cooled.
• The outer surfaces may become hot during use. The rotating mesh basket
WILL be hot. Wear oven mitts or use the fetch tool when handling hot
components or surfaces.
• Should the unit emit black smoke, unplug immediately and wait for smoking
to stop before removing oven contents.
• When operating, air is released through the air outlet vent. Keep your hands
and face at a safe distance from the vent. Also avoid the air while removing
the rotating mesh basket from the unit.
• When the time has run out, cooking will stop but the fan will continue
running for 20 seconds to cool the unit down.
• Do not fill the inner pot more than two-thirds full. When cooking food that
may expand, like rice, dried vegetables, or beans, do not fill more than half
of the pot. Overfilling may cause injury or damage.
• Always use the correct amount of liquid called for in recipes and instructions.
• To prevent food contact with the interior upper screen and heat element,
do not overfill the rotating mesh basket.
• To avoid the risk of fire or injury, never pour oil into the rotating mesh basket.
• Do not sauté using oil while the pressure cooking function is running.
• Follow the cleaning and maintenance guidelines in this manual.
• Store the appliance in a location that is cool and dry.

4
1. Main Unit
2. Air Fryer Unit
3. Pressure Lid
4. Fry Basket
5. Roast Rack
6. 6-Quart Removable Cooking Pot
7. Spoon
8. Measuring Cup
9. Condensation Collector
10. Power Cable
2
6
34
5
17
10
PARTS & ACCESSORIES
8
9
5
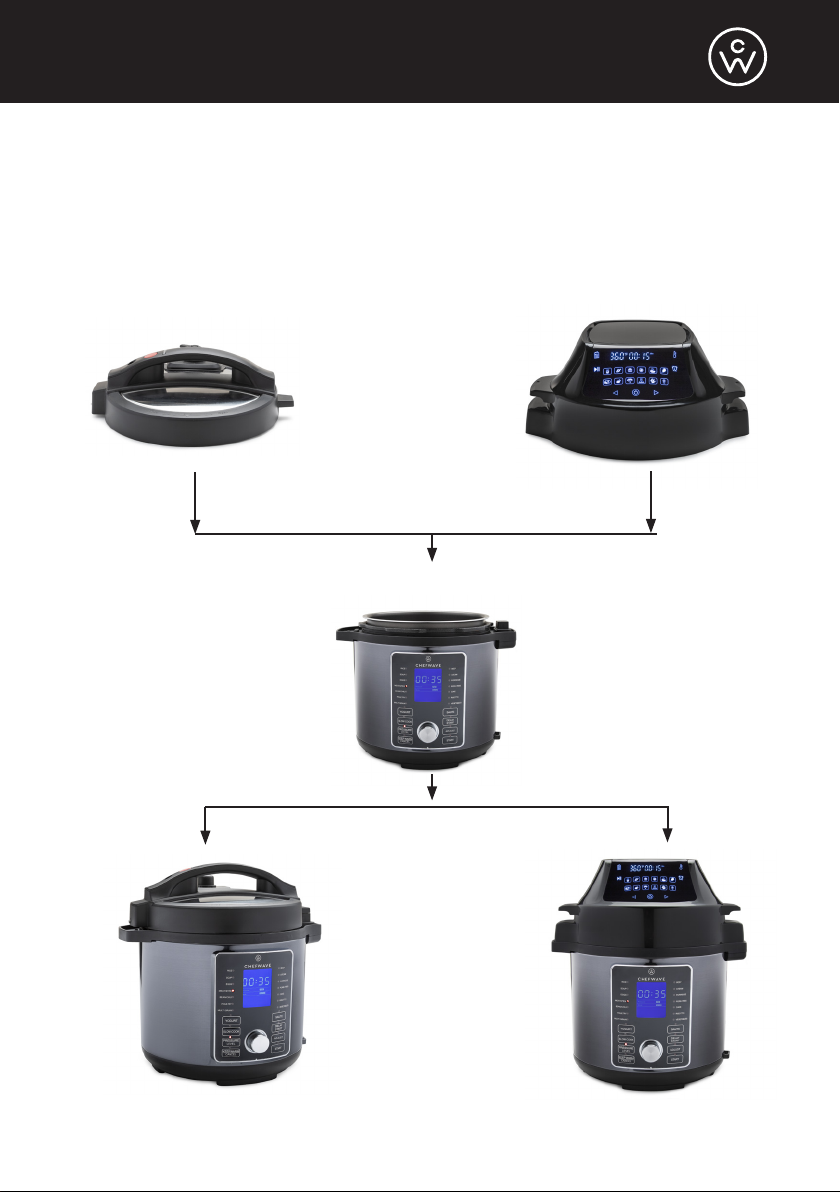
USING THE ACCESSORIES
The Swap Pot comes with two lids: the pressure lid and the air fryer unit. Attach
the lid you wish to use to the main unit.
MAIN UNIT
PRESSURE LID AIR FRYER UNIT
PRESSURE COOKER AIR FRYER

6
The fry basket (left) and roast rack (right) can be inserted into the 6-quart pot to
roast and fry foods using the air fryer unit. When the air fryer unit is attached, the
pressure cooker functionality will be disabled.
When the pressure cooker lid is attached, the front LCD control panel will light
up, indicating that the pressure cooking functions are enabled.
7
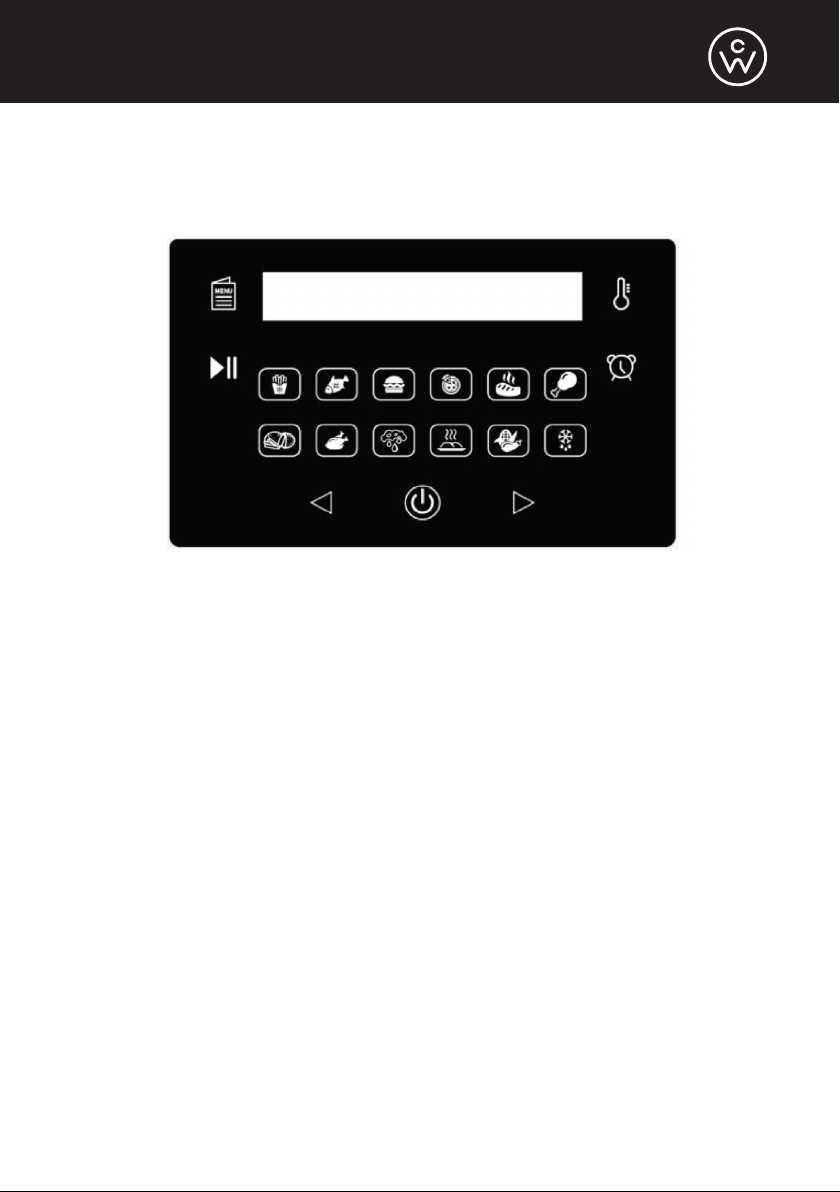
AIR FRYER DIGITAL CONTROL PANEL
• The air fryer control panel features 12 presets: Chips, Fish, Hamburger,
Pizza, Beef Steak, Chicken Leg, Bake, Chicken, Dehydrate, Broil, Corn, and
Defrost.
• When the air fryer lid is attached, the blue lights of the LCD panel will flash.
Then, the On/Off button at the bottom of the panel will continue flashing.
Press that button to begin using the air fryer. The On/Off button can also be
used to turn off the machine, canceling the cooking process.
• Use the Menu button to cycle through the 12 presets.
• If desired, use the Temperature button (thermometer icon on the top right
corner) to manually set the temperature. Then, use the Left and Right
arrows to change the temperature.
• If desired, use the Timer button (clock icon on the right) to manually set the
cooking time. Then, use the Left and Right arrows to change the time.
• After selecting a preset or manually setting the time and temperature, use
the Start button (play/pause icon on the left) to begin the cooking process
or pause it once begun.
8
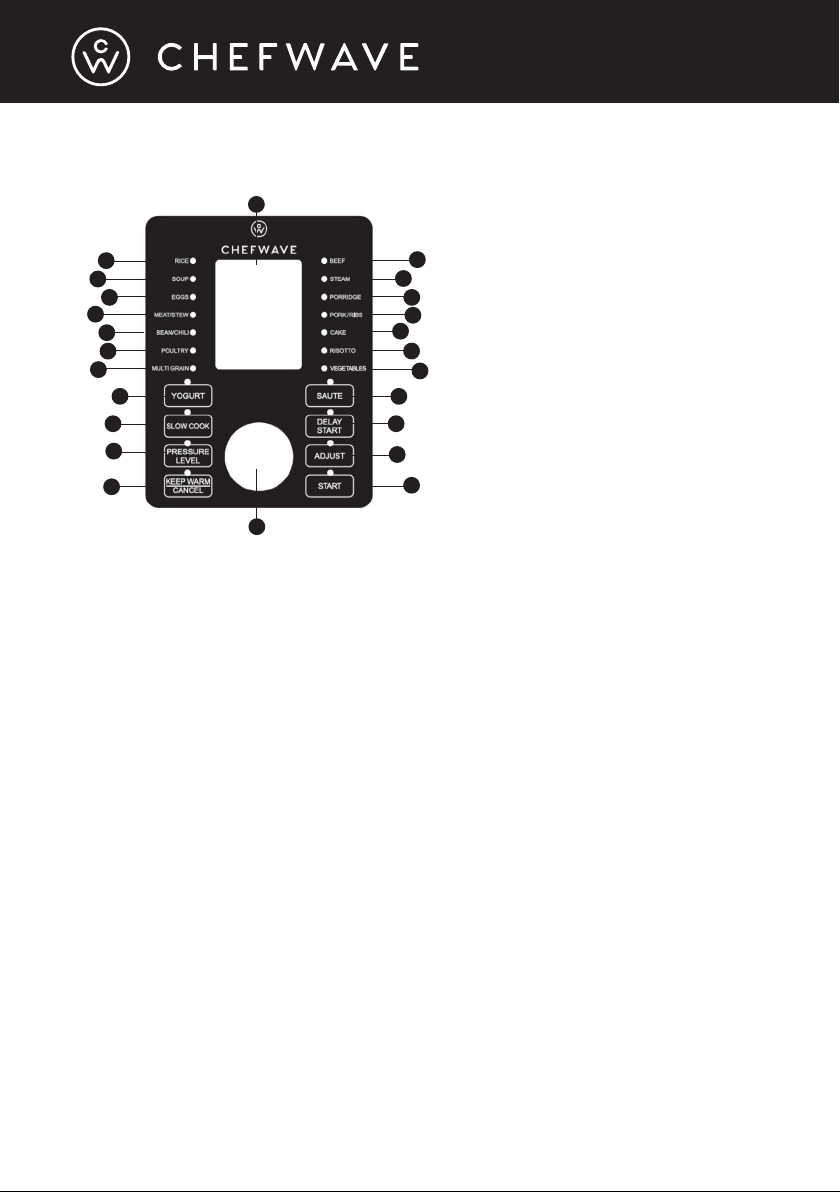
PRESSURE COOKER DIGITAL CONTROL PANEL
When the pressure cooker lid is attached, the Swap Pot will default to Standby
Mode. Turning the Function knob will exit standby.
• Use the Function knob to select the desired cooking function. After you
have selected a function, press the Start button to begin cooking.
• Use the Pressure Level button to set the pressure level to either “low” or
“high.”
• Use the Adjust button to set the timer. Use the Function knob to manually
adjust the time. See the “Pressure Cooking Settings” section on page 15 for
instructions.
• Use the Delay Start button to start cooking at a designated time in the future.
Turning the Function knob sets the Delay Start time. See the “Instructions
for Pressure Cooking” section on page 14 for instructions.
• Use the Keep Warm/Cancel button to end the selected cooking function
or to keep your food warm after cooking. Pressing the Keep Warm/Cancel
button before or after cooking (when the Swap Pot is in Standby Mode) will
toggle Keep Warm on and off. Press it during cooking to cancel the cooking.
Keep Warm/Cancel also controls the beeping sounds. Press and hold down
the button for 3 seconds to turn it off or back on again.
NOTE: Always double-check that you have pressed the correct button
when making your selections.
NOTE: You cannot turn off safety alert sounds.
1
2
3
4
5
6
7
8
9
10
11
12
13
14
15 16
17 18
19 20
21 22
23
1-17. Cooking functions
18. Delay Start button
19. Pressure Level button
20. Adjust button
21. Keep Warm/Cancel button
22. Start button
23. Function knob
24. LCD display
24
9
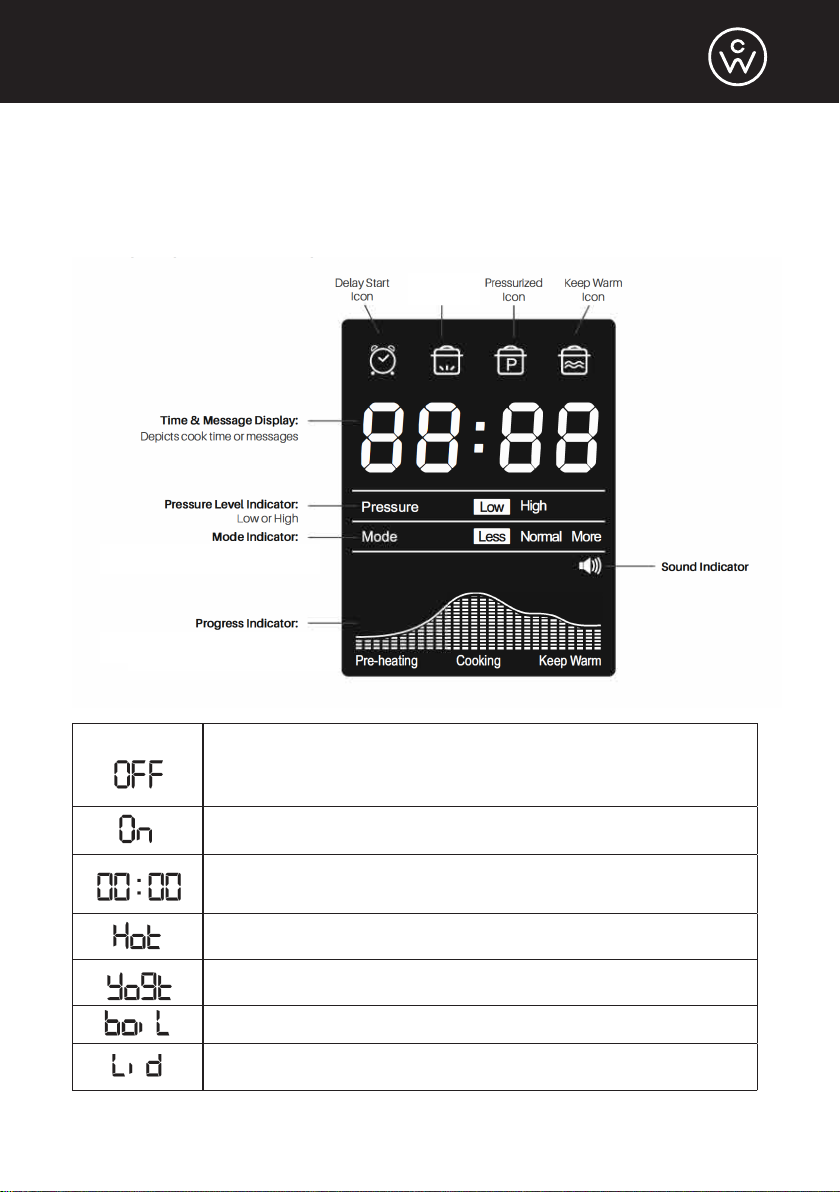
Control Panel LCD Display
The LCD display uses icons, words, and numbers to depict time, pressure levels,
modes, cooking progress, and messages.
LCD Display Messages
The cooker is plugged in, but no programs are selected.
Ready to use, and you can choose a program.
Your cooker is ready to use, and it is preheating.
Timer indicating how much time is still left. Used for Cook
Time, Delay Start, or Keep Warm functions.
Preheating Sauté is over.
Yogurt program is complete and ready for pasteurizing.
Pasteurizing
Lid is not locked in place.
Preheating
Icon
(Preheating, Cooking, or Keep Warm)
Less, Normal, or More

10
BEFORE FIRST USE
1. Read all warning labels on the packaging and all safety instructions before
use.
2. Unpack the appliance and remove all packaging materials, including any
materials found between the inner pot and the heating plate.
Before Using the Pressure Cooker
1. Open the lid by holding down the red button on the handle and turning the
handle counterclockwise until the arrow icon on the lid is aligned with the
unlock icon on the exterior. Follow these instructions in reverse to lock the
lid.
2. Always ensure the rubber seal ring is securely fitted onto the metal Y-shaped
ring inside the lid. Make sure the crease in the rubber seal ring meets with
the outside of the Y-ring all the way around. Then, place the Y-ring and
rubber seal ring back into the lid, making sure the hole in the center of the
Y-ring’s cross-section is lined up with the metal pin in the center of the lid.
Press down firmly until the Y-ring is secured onto the lid.
3. Remove the inner pot and make sure that all parts are included.
4. For the first use, to ensure correct assembly of the rubber seal ring, it is
recommended to fill the inner pot with water to the 2/3 line and program to
pressure cook for 30 minutes. Once completed, pour out the water. Rinse
and towel dry the inner pot. The pressure cooker is now ready for use.
5. Attach the condensation collector at the rear of the housing by sliding it into
the matching slot.
Before Using the Air Fryer
1. Remove the Pressure Cooker lid and set it aside.
2. Wash the Air Fryer lid using warm, soapy water, and then rinse and dry it
thoroughly. Use a damp cloth to wipe down the outer housing. Never
immerse it in water or other liquids. If necessary, also clean the inner pot as
described above.
3. Attach the Air Fryer lid by lining up the connecting pins on the underside
with the matching pinholes on the housing of the Swap Pot.

11
COOKING TIPS
Pressure Cooker Safety Precautions
• Always use caution when moving the steam release handle to the venting
position after cooking. Keep your hands, face, and skin away from the steam
release valve to avoid the risk of burns.
• Wait until the pressure inside the appliance is completely released before
you open the lid. The lid will remain locked until the float valve drops, and
the red button will not be able to be pushed. Never force the lid to open.
• The inner pot may stick to the lid when the lid is opened. This will happen
when a vacuum seal has formed. To release the seal, turn the steam release
handle to the venting position.
• If the float valve becomes stuck, turn the steam release handle to the
venting position. After the steam has been released, push down the float
valve using a utensil since it may be hot.
NOTE: See the “Safety Instructions” section on page 2 for more information on
safety precautions to observe.
How to Use Liquids in the Pressure Cooker
• Always add a minimum of 1 cup of water or other liquid to produce sufficient
steam to cook under pressure. In addition to water, you can use liquids such
as stock, juice, sauce, beer, or wine. Be aware that oils and oil-based sauces
do not contain a high enough water content, and therefore they do not fulfill
the minimum amount of liquid that is required for cooking.
Setting the Pressure Cooker Time
• Cooking time and pressurizing time will vary depending on the temperature
you are using as well as the ingredients. If food is cold or frozen, it will take
longer to cook.
• Do not use the Delay Start function for foods such as oatmeal, porridge, or
other thick liquids because they may clog the steam valves. These types of
foods should be monitored while they are cooking.
Air Fryer Safety Precautions
• Be careful when removing the air fryer unit after cooking. It will be hot.
• Do not overfill the air fryer unit; doing so can interfere with the fan.

12
INSTRUCTIONS FOR AIR FRYER COOKING
The Swap Pot lets you swap lids between the air fryer lid and the pressure
cooking lid. Use the pressure cooker function to tenderize your food before
using the air fryer lid to crisp your meal.
NOTE: If you wish to use the pressure cooker function after air frying, you must
wait at least 10 minutes for the Swap Pot to cool.
The air fryer lid can be easily opened during cooking, allowing you to check on
your meal. Removing the lid will pause the cooking; the Swap Pot’s memory
function conveniently remembers where you left off. Once you return the lid,
the timer will resume and the heating element will turn back on.
1. Plug the power cord into a wall outlet and attach the lid. Then, press the On/
Off button. The default temperature of 360°F and time of 15 minutes will
display.
2. To manually set a new temperature, first click the Temperature button, and
then click the left and right arrows to toggle up or down. The temperature
can be set in 10-degree intervals between 90°F and 400°F. To manually set
a new time, first click the Time button, and then toggle with the arrows. The
countdown timer can be set in 1-minute increments between 1 minute and
24 hours.
3. To select a preset, press the Menu button. Doing so will cycle through the 12
options. From there, if you choose, you can manually adjust the temperature
and time following the instructions in the previous step.
NOTE: The manual temperature and time ranges will vary depending on
which preset you have chosen. See the chart on page 23 for the various time
and temperature ranges. To return to the default settings, turn the air fryer
off and on again.
4. With the pot inserted, place either the fry basket or the roast rack in the pot.
NOTE: It is best to preheat the Swap Pot for 5 minutes before adding
ingredients to the pot. To do this, close the lid and press the On/Off button
before continuing to the next step.
5. Add all ingredients to the fry basket or roast rack. Close the lid and press the
On/Off button to begin cooking.
NOTE: If the air fryer is preheated, there is no need to press the On/Off
button again.
6. While cooking is in progress, you can take off the lid and remove the fry
basket if you need to shake or toss ingredients for even browning. Simply
lower the basket back into the pot and put the lid back in place when ready,
and cooking will automatically resume.
NOTE: Use oven mitts when handling a hot basket or rack.

13
7. The unit will beep when cooking is complete.
INSTRUCTIONS FOR PRESSURE COOKING
You can pressure cook with the following programs: Meat/Stew, Bean/Chili,
Soup, Rice, Poultry, Pork/Ribs, Multigrain, Porridge, Steam, Eggs, Cake, Risotto,
and Vegetables. The other programs offered by the pressure cooker do not use
pressure.
1. Add all ingredients to the inner pot. Do not put any food or liquid in the
cooker base. Always add the minimum amount of liquid as described in the
“Cooking Tips” section on page 11. The inner pot should not be more than
two-thirds full with precooked food and liquid. When cooking food that
expands, such as rice, beans, or dried vegetables, only fill up to half of the
pot.
2. Make sure that the cooker base, the inner pot, and the heating plate are all
dry. Place the inner pot inside the cooker base.
NOTE: Keep the power turned off.
3. Put the pressure cooker lid on the cooker and turn it clockwise until you
hear a click to indicate that the lid is locked. Turn the steam release handle
to the sealing position. Be sure that the float valve on the inside of the lid has
dropped down. The float valve is what prevents the lid from being opened
before it is safe to do so.
4. Plug the appliance into an outlet. It will enter standby mode.
5. Select the desired cooking function. The corresponding indicator light will
illuminate. To select a different cooking function, press Keep Warm/Cancel
and select a different function.
6. The default cooking mode is “normal,” and the default pressure level is
either “low” or “high” depending on the cooking function. You can adjust
the cooking mode to “less,” “normal,” or “more” by first pressing the
Adjust button, and then turning the Function knob to cycle through these
selections. You can adjust the pressure level to “low” or “high” using the
Pressure Level button. You can increase or decrease the cooking time
using the Function knob. For more information, see the “Pressure Cooking
Settings” section on page 15.
NOTE: The non-pressure cooking functions are Slow Cook, Sauté, Yogurt,
and Keep Warm. The Pressure Level button is disabled for these functions.
NOTE: You cannot change the cooking time for the Rice function; it adjusts
automatically.

14
7. The optional Delay Start function allows you to start cooking at a designated
time in the future rather than immediately. You can delay the start time up
to 24 hours, and the time can be adjusted in 10-minute increments. To use
this function, press the Delay Start button and use the Function knob to set
the desired delay time. Press the Start button to start the timer, and cooking
will commence at the designated time.
NOTE: The Delay Start function is disabled for the Sauté and Yogurt
functions (which do not use pressure).
WARNING: Do not allow perishables such as meat, poultry, fish, or dairy
products to sit at room temperature for more than 2 hours or more than 1
hour in high room temperatures. Do not use the Delay Start function for
thick or foamy foods such as oatmeal.
8. After selecting a cooking function, you will hear three beeps. The display will
show “preheating” while the pot warms up. Depending on your selections,
preheating can take anywhere from a few minutes to more than 40 minutes.
During preheating, steam may release, and the float valve will rise as the
pressure builds.
9. When the appropriate amount of pressure and preheating has been
reached, cooking will begin. The display will show “cooking”, and the timer
will start. You may hear a clicking sound during cooking; this is a normal
occurrence.
10. At any time during the cooking process, you can adjust the pressure level or
the cooking time, and you can turn the Keep Warm function on or off. You
can press the Cancel button to stop the cooking process early.
11. When cooking has finished, you will hear a beep, and the cooker will enter
Keep Warm mode if that function has been turned on. The cooker will
automatically turn itself off and enter standby mode after 24 hours.

15
PRESSURE COOKING SETTINGS
The following settings can be adjusted after you have selected a cooking
function. Note that some settings cannot be adjusted once cooking has begun.
Press Keep Warm/Cancel if you need to start over.
Less, Normal, More
Press the Adjust button and turn the Function knob to cycle through the
selections for “less,” “normal,” and “more.” This selection affects the time and/or
temperature. This setting must be selected before cooking begins.
Pressure Level
When using the pressure cooking functions listed on page 13, you can adjust
the pressure level to “low” or “high” using the Pressure Level button.
Cooking Time/Temperature
Use the Function knob to adjust the time and temperature when applicable
(see the chart beginning on page 19). When setting the time and temperature
manually, you can set the cooking time in 1-minute increments from 1 minute to
24 hours. The temperature can be set in 10-degree increments from 90°F to
400° F.
Delay Start
The Delay Start button will start the cooking at a designated time in the future.
This setting must be selected before cooking begins. Set your desired delay
time using the Function knob.
When the display reads “00:00” (default), Delay Start is off. It will automatically
turn on when set to any other setting. If you wish to turn the Delay Start function
off, turn the knob in either direction until the display reaches “00:00”.
Keep Warm/Cancel
The preset functions will automatically keep your meal warm after cooking
has finished. Press the Keep Warm/Cancel button before or after cooking
to manually warm your food when the Pressure Cooker is in standby mode.
Pressing the Keep Warm/Cancel button during cooking will will cancel your
cooking function.
NOTE: Be absolutely sure you want to cancel before pressing this button, as
you will not be able to undo this action. When you have canceled cooking, you
must wait until pressure is released before opening the lid.

16
PRESSURE RELEASE
There are two pressure-release methods: quick release and natural release. The
method that you should use depends on your recipe. Most recipes will indicate
which method to use.
Quick-Release Method
This method releases pressure quickly in the form of steam. When cooking is
complete, turn the steam release handle to the venting position to release the
pressure. Hot steam will be released through the vent, so be sure to use extreme
caution by wearing protective gloves and keeping your hands, face, and skin
away from the valve to avoid the risk of burns. When all of the steam has been
released and the float valve has dropped, carefully open the lid so that it is
pointing away from you, and be cautious of any lingering steam, oil, or water.
Natural-Release Method
This method takes much more time than the quick-release method. Use this
method for foods with a large volume of liquid, starch content, or ingredients
that may produce foam, such as soup, pasta, oatmeal, and beans, to prevent
liquid from splattering out. When cooking is complete, do not turn the steam
release handle. Rather, let the pressure release on its own. This could take 10
to 40 minutes or longer. You can leave the cooker on the Keep Warm setting,
or you can turn it off so the contents will cool more quickly. After about 10 to
15 minutes have passed, you can turn the steam release handle to the venting
position to release pressure. Generally, this will not affect the ingredients. When
the float valve has dropped, carefully open the lid so that it is pointing away from
you.
CAUTION:
• Never block the steam release vent or open the lid while the cooker is in
operation or when it is releasing steam.
• Keep your hands, face, and skin away from the steam release vent while the
cooker is in operation or when it is releasing steam.
• Never touch the lid or any metal parts of the appliance unless you are
wearing mitts/gloves.
• Use utensils or wear protective mitts/gloves when using the quick-release
method.
• See the “Safety Instructions” section on page 2 for more information on
safety precautions to observe.

17
INSTRUCTIONS FOR NON-PRESSURE COOKING SETTINGS
Use the following programs to cook without pressure: Slow Cook, Sauté, Keep
Warm, and Yogurt. The Pressure Level button is disabled for non-pressure
cooking functions.
Using the Sauté Function
Youcansautéor simmer food insidetheinner pot usingtheSautéfunction. Leave
the lid off when you are sautéing, and do not leave the appliance unattended.
1. Make sure that the cooker base, the inner pot, and the heating plate are all
dry. Place the inner pot inside the cooker base.
NOTE: Keep the power turned off.
2. Plug the appliance into an outlet. It will enter standby mode.
3. Press the Sauté button. To change the temperature, use the Adjust button
and Function knob to cycle through the selections for “less” (appropriate
for simmering or thickening sauce), “normal” (appropriate for standard
browning), and “more” (appropriate for stir frying or blackening meat).
4. Press the Start button, and you will hear three beeps. The display will show
“on” while the pot warms up. When the desired temperature has been
reached, the display will show “hot.”
5. Add the ingredients to the inner pot and sauté as desired.
6. When you have finished, press the Keep Warm/Cancel button to stop or
wait until the cooking function has completed. The display will show “off,”
and the cooker will enter standby mode.
NOTE: The cooker will automatically enter standby mode after 30 minutes
have elapsed.
Using the Slow Cook Function
You can cook ingredients slowly (from 30 minutes to 9 ½ hours) using the Slow
Cook function. You should regularly monitor the cooking progress when using
this function.
1. Make sure that the cooker base, the inner pot, and the heating plate are all
dry. Add the ingredients to the inner pot, and place it inside the cooker base.
NOTE: Keep the power turned off.
2. Put the lid on the cooker and lock it. Turn the steam release handle to the
venting position.
3. Plug the appliance into an outlet. It will enter standby mode.

18
4. Press the Slow Cook button. To change the time, use the Adjust button
and the Function knob to cycle through the selections for “less,” “normal,”
and “more.” The default cooking time is 4 hours, though you can use the
Function knob to adjust the cooking time from 30 minutes to 20 hours.
5. Press the Start button, and you will hear three beeps. The display will show
the remaining cooking time.
6. You can stop the function at any time by pressing the Cancel button.
Otherwise, when the function has completed, the cooker will enter Keep
Warm mode. The cooker will automatically shut off after 24 hours and enter
standby mode.
Using the Yogurt Function
1. Make sure that the cooker base, the inner pot, and the heating plate are all
dry. Place the inner pot inside the cooker base.
NOTE: Keep the power turned off.
2. Plug the appliance into an outlet. It will enter standby mode.
3. Add milk to the inner pot.
4. To pasteurize the milk, press the Yogurt button repeatedly until “more” is
selected. The display will show “boil.” Press the Start button, and you will
hear three beeps.
5. When the function has completed, the display will show “yogt.”
6. Remove the inner pot, and let the milk cool to a temperature of 112°F.
7. Add active cultures to the milk.
8. Place the inner pot inside the cooker base and close the lid. You can leave
the steam release handle in either the venting position or the sealing
position.
9. Press the Yogurt button and make sure that “normal” mode is selected. The
default amount of time is 8 hours. You can use the Function knob to adjust
the fermentation time.
Table of contents


