Chi Lok Bo Toys 253807 Datasheet
CHILDREN’S
ELECTRIC TOY
BEACHCAR
SUITABLE FOR 37~96 MONTHS
MAXIMUM USER WEIGHT: 30KG
ADULT ASSEMBLY REQUIRED
OWNER’S MANUAL WITH ASSEMBLY INSTRUCTIONS
READ AND UNDERSTAND THIS ENTIRE MANUAL BEFORE USING!
PLEASE KEEP THIS MANUAL FOR FUTURE REFERENCE AS IT CONTAINS IMPORTANT INFORMATION.
BEFORE FIRST TIME USE, CHARGE THE BATTERY FOR AT LEAST 46 HOURS.
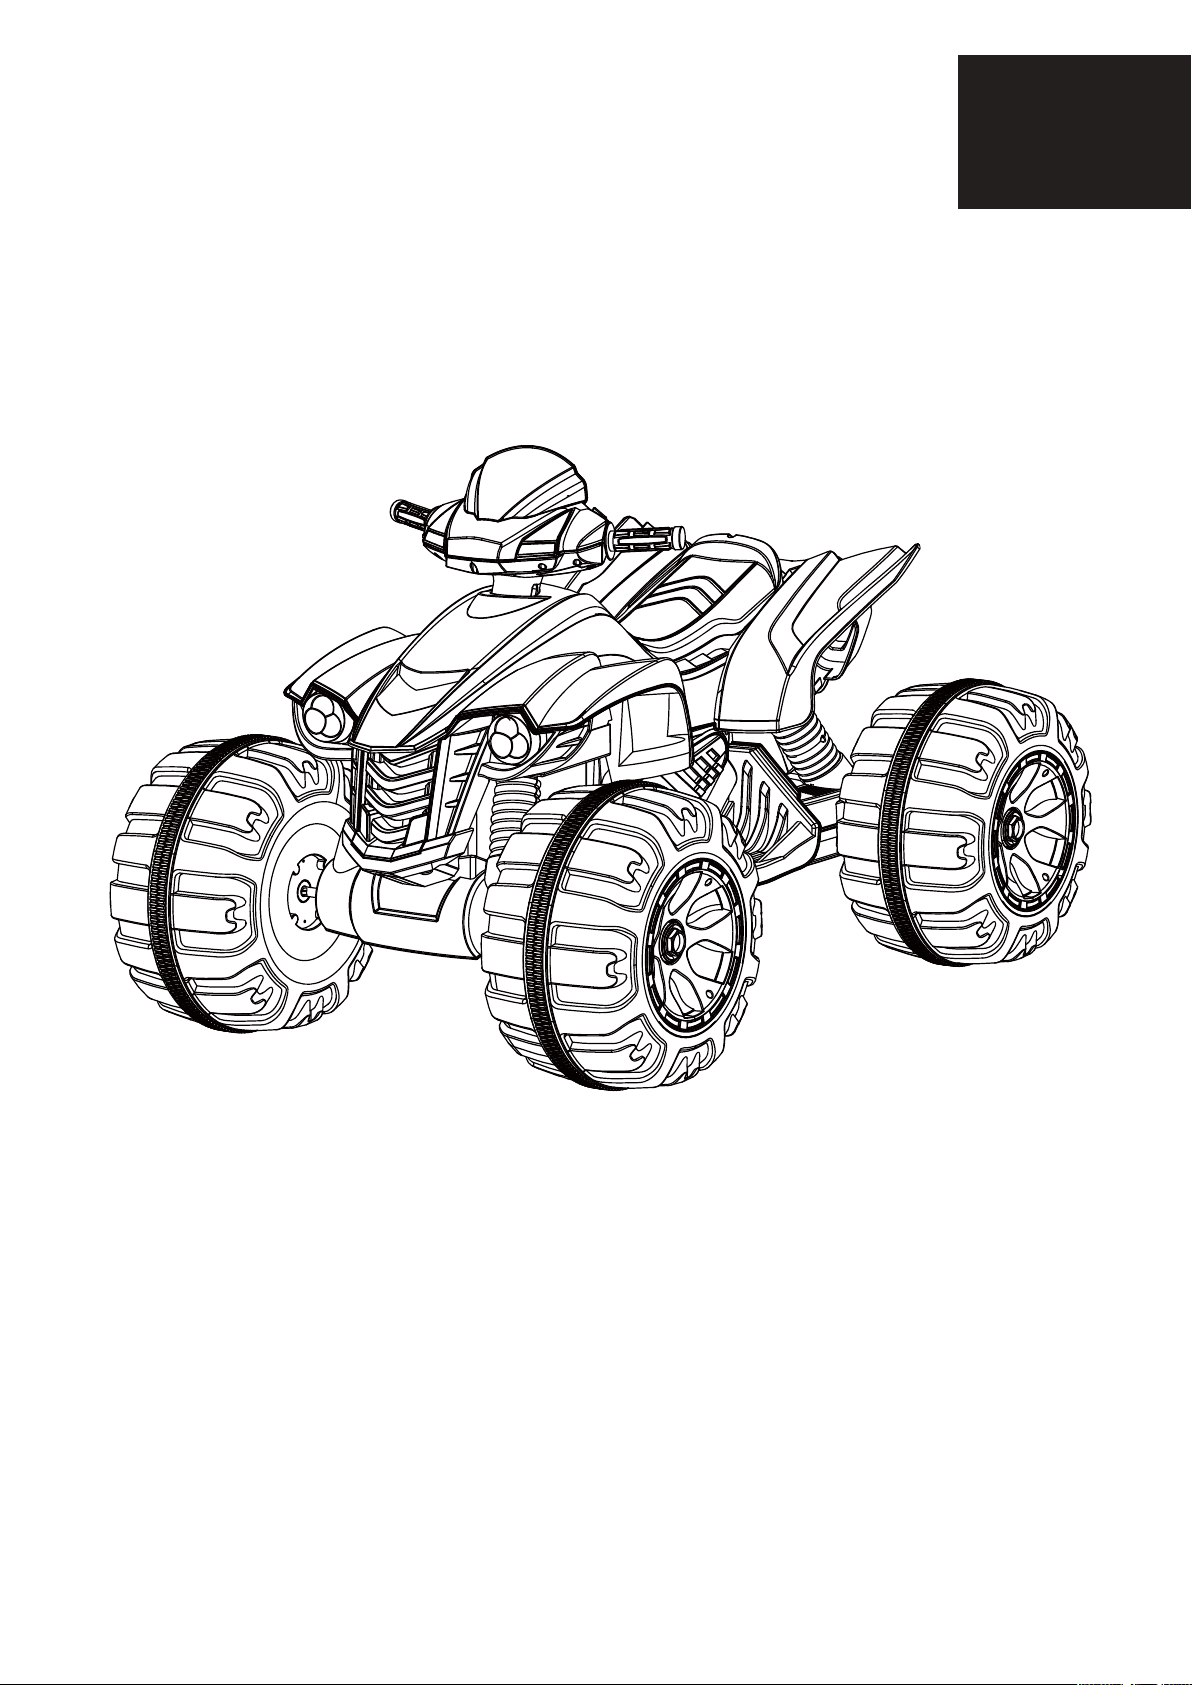
Products features may
vary from the picture
above.
253807
EN
ko1121

WARNING
CHOKING HAZARD - Small parts. Not suitable for children under 36 months.
Käytä lelua VAIN tasaisella alustalla!
WARNING!
FOR THE SAFETY OF YOUR CHILD, PLEASE READ ALL WARNINGS AND ASSEMBLY/USE INSTRUCTIONS. KEEP THIS GUIDE FOR
FUTURE REFERENCE.
• ADULT ASSEMBLY REQUIRED. The product contains small parts, which are for adult assembly only. Keep children away when
assembling.
• Always remove protective material and poly bags and dispose before assembly.
ABOUT YOUR NEW VEHICLE
Thank you for your purchasing our products, we wants your child to enjoy this product for years to come. Keep these points in
mind as you read this guide:
Battery: 12 V 7 Ah x1 (fuse: 5A ja 13A) tai 12 V 10 Ah x1 (fuse: 5A ja 13A)
Load Capacity: under 30 kg Auton koko: 120 x 82 x 77 cm
Suitable age: 37–96 months Nopeus: 3–5 km/h
Average battery life: Approximately 300 times Laturi: Input: depend on local
voltage Output: DC12V1A
Charge time: 8–12 hours Power way: charging type

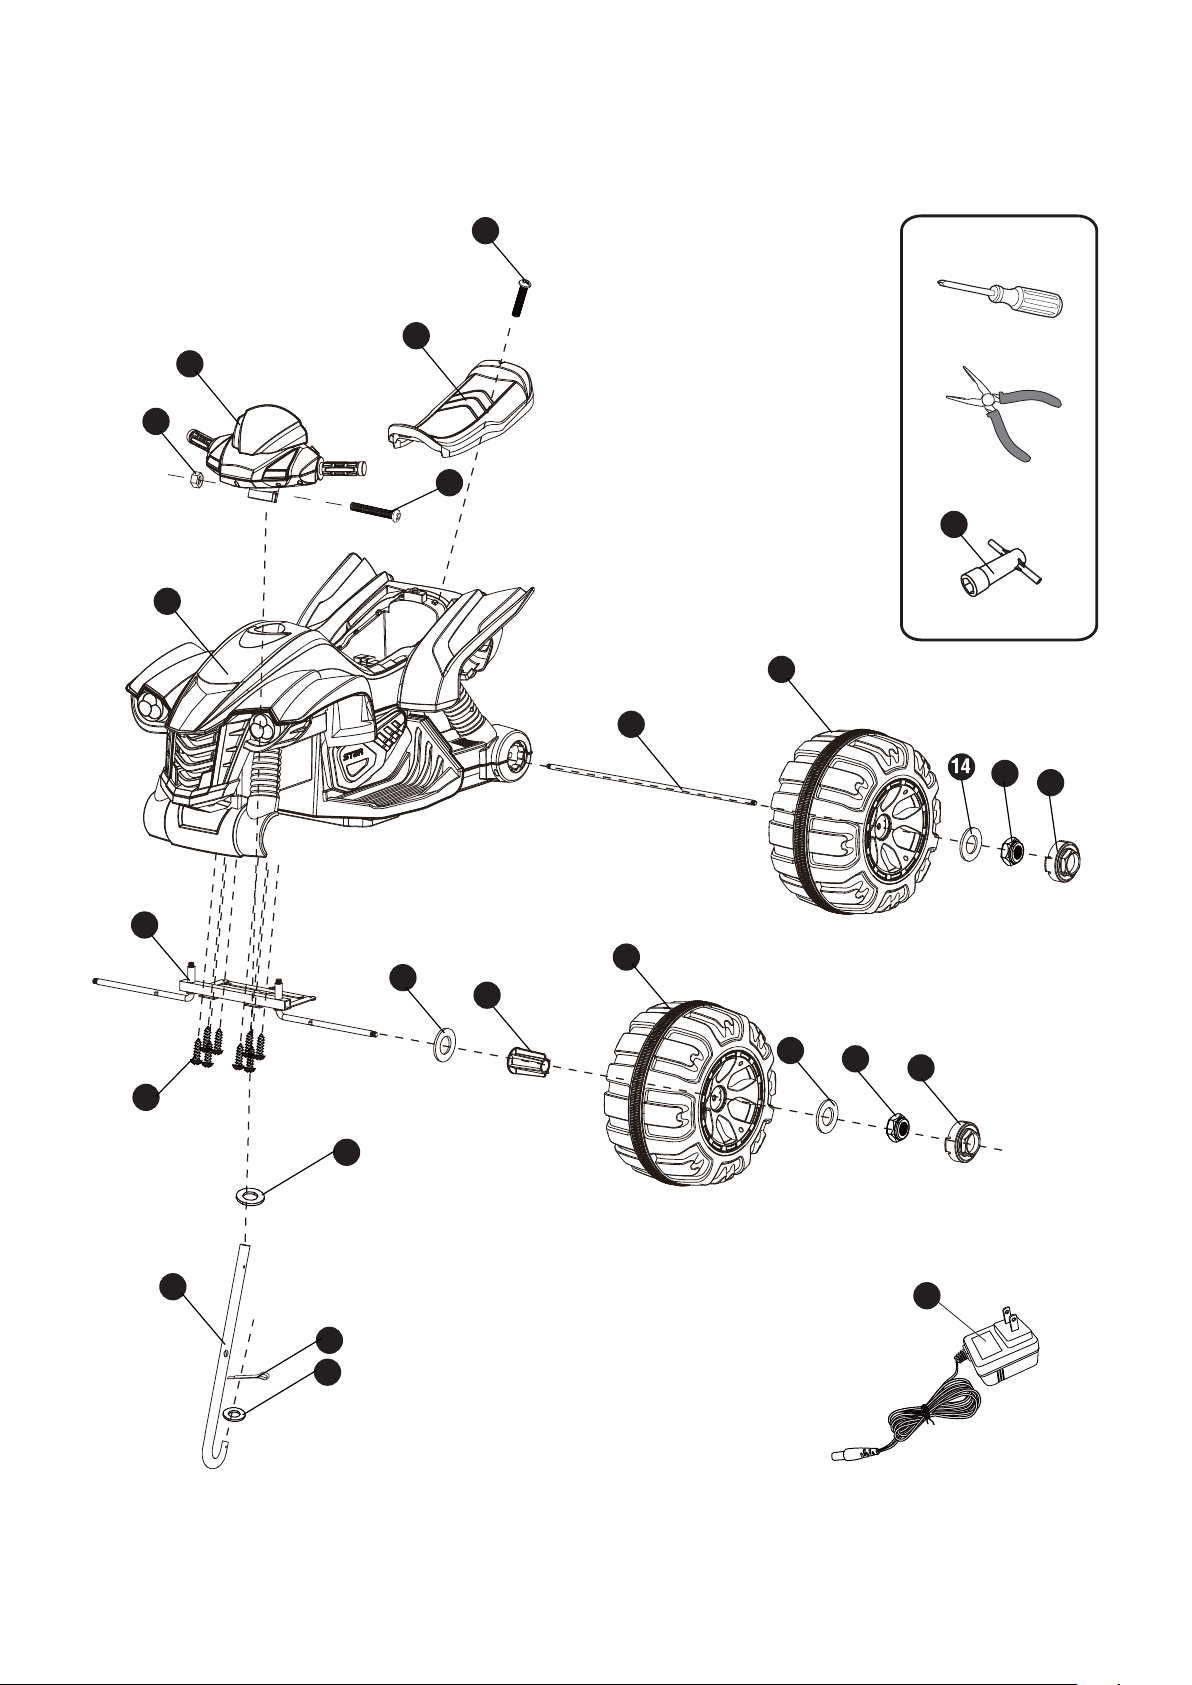
PART LIST
Part no. Part name Qty
(pcs)
Remarks
1 Handle bar 1
2 Vehicle body 1
3 Front axle assembly 1
4Seat 1
5 M5 x 45 -machine skrew 1 Placed on the steering wheel
6 Ø 5 nut 1 Placed on the steering wheel
7 Ø 12 -washer 4 Placed on the front axle
8 Steering column 1
9 Front wheel 2
10 Rear wheel 2
11 Ø 10 locknut 4 2 pcs placed on the front axle, 2 pcs placed
on the rear axle
12 Rear axle 1
13 Charger 1
14 Ø 18 washer 2 placed on the rear axle
Assembly package
A Ø 4 x 12 screw 9 1 pc for spare
B M5 x 12 -machine skrew 1
C Split pin 2 1 pc for spare
D Hubcap 4
E Bushing 2
F Spanner 2
7 Ø 12 washer 3 1 pc for spare

1
2
3
A
8
C
7
7
7
7
E
9
10
11
13
11
D
D
12
B
4
6
5
F
7
PART DIAGRAM
Tools Required
Screwdriver
(not included)
Pliers(not included)
Spanner
NOTE: Some of the parts shown are to be assembled on both sides of vehicle.

ASSEMBLY STEPS
• Your new vehicle requires adult assembly. Please set aside at least 40 minutes for assembly. Children can be harmed by small
parts, sharp edges and sharp points in the vehicle’s unassembled state. Care should be taken in unpacking and assembly of
the vehicle. Children should not handle parts, or help in assembly of the vehicle.
• Please identify all parts before assembly and save all packaging material until assembly is complete to ensure that no parts
are discarded.
• Assembly tool for need: screwdriver(provide for oneself) and spanner.
• Turn the vehicle body upside down.
• Fit the front axle assembly to the vehicle body and
tighten four Ø 4x12 screws each side to secure it with
a screwdriver.
• Remove all the parts from the front axle.
• Fit a Ø12 washer onto the front axle.
• Fit a front wheel onto the front axle.
• Fit a Ø12 washer onto the front axle.
• Fit a Ø10 locknut to the end of the front axle and
tighten with a spanner, DO NOT over-tighten.
• Repeat this procedure to assemble the
• Remove all the parts from the rear axle.
• Insert the real axle through the hole in the rear of the
vehicle body.
1x4
Ø4x12 screw
Front axle assembly
2
Front axle
Bushing Ø 12 washer Hubcap
Ø 12 wsher
Front wheel Ø 10 locknut
3
Rear axle

• Fit the driving wheel onto the rear axle. Make it
match with the gear box.
• Fit a Ø18 washer onto the rear axle.
• Fit a Ø10 locknut to the end of the rear axle.
• Repeat this procedure to assemble the other rear
wheel to real axle.
• Tighten the locknuts on both sides of rear axle with
two spanners. DO NOT over-tighten.
• Fit the hubcaps.
• Repeat this procedure to assemble the other front
wheel
IMPORTANT SUPPLEMENT TO INSTRUCTION MANUAL
After assembling any wheel to the axles, please check the gap between the screw thread and the
collapsible (refer to below picture), if the gap is too big, please add two or three washers inside
the wheel, But after tightening the nut outside the wheel, please turn the wheel by your nger
to check if the wheel can run smoothly, this is very important, because if the wheel can run
smoothly, it is ok, but if the nut press the wheel and the wheel can’t run smoothly, the motor will
be broken easily! Then you need to decrease one or two washers to make sure the wheel can run
smoothly!
• Turn the vehicle on its side.
• Slide a Ø12 a washer onto the steering column from the straight end (PIC6-1).
• Insert the straight end of steering column through the opening in the vehicle body.
• Insert the bent end into the hole in the steering linkage, secure it with a split pin and a Ø10 washer (PIC6-2,6-3)
4Rear wheel Ø 10 locknut
Rear axle Ø 18 washer Hubcap
Gap
6
6-1
6-2 6-3
Ø 12 washer
Steering
column
Ø 12
washer
Split pin

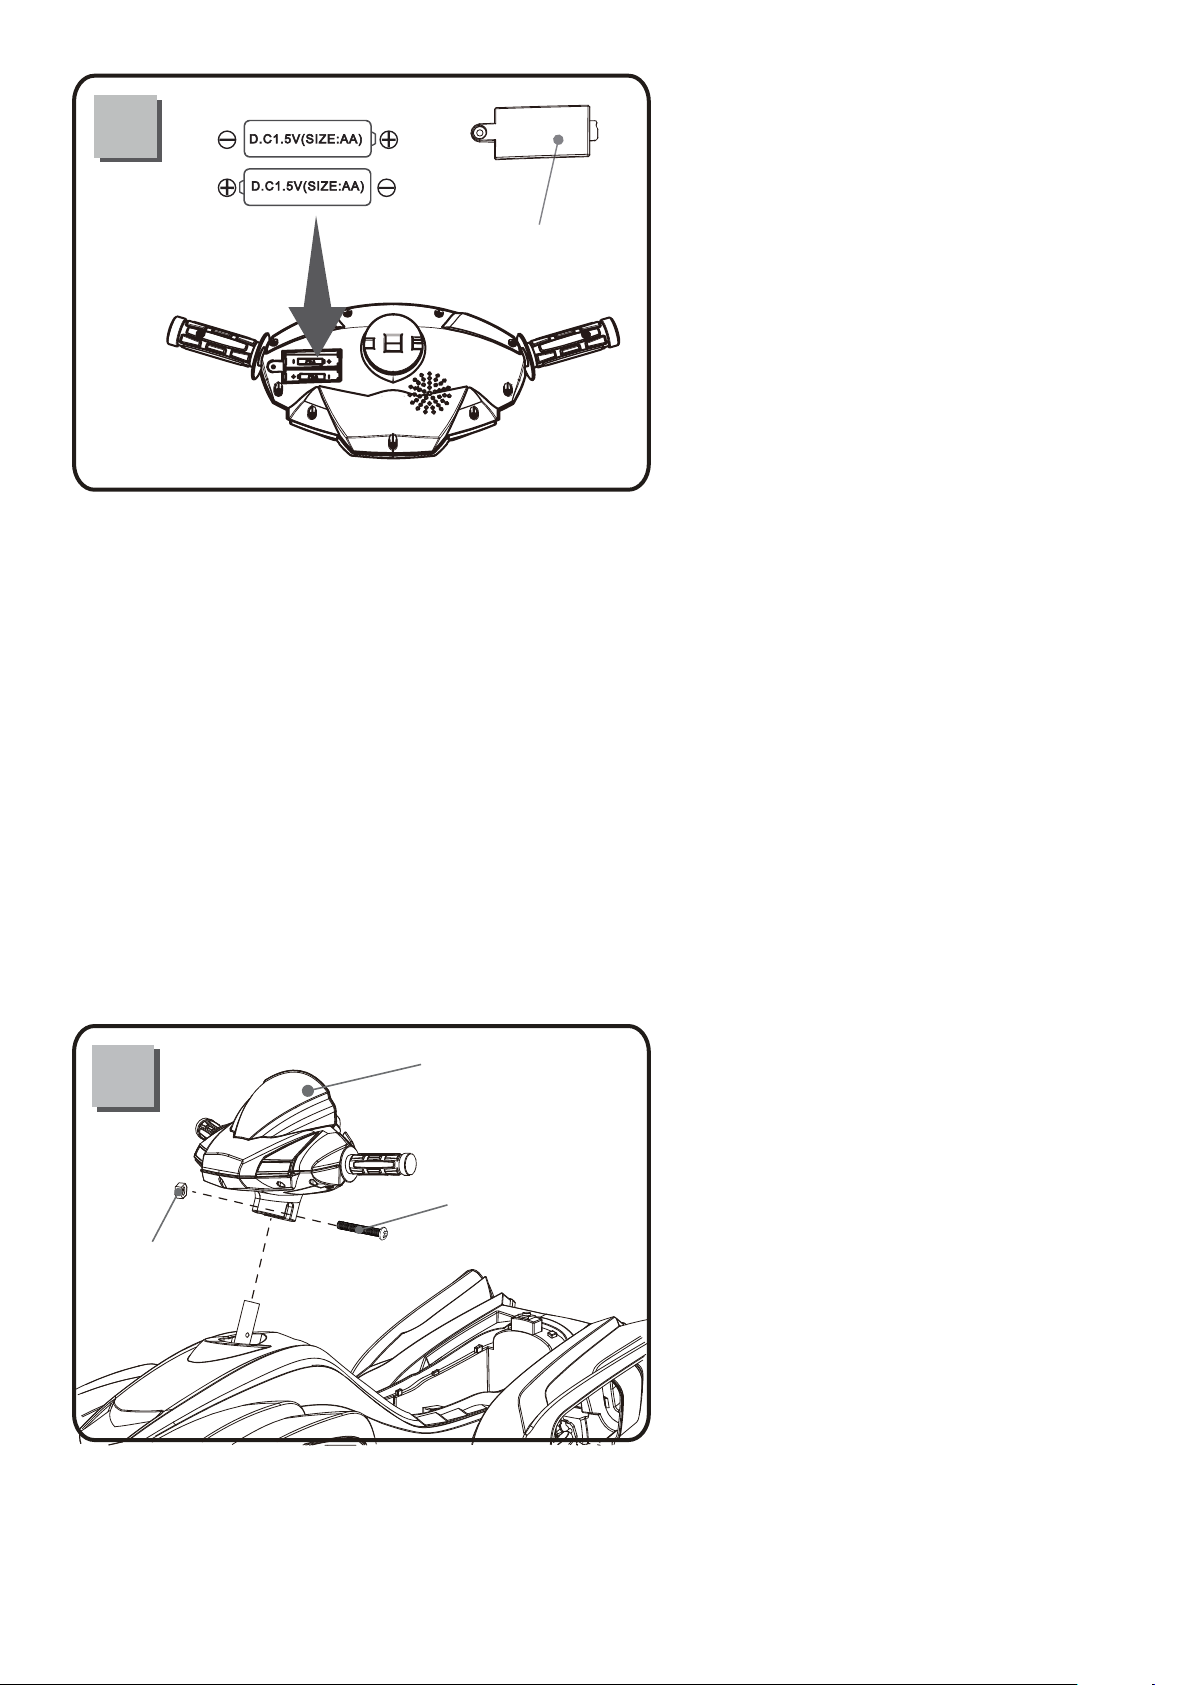
• Remove the screw in the battery compartment door
on the back of the handle bar with a screwdriver and
lift to open.
• Insert two“AA” (LR6) alkaline batteries into the
handle bar.
• Replace the battery compartment door.
Batteries not included.
BATTERY INFORMATION
• Non-rechargeable batteries must not be recharged.
• If removable rechargeable batteries are used, they must be charged only under adult supervision.
• Remove rechargeable batteries from the product before charging.
• Do not mix old and new batteries. Do not mix dierent types of batteries: alkaline, standard (carbon-zinc) or rechargeable
(nickel-cadmium).
• Insert batteries as indicated inside the battery compartment: anode to anode, cathode to cathode.
• Remove batteries during long periods of non-use. Always remove exhausted batteries from the product. Battery leakage
and corrosion can damage this product. Dispose of batteries safely.
• Never short-circuit the battery terminals.
• Turn the vehicle body upright.
• Remove the M5x45 machine screw and Ø5 nut from
the handle bar.
• Insert the handle bar to the end of the steering
shaft. Line up the holes in the handle bar with the
hole in the steering shaft. Tighten the M5x45 machine
screw and Ø5 nut back in the same location with a
screwdriver.
7
Battery compart-
ment door
8
Ø 5 nut
Handle bar
M5 x 45 machine
skrew

• Locate the red wire connector and plug it into the
terminal on battery.
• Locate the red wire connector and plug it into the
terminal on the fuse.
• Insert the tabs on the seat into the slots in the
vehicle body, and tighten a M5x12 machine screw to
secure it with a screwdriver.
9
12V7AH battery follow this procedure.
Fuse box Red wire connector
Fuse box
Red wire connector
12V10AH battery follow this procedure.
10 M5x12 machine screw
Seat

HOW TO OPERATE YOUR VEHICLE
WARNING!
PREVENT INJURIES AND DEATHS:
• NEVER LEAVE CHILD UNATTENDED. DIRECT ADULT SUPERVISION IS REQUIRED. Always keep child in view when child is in
vehicle.
• This toy should be used with caution since skill is required to avoid falls or collisions causing injury to the user or third parties.
• Protective equipment should be worn.
• Never use in roadways, near cars, on or near steep inclines or steps, swimming pools or other bodies of water.
• Always wear shoes.
• Always sit on the seat.
• Not to be used in trac.
• This toy is unsuitable for children under 36 months due to its maximum speed; Maximum user weight is 30 kgs.
• This toy has no brake.
Must conrm before using that following work which is already nished:
• Important! Before using the vehicle for the rst time, the battery needs to be charged for 4 to 6 hours, no more than 10
hours. Only an adult can charge and recharge the battery.
• Check all the screws, cap nuts and protective coverings regularly and tighten as required. Check plastic parts on a regular
basis for cracks or broken pieces.
RULES FOR SAFE RIDING
READ THESE RULES ALOUD TO YOUR CHILD ANDTHEIR PLAYMATES AND MAKE SURE THEY UNDERSTAND THEM!
• Keep Children within Safe Riding Areas:
- Never use in roadway, near motor vehicles, on lawn space, on or near steep inclines or steps, swimming pools or other bodies
of water;
• Use the toy only on at surfaces. Such as inside your house, garden or playground.
• Never use in the dark. A child could encounter unexpected obstacles and have an accident. Operate the vehicle only in the
daytime or a well-lit area.
• It is not recommended to drive the vehicle on wet surfaces or on lopes of greater than 15 degrees.
• Do not use this vehicle outdoors when it is raining or snowing.
• Make sure you come to a complete stop before changing directions from forward to back.
• Please follow the correct weight and age limits allowed to drive this vehicle.
• It is prohibited to change the circuit or add other electric parts
• Inspect wires and connections of the vehicle periodically.
• In order to avoid accidents, please ensure the vehicle is safe before riding.
• Do not let any child touch the wheels or be near them when the car is moving .

USE OPERATION
1. Foot pedal: Applies power (speed) to the vehicle.
– To move the car, press the pedal down.
– To brake or slow down, release pressure from the pedal.
2. Forward/reverse switch: Changes the direction that vehicle moves from forward to reverse.
– To move the car forward, rock the switch to “forward”position.
– To move the car backward, rock the switch to “reverse”position.
HINT: The vehicle is designed to operate in low speed only in reverse.
3. Sounds buttons (IF EQUIPPED): Press for sounds playing.
IMPORTANT!
Always stop vehicle when changing the speed or direction to avoid damage the gears and motor.
ADVANCED USE – HIGH SPEED DRIVE
Make sure your child knows how to steer, how to start and stop the vehicle and knows the rules for safe driving. The vehicle
can be driven at a maximum of 3~5 km/h.
1
2
3
How To Operate Your Vehicle
Use Operation
Always stop vehicle when changing the speed or direction to avoid damage
the gears and motor.
IMPORTANT!
1. Foot pedal: Applies power (speed) to the vehicle.
●To move the car, press the pedal down.
●To brake or slow down, release pressure from the pedal.
2. Forward/reverse switch: Changes the direction that vehicle moves from forward to
reverse.
●To move the car forward, rock the switch to “forward” position.
●To move the car backward, rock the switch to “reverse” position.
HINT: The vehicle is designed to operate in low speed only in reverse.
3. Sounds buttons (IF EQUIPPED):Press for sounds playing.
Make sure your child knows how to steer, how to start and stop the vehicle and knows
the rules for safe driving. The vehicle can be driven at a maximum of 3~5 km/h.
ADVANCED USE - High speed Drive

CHARGING YOUR VEHICLE
ONLY AN ADULT CAN CHARGE AND RECHARGE THE BATTERY!
WARNING!
• PREVENT FIRE AND ELECTRIC SHOCK:
- Use the only rechargeable battery and charger supplied with your vehicle. NEVER substitute the battery or the charger with
another brand. Using another battery or charger my cause a re or explosion.
- Do not use the battery or charger for any other product. Overheating, re or explosion could occur.
- NEVER modify the electric circuit system. Tampering with the electric system may cause a shock, re or explosion or my
permanently damage the system.
- Do not allow direct contact between battery terminals. Fire or explosion can occur.
- Do not allow any type of liquid on the battery or its components.
- Explosive gasses are created during charging. Do not charge near heat or ammable materials. Charge the battery in a well-
ventilated area ONLY.
- NEVER pick up the battery by the wires or charger. Damage can occur to the battery and may cause a re. Pick up the battery
by the case ONLY.
- Charge the battery in a dry area ONLY.
• Battery posts, terminals and related accessories contain lead and lead compounds, chemicals known to the State of California
to cause cancer and reproductive harm. Wash hands after handling.
• Do not open the battery. Battery contains lead acid and other materials that are toxic and corrosive.
• Do not open the charger. Exposed wiring and circuitry inside case may cause electric shock.• Only adults may handle or
charge the battery. NEVER allow child to handle or charge the battery. Battery is heavy and contains lead acid (electrolyte).
• Do not drop the battery. Permanent damage to the battery could occur or cause serious injury.
• Before charging the battery, check for wear or damage to the battery, charger, its supply cord and the connectors. DO NOT
charge the battery if any damage to parts has occurred.
• Do not allow the battery to drain completely. Recharge the battery after each use or once a month if not used regularly.
• Do not charge battery upside down.
• Always secure the battery with the bracket. Battery can fall out and injure a child if vehicle tips over.
• The charging input socket is UNDER THE SEAT.
• Before the rst use, you should charge the battery for 4-6 hours. Do not recharge the battery for more than 10 hours to avoid
overheating the charger.
• When the vehicle begins to run slowly, recharge the battery.
• After each use or once a month minimum recharge time as 8 to 12 hours, less than 20 hours at most.
1. Open the cover of the socket (the socket is under the taillight),plug the charger port into the input socket.
2. Plug the charger plug into a wall outlet. The battery will begin charging
WARNING!
This product with CHARGING PROTECTION: When charging, all the functions will be cut o!
This appliance can be used by children aged from 8 years and above and persons with reduced physical, sensory or mental
capabilities or lack of experience and knowledge if they have been given supervision or instruction concerning use of the
appliance in a safe way and understand the hazards involved. Children shall not play with the appliance. Cleaning and user
maintenance shall not be made by children without supervision.
1
2

TROUBLESHOOTING GUIDE
PROBLEM: The vehicle does not run
ROBLEM CAUSE: The battery may low on power.
After each use, or once a month minimum, charge the battery for a full 10 hours. Do not leave the battery on the charger for
more than 20 hours.
POSSIBLE CAUSE: Thermal fuse has tripped.
The vehicle is equipped with a self-resetting fuse. When the vehicle is overloaded or operated incorrectly; the self-resetting
fuse will be cut o for 5-20seconds before becoming operational again. The self-resetting fuse is under the seat (Refer to the
picture.)
To avoid the fuse cut o the power, follow these guidelines:
DO NOT overload the vehicle, Maximum weight allowed :30kg
DO NOT tow anything behind the vehicle.
DO NOT drive up steep slopes.
DO NOT drive into xed objects, which may cause the wheels to spin, causing the motor to overheat.
DO NOT drive in very hot weather, components may overheat.
DO NOT tamper with the electric system, Doing so may create a short circuit, causing the fuse to trip.
POSSIBLE CAUSE: Wheel nuts are loose.
If the nuts are not tight, the wheels will not engage the forward gears. Tighten the nut with the nut wrench.
POSSIBLE CAUSE: Battery connector or wires are loose.
Make Sure the battery connectors are rmly plugged in to each other.
POSSIBLE CAUSE: Battery is dead.
Have you properly maintained the battery according to the directions? Is the battery old? Your battery may need to be
replaced.
POSSIBLE CAUSE: Electric system is damaged.
Water may have corroded the system, or loose dirt, gravel or sand might have jammed the switch.
POSSIBLE CAUSE: Motor is damaged.
The motor needs professional repair.
PROBLEM: The battery will not recharge.
POSSIBLE CAUSE: Battery connector or adapter connector is loose.
Make sure the battery connector and adapter connector are rmly plugged together.
POSSIBLE CAUSE: Charger is not plugged in.
Make sure the charger is plugged into the wall outlet and the power ow to the outlet is on.
POSSIBLE CAUSE: Charger is not working.
Is the charger warm while charging? If not, the charger may be broken and may need to be replaced.
PROBLEM: The vehicle does not run very long.
POSSIBLE CAUSE: Battery may be undercharged.
You may not be charging the battery long enough. After each use, or once a month minimum, charge the battery for 8 to 10
hours. Do not leave the battery on the charger for more than 20 hours.
POSSIBLE CAUSE: Battery is old.
The battery will eventually lose the ability to hold a charge. Depending on the amount of use, and varying conditions, the
battery should operate for one to three years. Replace the battery with a new one.
PROBLEM: Battery buzzes or gurgles when charging.
This is normal and not a cause for concern. It may also be silent when charging, which is also normal.
PROBLEM: Charger feels warm when recharging battery.
This is normal and not a cause for concern.
MAINTAINING YOUR VEHICLE
• It is parents’responsibility to check main parts of the toy before using, Must regularly examine for potential hazard, such as
the battery, charge,cable or cord, plug, screws are fastening enclosure of other parts and that in the event of such damage, the
toy must not be until that damage had been properly removed.
• Make sure the plastic parts of the vehicle are not cracked or broken.
• Occasionally use a lightweight oil to lubricate moving parts such as wheels.
• Park the vehicle indoors or cover it with a tarp to protect it from wet weather.
• Keep the vehicle away from sources of heat, such as stoves and heaters. Plastic parts may melt.
• Recharge the battery after each use. Only an adult can handle the battery. Recharge the battery at least once a month when
the vehicle Raider is not being used.

• Do not wash the vehicle with a hose. Do not wash the vehicle with soap and water. Do not drive the vehicle in rainy or snowy
weather. Water will damage the motor, electric system and battery.
• Clean the vehicle with a soft, dry cloth. To restore shine to plastic parts, use a non-wax furniture polish. Do not use car wax.
Do not use abrasive cleaners.
• Do not drive the vehicle in loose dirt, sand or ne gravel which could damage moving parts, motors or the electric system.
• When not using, all the electrical source should be turn o. Turn o the power switch and disconnect the battery connection.
DISPOSAL OF BATTERY
• Your sealed lead-acid battery must be recycled or disposed of in an environmentally sound manner.
• Do not dispose of your lead-acid battery in a re. The battery may explode or leak.
• Do not dispose of a lead-acid battery in your regular, household trash. The incineration, land lling or mixing of sealed lead-
acid batteries with household trash is prohibited by law.
• Return an exhausted battery to your local approved lead-acid battery recycle, such as a local seller of automotive batteries.
• Contact your local waste management ocials for other information regarding the environmentally sound recycling and
disposal of lead-acid batteries.
Our products are suitable for ASTM F963; GB6675; EN71 and EN62115 standard.
Importer/Maahantuoja/Importör/Maaletooja/Importētājs/Importuotojas: Tammer Brands Oy, Viinikankatu 36, 33800 Tampere, Finland

253807
FI
ko1121
LASTEN
SÄHKÖTOIMINEN
LELUMÖNKIJÄ
• SOVELTUU 38VUOTIAILLE
• KÄYTTÄJÄN SUURIN SALLITTU PAINO: 30 KG
• AIKUISEN ON KOOTTAVA TUOTE
KÄYTTÖ JA ASENNUSOHJE
VARMISTA, ETTÄ OLET LUKENUT JA YMMÄRTÄNYT KOKO KÄYTTÖOHJEEN ENNEN TUOTTEEN
KÄYTTÖÄ!
SÄILYTÄ TÄMÄ OHJE TULEVAA TARVETTA VARTEN, SILLÄ SE SISÄLTÄÄ TÄRKEITÄ TIETOJA.
ENNEN ENSIMMÄISTÄ KÄYTTÖÄ AKKUA ON LADATTAVA VÄHINTÄÄN 46 TUNTIA.
Tuotteen ominaisuudet
saattavat poiketa
kuvassa esitetystä.

VAROITUS
TUKEHTUMISVAARA – Sisältää pieniä osia. Ei sovellu alle 3-vuotiaille lapsille.
Käytä lelua VAIN tasaisella alustalla!
VAROITUS!
LAPSEN TURVALLISUUDEN TAKAAMISEKSI LUE KAIKKI VAROITUKSET JA KOKOONPANO-/KÄYTTÖOHJEET. SÄILYTÄ TÄMÄ
KÄYTTÖOHJE MYÖHEMPÄÄ TARVETTA VARTEN.
• AIKUISEN ON KOOTTAVA TUOTE. Tuote sisältää pieniä osia, joten laite soveltuu vain aikuisen koottavaksi. Kokoa tuote lasten
ulottumattomissa.
• Poista aina suojamateriaalit ja muovipussit ja hävitä ne ennen tuotteen kokoamista.
TIETOJA UUDESTA LELUSTA
Kiitos, että olet valinnut tämän tuotteen. Toivottavasti siitä on lapsellesi iloa useiksi vuosiksi. Pidä mielessä seuraavat kohdat,
kun luet tätä käyttöohjetta:
Akku ja sulake: 12 V 7 Ah x1 (sulake: 5A ja 13A) tai 12 V 10 Ah x1 (sulake: 5A ja 13A)
Kantavuus: alle 30 kg Auton koko: 120 x 82 x 77 cm
Ikäsuositus: 3–8 vuotta Nopeus: 3–5 km/h
Akun keskim. käyttöikä: noin 300 latauskertaa Laturi: tulo: paikallisen jännitteen
mukaan
lähtö: DC 12 V 1A
Latausaika: 8–12 tuntia Virtalähde: ladattava

OSALUETTELO
OSANRO OSAN NIMI Kpl HUOMAUTUS
1 Ohjaustanko 1
2 Ajoneuvon runko 1
3 Etuakselin kokoonpano 1
4 Istuin 1
5 M5 x 45 -koneruuvi 1 Ohjaustangolla
6 Ø 5 -mutteri 1 Ohjaustangolla
7 Ø 12 -aluslevy 4 etuakselilla
8 Ohjauspylväs 1
9 Etupyörä 2
10 Takapyörä 2
11 Ø 10 -lukkomutteri 4 2 kpl etuakselilla, 2 kpl taka-akselilla.
12 Taka-akseli 1
13 Laturi 1
14 Ø 18 -aluslevy 2 taka-akselilla
Asennuspaketti
A Ø 4 x 12 -ruuvi 9 1 kpl VARALLA
B M5 x 12 -koneruuvi 1
C Sokka 2 1 kpl VARALLA
D Pölykapseli 4
E Holkki 2
F Avain 2
7 Ø 12 -aluslevy 3 1 kpl VARALLA
1
2
3
A
8
C
7
7
7
7
E
9
10
11
13
11
D
D
12
B
4
6
5
F
7
OSALUETTELO
Tarvittavat työkalut
Ruuvitaltta
(ei sisälly pakkaukseen)
Pihdit
(ei sisälly pakkaukseen)
Avain
HUOMAUTUS: jotkin kuvassa olevat osat asennetaan ajoneuvon molemmille puolille.

KOKOONPANO
• Aikuisen on koottava tuote. Varaa kokoonpanoon vähintään 40 minuuttia. Pienet osat sekä terävät reunat ja kulmat saattavat
olla haitallisia lapsille lelun ollessa vielä purettuna. Pura osat varovasti pakkauksesta ja kokoa. Lapset eivät saa käsitellä irrallisia
osia tai auttaa tuotteen kokoonpanossa.
• Varmista, että tunnistat kaikki osat ennen kokoonpanoa. Säästä kaikki pakkausmateriaalit, kunnes kokoonpano on valmis,
jotta voidaan varmistua siitä, ettei pakkauksiin ole jäänyt osia.
• Tarvittava asennustyökalu: ruuvitaltta (ei sisälly toimitukseen) ja avain.
• Käännä ajoneuvon runko ylösalaisin.
• Aseta etuakselin kokoonpano ajoneuvon runkoon.
Asenna se paikoilleen kiristämällä neljä Ø 4 x 12
-ruuvia kummallekin puolelle ruuvitaltalla.
• Irrota kaikki osat etuakselista.
• Asenna Ø 12 -aluslevy etuakselille.
• Asenna etupyörä etuakselille.
• Asenna Ø 12 -aluslevy etuakselille.
• Asenna Ø 10 -lukkomutteri etuakselin päähän. Kiristä
ruuviavaimella. ÄLÄ kiristä liikaa.
• Asenna toinen etupyörä toistamalla toimenpiteet.
• Irrota kaikki osat taka-akselista.
• Asenna taka-akseli ajoneuvon rungon takaosassa
olevasta aukosta.
1x4
Ø 4 x 12 -ruuvi
Etuakselin kokoonpano
2
Etuakseli
holkki Ø 12 -aluslevy Pölykapseli
Ø 12 -aluslevy
Etupyörä Ø 10 -lukkomutteri
3
Taka-akseli
• Asenna vetävä pyörä taka-akselille. Kohdista se
vaihdelaatikon kanssa.
• Asenna Ø 18 -aluslevy taka-akselille.
• Asenna Ø 10 -lukkomutteri taka-akselin päähän.
• Noudata samoja ohjeita toisen takapyörän
asennuksessa taka-akselille.
• Kiristä lukkomutterit taka-akselin kummallekin
puolelle kahdella avaimella. ÄLÄ kiristä liikaa.
• Asenna pölykapselit.
TÄRKEÄ TÄYDENNYS KÄYTTÖOHJEESEEN
Kun pyörä on kiinnitetty akseliin, tarkista ruuvin kierteen ja keskiön välinen etäisyys (ks. kuva).
Jos väli on liian suuri, lisää pyörän sisäpuolelle kaksi tai kolme aluslevyä. Kun olet kiristänyt
pyörän ulkopuolisen mutterin, pyöräytä pyörää kädellä tarkistaaksesi, että pyörä pääsee
pyörimään vapaasti. Tämä on erittäin tärkeää, koska jos pyörä ei pääse pyörimään vapaasti
mutterin painuessa pyörää vasten, moottori saattaa helposti vaurioitua. Tällöin on vastaavasti
poistettava yksi tai kaksi aluslevyä, jotta pyörä pääsee pyörimään vapaasti!
• Käännä ajoneuvo kyljelleen.
• Liu’uta Ø 12 -aluslevy ohjauspylvääseen suorasta päästä (kuva 6-1).
• Asenna ohjauspylvään suora pää ajoneuvon rungossa olevasta aukosta.
• Työnnä taivutettu pää ohjausvivuston aukkoon ja kiinnitä se sokalla ja Ø 10 -aluslevyllä (kuvat 6-2 ja 6-3).
4Takapyörä Ø 10 -lukkomutteri
Taka-akseli Ø 18 -aluslevy Pölykapseli
Väli
6
6-1
6-2 6-3
Ø 12 -aluslevy
Ohjauspylväs
Ø 12
-aluslevy
Sokka
• Irrota ruuvitaltalla ohjaustangon takana olevan
paristokotelon luukun ruuvi ja nosta luukku auki.
• Asenna ohjaustankoon kaksi AA (LR6) -alkaliparistoa.
• Aseta paristokotelon luukku takaisin.
HUOMAUTUS: Tuotteiden mukana ei toimiteta AA
(LR6) -alkaliparistoja.
PARISTOJEN TIEDOT
Paristot saattavat vuotaa nesteitä, jotka saattavat aiheuttaa kemiallisen palovamman tai vaurioittaa laitetta. Estä paristojen
vuotaminen seuraavasti:
• Älä käytä yhtä aikaa vanhoja ja uusia paristoja.
• Älä käytä erityyppisiä paristoja ja akkuja sekaisin: alkaliparistoja, vakioparistoja (hiili-sinkki) tai ladattavia akkuja (nikkeli-
kadmium). Aseta paristot paristokoteloon ohjeiden mukaisesti.
• Poista paristot, jos lelua ei käytetä pitkään aikaan. Poista tyhjentyneet paristot aina tuotteesta. Vuotavat paristot ja korroosio
voivat vaurioittaa tätä tuotetta. Hävitä paristot turvallisesti.
• Älä hävitä paristoja polttamalla. Ne saattavat räjähtää tai vuotaa.
• Älä oikosulje paristojen liittimiä.
• Lataa ainoastaan ladattavia akkuja.
• Laitteessa saa käyttää vain samanlaisia tai samaa tyyppiä olevia paristoja.
• Jos käytössä on ladattavia akkuja, ne on ladattava aikuisen valvonnassa.
• Poista ladattavat akut tuotteesta ennen latausta.
• Lelujen kanssa käytettävät akkulaturit on tutkittava huolellisesti johdon, pistokkeen, kotelon ja muiden osien vaurioiden
varalta. Jos vaurioita löytyy, lelua ei saa ladata laturilla, ennen kuin vaurio on korjattu.
• Kun ääni hiljenee tai loppuu, paristot on vaihdettava.
• Käännä ajoneuvon runko oikeinpäin.
• Irrota M5 x 45 -koneruuvi ja Ø 5 -mutteri
ohjaustangosta.
• Työnnä ohjaustanko ohjausakselin päähän. Kohdista
ohjaustangon reiät ohjausakselin reikään. Kiristä
M5 x 45 -koneruuvi ja Ø 5 -mutteri takaisin samaan
paikkaan ruuvitaltalla.
7
Paristokotelon
luukku
8
Ø 5 -mutteri
Ohjaustanko
M5 x 45 -koneruuvi
Table of contents
Languages:
Other Chi Lok Bo Toys Motorized Toy Car manuals


Popular Motorized Toy Car manuals by other brands


BERG
BERG RACER E GO KART BF Owner's manual and assembly instructions

Team Losi
Team Losi Night Crawler LOSB0104 manual

HPI Racing
HPI Racing Maverick Quantum+ FLUX quick start guide

Lenoxx
Lenoxx GTRBLACK manual

Carrera RC
Carrera RC 370200990 Assembly and operating instructions

Radio Shack
Radio Shack 60-4358 owner's manual