China Care Medical CCX-FNX10 User manual

MODEL CCX-FNX10
PORTABLE X-RAY UNIT
OPERATION MANUAL

PORTABLE X-RAY UNIT OPERATION MANUAL
INDEX
I、INTRODUCTION………………………………………… 1
II、SPECIFICATIONS……………………………………… 1
III、INSTALLATION AND ADJUSTMENT………………… 5
IV、OPERATION METHOD………………………………… 7
V、GENERAL DESCRIPT ION OF PRINCIPLE ………… 8
VI、ATTENTION CAUSE……………………………………… 9

PORTABLE X-RAY UNIT OPERATION MANUAL
INTRODUCTION
PAGE 1
ⅠINTRODUCTION
This unit is a portable diagnostic X-ray unit r-ray-proof with a single
focus. It can be use for medical fluoroscopy and radiography on bone, heart,
skull and foreign body in the body, etc. It is easy to assemble and operate.
ⅡSPECIFICATIONS
1. Operation condition of the unit
Environmental temperature: 10-40℃
Relative humidity: 30%-75%
Atmospheric pressure: 70-106kPa
2. Power condition: AC 220V±10%(single phase) ,50Hz/60Hz,
Net resistant ≤2Ω
3. The maximum tube voltage: 75kVp
4. The maximum tube current : 10mA
5. Selection scope of time: 0.2-9.9sec.
6. The focus of X-ray tube:1.5×1.5mm2
7. Horizontal turning angle of the X-ray unit head: 360º
8. X-ray unit head turning angle around the horizontal axis: 270º
9. Stretching & retracting range of the X-ray unit head: 700mm
10. Weight: 25Kg
11. Working current of the equipment: 5A
PORTABLE X-RAY UNIT OPERATION MANUAL
SPECIFICATIONS
PAGE 2
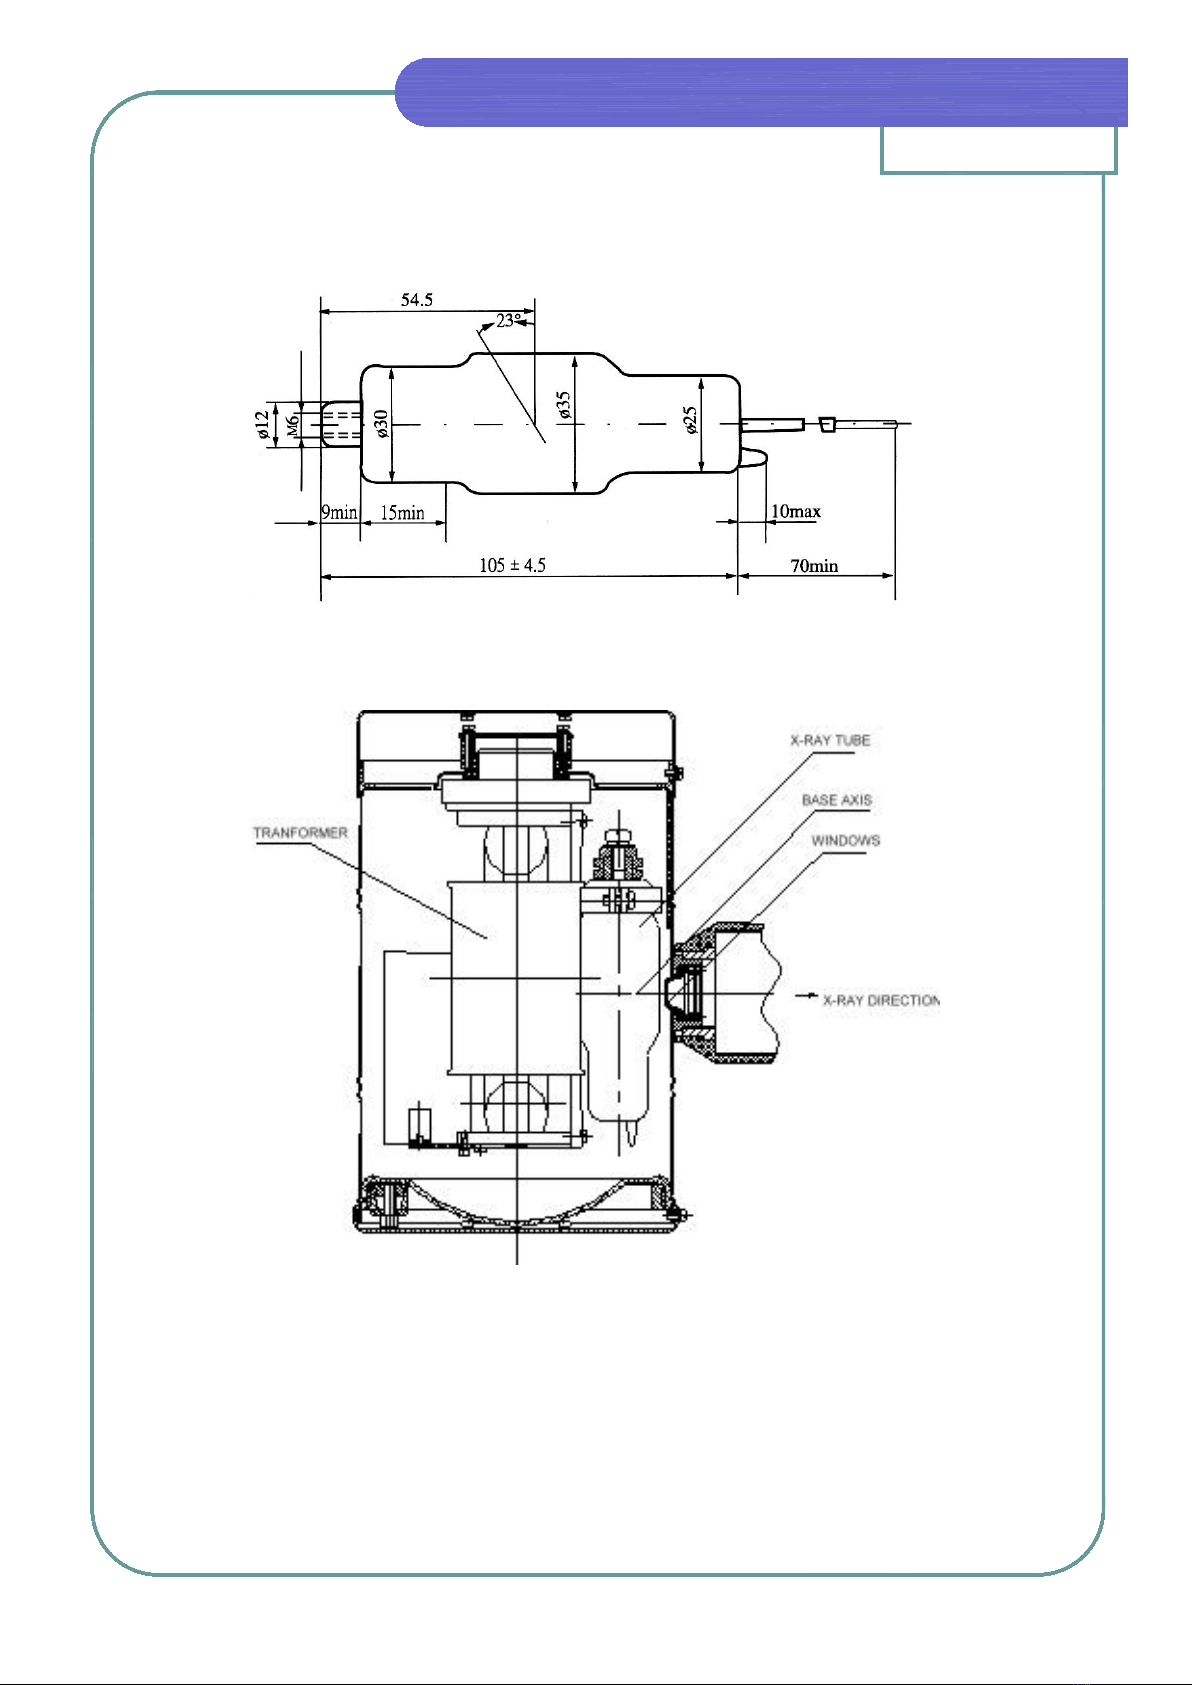
X TUBE
组合式机头外形图
PORTABLE X-RAY UNIT OPERATION MANUAL
SPECIFICATIONSPAGE 3

PORTABLE X-RAY UNIT OPERATION MANUAL

PAGE 4
PORTABLE X-RAY UNIT OPERATION MANUAL

PAGE 5
CXⅢASSEMBLY
1.Take out everything from the case.
2. Latch the case tight, place it on a sound spot.
3. First insert the horizontal track into the horizontal hole of the fixture
and fix it. Then relax the behind fender and insert it into the hole with a
angle of 45º and screw tight, preventing it from sliding out.
4.Attach the controller to right side of the case for balance. Insert the vertical
frame into the square hole on the case and ensure to put the frame into the
bottom of the case.
PORTABLE X-RAY UNIT OPERATION MANUAL

PAGE 6
5.Unit the angular arm, fit it upon the horizontal assembly and screw tight.
6.Set up the X-ray generator and the fluorescent screen. Use the shutter when
fluoroscoping and the cone for radiography.
7.Connect all the wirings properly.

PORTABLE X-RAY UNIT OPERATION MANUAL
OPERATION METHODPAGE 7
ⅣTRAINING AND ADJUSTING
1. TRAINING
A new or laid-off unit should to through a training process for
heightening the degree of vacuum in the x-ray tube, there by prolonging its years
of service.
Begin fluoroscopic exposure from the lowest KV gradually up to its highest,
exposing once on each KV step. If all is in order, training is finished. If there
appears any abnormal case, repeat the process until the desired result is gained.
2. ADJUSTING
(1) Adjustment of the fluoroscopic current.
Turn the power switch to make sure the voltage is 220V and turn the KV
switch to 65KV. The amperemeter should display 3-5mA when pressing the
footswitch. If it is over, adjust the adjustment ring on the resistor R1 in the
controlling box.
(2) Adjustment of the radiographic current.
Turn the power switch to make sure the voltage is 220V and turn the KV
switch to 75KV. The amperemeter should display 10mA when pressing the
timer. If it is short or over, adjust the another adjustment ring on the
resistor R1 in the controlling box.
Note: Before adjusting the ring of the resistor, loosen the screw (don’t
take it off ) and lightly shift the ring until the sought-for position is reached.
Then tighten the screw back.
Note:1 stand for
fluoroscopic
resistance ring
2 stand for radiographic resistance ring
2
1

PORTABLE X-RAY UNIT OPERATION MANUAL
ENERAL
PAGE 8
ⅤDIRECTIONS FOR OPERATION
Before the current is on , be sure that the unit as a whole is well connected with
the ground.
1.Fluoroscope
(1) Turn the switch to
(2) Turn power switch till it reads 220V.
(3) Select the required KV.
(4) Let the patient stand or sit between the x-ray tube and screen.
(5) Press the foot-switch continuously which means fluoroscope. The doctor
can observe through the screen.
(6) Cut off the source and turn the switch to its lowest position.
2.Radiography
(1) Turn the switch to
(2) Turn power switch till it reads 220V.
(3) Select the required KV and exposure time.
(4) Let the patient stand or lie between the x-ray tube and photo.
(5)Press the timer continuously until it stops automatically. Then
Develop the photo.
(6)Cut off the source and turn the switch to its lowest position.
ⅥGENERAL DESCRIPTION OF PRINCIPLE
Referring to the principle diagram of the unit’s circuit. Put AC power on
and turn the power switch on. The auto-transformer T is powered on , adjust
the line voltage regulator S until the voltage display screen is 220V Regard T1
as power, and primary coil of high voltage transformer T2 as load, after it is
powered on through resistor R2 and the counter-voltage for the X-ray tube.

PORTABLE X-RAY UNIT OPERATION MANUAL
PAGE 9
..ⅦTROUBLES AND BEMEDIES
If the equipment has some problems, many of these problems can be
corrected using the following problem guide.
1. Power on lame will not light ----First be sure the key switch is turned on,
then check to be sure it’s plugged in completely and check the building
circuit breaker or fuse.
2. Lamp of the timer and audible signal are not energized by pressing, the
timer----check that the power on lamp is on (If not ,see item 1).
3. Light or blank films doesn’t work-----Be sure the power on and audible
signal operate normally (If not , see item 1,2). When an exposure is made,
be sure that the timer is depressed during the entire exposure. Do not
release it until the exposure e terminates automatically.
4. X-ray doesn’t stop after the selected time -----The lamp of the timer or
audible signal does not terminate automatically, immediately , release the
timer, turn power switch “OFF’ and disconnect power.
The above steps are taken, the problems have been not soluted , require
the technicians to repair it.
ⅧATTENTION CAUSE
1. In order to be safe during operation, a good ground connection wire
should be fixed.
2. Because the heat capacity of the small model X-ray unit is somewhat
limited, it is suggested that operated with intervals.
3. During disassembling the machine , first disassemble the unit head, then
the other parts.
4. After operation , cut off the power supply , put every selector on the
controlling box to its lowest position, put the X-ray tube head into balance
position.
5. Attention to keep the unit well, and take all kinds of the parts slightly.

PORTABLE X-RAY UNIT OPERATION MANUAL
PAGE 10
HEAT FUSE 250v-10A-85 C
W
C4
S2 KS30-1-7
RESISTANT
RESISTANT
SWITCH
SWITCH
(GREEN)
POWER LAMP
(YELLOW)
JF10 ELECTRICAL PRINCIPLE DIAGRAM
NAME TYPE
RESISTANT
R1
R2
S3
RXQ-T-10-1.5K
H1
S2
PA
R1
1.5K
S3
地
M
F
0
RXQ-T-10-300Ω
V1
K
V2
BA1.BA2
2CZ5A/200V
DIODE
RELAY LY4AC/24V
FUSE
XD2-1/85
X-RAY TUBE
S1 KS30-1-8
SWITCH
KN1
H2
PV
S4
S5
PA
H1
TIMER
FOOT-SWITCH
85C1 0-20mA
85L1 0-250V
AMPEREMETER
VOLTMETER
XDX-1-6.3V
POWER LAMP
XDX-1-6.3V
R3 VARIABLE
-RESISTANT BC-25W-500Ω
4
3
2
16
XP3
1 7 1 7
XP4
S4 S6
1 7
XS3,4
XP3-12
XP3-11
XP1-2
XP1-1
XP1-3
J1-3 J1-2
7805
D2
5V
J1
H2
K4
J2-3
J2-2
C3
C1
D1
J1-6
LB
J2
5V
D4
R6
Q1
OFF
0V
5V
12V
24V
S1 ~ K
K-1
K2
R4 R2
V1
T3
T2
V2
D3
1
26
34
8
555
IC1
C2
R5
W1
P
80 82
83
84
81
86 85 88
24
35
87 89
1
1
4
3
25
XP5
XS5
XS2
4321
XP2
5
541
2
3
3 6 9
8
5
2
1 4 7
拍片 XP1-5
XP1-4
R3
500Ω
透视
K-2.3
24Ω 300Ω
PV
ON
S29
15
14
13
12
11
10
9
8
7
6
240V
235V
230V
220V
210V
202V
193V
182V
168V
154V
7
10
8
12
11
14
13
S19
1
10V
529V
32
2
3
XS1
1
1
BA2
XP1
BA1
XP6
地LN
RXYC-20-24ΩR4
XP.XS
PLUGSOCKET
CIRCUIT BOARD
PCB
W
XP2-6 XP2-7
XP2-8 XP2-9

PORTABLE X-RAY UNIT OPERATION MANUAL
PAGE 11
The encadement listing of model portable X-Ray Unit
Serial number
name
number
1
controller
1
2
The head of X-Ray
1
3
The collective light canister of
Photography
1
4
Calculagraph
1
5
Foot brake
1
6
Power line
1
7
The line of the head and controller
1
8
The line of the ground
1
9
The level trajectory
1
10
Syphon(long,short)
2
11
The pieces of the stand pole
1
12
Coalition axes
1
13
Leaden door
1
14
Fluorescent screen
1
15
Knighthead
2
16
Drier
1
17
Operation manual
1
18
Eligible certification
1
19
Fuse
4
20
Aluminum piece 0.5mm/2mm
1/piece
Table of contents
Popular Medical Equipment manuals by other brands


Getinge
Getinge Arjohuntleigh Nimbus 3 Professional Instructions for use

Mettler Electronics
Mettler Electronics Sonicator 730 Maintenance manual

Pressalit Care
Pressalit Care R1100 Mounting instruction

Denas MS
Denas MS DENAS-T operating manual

bort medical
bort medical ActiveColor quick guide

AccuVein
AccuVein AV400 user manual


