chinavasion CVFQ-E205 Instruction Manual

USB Monitor
Manual Operation

USB Pffiered MonitoF are with DisplayLink technology buitt in. USB
monitors are the easiest way to add an additional display to your pC or Mac.
Simply install the DisplayLink sofiwarE and ptug the USB monitor into your
USB polt - Thats it ! Most USB monilors are powered by the USB porl, so
there is no need for an additional pow lead, making them power efficient and
portable. USB monitors tel lT departments improve their worker produdivity
with oxl.a monitors without the s5t or time required to add graphic cards to
each and every PC.
You can conned this LCD $reen to your pC or laptop via USB, so you can
use it as a se@ndary scren. Available in 8 inch or 10.1inch model, this USB
Monitor is compatible wilh PC and Mac, support Microsoft Windows Xp, 2000,
Vista, WinT and Mac OS. This tiny LCD sseen can be used for a Side Show
device, instant measaging program, system statislics, or a photoshop toolbox
etc.
1. Safety Instructions
Thse safely instructions must be folleed to ensure your salety and prevent
properly damage.
Make sure to read lhe instruclions carefully and us the product in the srrect
mannet
1.The monitor doesnl .equiE any additional power source. Make sure to
use USB Cable (DC 5V 500mA) only.
2. Do not place ths monitor in a location exposed to moisture, dust. smoke,
water, or in a car.
3. Clean the product using a soft cloth with a monitor cleaner only. Make
Eure to dis@nnect USB Cable while cbaning. Ensure that water does not
enter the product and that it is not wet.
4. LED display is rragile unit_ Do not fore on LCD Screen. Do not tap or
Bcratch LCD Stren with a sharp obje€{, otheNise, LCD may get damage. Do
nol put the monitor in a unstable or may fall location, otheMise, may cause
peBonal injury or damage the machine.
5. Ensure that users do not disassemble, repair or modify the product by
themselves. lf the product needs to be repaired, conlacl a Setrice Cenler

Contents
l, Producl Features--------*----------- 3
2. Conneclions and lnstallation----*-*-- 4
3. System Requir€ments & Restrictions ---6
4. Parameters-------------------------------7
5. Accssories------"-------"----.---"-------7
6. Troubleshooiiong-----------------8
Product Features
O. Front panel
1..- 114 inch thread fixed hole
2-- B type mini USB input port, USB signal input
3- Atype USB extension port, mn be used as a mouse, keyboard,
or U disk expansion pod
4-- VESA(75.75mm) Mounting lnstallation Fixed Hote(optional)
2. Connections and lnstallation
O. USB monitor doesn't require any additional power souree except USB.
So that need require the USB ports on PC €n supply current which is not less
than 400mA. Attached Y type USB cable has 3 USB input port, 2 A type and 1
B type mini USB port. 2 A type USB Port connect the PC USB port B type mini
USB port connect to the port in ihe monitol
Attached Y typ. USB cable:
tw
1. A type USB Port, power and data transmission, connet to the USB
po.t of the PC.
2. A type USB Port, power and data transmission, conneci to the USB
oort of the PC. (optpnal)
3. B type mini USB input porl, connect to USB moniior inpui port.
Please use the two A type USB plug into the PC to the USB port to ensure
supply
@- Rear Case aod USB Signal lnput Port

@. Systom RequlremenE:
. CPU: lntel Pentium/Celeron/AMD/K6/Athlon/Duron 1.2GHz or above
. RAM: 5'l2MB RAM or above
. USB: at least one or more USB2.0 port
. HDD: 30MB HDD space above
@. lnsblling monitor dfiver:
@-l.lnsert the CD into the CD-ROM drive
. Please make sure that your USB moritor is connected to the PC
. Do not power off or disconnec't ihe USB cable until installation is
completely linished. This may damage systems or may €use system errore.
(9-2. Open the folder
J"- I *la*t
L*''j
(O-3. Double click the icon
Disl.rti&6 l.
Popup as follows:
I
@ 4- Choose insiall language:
@-5. Ctick '{l. fl4"Pt :l "agree", the systffi wilt automaticatty instEll
lhe driver
@-6. When the driver irelallation is @mplete, i*n G* .ppuur" on yow
system tray.
While instalting soltware drivet, mke su.e the USB rable be
conrec&d to th6 comprler
@-7.At this poinl, your USB monitors can display properiy, you 6an follow
the comFrter prompt6, make the appropriate settings for the USB Moniior
3. System Requirements & Restrictions
1l). opereting Systems
.Windows XP
-Seilice Pack 1 pdor: Not supported
-Sorvice Pack 2 or afier: Supported
.\I/indows 2000
-Seruice Pack 3 prior: Not supported
-Seryice Pack 4 o. afler: Supported
.Windows Server 2003: Not supported
.Windows Vista: Supported except 64bit systems
.Windows 7
. Mac OS
User may check the Opsating System ve6ion by Right{tick 'My Computer' +
'Properiies' -'System Properties'
O. USB Monitor is a USB monitor to be E@gnized as a Generic USB

devie. Theretore system bool-up screen or DOS screen cannot be disptayed
propedy.
O. Any software that requires Hardware gD ac@leralor cannot be
displayed properly with USB monitfi Suc*l as below.
- Real Player(Expansion Mode)
- 3DGraphicGame6
- Programs based on Direct X gEphic engine
Dlt the PC d@sn't support USB2.0, USB Monitor may not operate property.
€). lf the systems craphic card doesn,t support WDDM(Windows Djsplay
Driver Model), the USB monitor,s exlension mode may not work properly with
Wndows vista System.
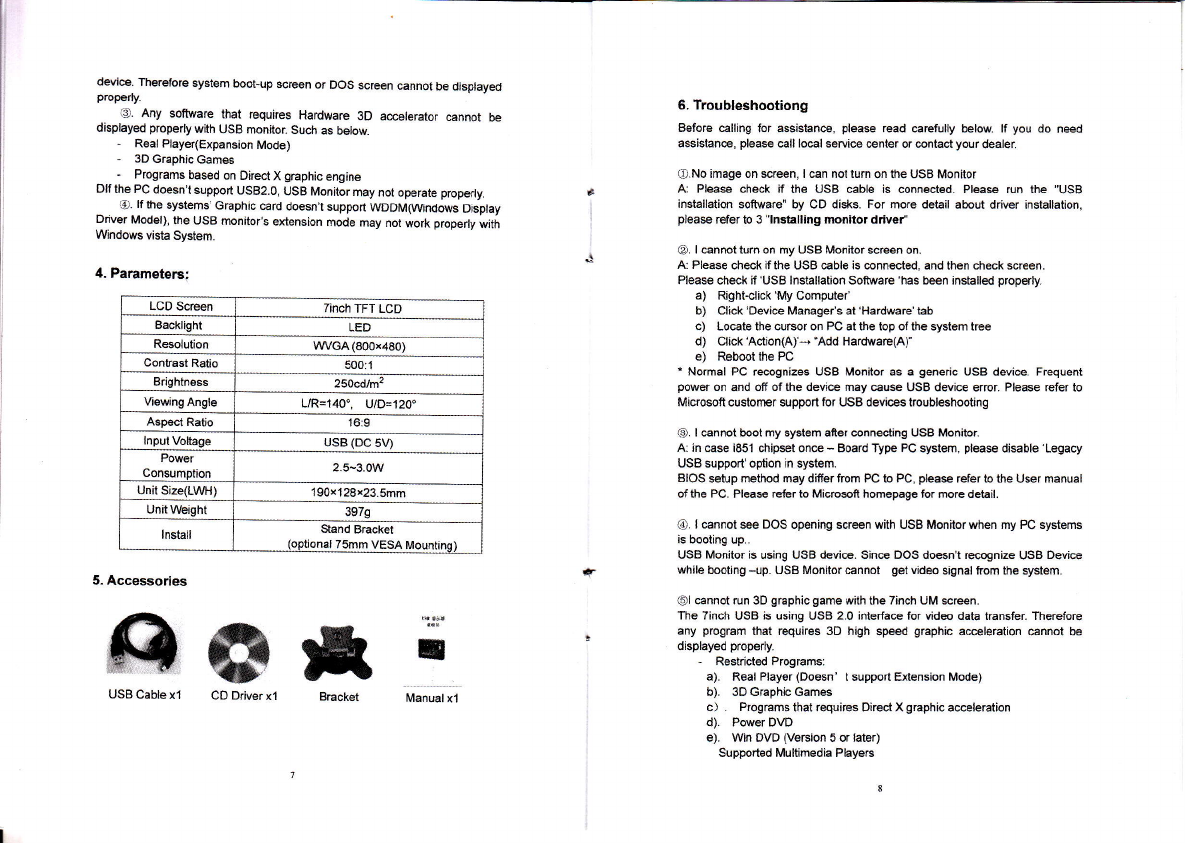
4. Parameters;
LCD Streen Tinch TFT LCD
Backlight LED
Resolution VWGA (600x4E0)
Contrasl Ratio 500r1
Brightno6E 25acd/m2
Viowing Angle UR=140", U/D=120'
Aspect Ratio 18:g
lnpul Voltage usB (Dc 5v)
Power
Consrmnli^n 2.5-3_0W
Unit Size(LWH) 190x128x23.5mm
unir weight 3979
lnstall Sand Bracket
(optional 75mm VESA Mountir
5- Accessories
6. Troubleshootiong
BEfore €lling ,or assistane, please read €efully below. lf you do ned
assistane, please call lmal service cenler or contac{ your &aler.
G.No image on $reen, I can not turn on the USB Monitor
A: Please check if the USB €ble is connected. Please run the "USB
installation soflIvare" by CD disks. For more detail about driver installation,
ploase refer to 3 "lnstalling monitol drived'
@. I cannol turn on my USB Monitor screen on.
A: Please check ifthe USB cable is connected, and then check s$een.
Please check if'USB lnstallation Softlvare 'has been installed proper,y.
a) Right-clicl('MyComputea
b) Click 'Device Manager's at 'Hardware' tab
c) LoGte the cursor on PC at the top of the system he
d) Click'Action(A)'+'Add HardwaE(A)'
e) Rebootthe Pc
" Normal PC re@gnizes USB Monitor as a generic USB devi@. Frequent
power on and off ot the device may caus USB dsr'ie errcr. Pleffi refer to
Microsofi cuslorner support for LJSB devls troubleshootjng
.€1. I mnnot boot my syslem afrer @nnecling USB Monitor
A: in case i85l chipsei once - Board Type PC systffi, pleas disable 'Legacy
USB support'option in system.
BIOS setup method may differ frcm PC b PC, please refer b the User manual
of the PC. Pleasc refer to Micl@ft homepage tor rcre debil.
@. I cannot s€e DOS opening screen with USB Monitor when my PC systems
is booting up..
USE Monitor is using USB devie. Sinft DOS d€sn't recognize USB Device
while booting -up. IJSB Monitor €nnol get vid& slrnal ftom lhe syslem.
Ol cannot run 3D graphic gam6 with ihe Tinch UM sffeen.
The Tinch U$B b using USB 2.0 interfa@ for vid@ daia lransfer. Therefore
any program that requires 3D high sp€€d graphb aceleration cannot be
displayed properly.
- Restricted Programs:
a). Real Player (Doesn' t support Extension Mode)
b). 3D Graphb Games
c) . Programs that requires Dired X graphic a@leration
d). PowerDVD
e). Wn DVD (Version 5 or later)
Supported Multimedia PlayeE
l\4anualxl
*#lE n
USB Cable xl CD Driver x1

I
i
aI \Mndows Media player (Version 10 or later)
b). coM Ptayer
c). KM Player
O, Howto unin$ell 'USB installation sofiware"
A 'Contol Panel'+ 'Program AddRemove, + .Dispay link Core sofrware,+
Cli*lmve'.
+. Hil many USB MonitoE can be connected to one pC?
USB Monitor is a generic USB device. Theoreticslly a pC €n recognize up io
'127 USB devie. Horever with the latest pC system, we re6mmehd number
of USB monitors and each respective pC system requirements as below_
a) . 1-2 USB Monitor connections -.1.2GHz CpU/Si2 MB Memry
b). 3-5 USB Monitor mnnstions -1.BGHz CpU/1cB Memory
c). 6 USB Monitor connections -1.6eHz Dual core CpU/lGB Memory
* Display response rates on each USB monitot may vary upon lhe po,s
Bou@ management statua.
O. When USB mnnected with pC frst, afrer pC starts, UM is standby and no
display?
A: Plug{ut and plug in again with the USB cable be{vren pC and USB
Monitor, or please uninstall the Displaylink software drivq and then re-instatl
the driver
Table of contents
Other chinavasion Monitor manuals