Christie LW400 User manual

LW400-LWU420-LX400 Lamp/Filter Replacement Instruction Sheet 1 of 4
020-000133-03 Rev. 1 (09-2011)
LW400/LWU420/LX400
Lamp/Filter Replacement Instruction Sheet
INTRODUCTION
These instructions outline the details for Lamp and Filter replacement in the LW400 projector (Model No. 121-
001102-xx), the LWU420 projector (Model No. 121-004105-xx) and the LX400 (Model Nos. 121-003104/
115-xx). The lamp is located on the right side of the projector (viewed from the back) and the filter is located
on the left side of the projector (viewed from the back). NOTICE: Use only a Christie approved Lamp and
Filter Kit for your specific projector model.
KITS REQUIRED
• Lamp - p/n 003-120457-01
• Filter - p/n 003-002119-01
TOOLS REQUIRED
Phillips screwdriver
INSTRUCTIONS
LAMP REPLACEMENT
The projector uses a high-pressure mercury glass lamp which can explode with a loud
bang, or burn out, if jolted or scratched or handled while hot, or wear out over time. If the lamp should
explode, immediately disconnect all power sources to the projector. Ventilate the room well, and make sure
not to breathe the gas that comes out of the projector vents. Avoid contact with eyes and mouth.
Do not use an old (used) lamp as this may cause it to explode.
Do Not operate a projector while any lamp is removed. This may result in malfunctions, fire
hazard, or other accidents.

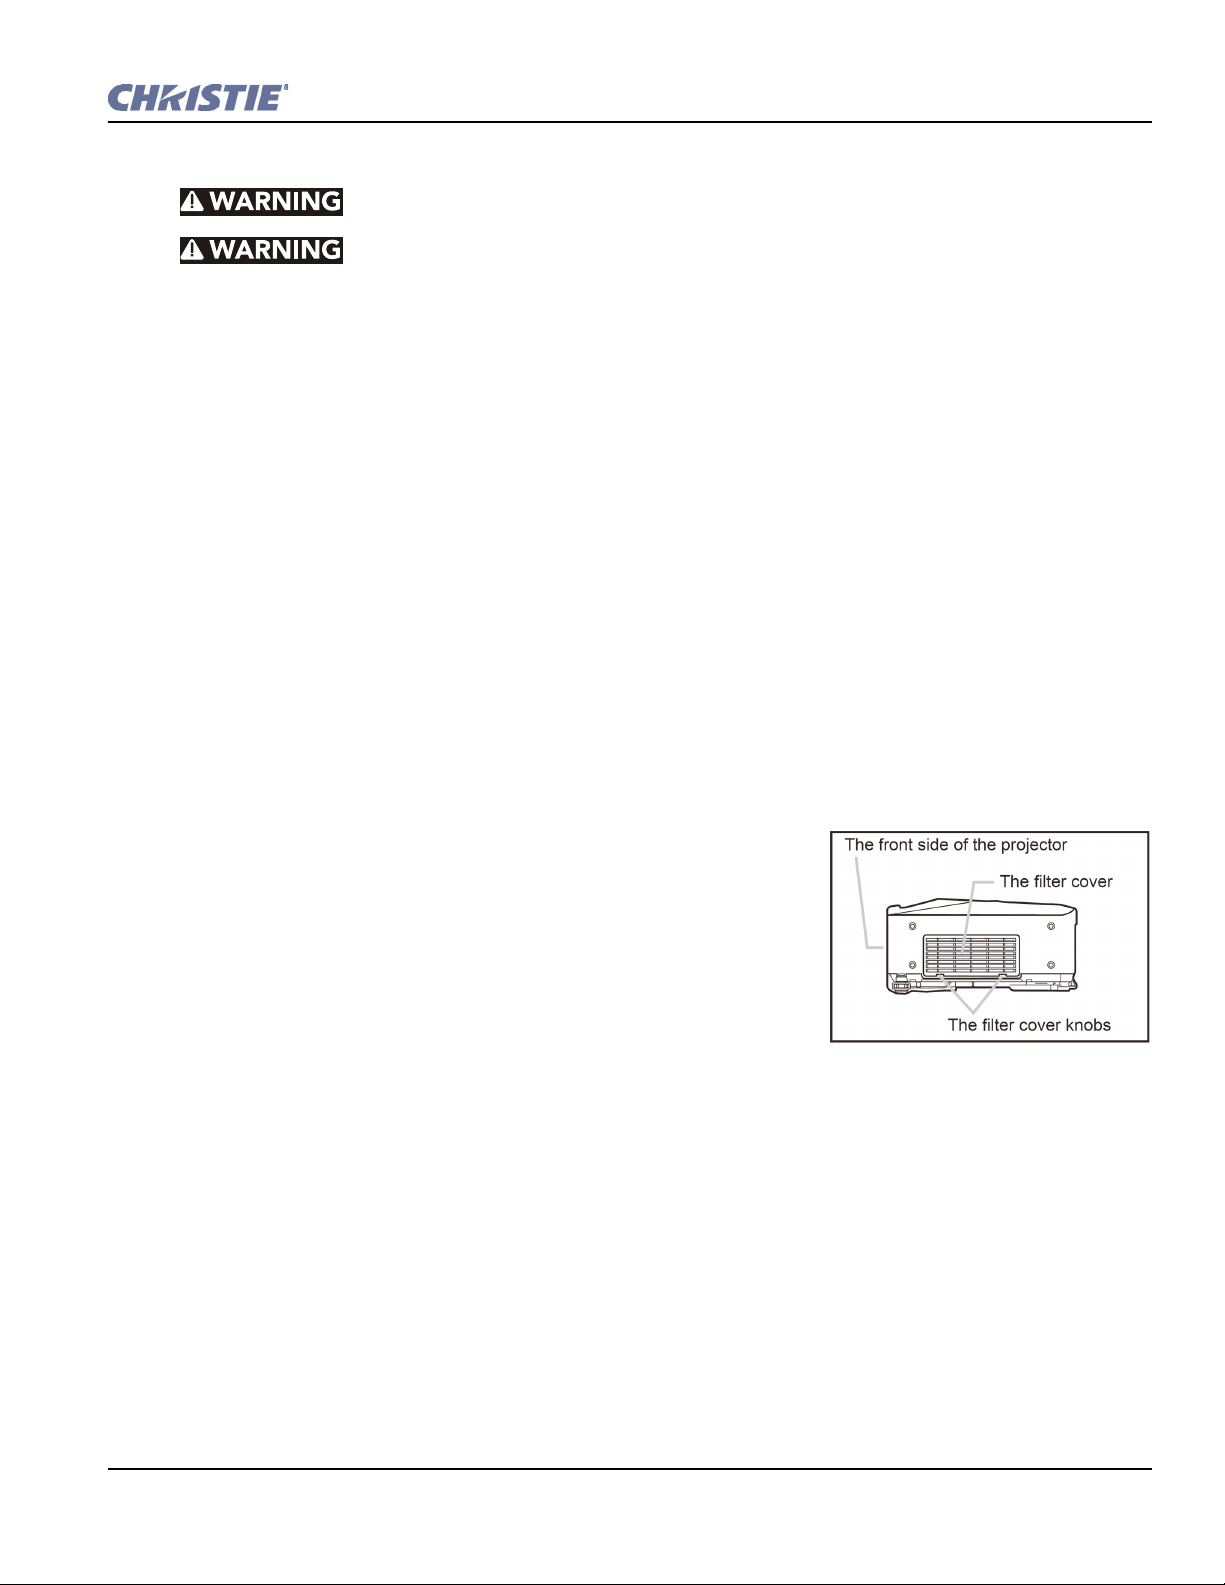
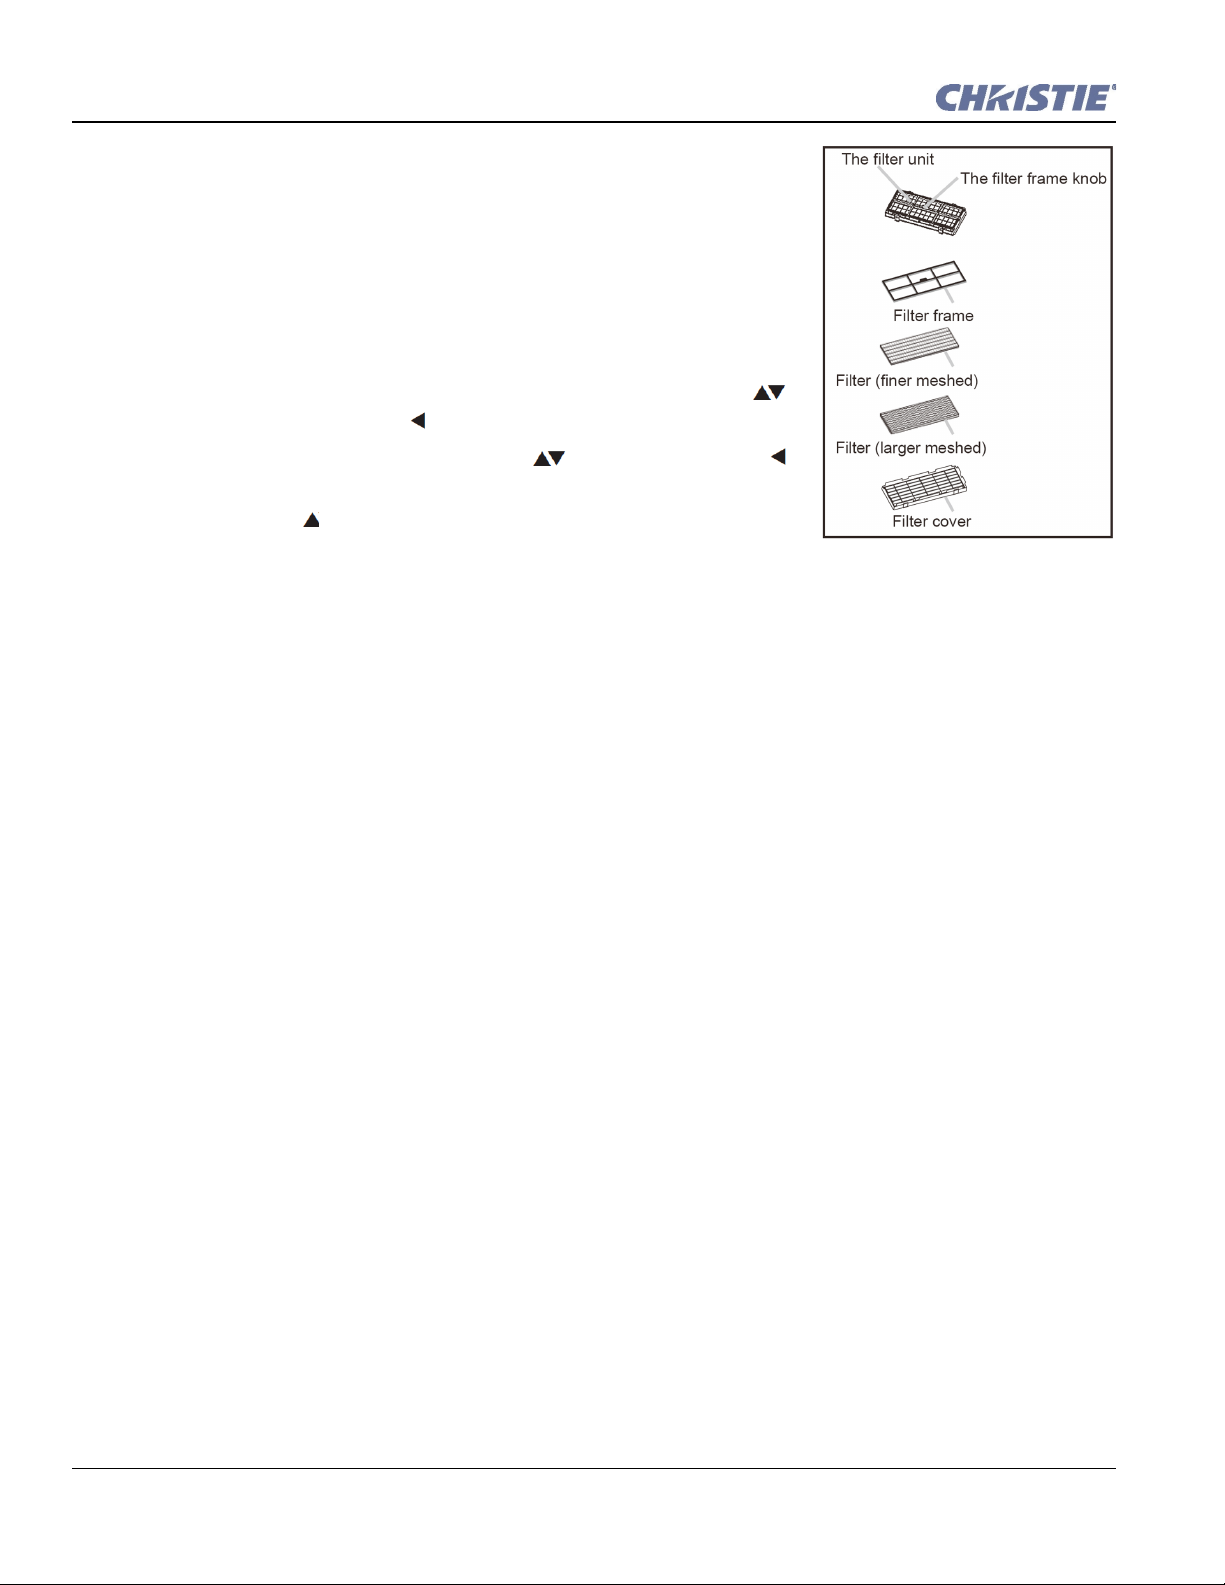
2 of 4 LW400-LWU420-LX400 Lamp/Filter Replacement Instruction Sheet
020-000133-03 Rev. 1 (09-2011)
When replacing a lamp that has burnt out, wait at least 45 minutes for the lamp to cool
sufficiently. Handling the lamp while hot can cause burns, as well as damaging the lamp. Shards of glass
may damage internal projector components or cause injury during handling.
Never unscrew except the appointed (marked by an arrow) screws.
Do not open the lamp cover while the projector is suspended from above. This is
dangerous as the shards from the broken bulb will fall out when the cover is opened.
NOTICES: 1) Use only the lamp of the specified type. 2) A lamp that explodes soon after first use, may be
experiencing electrical problems other than the lamp itself. If this occurs, contact your local dealer or a
service representative. 3) Overuse of a lamp can cause the picture to darken, not to light up or to explode.
When the pictures appears dark, or when the color tone is poor, replace the lamp as soon as possible.
LAMP DISPOSAL
This product contains a mercury lamp; DO NOT not place it in the trash. Dispose of the lamp in accordance
with local environmental laws. For lamp recycling, go to www.lamprecycle.org. (in the US) For product
disposal, contact your local government agency or www.eiae.org (in the US) or www.epsc.ca (in Canada).
REPLACING THE LAMP
A lamp has a finite product life. Using the lamp for long periods of time may cause the picture to darken or
poor color tone. Each lamp has a different life span, and some may explode or burn out soon after being put in
use.
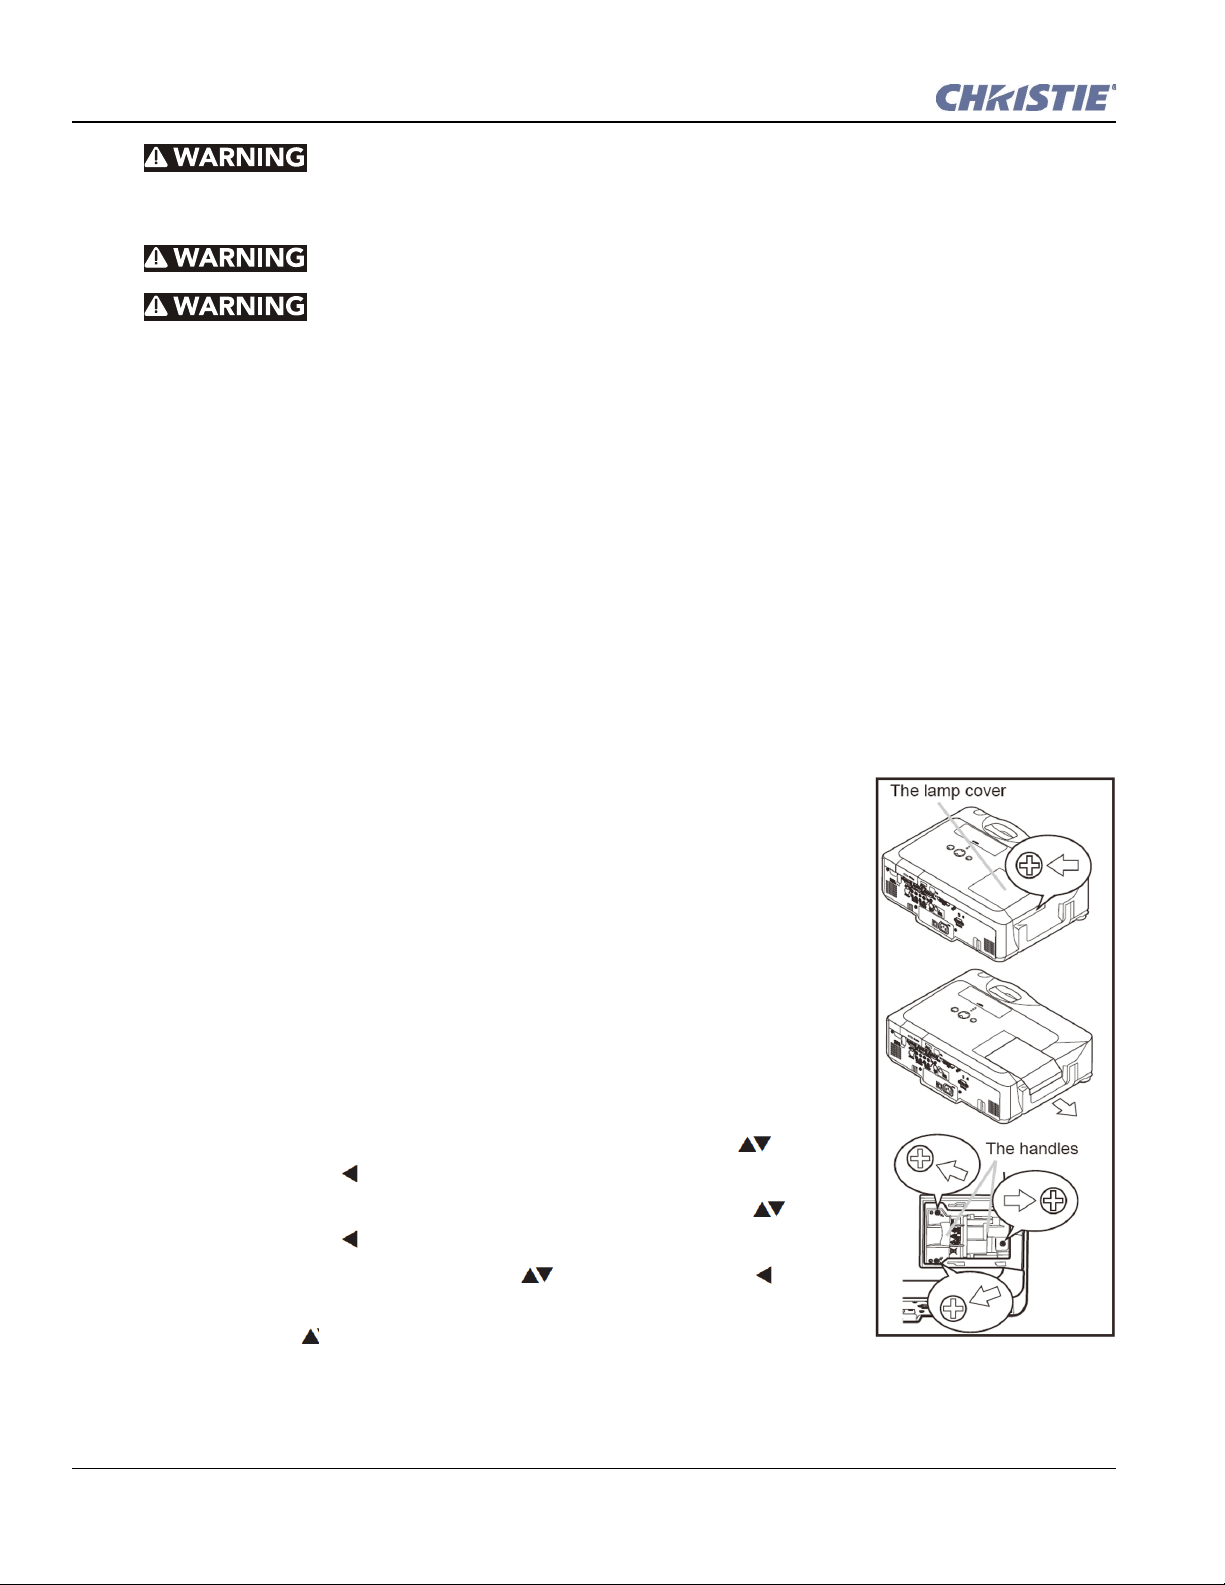
1. Turn the projector off, and unplug the power cord. Allow the projector to cool
for at least 45 minutes.
2. Loosen the lamp cover captive screw (marked by arrow) and slide the lamp
cover to the side to remove it.
3. Loosen the 3 lamp captive screws (marked by arrow), and slowly remove the
lamp using the lamp handles.
4. Insert the new lamp, and secure the 3 lamp captive screws to lock it in place.
5. Slide the lamp cover back in place and secure lamp cover captive screw.
6. Turn the projector ON and reset the lamp time using the LAMP TIME function
in the OPTION menu as follows:
a. Press the MENU button to display a menu. Only when the EASY MENU
has appeared, please perform the next step (b).
b. Point at the “Go to Advanced Menu …” in the menu using button,
then press the button.
c. Point at the “OPTION” in the left column of the menu using button,
then press the button.
d. Point at the ”LAMP TIME” using button, then press the button. A
dialog will appear.
e. Press the button to select “RESET” on the dialog. It performs resetting
the lamp time.
NOTICE: DO NOT reset lamp counter unless the lamp has been replaced with a new lamp.

LW400-LWU420-LX400 Lamp/Filter Replacement Instruction Sheet 3 of 4
020-000133-03 Rev. 1 (09-2011)
FILTER REPLACEMENT
Always disconnect all power sources to the projector before servicing
When replacing a filter, wait at least 45 minutes for the lamp to cool sufficiently.
Handling the lamp while hot can cause burns, as well as damaging the lamp. Shards of glass may damage
internal projector components or cause injury during handling.
NOTICES: 1) Use only the specified air filter. 2) Do not use the projector with the air filter and/or the filter
cover removed. It could result in a fire and/or malfunction to the projector. 3) The air filter should be cleaned
periodically. If the air filter becomes clogged by dust or similar, internal temperatures may rise and could
cause a heat build-up and/or malfunction to the projector.
NOTES: 1) Replace the air filter when it is damaged or too soiled, and also when you replace the lamp. 2)
Reset the filter time only when you have cleaned or replaced the air filter, for a suitable indication about the air
filter. 3) The projector may display the message “CHECK THE AIR FLOW” or turn itself off, to prevent the
internal heat level from rising too high.
If the air filter becomes clogged by dust or the like, internal temperatures rise and could cause a re, a burn and/
or malfunction to the projector. When the indicators or a message prompts to clean the air filter, clean the air
filter as soon as possible. Please check and clean the air filter periodically, even if there is no message.Please
replace the air filter when it is damaged or too soiled.
And also when you replace the lamp, always replace the air filter. The required air filter is included in the lamp
kit. NOTE: When the projector is suspended from the ceiling, use a vacuum cleaner to remove dust that has
accumulated on and around the filter cover to avoid dust from entering the compartment when the filter cover
is removed.
1. Hold the filter cover knobs while removing it. The filter cover is an
assembly made up of the cover, 2 filters and a retaining frame.
2. Once removed, vacuum all sides of the filter cover assembly. If the air
filter is damaged or too soiled, replace it immediately.
3. To replace, hold the filter cover in one hand while holding and pulling
the filter frame knob using the another hand.
4. Remove and discard the 2 filters.

4 of 4 LW400-LWU420-LX400 Lamp/Filter Replacement Instruction Sheet
020-000133-03 Rev. 1 (09-2011)
5. Place the larger meshed filter onto the filter cover first, then place the
finer filter onto the larger meshed filter.
6. Place the filter frame onto the filter cover (covering the filters).
7. Install the filter cover back onto the projector.
8. Turn the projector on and reset the filter time using the FILTER TIME
function as follows:
a. Press the MENU button to display a menu. When the EASY MENU
has appeared, please skip the next step (b).
b. Point at the “OPTION” in the left column of the menu using
button, then press the . button.
c. Point at the “FILTER TIME” using button, then press the
button. A dialog will appear.
d. Press the button to select “RESET” on the dialog. It performs
resetting the filter time.
Other manuals for LW400
6
This manual suits for next models
2
Table of contents
Popular Water Filtration System manuals by other brands

eSpring
eSpring Water Purifier owner's manual

Pentair
Pentair EVERPURE EZ-RO 200/2G Installation & operation guide

Eureka Forbes
Eureka Forbes Aquaguard select AWS C2500 DX user manual

Clean Water
Clean Water 7500-REV4 installation guide

UV Pure Technologies
UV Pure Technologies UPSTREAM instruction manual

BWT
BWT bestaqua 14ROC Installation and operating instructions