Studio Force D / V 48 & 72 Quick Start Guide V2.0 Studio Force D / V 48 & 72 Quick Start Guide V2.0
1. Overview
The Studio Force™ 48 & 72 LED fixtures range features a choice of 6,100K CCT, daylight white (Studio Force D 48 & 72) &
3,000K – 6,100K CCT, variable white (Studio Force V 48 & 72) models. The Studio Force D & Studio Force V line-ups each
feature a choice of 1.2m / 4ft (48) & 1.8m / 6ft (72) batten lengths. The 1.2m / 4ft Studio Force D 48 & V 48 batten lengths
utilise eight light engines featuring 24 high powered LEDs per engine / a total of 192 LEDs per fixture. The 1.8m / 6ft Studio
Force D 72 & V 72 batten lengths utilise 12 light engines featuring 24 high powered LEDs per engine / a total of 288 LEDs per
fixture. Each Studio Force D batten length features 24 cold white LEDs per engine, whereas the Studio Force V batten lengths
feature 12 cold white & 12 warm white LEDs per engine. The Studio Force D / V 48 & 72 features built-in power supplies which
can operate as a stand-alone unit or remotely controlled through ANSI E1.11 USITT DMX 512-A protocol.
2. Safety
Caution
1. This product is for professional use only. It is NOT intended for domestic or outdoor use.
2. The bright flash of light during power-up & continuous strobe effect may cause epileptic seizure.
3. This product must be used with safety cable.
. Cabling
The Studio Force D / V 48 & 72 utilise PowerCon connectors for power input & through. The DMX control data input & through
connections from an external control console are via two XLR 5-pin connectors. The chassis are ground bonded.
Note: The maximum number of Studio Force D 72 / V 72 fixtures running off a single power input cable is 2 at 120V AC or 4 at
240V AC. The maximum number of Studio Force D 48 / V 48 fixtures running off a single power input cable is 3 at 120V AC or 6
at 240V AC. Please refer to ANSI & AWG standards for the maximum data & power cable lengths.
4. Mounting
The Studio Force D / V 48 & 72 are equipped with built-in adjustable mounting brac ets for floor, wall & truss mounting
applications. Use the pair of quic release levers for easy tilt adjustment. Secure the fixture with a safety bond through the fixing
hold that is built into the end plates of the fixture.
5. Orientation
The Studio Force D / V 48 & 72 are built with near/far lenses that optimise the beam spread when used on a wall or cyclorama.
The side with near-field lenses is indicated by the narrow edge border, which should be adjacent to the wall or cyc. The side with
far-field lenses is indicated by the wider edge border, which should be facing away from the wall or cyc.
6. Cyc & Border Lens
“Cyc Lens” & “Border Lens” are slide-in optical accessories available to adjust the light output. Cyc Lens is an acrylic panel with
a 60°x10° diffusion film & the Border Lens is 40°x40°. Two accessory slots are available for loc ing. Spring Plungers are pre-
installed at the far ends of both accessory slots to loc in-place the slide-in panels. The height of the spring plungers are preset
& fixed with no need for further adjustment.
7. Control
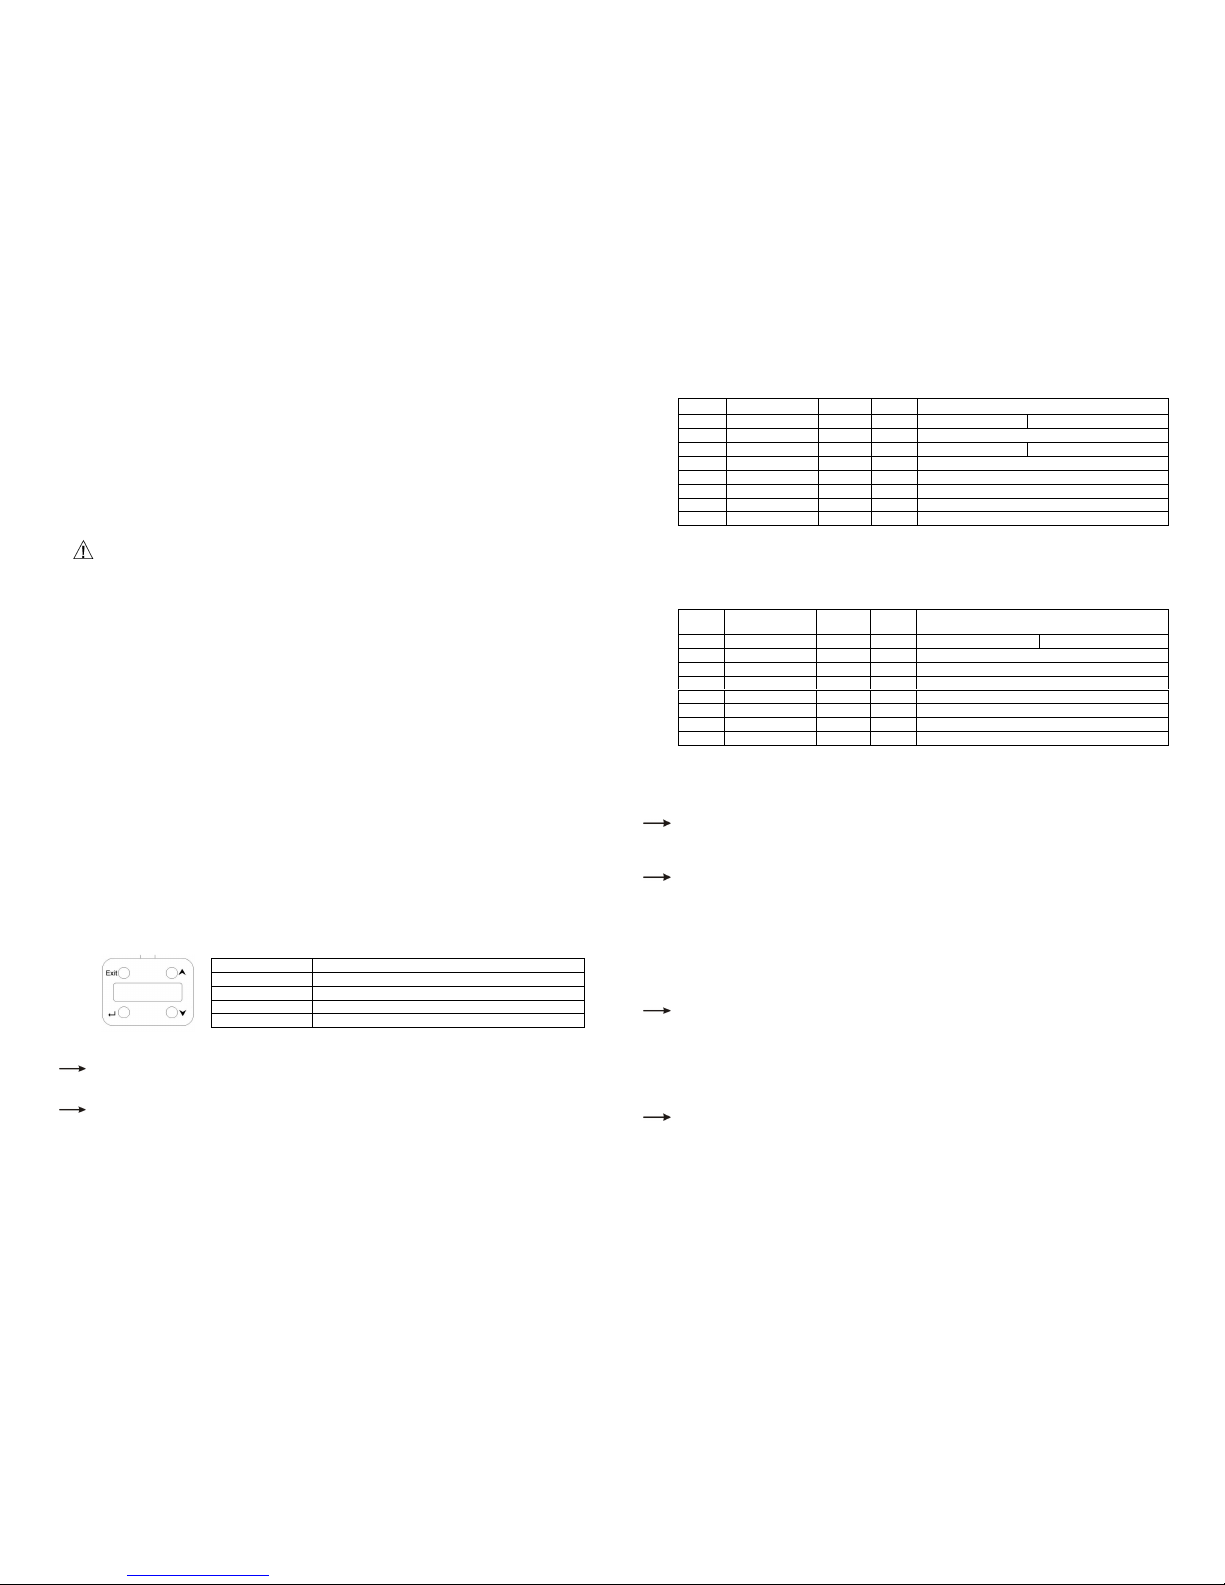
The control functions of the Studio Force D / V 48 & 72 are accessed through the LCD display at the rear of the fixture with 4
push buttons.
Control Function
Exit Bac to previous menu
Up Arrow Increases (+) the mode level or value
Down Arrow Decreases (-) the mode level or value
Bac Arrow (Enter) Stores the menu choice
Control Menu
Home / DMX Address
To set the DMX start address, press Enter, press Up/Down buttons to adjust DMX start address, press Enter for 2 seconds to
save settings.
Control Mode
There are 5 DMX controlled modes featuring: 2 grouping options (single, all-grouped), pre-programmed loo s & stand-alone
effects. Refer to the list below for details. Press Enter, press Up/Down buttons to select control mode, & press Enter for 2
seconds to save.
Studio Force D 48 & 72: Control Mode – Software Version 2.0
Mode Name Group Ch Description
1 Dim32 / Dim48 Single 32/48 32 x W (SF 48 ) 48 x W (SF 72)
2 FxDim All 2 1 x Intensity Fx + W
3 Dim8/Dim12 Single 8/12 8 x W 12 x W
4 Dim1x All 1 1 x W
11 Loo Sel 1 Loo Select
12 Mastr StndAlon Stand-alone Master
13 Slave StndAlon Stand-alone Slave
Manual Manual
Manual: From the main menu, press Up/Down to access “Control Mode”, press Up/Down to select “Manual”, & then press
Enter for 2 seconds to save the setting. Press Exit & the display will show “Manual Control” & the intensity level “00% Intensity”.
To adjust the levels press Enter once & “00%” will flash. Use the Up/Down buttons to adjust the levels. Press Enter for 2
seconds to save the settings.
Mode Name Group Ch Description
1 Dim32 / Dim48 Single 32/48 (16 x WW) + (16 x CW) (24 x WW) + (24 x CW)
2 FxCTI All 3 1 x Intensity Fx + 1 x Colour Temp + 1 x Intensity
3 WW/CW All 2 (1 x WW) + (1 x CW)
4 CTI All 2 1 x Colour Temp + 1 x Intensity
11 Loo Sel 1 Loo Select
12 Mastr StndAlon Master stand-alone
13 Slave StndAlon Slave stand-alone
Manual Manual
Manual:
From the main menu, press Up/Down to access “Control Mode”, press Up/Down to select “Manual”, & then press
Enter for 2 seconds to save the setting. Press Exit & the display will show “Manual Control” – the color temperature level “CT
00%” & the intensity level “Int 00%”. To adjust the levels press enter once & the CT level will flash. Use the Up/Down buttons
to adjust the value & press Enter again once & the “Int” level will flash. Use the Up/Down buttons to adjust the value & press
Enter for 2 seconds to save the settings.
When DMX is Lost
If DMX is not detected various output options can be selected: Press Enter, press Up/Down to select mode & options, press
Enter for 2 seconds to save settings. Off - will snap to off; Hold - will hold the last valid DMX state; Loo 1-31 will snap to the
Loo of your choice.
Look Store
31 internal preset FX Loo s are available for stand-alone operation, 1-23 are pre-programmed.
To replay a Loo in stand-alone operation, press Up/Down to select Loo Store, press Enter, press Up/Down to select the
desired Loo & press Enter for 2 seconds to save settings.
To replay a Loo with a DMX console, press Up/Down to Control Mode11& press Enter for 2 seconds. Use the DMX console
with the assigned channel to playbac the various loo s stored. (1-31 loo s in 1 single channel) Note:
::
: DMX has priority over
internal Loo s.
Loo s can be recorded to the internal flash memory by users & will be preserved on power down. Loo s will be returned to
default settings upon reset. There are two ways to record a loo : Simple, with DMX console & Advanced, stand-alone. (DMX is
unplugged): refer to user manual for control details.
Technical
Frequency settings & pre-programmed engines can be uploaded in this mode.
Press Up/Down to access ‘Frequency’ - 4 frequency settings are available - 600, 1200, 2400 & 4800 to allow for the LED
scan rate to be synchronized with the video camera & avoid a flic ering effect. Select frequency & press Enter for 2 seconds to
save settings.
Press Enter, Up/Down to select ‘Upload Engines’ & press Enter for 2 seconds to save. Connect to the Chroma-Q Uploader &
proceed with the uploading process. See Quic Start Guide of the Chroma-Q Uploader for the uploading connection &
operation.
Reset to Default
Press Up/Down to access this mode, press Enter & display will show ‘reset?’, press Enter for 2 seconds & display will show ‘resetting’ ;
display will show ‘done’ when complete & menu settings have bee reset to factory defaults: DMX address = 001, Control Mode = 1,
When DMX is Lost = Hold, Loo s = 00, Display = On, Frequency = 600
8. Further Information
Please refer to the Chroma-Q Studio Force D / V 48 & 72 manual for more detailed information. A copy of the manual can be found at the
Chroma-Q website – www.chroma-q.com – under Support.