Cineroid L2C-5K User manual

Cinema & Broadcasting Equipment
English
Model : L2C-5K (Daylight)
L2C-3K (Tungsten)
L2C-3K5K (Tungsten + Daylight )
Cineroid
LED
Manual
Japanese

LED Light
SECULINE Co., Ltd
LED Light
English
SECULINE Co., Ltd
2 3
Thank you for purchasing the Cineroid LED light.
The Cineroid LED employs a very high color rendering index (CRI).
It displays a very stable color temperature and brightness so that
both motion pictures and still images can be taken in their most
natural color tones. Please read this user manual thoroughly before
using the Cineroid LED.
Test Before Operating
It is recommended to test the Cineroid LED before use. Make sure
the light comes on when powered and that the brightness control
works properly.
Copyrights and Prohibitions
The use of images of people, property and places without
permission can be prohibited by law. Please refer to your region's
laws regarding copyrights and prohibitions.
○ Canon and EOS are registered trademarks of Canon.
○ Nikon is a registered trademark of Nikon.
○ Sony is a registered trademark of Sony.
Safety Precautions
Please observe the following safety precautions as they are meant for
the safe and proper use of the product to reduce the risk of accidents.
Upon reading the user manual, keep it in a safe and available place.
◎ Do not use any batteries, power cord, or accessories that are not specified in this
document.
◎ When using a power cord, be sure to plug it in completely. Do not handle power plugs
when your hands are wet. When unplugging the power cord, grasp the plug body
or adapter instead of the cord.
◎ Power cords that are scratched, heavily bent or twisted can potentially be hazardous and
a source of electric shock and/or fire.
◎ Do not insert foreign objects into the product’s electric or cable components.
◎ Do not place the power cord near sources of heat as this may melt or cause damage to
the cord potentially causing fire or electric shock.
◎ Do not disassemble or modify the product. This may damage the product and cause
danger due to a malfunction.
◎ Please keep the product out of reach of young children. Injuries may occur due to damage
to the product.
◎ When using the product in an airplane or hospital setting, it is recommended to acquire
authorization first as signals or electro-magnetic waves from the product may cause other
equipment to malfunction.
◎ Do not store the product in a dusty or humid environment as damage may occur.
◎ When the product is mounted on a camera, do not lift or move the camera by grabbing
the product. This may cause damage to the product or the camera mount.
◎ Do not clean the product with paint thinner, benzene, or other volatile solvents. This may
cause damage to the product and become a fire hazard.
◎ This product is not waterproof. If the product is dropped in water, contact the service
center immediately.
LED Light
SECULINE Co., Ltd
LED Light
English
SECULINE Co., Ltd
Table of Contents
Safety Precautions ............................................................... 3
Table of Contents ................................................................ 4
Configuration ....................................................................... 5
Parts .................................................................................... 6
Mounting / Detaching the Lamp .......................................... 7
Installing the Battery ............................................................ 7
Powering On/Off .................................................................. 8
Adjusting Brightness ........................................................... 8
Adjusting Fan Speed ........................................................... 9
Mounting the Grid ................................................................ 9
Connecting External Power ................................................ 10
Warning Displays ............................................................... 10
Product Specifications ....................................................... 11
4 5
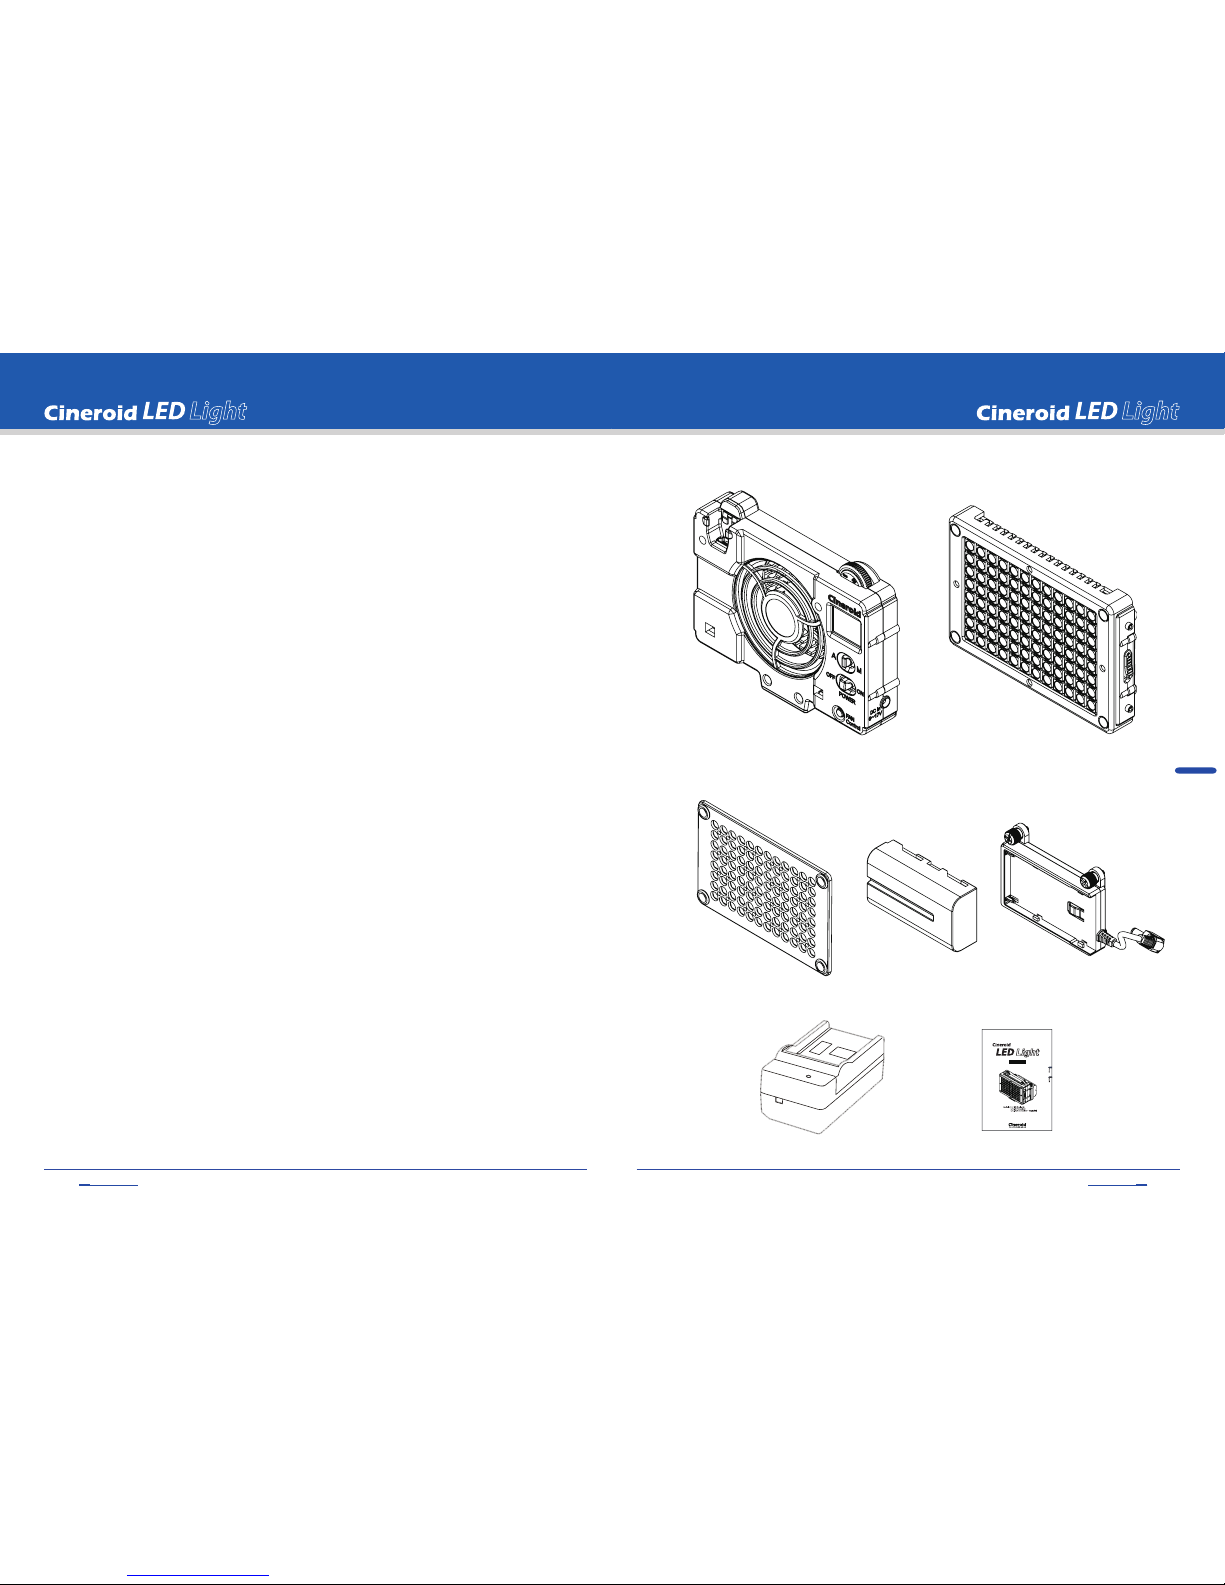
Configuration
A. Body B. LED Lamp
C. Honey comb D. Battery E. Battery mount
G. Char
g
er H.Manual

LED Light
SECULINE Co., Ltd
LED Light
English
SECULINE Co., Ltd
Mounting/Detaching the Lamp
1. The LED lamp is mounted onto the body. Be sure to power off the light before mounting
the lamp.
2. The lamp has a top and bottom. Make sure the arrow on the front the lamp is pointing
up when mounting. Press the lamp firmly onto the body until you hear a clicking sound
and it locks into place.
3. Attempting to mount the lamp incorrectly or in the opposite direction may result in
a partially lit lamp or damage to the unit itself.
4. To detach the lamp from the body, simply lower the levers on both sides of the lamp
together.
5. If the lamp is not mounted properly, a warning light will appear on the front top right
corner of the LED light.
Installing the Battery
1. Attach the battery mount to the back of the body with the use of the two screws on
the mount.
2. Connect the cable on the battery mount to the body.
3. Attach the battery to the battery mount.
4. Be sure to fully charge the battery before installing.
5. The warning light will come on when the battery is running out of power.
21
6 7
Parts
Battery Mount
LED Lamp
LED Body
Eject lever
Remote controller Socket
Dimmer
Fan speed control
Power ON/OFF
FAN Mode
LCD Display
Warning lamp
Fan
1/4”Screw mount
DC in
Magnet
LED
Battery
Screw
Power cable
Join
LED Light
SECULINE Co., Ltd
LED Light
English
SECULINE Co., Ltd
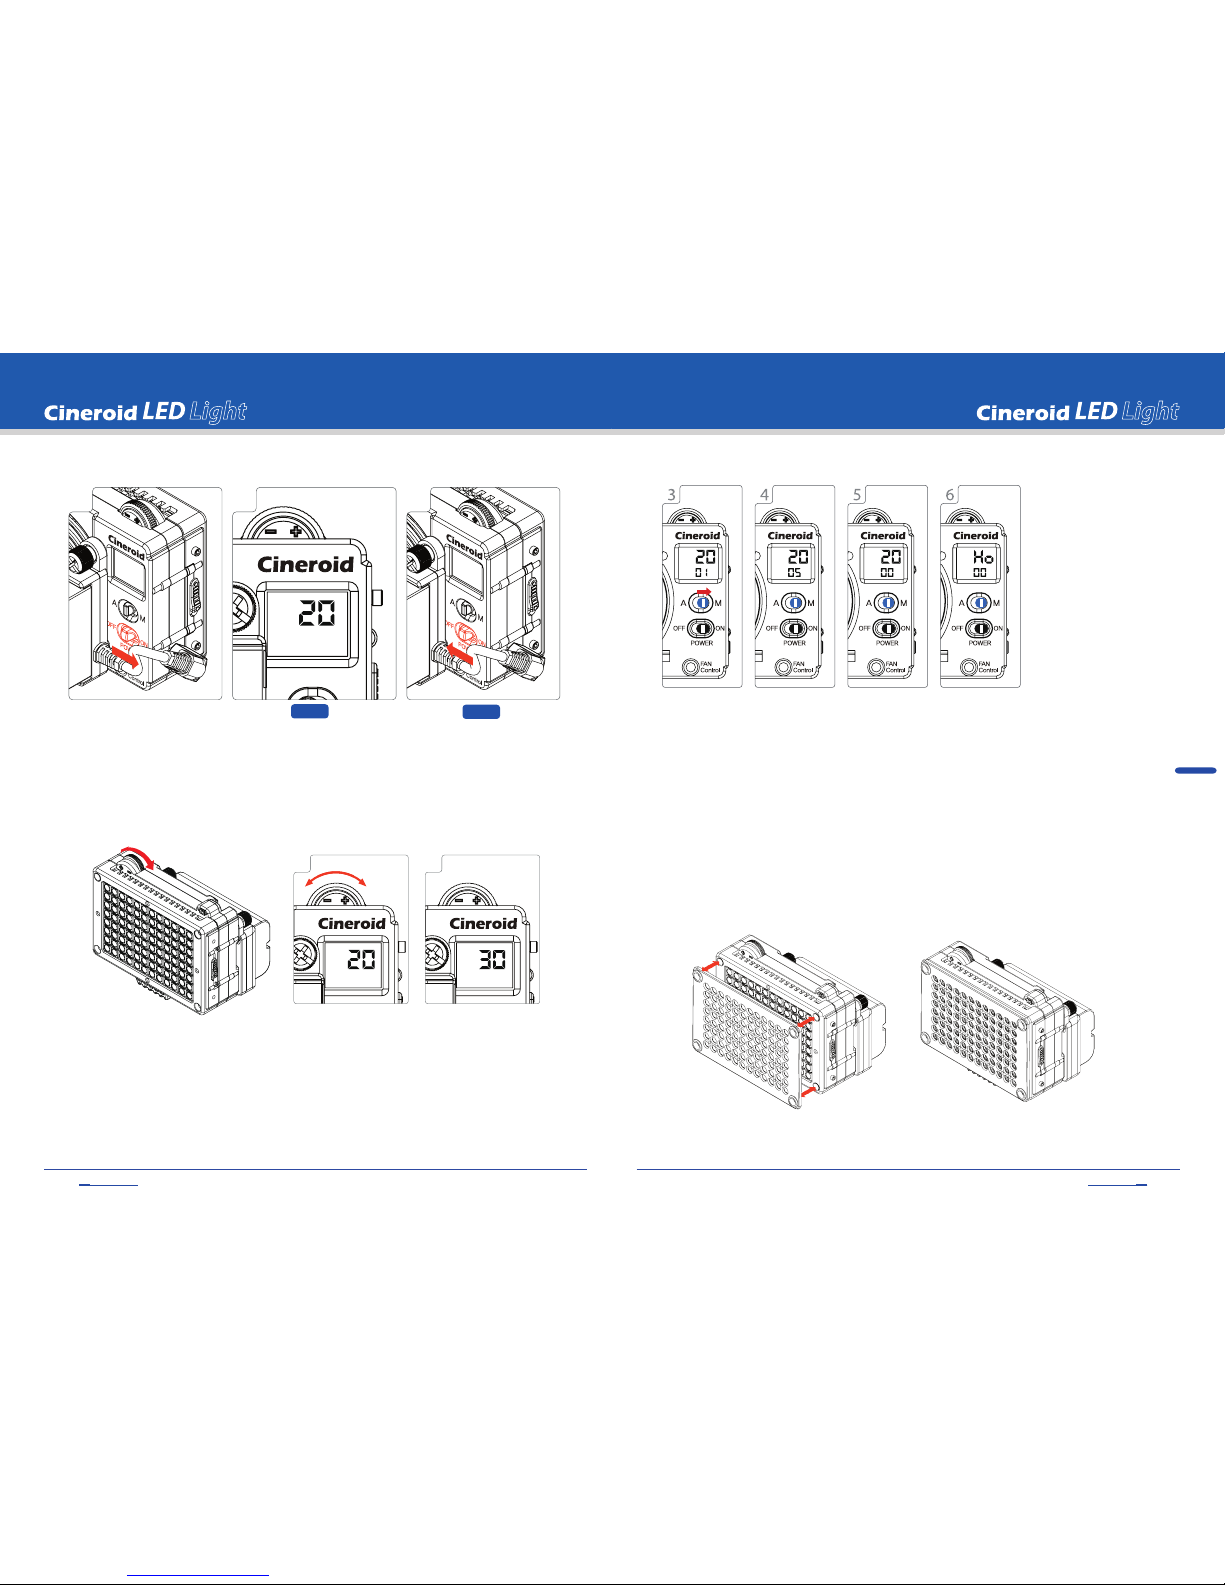
Adjusting Brightness
1. Turn the brightness dial side to side to adjust the brightness.
2. The brightness range is from 0~30 and the current level is displayed on the LCD.
3. Turning the dial to the right increases brightness.
4. Turning the dial to the left decreases brightness.
5. Adjusting the brightness to zero DOES NOT power off the LED light.
Adjusting Fan Speed
1. The Cineroid LED light has a built-in fan to control the heat level.
2. Adjust the speed of the fan to reduce noise in shooting situations.
3. Turn the fan switch from “A”(Auto) to “M”(Manual) and the current fan speed will
be displayed on the LCD.
3. Press the fan control button to adjust the speed of the fan. The speed ranges from
1~5 with 1 being the slowest speed.
4. The fan will not turn on if the speed is set to zero.
5. Setting the fan speed to zero to turn off the fan will result in increasing the heat level of
the LED light. This will cause the light to automatically turn fan on.
The too high heat level will cause to shut off and a warning “HO” will appear on
the LCD display.
Mounting the Grid
1. Mounting the grid will prevent the light from spreading to the sides.
2. Line up the magnets on the grid to the lamp to mount the grid.
Powering On/Off
1. Move the power switch to“ON”to turn on the LED light.
2. Check to see of if the information on the LCD is displayed properly.
3. Move the power switch to “OFF” to turn off the LED light.
OFF
ON
13
2
2 3
8 9

LED Light
SECULINE Co., Ltd
LED Light
English
SECULINE Co., Ltd
Connecting External Power
1. In addition to the rechargeable battery, external power sources can also be used to
power the light.
2. 12V, 2A power is recommended for external power.
3. Remove the battery mount plug from the body.
4. Insert the power plug from the external power source.
Warning Displays
1. The LCD will show a few warning displays.
2. Ho: Internal temperature is too hot.
3. Low battery
DC in
6~17V
10 11
HG-1
PA01
FCB044
FCB043
Model Form Remarks
Power Adapter
Hand Grip
○Optional Products
○Product Specifications
Light angle
Power
Weight
Size
135 degree
DC 6~17V
189g
75 × 93 × 43(mm)
DC plug only for PA01
DC plug with D-tap for PA01

Cineroid
LED
We will strive to create the best products
and provide superb service.
Customer Support Center
Seculine Co., LTD.
Tel +82.2.850.3021 / Fax +82.2.850.3027
Rm.510, Kolon Science Valley #2, Guro-dong, 811, Guro-gu, Seoul, 152-878, Korea
Homepage www.cineroid.com
E-mail [email protected]
Printed in Korea
This manual suits for next models
2
Table of contents
Other Cineroid Camera Accessories manuals


