Circassia NIOX MINO User manual
US ENGLISH
510(k)
K101034
NIOX MINO®
User Manual

Remember
•Itisimportanttoadheretothespeciedoperatingconditions:
Ambienttemperature:60to85°F(+16to30°C)
Humidity:20to60%RH(non-condensing)
•Mobilephonesandcordlessphonesmightinterferewiththeinstrument
andshouldthereforebekeptawayfromtheinstrument.Interference
couldmakeitimpossibletoperformameasurement.
•Whenwithinthespeciedoperatingconditionsitisrecommendedto
keep NIOX MINO®withinstalledSensorconnectedtoapoweroutlet
wheneverpossible.
•ItisrecommendedtoallowaSensortobeconnectedfortwohours
beforetherstmeasurementisdone.
•ItisrecommendednottouseNIOXMINOintheproximityofareas
wherevolatilesubstancessuchasorganicuidsordisinfectantsare
beingused.Specialattentionshouldbepaidtoaerosolsanddisinfection
baths(eitheropenvesselsorultrasonicbaths).
•AlwaysuseaNIOXMINOBag(closed)fortransportationandstorage
ofNIOXMINOwhenitisdisconnectedfromthepoweroutlet.(The
NIOXMINOBagissoldseparately.)
•Shelf-life-NIOXMINOinstrument:Minimum3yearsattimeofdelivery,
or3,000measurements.
NIOXMINOSensor:Maximum12monthswhenmountedinNIOXMINO
orexpirationdateasstatedonthesensor,whichevercomesrst.
Note!
Thismanualisintendedformedicalcarepersonnelandforuse
whenteachingpatientshowtousetheNIOXMINOinstrument.
Toaidthis,ademonstrationmodeisavailableintheinstrument.
Pleaserefertothe"Demonstrationmode"section,page7.

1
Warnings! ........................................................... 2
Intended use ...................................................... 2
Training requirements ....................................... 2
Presentation ....................................................... 3
Installation and set-up ...................................... 4
Measurement ..................................................... 5
EnterpatientID(optional)...................................5
PerformFeNOmeasurement..............................6
View stored results ............................................ 7
Ambient NO measurement ............................... 7
Demonstration mode ......................................... 7
Change settings ................................................. 8
Timeanddate.....................................................8
Soundvolume.....................................................8
Toplightintensity................................................ 8
Modeconguration-QCon/off...........................8
Information menu .............................................. 9
External Quality Control procedure (QC) ...... 10
SelectionandqualicationofQCtesters..........10
QCmeasurement............................................. 11
ViewstoredQCresults..................................... 12
ViewQCinformation.........................................12
ResetQCtester................................................ 12
Turn off NIOX MINO®....................................... 13
MovingNIOXMINO.......................................... 13
General Care .................................................... 13
Preventiveinspections...................................... 13
ChangeSensor.................................................13
ChangeNOscrubber........................................14
Disposalofused/expiredproducts....................14
Returnshipments.............................................14
Support.............................................................14
Limitedwarranty...............................................14
Troubleshooting ............................................... 15
Alert codes........................................................ 16
Technical data .................................................. 17
Displaybuttonsandsymbols............................ 17
Symbolsexplanation.........................................19
Backplate.......................................................... 19
Baselabel........................................................ 19
Dimensionsandweight.....................................19
Electrical data................................................... 19
Noiselevel(standby)....................................... 19
Shelf-life............................................................19
Operatingconditions.........................................19
ExhaledNO-performancedata....................... 20
Linearity............................................................ 20
Precision........................................................... 20
Accuracy........................................................... 20
Method comparison.......................................... 20
Inhalation parameters....................................... 20
Exhalation parameters......................................20
Memory capacity..............................................20
Transportandstorage....................................... 20
Patientlter(mouthpiece)................................. 20
Responsiblemanufacturer................................ 21
NIOX MINO®parts and accessories ............... 21
Connect NIOX MINO®to a PC
using USB ........................................................ 21
NIOX®Panel ...................................................... 21
Cautions ........................................................... 22
NIOX MINO surveillance procedures ............. 24
Clinical documentation ................................... 24
Medical Device Reporting (MDR) ................... 25
Guidance and manufacturer's declaration .... 25
Electromagneticemissions............................... 25
Table of contents
UsermanualEPM-000109,version12,April2017,
for instruments with software version from 2005
to 20XX and 22XX to 23XX.Xcanbeanynumber
between0and9.Theversionnumberforyour
instrumentcanbeseenintheInformationmenu,
seepage9.
Informationinthisdocumentissubjecttochange.
AmendmentswillbemadeavailablebyCircassia,
Inc.astheyoccur.
•NIOXMINOis510(k)cleared,K101034,byFDA.
•NIOXMINOisCE-markedaccordingtoInVitro
DiagnosticDeviceDirective98/79/ECand
approvedforclinicaluseinEECcountries.
•NIOXMINOisRoHScompliant.
•Copyright©2017CircassiaAB,Uppsala,Sweden.
•NIOXMINOandNIOXareregisteredtrademarks
ofCircassiaAB.
•CircassiaisaregisteredtrademarkofCircassia
Limited.

2
Warnings!
•TheNIOXMINO®instrumentmustalwaysbe
usedandhandledasstatedinthismanual.
Circassiaacceptsnoresponsibilityfordamaged
equipmentorfaultyresults,iftheequipmentis
notusedaccordingtothismanual.
•DonotuseadamagedNIOXMINOinstrument
ordamagedcomponents.
•Useonlythepowersupplyunitprovided.
•Keeptheinstrumentoutofwater.Ensurethatno
liquidisspilledordrippedontheinstrument.
•Donotheatordisposeoftheinstrumentor
Sensorinre.Pleaserefertothe"Handlingof
used/expiredproducts"section.
•Takecarenottodroptheinstrumentorsubjectit
tostrongimpact.
• It is recommended not to use NIOX MINO in the
proximityofareaswherevolatilesubstances
suchasorganicuidsordisinfectantsare
beingused.Specialattentionshouldbepaid
toaerosolsanddisinfectionbaths(eitheropen
vesselsorultrasonicbaths).
•NIOXMINOshouldnotbeusedadjacenttoor
stackedwithotherequipment.
•TheNIOXMINOSensorcontainschemicalsthat
couldbeharmfulifswallowed.
•Touchonlythegreycapwhenexchangingthe
Sensor.
•Donotcleanthesensor.Cleaningofthe
Sensorwithethanolorsimilardisinfectantmight
destabilizeitforanon-predictabletimeperiod.
•KeeptheSensoroutofwater!Ensurethatno
liquidisspilledordrippedontheSensor.
•TheNOscrubbercontainspotassium
permanganateandshouldbedisposedofas
hazardouswasteinaccordancewiththelocal
wastedisposalregulations.
• Whenselectinganaccessoryforyour
NIOX MINO please keep in mind that an
accessorynotrecommendedbyCircassia
mayresultinlossofperformance,damageto
yourNIOXMINO,re,electricshock,injury
ordamagetootherproperty.Theproduct
warrantydoesnotcoverproductfailureor
damageresultingfromusewithnon-approved
accessories.Circassiatakesnoresponsibilityfor
healthandsafetyproblemsorotherproblems
causedbytheuseofaccessoriesnotapproved
byCircassia.
•NomodicationoftheNIOXMINOinstrumentor
theSensorisallowed.
Also see Cautions page 22.
Intended use
NIOX MINO measures Nitric Oxide (NO) in human
breath.NitricOxideisfrequentlyincreasedin
someinammatoryprocessessuchasasthma.
ThefractionalNOconcentrationinexpiredbreath
(FeNO),canbemeasuredbyNIOXMINOaccording
toguidelinesforNOmeasurementestablishedby
theAmericanThoracicSociety.
MeasurementofFeNO by NIOX MINO is a
quantitative,non-invasive,simpleandsafemethod
to measure the decrease in FeNO concentration in
asthmapatientsthatoftenoccursaftertreatment
withanti-inammatorypharmacologicaltherapy,as
anindicationofthetherapeuticeffectinpatientswith
elevatedFeNOlevels.NIOXMINOissuitablefor
childrenapproximately7-17years,andadults18
yearsandolder.
FeNOmeasurementsprovidethephysicianwith
meansofevaluatinganasthmapatient’sresponse
toanti-inammatorytherapy,asanadjuncttothe
established clinical and laboratory assessments
inasthma.NIOXMINOshouldonlybeusedas
directed in the NIOX MINO User Manual and the
NIOXMINOQualityControlTestUserManual,by
trainedphysicians,nurses,respiratorytherapists
andlaboratorytechnicians.NIOXMINOcannotbe
usedwithinfantsorbychildrenapproximatelyunder
theageof7,asmeasurementrequirespatient
cooperation.NIOXMINOshouldnotbeusedin
criticalcare,emergencycareorinanaesthesiology.
Training requirements
NIOX MINO should only be used as directed in this
manual,bytrainedphysicians,nurses,respiratory
therapistsandlaboratorytechnicians.“Trained”
statusisachievedonlyaftercarefulreadingofthis
manual.

3
Presentation
NIOX®Filter
Disposablepatientlterthatmustbe
exchangedbeforeeachmeasurement
session and patient
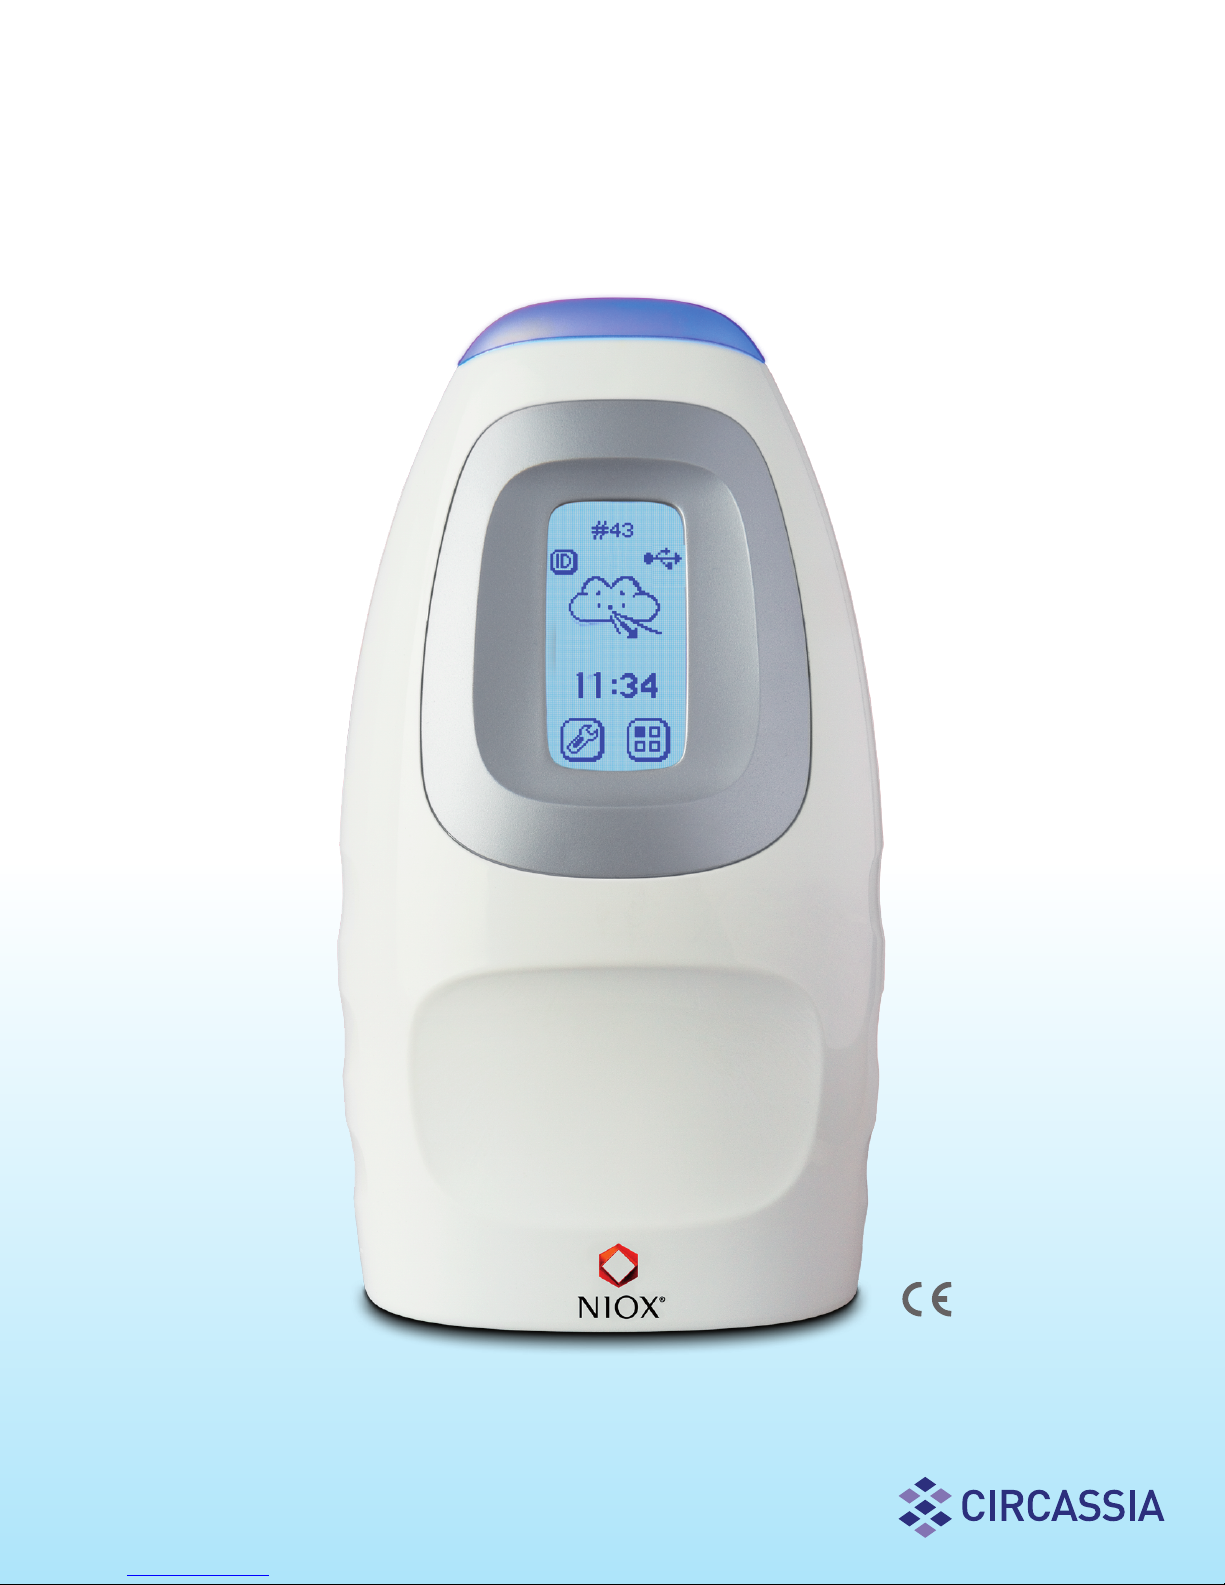
Display
NIOX MINO®instrument
Toplight
NIOX Panel PCbased
programthatallows
thepatienttofollowthe
measurementonaPC
screen,seepage21.
Powersupplyunit
NOscrubber,
(page14)
Main screen
OptionalPCconnection.
Cable(USB)
NIOXMINOSensor,
(page13)
Numberofremaining
measurementsfor
mountedSensor,or
PatientID(optional)
PerformQC
(page11)
USBcableconnected
Mode status
Mode screen
Standard
measurement mode
(page6)
QCmeasurement
mode
(page11)
Return
Ambient
measurement
(page7)
Demonstrationmode
(page7)
Viewmeasurement
results
(page7)
Settingsscreen
Controlledpower
off(page13)
NO scrubber
setup
(page14)
Notavailablefor
theUSmarket
Return
Mode
conguration
(page8)
Lightandsound
(page8)
Timeanddate
(page8)
Information
(page9)
SetID
(page5)
USB
connector
Strapholderfor
NIOX MINO Hand
Strap(optional
accessory)

4
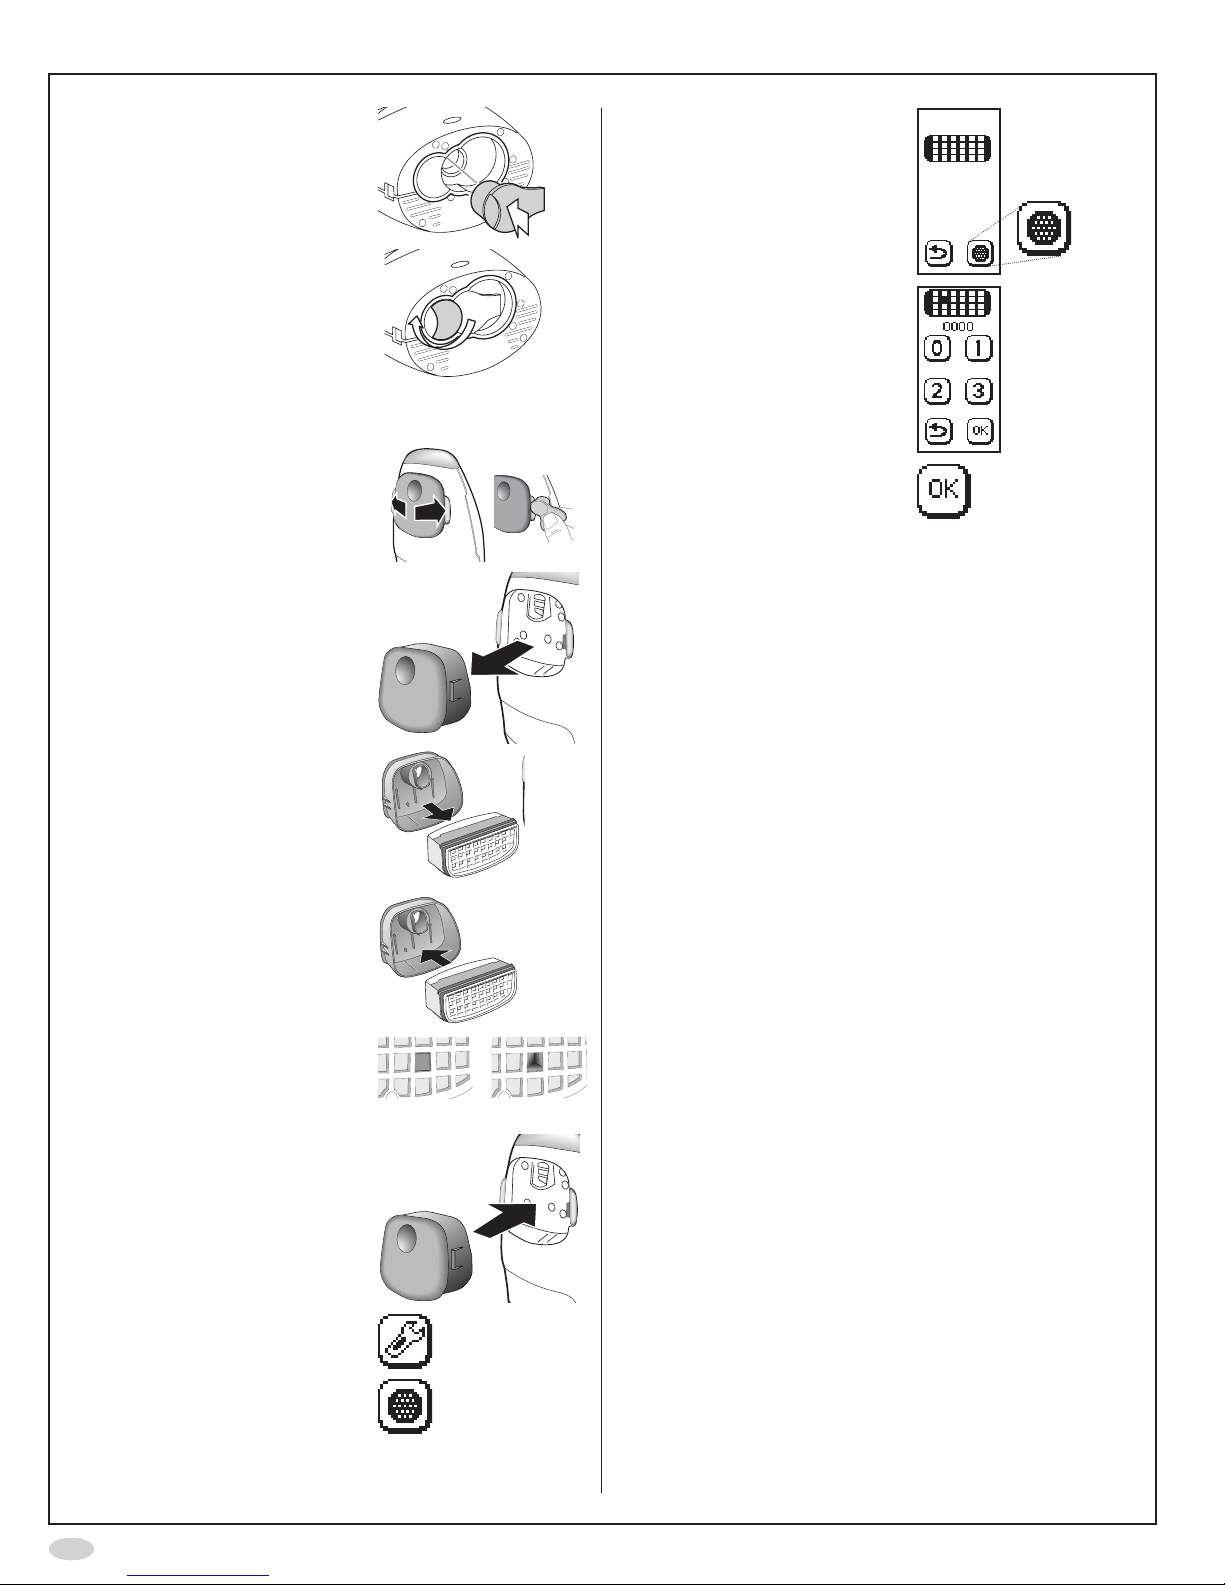
Installation and set-up
Caution!
BecarefulwhenopeningtheSensorcan.The
insideoftheopeninghassharpedges.Donot
touchorcleanthewhiteSensormembrane.
1. InserttheSensorintothe
compartment at the base
oftheinstrument
2. Turntheorangeswivel
until locked
3. Gently,spreadthelatches
apart,oneatatime,
(Optionally:Usethered
QCplugtospreadthe
latches apart)
...andcarefullypullout
thecover
4. InsertthenewNO
scrubberintothecover
Makesuretouseanew
NOscrubber,withan
unbroken hole
Unbroken Broken
5. Replacethecoverand
make sure it snaps in
place
6. Attachthepowersupply
unit to the instrument and
toapoweroutlet
7. Waitfortheinstrument
to start up and press the
Forwardbutton
8. Remindertoinsertanew
NOscrubber.Pressthe
Forwardbutton
9. SelectUSAonthedisplay
Note!
Thisscreenisonly
displayedatrststart-up
oftheinstrument.
10.SelectSettings
11.SelectClock
12.Thetimeanddatesettings
areshown
13.Usetheplusandminus
buttons to set the time and
date
14.Selecttheforwardbutton
tochangebetweenhour,
minute,month,day,and
year
15.SelectOKtoacceptthe
changes
16.SelectNOscrubber
17.AgainselectNOscrubber

5
18.Inputthepasscode0000
usingthenumberbuttons
toconrmthatanew
NO scrubber is installed
19.SelectOKtoacceptthe
changes
20.Optional:ConnectaUSB
cable,seepage21
21.SelectReturntogoback
to the Main screen
22.Allowtheinstrumentto
stabilize.
Note!
Stabilizationoftheinstrumentnormallymay
takeupto30minutesfollowingconnection
ofthepowersupplyunittothepoweroutlet.
However,itisrecommendedtoallowthe
NIOX MINO®Sensortobeconnectedfortwo
hoursbeforetherstmeasurementisdone.
Measurement
Dependingonwhatisshownonthedisplay,proceed
asfollows:
Stabilizationinprogress
Wait until ready
Instrument in sleep mode
Touchthedisplay
Readyforuse
Note:
Atwinklingasteriskonthescreen
indicatesthattheexternalQualityControl
(QC)procedureisactivated.AdailyQC
measurementismandatoryforclinicaluse.
Youshouldstartthequalicationprocessof
atleastonestaffmemberforthisprocedure,
seepage11.
Enter patient ID (optional)
Note!
IfPatientIDisused,ithastobeenteredbefore
eachmeasurement(evenifitisthesame
patient).
InputapatientspecicIDnumber,upto10digits.
1. SelecttheIDbuttononthe
main screen
2. InputthepatientspecicID
usingthenumberbuttons to
Usetheshiftbuttonsto
changebetweendigits0to
4 and 5 to 9
3. SelectOKtoacceptthe
patientID

6
Perform FeNO measurement
Make sure that the instrument is ready
formeasurement(activatebypressing
thedisplayifinsleepmode)
Important!
Alwaysattachanewpatientlterfor
eachnewpatient
Storethepatientltersintheoriginal
boxpriortouse.
Choose one of three options in order to follow the measurement
Listentothesoundsignals
andviewthetoplight.
Look at
the display
usinga
mirror.
IftheoptionalPCbased
NIOX®Panelisused,look
atthePCscreen.(see
page21)
1. Emptylungs
2. Inhaledeeply
throughthelterto
totallungcapacity
Thecloudonthedisplayis
inatedandthetoplightis
turnedoffwhileyouinhale
Thesun/cloudisrising
Inhalation time is displayed
withbuttonsifmeteris
selected
3. Exhaleslowly
throughthelter
untilthetoplight
andsoundturnsoff
Continuoussoundand
steadylight=OK
Intermittenthighfrequency
soundandickeringlight=
exhalation too hard
Intermittentlowfrequency
soundandickeringlight=
exhalationtooweak
4. Waitforresult FeNOvalue
PatientID(ifentered)
Sequencenumber
(each measurement
resultisgivena
uniqueidentication
number)
7
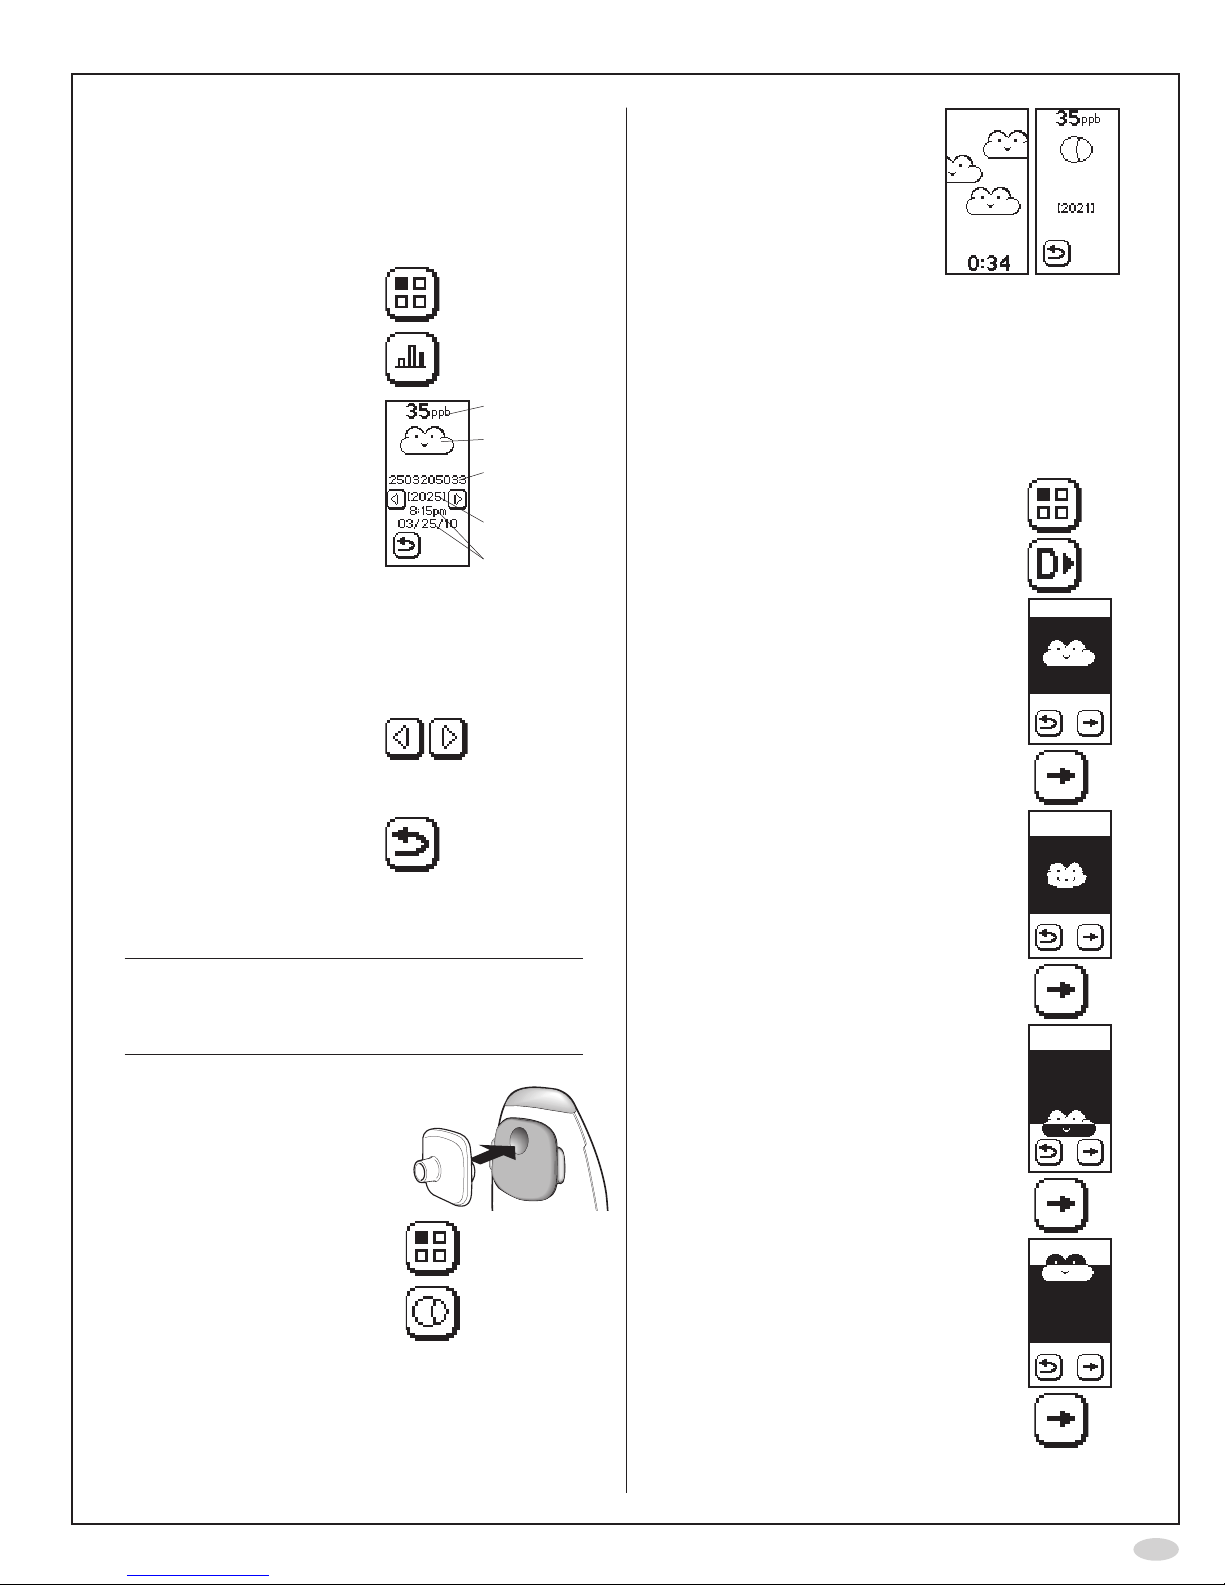
View stored results
Themeasurementresultisautomaticallydisplayed
attheendofameasurement.Allpreviousresultsare
storedintheinstrument,andcanbeviewedatany
time.
1. SelectMode
2. SelectMeasurement
results
3. Thelateststored
measurement is
displayed,showing:
A. FeNOvalue
B. Measurementmode
C. PatientID(ifentered)
D. Sequencenumber
(each measurement
resultisgivena
sequencenumber)
E. Timeanddateof
measurement
A
B
C
D
E
4. Usethepreviousand
next buttons to step
throughthestored
measurements
5. SelectReturntogoback
to the Mode screen
Ambient NO measurement
Note!
A completed ambient NO measurement is
countedasonemeasurementfortheSensor
and NIOX MINO®.
1. Attachanewpatientlter
2. SelectMode
3. SelectAmbient
measurement
4. Waitforresult
(approximately 4 minutes)
Demonstration mode
Usethismodeforanewpatientinorder
todemonstratethedifferentstepsduringa
measurementandthecorrespondingillustrations
onthedisplayaswellaslightandaudiofeed-back.
(Soundvolumehastobeactivated.)
1. SelectMode
2. SelectDemo
3. Theinhalationscreenisshownand
thetoplightisturnedoff
4. UsetheForwardbuttontoadvance
to the next screen
5. Thenormalexhalationscreenis
shown
Correctexhalationpressure:The
cloudinasteadycenteredposition,
thetoplightislit,andtheaudio
emits a constant sound
6. UsetheForwardbuttontoadvance
to the next screen
7. Theexhalationtooweakpressure
screenisshown
8. UsetheForwardbuttontoadvance
to the next screen
9. Theexhalationtoostrongpressure
screenisshown
10.UsetheForwardbuttontoadvance
to the next screen

8
11.Thewaitforresultscreenisshown
(staticview)
12.SelectReturntogobacktothe
Mode screen
Change settings
Time and date
1. SelectSettings
2. SelectClock
3. Thetimeanddatesettingsare
shown
4. Selectthetimeformaticonsto
changebetweenUSandISOtime
and date
5. Usetheminusandplusbuttonsto
set the time and date
6. Selecttheforwardbuttontochange
betweenhour,minute,month,day,
and year
7. SelectOKtoacceptthechanges
Sound volume
1. SelectSettings
2. SelectSoundandLight
3. Thesoundvolumesettingisshown
4. Usetheminusandplusbuttonsto
setthesoundvolume
5. SelectOKtoacceptthechanges
Top light intensity
1. SelectSettings
2. SelectSoundandLight
3. Selecttoplight
4. Thetoplightsettingisshown
5. Usetheminusandplusbuttonsto
setthelightintensity
6. SelectOKtoacceptthechanges
Mode conguration - QC on/off
Note!
Forclinicaluse,theQCmustalwaysbeon!
1. SelectSettings
2. SelectModeConguration
3. SelectQCsettings
4. TheQCsettingsareshown
5. Usethebuttonstodeactivateor
activateQCmeasurement
6. SelectOKtoacceptthechanges

9
Information menu
1. SelectSettings
2. SelectInformationmenu
3. Theinformationscreenshows:
A. Numberofremainingsensor
measurements
B. Sensorexpirationdate
C. SensorserialNo.
D. Numberofremaining
instrument measurements
E. Instrumentexpirationdate
F. InstrumentserialNo.
G. Instrumentsoftwareversion
A
B
C
D
E
F
G
4. SelectReturntogobacktothe
Settingsscreen
...alternativelyselectAtoview
the alert codes
5. Thealertcodeinformationscreen
isshown,showingthe16latest
alerts
Note!
Thealertcodesinthelistare
onlytobeusedincontactwith
CircassiaPharmaceuticalsInc.
TechnicalSupport
•Dateofthealert
•Alertcode(fortechnicalsupport
purpose only)
6. SelectReturntogobacktothe
Informationscreen

10
TheexternalQualityControlisoneoftheprocedures
thatensuresthesystemisoperatingwithinits
specications.Forfurtherinformationregarding
NIOX MINO®surveillanceprocedures,seepage27.
Note!
TheQualityControlfunctioninNIOXMINO
mustalwaysbeactivatedasadailyQC
measurement is mandatorywhenthe
instrumentisclinicallyused.
TheexternalQualityControlconsistsoftwoparts.
Onepositivecontrolfromaqualiedstaffmember
withastableFeNOvalueprovidinganormal
biologicalFeNOsampleandanegativecontrol
consistingofaNOfreegassample,generated
fromambientair.NIOX MINO will allow for one daily
QC measurement that will not affect the number of
remaining tests on the NIOX MINO Sensor. (During
the rst 20 days of instrument start-up, a maximum
of four QC testers can be qualied without impact to
the number of remaining tests on the Sensor.)
Selection and qualication of QC testers
Aminimumofoneindividual(twoindividualsare
recommended)needstoqualifyforthisprocedure.
Identifyathirdindividualasaback-up,ifpossible.
Identifythestaffmemberswhowillperformthe
QualityControlandmeetthefollowingcriteria:
•Over18yearsofage.
•Noongoingcoldorknownairwaydisease.
•Non-smoker.
• Expected stable FeNOvaluesbetween5and40
ppb.
•Preferablynoallergies(exceptseasonal,see
below)orasthma.
AQCtesterwillbequaliedoverthecourseofthree
days.
Note!
IfthemostrecentQCmeasurementis
olderthan30days,thenthequalicationis
suspendedandtheQCtesterneedstore-
qualifyaccordingtothequalicationprocedure.
PerformthreeQCmeasurements,oneperdaywithin
sevendays,accordingtotheQCmeasurement
section.Ameanvalueiscalculatedfromthethree
measurementsthatmustbebetween5-40ppb.The
followingQCmeasurementonthefourthdaymust
bewithin±10ppbfromthemeanvalueandtheNO
scrubberresult<5ppb.ThentheQualityControlhas
passedandtheinstrumentisreadyforclinicaluse.
Thenextmovingmeanvalueiscalculatedwhenthe
QCtesterperformsaQCmeasurementfollowing7
days.
Result screens for the QC tester qualication
Day 1 Day 2 Day 3
After day 3
Positivecontrolresult:
FeNOvalueandlimits
(meanvalue+/-10ppb)
External Quality Control procedure (QC)

11
QC measurement
Theinstrumentwillpromptfora
daily QCprocedurebyshowinga
twinklingasteriskonthedisplay.
Alwaysconsiderthefollowinginordertoobtain
reliableresults.
Beforeanymeasurement:
•Avoidnitraterichfoodwithin3hrsbeforethe
measurement.
•Avoidstrenuousexerciseatleast1hourbeforethe
measurement.
Preferablydonotperformameasurementincaseof:
•Ongoingcold.
•Acuteseasonalallergy.
1. SelectMode
2. SelectQCmode
3. SelectQCtesternumber
(eachQCtestermust
selectanindividual
number)
4. PerformanormalFeNO
measurementaccordingto
page6.
5. Removethepatientlter
6. ImmediatelyattachtheQC
plug
7. SelecttheForwardiconon
the display
8. Waitfortheanalysistobe
completed and the test
result to be displayed
(approximately 5 minutes)
9. TheQCmeasurement
result is displayed
Note!
Duringthequalication
daysofanewQCtester
the result is displayed as
presentedDay1-3.
Day 1 Day 2 Day 3
A. Positivecontrolresult:
FeNOvalueandlimits
(meanvalue+/-10ppb)
B. QCtesternumber
C. Negativecontrolresult
(should be < 5 ppb)
After day 3
A
B
C
10.RemovetheQCplug
RepeattheQCtestifthepositiveand/orthe
negativecontrolfail.IftheQCfailurepersists,
discontinueuseofNIOXMINO®and contact
CircassiaTechnicalSupport.

12
Note!
IfthedailyQualityControlis
notsuccessfullyperformed,
oriftheresultsfromthe
QCareoutsidelimits,an
asteriskwillbedisplayed
besideeverymeasurement
value
Note!
TheprompttoQCthe
devicewillremainifthe
QCmeasurementwas
performedbyanon-
qualiedQCcandidate.It
isnotanindicationofan
unsuccessful(failed)QC
measurement.
View stored QC results
AllpreviousQCresultsarestoredintheinstrument
andcanbeviewedatanytimebyusingthefollowing
procedure:
1. SelectMode
2. SelectQC
3. SelectQCmeasurement
results
4. Thelateststored
measurement is displayed
A. Positivecontrolresult:
FeNOvalueandlimits
(meanvalue+/-10ppb)
B QCtesternumber
C. Negativecontrolresult
(should be < 5 ppb)
D. QCsequencenumber
E. Timeanddateof
measurement
A
B
C
D
E
Thequalicationresults
can also be displayed
A. QCtesterqualifying
result
B QCtesternumber
C. QCsequencenumber
A
B
C
5. Usethepreviousandnext
buttonstostepthroughthe
results
6. SelectReturntogobackto
the Mode screen
View QC information
QCtesterinformationisstoredintheinstrument.
1. SelectMode
2. SelectQC
3. SelectQCinfo
4. TheQCinformationis
displayed:
A. MeanQCFeNOvalue
andlatestmovingmean
dateforQCtesters1
and2
B. Ongoingqualication,
positioninQC
measurementsequence
forQCtester3,and
latestqualication
measurement date
C. TheQCtester4isnot
qualied
A
B
C
Reset QC tester
Thisprocedurewilldeletethedatafortheselected
individual
1. SelectSettings
2. SelectModeConguration
3. SelectQCsettings
4. SelectResetQCtester
5. SelecttheQCtestertobe
reset
6. Selectthecrossed-out
numbertoconrmresetof
desireduserID

13
Turn off NIOX MINO®
Note!
Whenwithinthespeciedoperatingconditions
(seepage16)itisrecommendedtokeep
NIOXMINOwithinstalledSensorconnectedto
apoweroutletwheneverpossible.
1. Pulloutthepowersupplyunitconnectorfrom
NIOX MINO
Moving NIOX MINO
Theinstrumentcanbemovedtoanotherpower
outletwithoptimizedinitiatingstartup.
Note!
Theinstrumentmustbeconnectedtothenew
poweroutletwithinafewminutes.
1. SelectSettings
2. SelectControlledpoweroff
3. SelectOKtoconrm
4. Movetheinstrumentand
connectittoapoweroutlet
5. Waituntiltheinstrumentis
ready to use
General Care
•UseanewNIOX®Filter(patientlter)foreachnew
patient.
•Onlycleantheinstrumentwithaclothdampened
with70%ethanol,isopropanolorsimilar
disinfectant.Becarefulwhenusingdisinfectants
asexcessalcohol(ethanol)mightpermanently
destroytheSensor.Donotusespraydetergents.
Note!
Neverattempttoopenorservicethe
NIOXMINOinstrumentorSensor.
Preventive inspections
Beforeeachmeasurement,visuallyinspect:
•thatNIOXMINOisnotdamaged
•thattheSensorisinplace
•thataNIOXFilterisattached
•thatthepowersupplycordisundamagedand
correctly connected to the instrument and to the
poweroutlet.
IfanyitemismissingordamagedcontactCircassia
PharmaceuticalsInc.
Change Sensor
Caution!
BecarefulwhenopeningtheSensorcan.The
insideoftheopeninghassharpedges.
DonottouchorcleanthewhiteSensor
membrane.
1. Pressandholdtheblue
button...
...whileturningtheorange
swivel
2. RemovetheSensor
14
3. InsertthenewSensor
4. Turnbacktheorange
swiveluntillocked
Change NO scrubber
1. Spreadthelatchesapart,
oneatatime,
(Optionally:Usethered
QCplugtospreadthe
latches apart)
...andcarefullypulloutthe
cover
2. Removetheused
NOscrubberfromthe
cover
3. InsertthenewNO
scrubberintothecover
Makesuretouseanew
NOscrubber,withan
unbroken hole
Unbroken Broken
4. Replacethecoverand
make sure it snaps in
place
5. SelectSettings
6. SelectNOscrubber
7. AgainselectNOscrubber
8. Inputthepasscode0000
usingthenumberbuttons
toconrmthatanew
NO scrubber is installed
9. SelectOK
Disposal of used/expired products
• Used or expired NIOX MINO®Sensorsshouldbe
recycledaccordingtothelocalrecyclingprogram
forelectronicequipment.Notethatthereisa
LiMnO2batteryinsidetheSensorunit*.
•AnexpiredNIOXMINOshouldberecycled,
accordingtothelocalprogramforelectronic
equipment.NotethatthereisaLiMnO2backup
batteryinsidetheinstrument*.
•TheNOscrubbercontainspotassium
permanganateandshouldbedisposedofas
hazardouswasteinaccordancewiththelocal
wastedisposalregulations.
•NIOXMINOisRoHScompliant.
*Thebatteriesarenotuser-replaceableparts.
Return shipments
ContactCircassiaTechnicalSupportbeforereturning
anyinstrumentoraccessory.Seecontactinformation
attheendofthisUserManual.
Support
PleasecontactCircassiaTechnicalSupportifyou
encounterproblems,whichyoucannotsolvewith
theactionsstatedinthismanual.
Forcontactdetails,seeback-pageofthismanual,
andprovidethefollowinginformation:
•Yourname,addressandtelephonenumber.
•SerialNo.(bothinstrumentandSensor).
•Alertdescription(asthoroughaspossible).
•Alertcodesorlists.

15
CircassiaPharmaceuticalsInc.providesaLimited
Warrantyforthisinstrumentandoriginalaccessories
deliveredwiththisinstrument.Conditionsaredened
atthetimeofpurchase.
DoNOTtrytorepairtheinstrument.ItisNOT
permittedtoopentheinstrument.Anyattemptto
opentheinstrumentwillvoidthewarrantyand
performancetospecicationscannotbeguaranteed.
Troubleshooting
Warning Action
Asteriskshown.
Theinstrumenthasnotbeen
veriedbyadailyQC.Performa
QCmeasurement.
DailyQCmeasurementoutside
limits.RestartthedailyQC
measurementwithanotherQC
tester.
Theinhalationwastooweakto
initiate a measurement or an
exhalation into the instrument
wasperformedpriortoan
inhalation.Stoptheprocedure
immediatelywhenthiswarning
appears.Waituntilthemain
menu screen is displayed and
repeattheinhalationwitha
strongerinhalationforce.
NOscrubberreminder.
Thesymbolisshownatrst
start-upoftheinstrumentasa
reminder to insert and set the
softwareforanewNOscrubber.
SeeInstallation and set-up
sectionpage4.
NOscrubberalmostexpired.
OrderanewNOscrubber.
Thesymbolisshownwhen10%
ofthemeasurementsremain
or2weeksbeforeexpiration
date and continue until the NO
scrubberhasexpired.ANO
scrubbercanbeusedfor1000
measurementsor1year.Refer
totheChangeNOscrubber
sectiononpage14.
Limited warranty

16
Warning Action
NoSensorconnected.Inserta
Sensor.
Sensoralmostexpired.Ordera
newSensor.
Thesymbolisshownwhen10%
ofthemeasurementsremain
or2weeksbeforeexpiration
dateandwillbeshownuntilthe
Sensorhasexpired.Refertothe
ChangeSensorsectionpage
13.
Instrumentalmostexpired.
Orderanewinstrument.
Thesymbolisshown4months
beforetheinstrumentexpiresor
when10%ofthemeasurements
remain.Theinstrumentwillnot
workaftertheindicateddate,
oraftertheindicatednumberof
measurements.Itisstillpossible
toviewmeasurementsstored
in the instrument memory and
downloaddatatoaPC.
Make sure that the ambient
temperatureisbetween60and
85°F(+16and+30°C).
WaitfortheSensortostabilize.
Removeanysourcesof
disturbance (such as cordless
ormobiletelephones,orgas
emittingappliances).Waitforthe
Sensortostabilize.
WaitfortheSensortostabilize.
<4minutes(countdown
started).
Alert codes
Alertmessagesandotherinformationareshown
ascodesatthetopoftheinstrumentdisplay.The
tablebelowprovidestherecommendedactionsto
betakenforanalertcode.Ifalertpersists,contact
CircassiaTechnicalSupport.
Code Action
User alerts
A10 Exhalationtoostrong.SelectReturnand
repeatthemeasurementwithlessforce.
A11 Exhalationtooweak.SelectReturnand
repeatthemeasurementwithgreater
exhalationforceandexhaleuntilsignalfor
completedexhalationisheard.
A12 Noexhalationdetected.SelectReturnand
repeat the measurement and exhale into
theinstrumentdirectlyafterinhalation.
A13 SelectReturnandrepeatthe
measurement.Donotbreathethroughthe
patientlterduringanalysis.
A14 WrongpasscodeforNOscrubber
exchange.
Instruments alerts
A20 Checkthatambienttemperatureis
withinspecication.Ifnecessary,shut
theinstrumentdown,moveittoanother
locationandrestarttheinstrument.
A21 Removeanysourcesofdisturbance(such
ascordless/mobiletelephones,orgas
emittingappliances).Whentheinstrument
isreadytrytorepeatthemeasurement.If
thealertpersists,unplugandreconnectthe
powersupplyunittorestarttheinstrument.
A22 Unplugandconnectthepowersupplyunit
torestarttheinstrument.
A23 Removeanysourcesofdisturbance(such
ascordless/mobiletelephones,orgas
emittingappliances).Whentheinstrument
isreadytrytorepeatthemeasurement.If
thealertpersists,unplugthepowersupply
unit,removeandreinserttheSensor,
reconnectthepowersupplyunitandrestart
theinstrument.
A24 Checkthatthesupplyvoltageiswithin
specication.Ifnecessaryreplacethe
powersupplyunit.
Connection alert
A31 ChecktheUSBconnectiontothePC
17
Code Action
QC alerts
A50 Themeanvalueofthethreequalication
resultsdoesnotfallbetween5-40ppb.
RestarttheQCtesterqualicationfrom
qualicationday1.
A51 Therehasbeenanattempttoperform
severalQCmeasurementsatthesameday
withthesametestperson.Waitoneday
andperformthenextQCmeasurement.
A52 Movingmeanvalueoutofrange.
RestarttheQCtesterqualicationfrom
qualicationday1.
A53 NOscrubberresultover5ppb.Check
thattheQCPlugwasattachedwhen
instructed.RestarttheQCmeasurement.
IfcontinuouslyshownreplacetheNO
scrubber.
A54 DailyQCresultlowerthan5ppb.Restart
themeasurementwithatestpersonwho
has a FeNOvaluehigherthan5ppb.
A55 DailyQCresulthigherthan40ppb.Restart
themeasurementwithatestpersonwho
has a FeNOvaluelowerthan40ppb.
A56 FailuretopresstheQCplugforwardbutton
intime(within1:30min).RepeattheQC
measurement and make sure to press
theforwardbuttonaftertheQCplugis
inserted.
Instrument and Sensor expiration alerts
A90 Instrument expiration date has passed
orallinstrumentmeasurementshave
beenused.Itisstillpossibletoview
measurements stored in the instrument
memoryanddownloaddatatoaPC.
ContactCircassiaTechnicalSupport.
A91 Sensorexpirationdatehaspassedorall
measurementsontheSensorhavebeen
used.ReplacetheSensor.
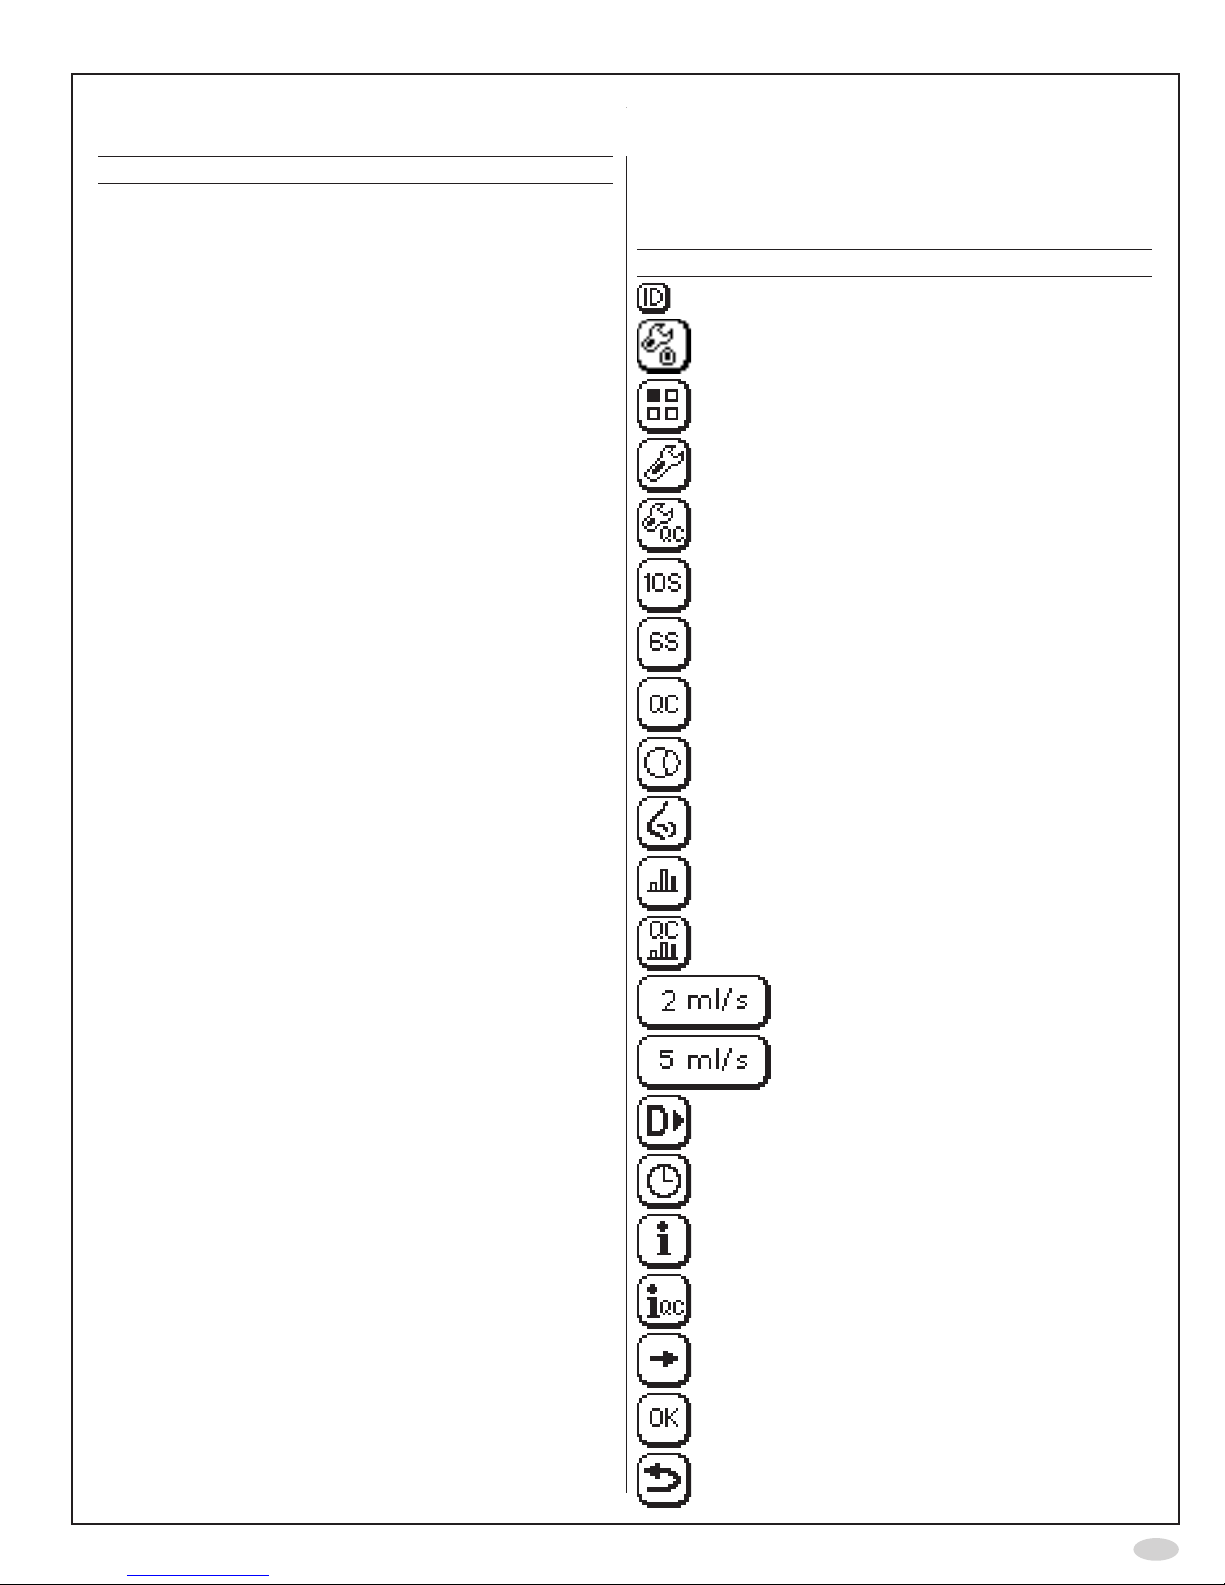
Technical data
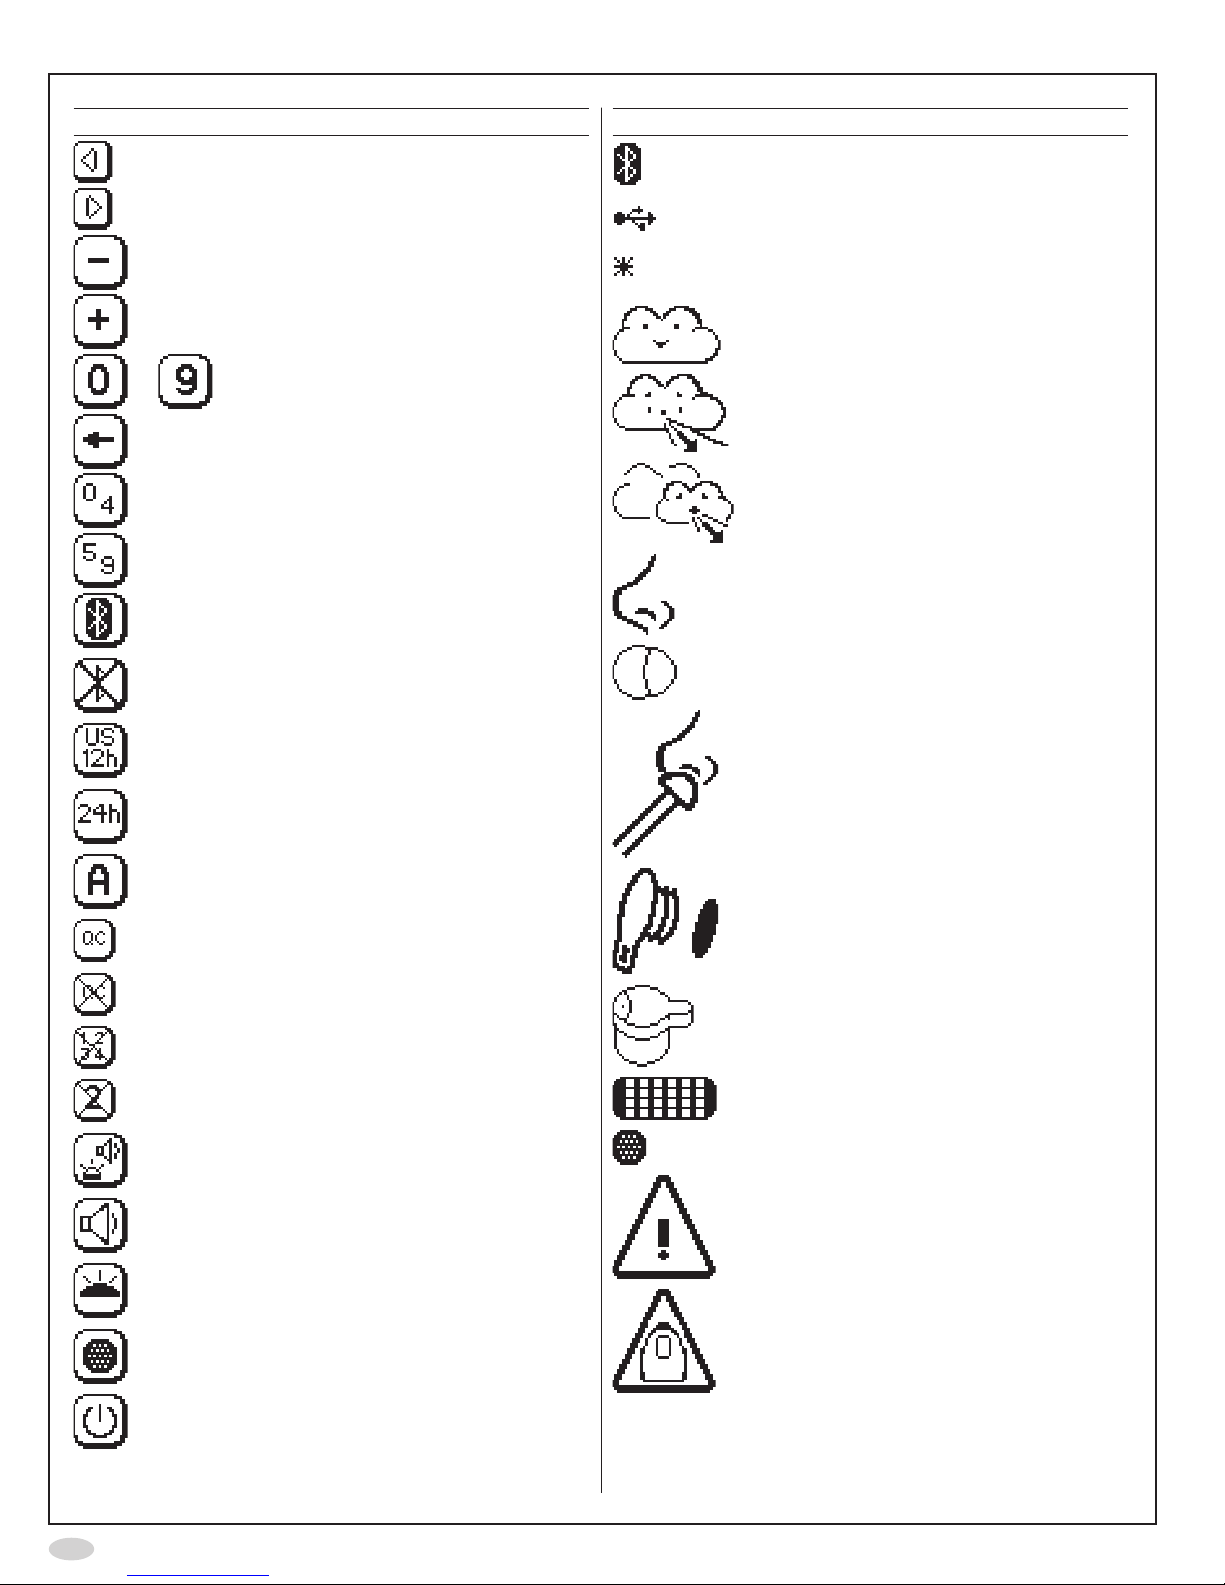
Display buttons and symbols
Button Description
EnterpatientID
ModeConguration
Measurement modes
Settings
QCsettings
Standard10secondexhalation
FeNO measurement
NotavailablefortheUSmarket,
research application
QCmeasurement
Ambient NO measurement
NotavailablefortheUSmarket,
research application
Storedmeasurementresults
StoredQCmeasurementresults
NotavailablefortheUSmarket,
research application
NotavailablefortheUSmarket,
research application
Demonstrationmode
Clock
Information
QCinfo
Forward
OK
Return
18
Button Description
Previous
Next
Decrease
Increase
to Number
Backspace
Shifttokeypad0-4
Shifttokeypad5-9
NotavailablefortheUSmarket
NotavailablefortheUSmarket
UStimeanddatesettings
ISOtimeanddatesettings
Alertinfo
ExternalQCon
ExternalQCoff
ResetQCtester
ConrmQCtesterreset
Soundandtoplight
Sound
Toplight
NOscrubbersetting
Controlledpoweroff
Symbol Description
NotavailablefortheUSmarket
USBcableconnected
Theinstrumenthasnotbeenveried
byadailyQC
Sleepmode
StandardFeNO measurement
NotavailablefortheUSmarket,
research application
NotavailablefortheUSmarket,
research application
Ambient NO measurement
NotavailablefortheUSmarket,
research application
InsertQCplug
InsertSensor
NO scrubber
NO scrubber
Generalwarning
Instrumentexpirationwarning
Table of contents
Other Circassia Medical Equipment manuals

Popular Medical Equipment manuals by other brands


Getinge
Getinge Arjohuntleigh Nimbus 3 Professional Instructions for use

Mettler Electronics
Mettler Electronics Sonicator 730 Maintenance manual

Pressalit Care
Pressalit Care R1100 Mounting instruction

Denas MS
Denas MS DENAS-T operating manual

bort medical
bort medical ActiveColor quick guide

AccuVein
AccuVein AV400 user manual


