CITA smart 11 User manual

Installation guide
smart
11 & 22

Contents
Introducing CITA Smart 22
Specifications Parameters
Preface
Safety Instructions
Package Contents
Installing CITA Smart 22
Commissioning
Wi-Fi Reset on CITA Smart 22
Plug-n-Play Mode
CITA Smart EV Connect App
Activation
Charger Operation
RFID Operation
How to setup Schedule
Charging
4G Router Configuration Guide
How to connect CITA Smart 22
to backend providers
Warranty
04
05
07
08
09
11
19
21
22
23
24
27
34
36
35
38
44

Smart 22
Approved EV Charger

Introducing CITA Smart 22
Commercial Charging Solution
Top Features
Compatible with all
Type 2 Charging Cables
Efficient Charging
CITA Smart EV App
via WiFi/4G/Ethernet
RFID Access
22kW Maximum Power Range
Solar PV Compatibility
with CT clamp
CITA Smart 22 commercial charger provides fast charging to an electric vehicle, using the chargers
on-board three phase supply. CITA Smart 22 designed with a type 2 charging socket, the charger is
compatible with either type 1 or type 2 cable. Compliant with the industrial standards, the charger
use MID certified meter to ensure accuracy and built-in RCD to secure the safety. CITA Smart 22 can
be connected to a charging network with the help of CITA Charger Management System portal.
Multiple public chargers in one location can be integrated into the network with only one Internet
communication connection
04

05
Electrical Specifications
AC Nominal Input
Phases/Lines
Rated Voltage
Rated Current
Frequency
3 phase + netural+ PE
400V±10%
32A
50/60Hz
AC Nominal Output
Output Voltage
Output Current
Output Power
400V±10%
6 - 32A programmable
22KW
General Specifications
Structure Design
Charging Socket
Charging Mode
Housing Material
LED Status Indication
RFID Card/Tag Qty.
MID Approved kWh Meter
6mA DC Trip
30mA AC Trip
IEC 62196 Type 2, IP54, locking
Mode 3 (IEC 61851-1 / SAE J1772 compliant
communication protocol)
High impact plastic
Green, Amber, Red
Yes, 5 supplied
Yes
Integrated
Required to install externally

4
Environmental Index
Operating Temperature
Working Humidity
Working Altitude
IP Rating
Mounting Method
Solar PV Compatibility
- 30~ + 50°C
5%~95% without condensation
<2000m
IP54
On a wall or on a poll
Optional, with 2nd external CT clamp
Package Information
Product Dimension
Net Weight
Gross Weight
435mm x 435mm x 225mm
4.90Kg
6.20Kg
06

07
The input and output voltages of this device are dangerously high, which can
endanger human life. Please strictly observe all warnings and operating instructions
on the device and in the manual. Unauthorised and non-professional service
personnel should not remove the cover of this device.
Warning
Thank you for your support on our products, our company focuses on the new energy field of electric
vehicle charging, dedicated to providing customers with excellent charging devices equipped with
all round solutions.
The ev chargers are of advanced functions with a steady performance, Wide range of application
and strong practicability, winning a good reputation in the industry.
Before any operation, please read the user manual carefully to understand the correct use of the
device. After reading, please retain the user manual for future review.
Preface

08
Safety Instructions
Please read the following safety instructions before handling the products:
Keep explosive and flammable materials, chemicals, vapours, and other hazardous objects away
from the charger.
Keep the charging socket clean and dry. If dirty, please wipe with a clean dry cloth. Touching the
socket core is strictly forbidden when powered on.
Do not use the charger in case the device has defects, cracks, abrasion, bare leakage and so on.
Please contact the working staff in case of the above conditions.
Do not attempt to disassemble, repair or refit the charger. If necessary, please contact the working
staff. The improper operation will result in device damage, electric leakage, etc.
In case any abnormal condition happens, please press the emergency stop button immediately,
and cut off all input and output power supply.
Please charge cautiously in rainy or lightning weather.
Children should not get close to or use the charger to avoid being hurt.
During charging, the EV is not allowed to drive. Charge only when the EV stops still. For Hybrid cars,
charging is allowed only when switching the engine off.

AB
C
D
F
E
Package Contents
The CITA Smart 22 box comes with the EV Charger(A), Front Case(B), a Wall Mount template(C), Screw
Set(D) to help with the installation, RFID(E) and a detailed user manual(F) to help you with the
installation process.
Package Verification
In case the package is
broken or damaged on
visual verification, notify
the seller immediately.
Check for all contents
mentioned above. Should
anything be missing, please
contact the seller
immediately.
09
User Manual
CITA Smart 22
www.citaevcharger.co.uk

Installing CITA Smart 22
https://www.youtube.com/watch?v=41yXTIFccoI
https://www.youtube.com/watch?v=41yXTIFccoI
https://www.youtube.com/watch?v=41yXTIFccoI
https://www.youtube.com/watch?v=41yXTIFccoI
https://www.youtube.com/watch?v=41yXTIFccoI
Scan the QR Code (or) Click on
the image to watch the installation video

11
INSTALLATION OF ANY ELECTRICAL DEVICE SHOULD BE CARRIED OUT BY A SUITABLY
QUALIFIED AND COMPETENT PERSON.
A qualified person has the skills and knowledge related to the construction, installation, & operation
of electrical devices and who has received safety training to recognise and avoid the hazards
involved.
Warning Electric Shock
Installing CITA Smart 22

12
Before installing the CITA Smart 22, The power line
you’re using is switched off on your service panel. "
In case the amperage rating of the charging cable is
different than the amperage rating of the (MCB), the
installer/user must change the station settings in the
mobile app and/or web platform for the station
management as provided by the operator or service
provider for this product.
The installation must incorporate an adequate
residual current device (RCD).
The MCB must be in line with the capacity of the
charging cable (22 kW).
In case the amperage rating of the charging cable is
different than the amperage rating of the (MCB), the
installer/user must change the station settings in the
mobile app and/or web platform for station
management as provided by the operator or service
provider for this product.
Things to keep in mind during Installation
of CITA Smart 22
This is a global product, and local wiring regulations & safety precautions within the country Of installation should be
adhered to at all times.
The CITA Smart 22 will require Wi-Fi communications to unlock all smart features of the charger. Before installation, it
is advisable to ensure a suitable Wi-Fi signal is available at your chosen point Of installation.
Bottom or Rear
Cable Entry
N, L3, L2, L1
Charging
Socket
MID
Energy
Meter
4G Router
RJ5 Connecter
Cable lock
Earthing
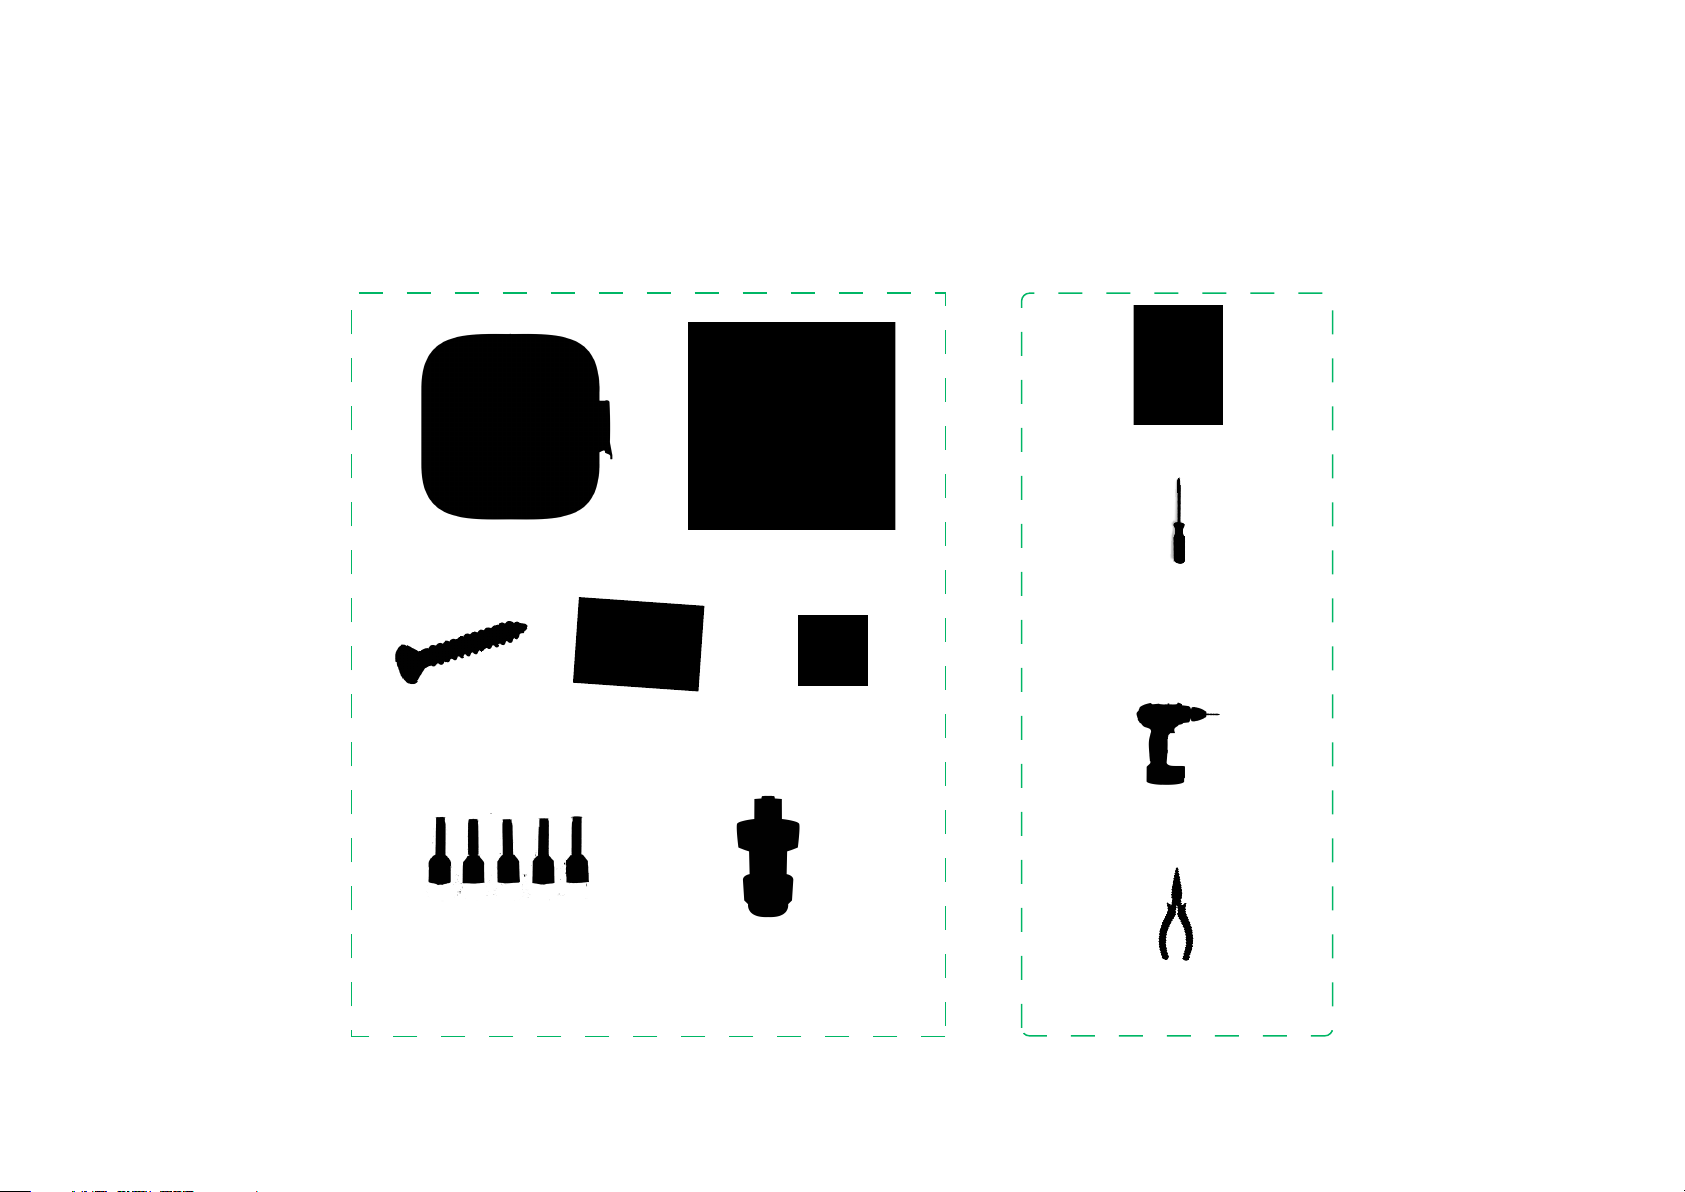
Tools Needed For The Installation
13
Included in the box Required Tools
CITA Smart 22
4 x Screws
32 mm x 6mm
Wall Mounting Template
4 x Plastic Fisher 2 x Screw Cap
Multimeter
Cross
Screwdriver
PH2x150mm / PH3x250mm
Electric Drill
Diagonal Pliers
3 Phase Cord
1 Blue 1 Red
1 Yellow 1 Black 1 x RJ45 Connecter

14
Preparing for Installation
1.3.1 Wall mounting method
Use the supplied template to drill
three fixing holes in the wall for the
supplied screws
Fix both top screws to allow you to hang
the charger

15
Preparing for Installation
Once the charger is hanging from the top
screws fix the charger firmly against the
wall by screwing from internally the
bottom screw.
Power supply cable installation from the
rear or bottom of the charger
The charger should be mounted at least
1.3m from ground level

Cabling should be prepared to be inserted from the back or from the bottom of the EV Charger.
Recommended to install the input power cable inside conduit.
The charger should be mounted at least 1.3m from ground level.
Electrical
Parameters
Input Voltage 400V±10%
Input Frequency 50/60Hz
Max Power 22kW
Output Voltage 400V±10%
Max Output Current 32A
Standby Power <8W
Note:
16

17
Connect the wires in their designated
terminals & make sure the cables are secure
before closing the transparent cover
Make sure no wiring is protruding from under
the transparent cover. Tighten the screws and
secure the transparent cover.
Do not over tighten
Commissioning

18
LED Notification Status
Check before Power-on
The charger is securely fitted to the wall/bracket
Chargers weatherproofing is not compromised
All electrical connections are securely tightened
All electrical connections are in the correct terminals
The charger lid and seal are secure and in the correct position
Secure the charger with the main cover
Please check the following before any operation
Standby Power-on, but no gun plug-in
State Description LED Status
Flashing green, 2S on 2S off
Ready to charge Gun plug-in, but not start charging yet Flashing yellow, 2S on 2S off
In charging Gun plug-in, and start charging by RFID Breathing green
Stop charging Charging stop, but gun is still plug-in Solid green
Fault Error happens Solid red

This device's input & output voltages are dangerously high, which can endanger human life. Please
strictly observe all warnings & operating instructions on the device and in the manual. Unauthorised
& non-professional service personnel should not remove the cover of this device
Warning
Wi-Fi Reset on CITA Smart 22
1. Open the CITA Smart 22 black cover and unscrew the transparent body cover.
2. Please press hold each highlighted white buttons
for 5-10 secs as soon as you turn on the charger.
3. This will reset the Wi-Fi and Bluetooth configuration
on the EV Charger and be ready for new network
pairing.
Solid Red: Ready to Pair
Blinking Red: Has Wi-Fi details and waiting to pair to a network
Solid Red Left, Blinking Green Right: Connected to the Wi-Fi
network and communicating to the backend.
Meaning of the LED notification
19

20
Switching between Online & Plug-n-Play Mode
Look for Jumper Name CN7 to change between
Online & Plug & Play mode operation.
Jumper in 2-3: Online Mode
(Default)
Jumper in 1-2: Plug & Play Mode
This manual suits for next models
2
Table of contents
Popular Batteries Charger manuals by other brands


VOLTCRAFT
VOLTCRAFT 1603380 operating instructions

Charge Xpress
Charge Xpress CXC-6525A owner's manual

Equinox Systems
Equinox Systems 7141-71SL instruction manual

Spygeargadgets
Spygeargadgets SG-HC240 quick start guide

Motomaster
Motomaster 011-1504-0 owner's manual

MY PROJECT
MY PROJECT MPLGD 10 A1 Original instructions