clage Zip 807121 Operating instructions

Zip
Instantaneous Hot Water
Electronically controlled instantaneous water heater
DSX Touch: 807121 - 50 °C
User and installation instructions
For 50°C models, the appliance delivers water not exceeding 50°C in accordance with AS3498

2
Instructions for installer - DSX Touch - 809508 - September 2021 v1.00 Art.no: 9120-34395
Contents
User instruction
. Description of the appliance ...........................
Simplified EU Declaration of Conformity ................
. How to use ..........................................
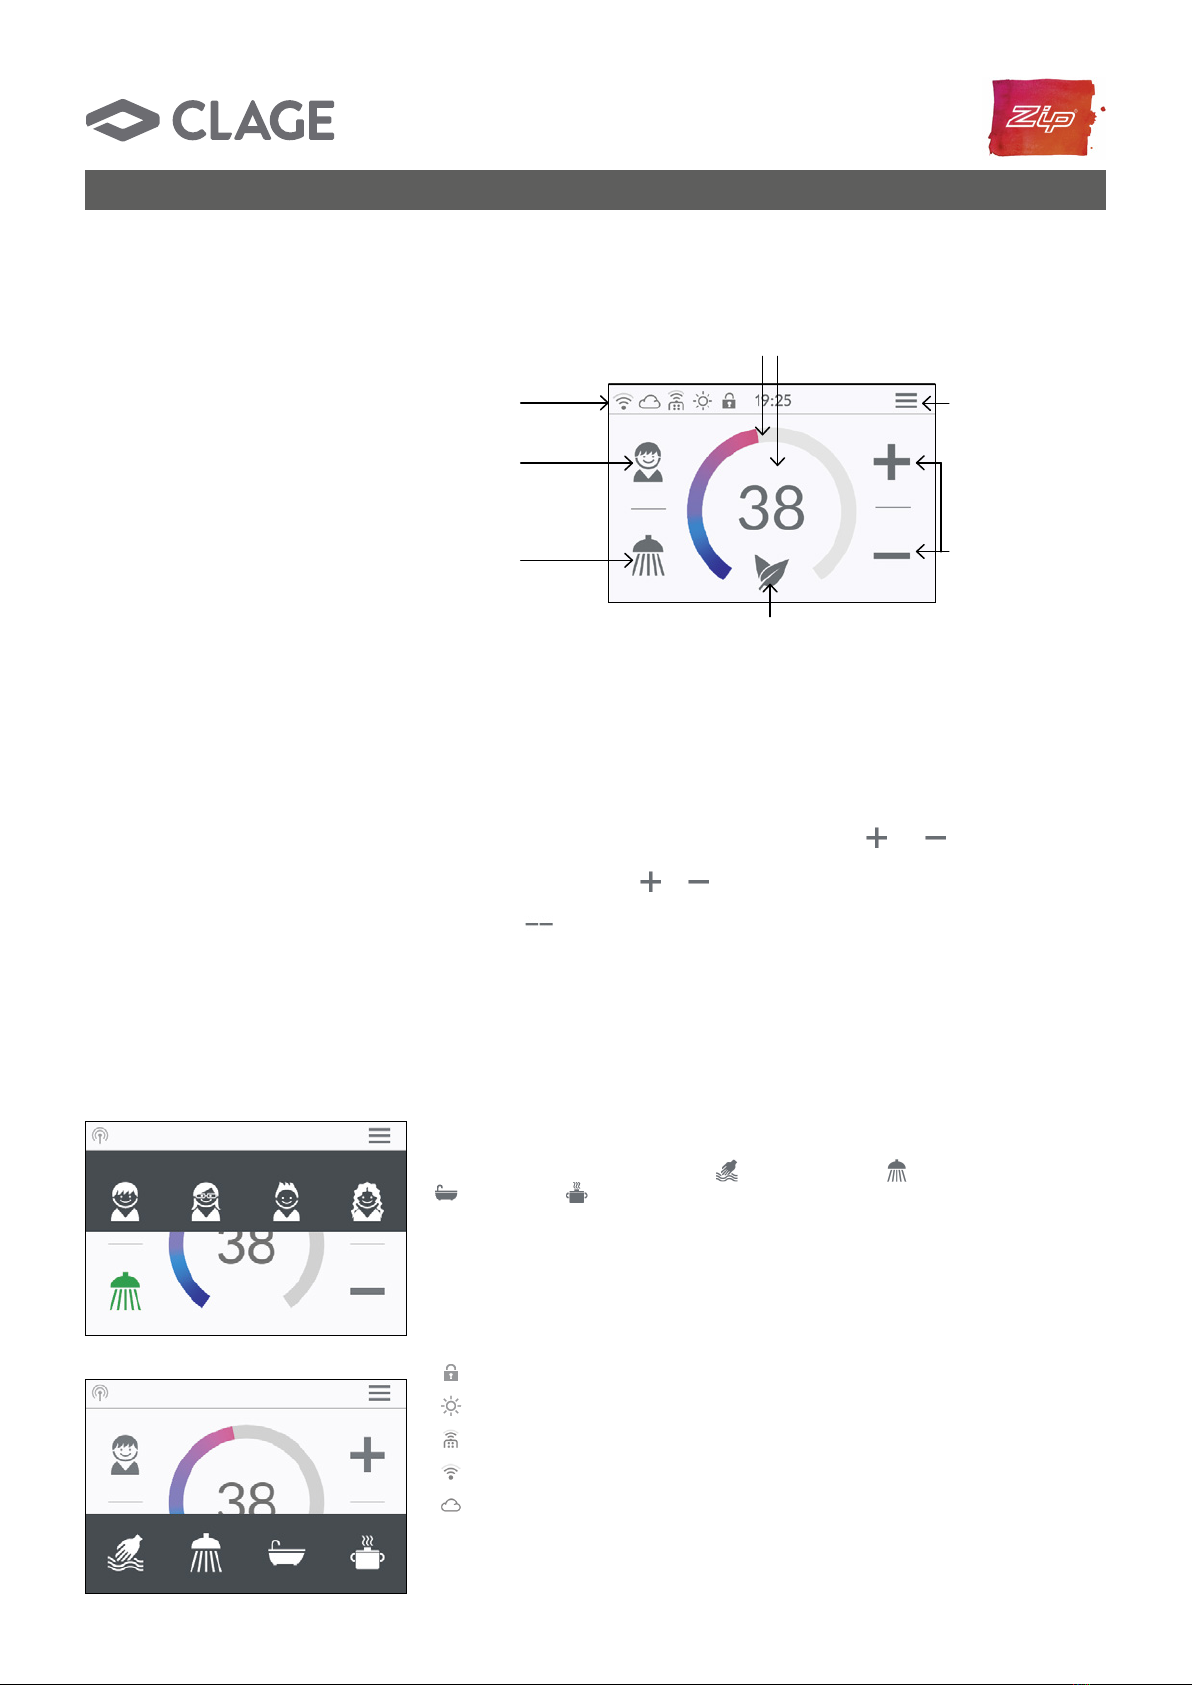
Main control .........................................
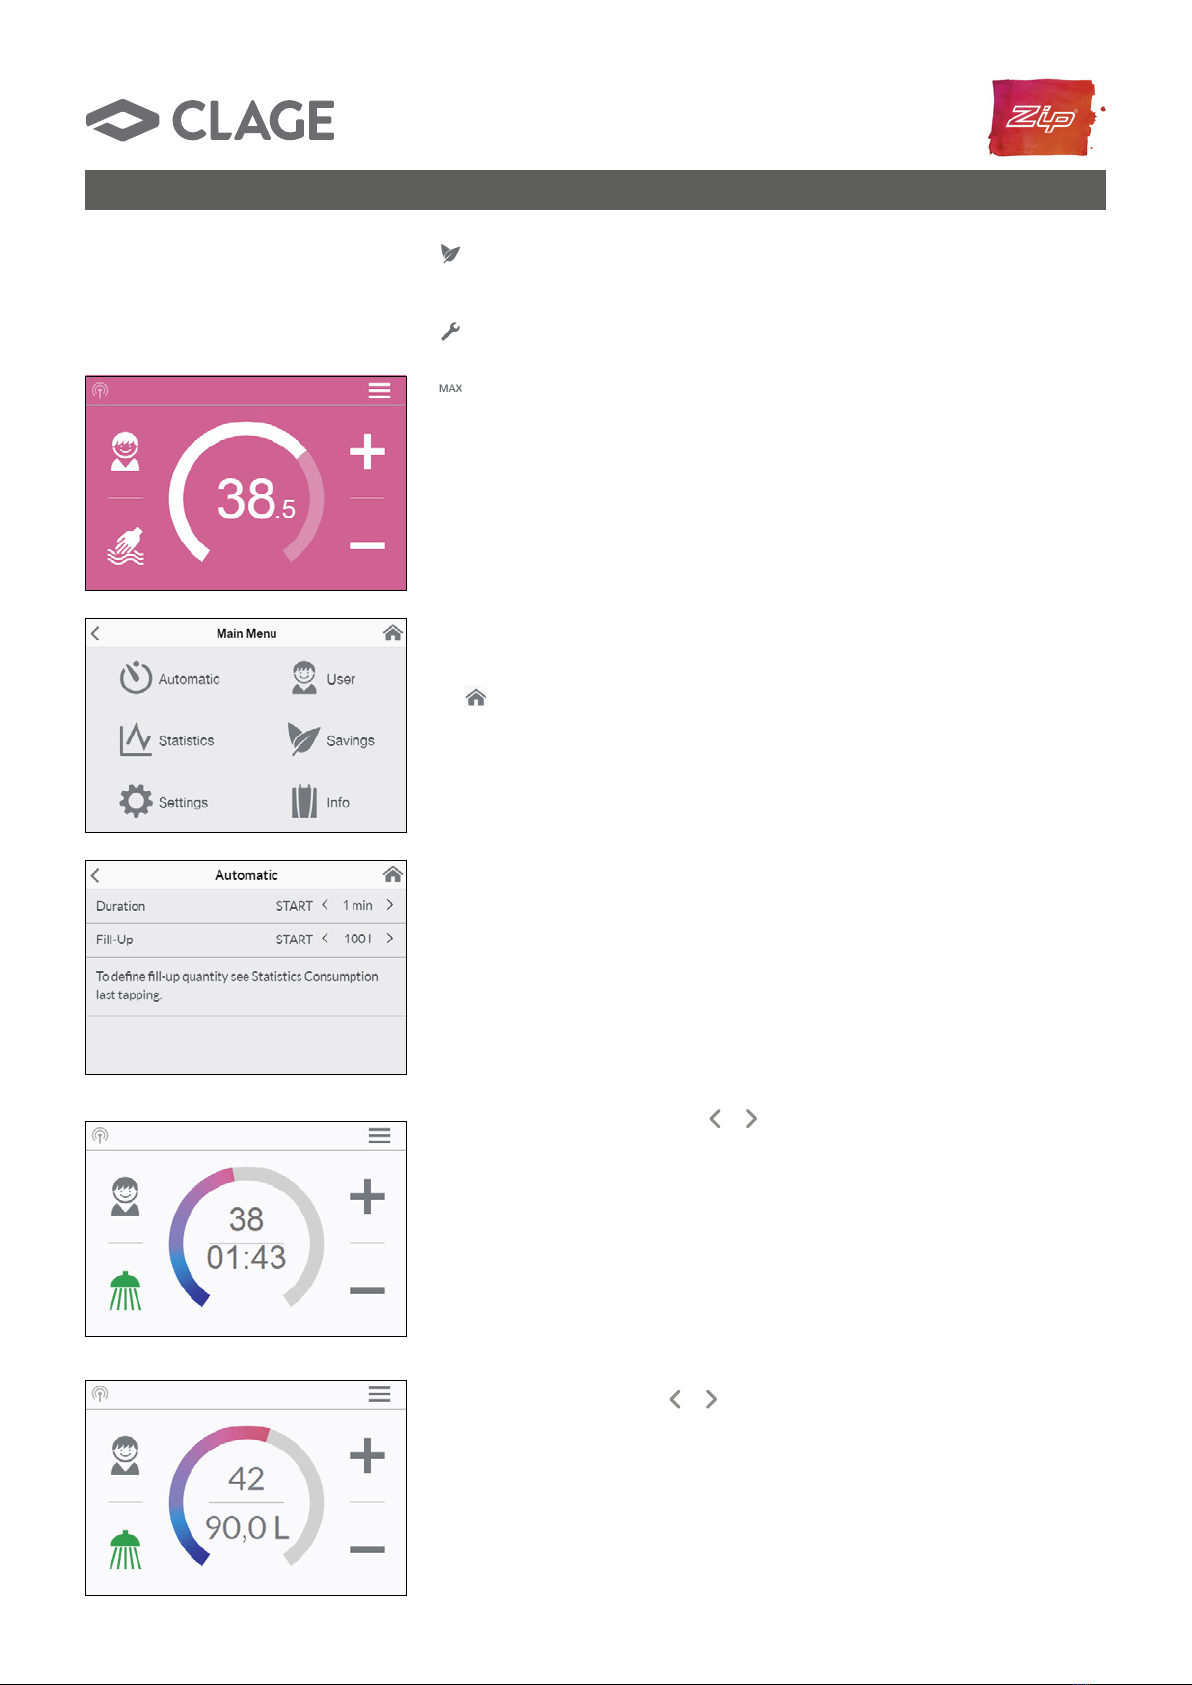
Main menu. . . . . . . . . . . . . . . . . . . . . . . . . . . . . . . . . . . . . . . . . . .
Statistics ............................................
Settings .............................................
User ................................................
Savings..............................................
Info .................................................
Power limit ..........................................
Top-up heating .......................................
How to save energy...................................
Venting after maintenance work........................
Cleaning and maintenance .............................
. Remote control ......................................
Mounting the wall bracket .............................
Initial operation ......................................
New registration of remote control at the instant water
heater...............................................
Handling ............................................
Displayed information.................................
Safety notes .........................................
Battery replacement ..................................
Disposal .............................................
. CLAGE app “Smart Control” ...........................
Initial operation ......................................
Activate/ deactivate Wi-Fi .............................
Software update......................................
Use .................................................
. Trouble-shooting and service...........................
. Product data sheet in accordance with EU regulation -
/ / ...............................
Installation instruction
. Overview............................................
. Technical specifications ...............................
. Environment and recycling ............................
. Dimensions ..........................................
. Installation. . . . . . . . . . . . . . . . . . . . . . . . . . . . . . . . . . . . . . . . . . .
Installation site .......................................
Mounting accessories .................................
Installing the wall bracket..............................
Installing connection pieces............................
Installing the appliance ................................
Mounting the remote control’s wall bracket..............
. Direct connection ....................................
. Electrical connection .................................
Wiring diagram .......................................
Structural prerequisites ...............................
Load shedding relay...................................
Electrical connection from below.......................
Electrical connection from above.......................
. Initial operation ......................................
Selection of power rating ..............................
Reinstallation ........................................
Notes in case of remote control connection problems.....
Shower application ...................................
Locking function .....................................
. Maintenance work ....................................
Cleaning and replacing the filter strainer ................
Cleaning and replacing the filter strainer if direct
connected ...........................................
The documents supplied with the device must be stored carefully.

3
Instructions for installer - DSX Touch - 809508 - September 2021 v1.00 Art.no: 9120-34395
1. Safety instructions
Please read these instructions carefully before installing or using the appliance! Keep
the instructions handy with the appliance for future use!
Installation, initial operation and maintenance of this appliance must only be conduct-
ed by an authorised professional, who will then be responsible for adherence to appli-
cable standards and installation regulations. We assume no liability for any damages
caused by failure to observe these instructions.
To observe additionally for pressureless installation:
• The water outlet behind the devices must not be blocked, and the water flow must not be restricted.
• The water outlet facilities, such as shower head, jet control and other outlet unit, must be decalcified regularly. Deposits
must be removed in regular intervals.
• Only the fittings recommended by the manufacturer may be used.
• If the appliance is exclusively connected to a single shower, only the shower heads recommended by the manufacturer
may be used. No other fittings or appliances which decrease the water flow to the shower may be installed.
• Do not use the appliance until it has been correctly installed and unless it is in perfect working order.
• Do not remove the front cover under any circumstances before switching off the mains electrical supply to the unit.
• Never make technical modifications, either to the appliance itself or the electrical leads and water pipes.
• The appliance must be earthed at all times.
• Pay attention to the fact that water temperatures in excess of approx. 43°C are perceived as hot, especially by children,
and may cause a feeling of burning. Please note that the fittings and taps may be very hot when the appliance has been
in use for some time.
• The appliance is only suitable for domestic use and similar applications inside closed rooms, and must only be used to
heat incoming water from the mains supply.
• The appliance must never be exposed to frost.
• The values stated on the rating plate must be observed.
• In case of malfunction, disconnect the fuses immediately. In case of leaks, cut off the mains water supply instantly.
Repairs must only be carried out by the customer service department or an authorised professional.
• This appliance can be used by children aged 3years and above and persons with reduced physical, sensory or mental
capabilities or lack of experience and knowledge if they have been given supervision or instruction concerning use of
the appliance in a safe way and understand the hazards involved. Children shall not play with the appliance. Cleaning and
user maintenance shall not be performed by children without supervision.
• If the appliance is factory equipped with a power supply cable, it must be replaced with an original spare cable from the
manufacturer in case of damage by an authorised technician in order to avoid any hazards.
• For appliances with direct connection, an all-pole disconnecting device with a contact opening width of ≥ 3 mm per
phase must be provided at the installation end, according to Australian wiring rules AS/NZ3000.
• The wall bracket must be secured with the supplied screws and dowels. The appliance must be secured to the wall
bracket. The appliance may only be operated if it has been properly mounted on the wall bracket.
• The prescribed nominal pressure stated on the rating plate may not be exceeded at any time.
• The required water resistance may not fall below the value stated on the rating plate at any time.

4
Instructions for User - DSX Touch - 809508 - September 2021 v1.00 Art.no: 9120-34395
2. Description of the appliance
As soon as you open the hot water tap, the instantaneous water heater switches on
automatically. When the tap is closed, the appliance automatically switches off. The
water heater is operated at the device itself, with the wireless remote control or via
the CLAGE app with a smartphone or tablet.
The E-convenience instant water heater DSX Touch is a fully electronically controlled
instantaneous water heater with touch display and remote control for a convenient
and efficient water supply to one or more tap outlets.
Its electronic control regulates the power consumption depending on the selected
outlet temperature, the respective inlet temperature and the flow rate, thus reaching
the set temperature exactly to the degree and keeping it constant in case of pressure
fluctuations. The required outlet temperature can be entered on the touch-sensitive
display within a range between 20 °C and 50 °C and can be read off that digital display.
Alternatively, the appliance can be conveniently controlled via the CLAGE app with a
smartphone or tablet or via an optional Bluetooth®remote control.
The DSX Touch has an intuitive menu guide where different user profiles can be set up
and where collected data can be read out
This appliance delivers water not exceeding 50°C in accordance with AS3498.
It is possible to use the instantaneous water heater in combination with an external
load shedding relay for electronically controlled instantaneous water heaters (refer to
installing instructions).
User instruction
Note: Carefully read the enclosed safety instructions through in full before the appliance
is installed, put into service and used and follow them in the further steps and during use!

5
Instructions for User - DSX Touch - 809508 - September 2021 v1.00 Art.no: 9120-34395
Temperature display
The coloured scale ring fills up as the temperature setting is increased and the colour
changes from blue when the temperature is low to red when the
temperature is high. In addition, the target temperature is displayed in °C as a figure in
the middle of the display.
Temperature setting
The desired temperature can be selected by tapping on and for the fine set-
ting or by dragging along the coloured scale ring for a quick selection within a range
of 20 °C to 50 °C. Tapping or once changes the temperature by 1°C, in the
comfort range between 35 and 43 °C by 0.5°C. If the temperature is set below 20 °C,
the symbol appears in the temperature display and the appliance switches off the
heating function.
User selection
Up to eight user profiles can be created. Every user has the option to save his desired
temperatures for the different uses in a profile. The user profiles can be selected by tap-
ping on the profile image and the temperatures saved in the profile are set (to create
profile, see Section “User”).
Applications
Preset applications can be selected here. Simply tap on the desired symbol.
The temperatures set at the factory (
Preset applications can be selected here. Simply tap on the desired symbol.
handwash=35 °C,
Preset applications can be selected here. Simply tap on the desired symbol.
shower=38 °C,
The temperatures set at the factory (
bath=42 °C,
The temperatures set at the factory (
hot water=48°C) can be changed for each application via the
temperature setting. If you touch the temperature value in the temperature display or
the application symbol for 3 seconds, the temperature is saved for the selected applica-
tion. The temperature display flashes once for confirmation. Application temperatures
saved in the user profile can be called up at any time by tapping on the corresponding
symbol
.
Status display, top
Control lock active (PIN)
The inlet temperature exceeds the target value (appliance does not heat up)
Optional Bluetooth remote control registered
Wi-fi is activated
The appliance is connected to the CLAGE Cloud
Status display, bottom
Display area for functions which require confirmation from the user or which are of
great significance.
3. How to use
Main control
The display shows the main control by default. The current status is displayed and by
tapping on the touch screen you get access to various submenus and functions.
Main menu
Temperature setting
Status display, bottom
Status display, top
User selection
Applications
Temperature display

6
Instructions for User - DSX Touch - 809508 - September 2021 v1.00 Art.no: 9120-34395
3. How to use
Main menu
All function menus and saved values of the appliance can be selected from here. Tap on
the symbol to go back to the main control.
Automatic
In this menu, two functions can be selected. Automatic either measures the time in
seconds via the function “Duration” or the flow of heated water in litres via the func-
tion “Fill-Up”. Cold water added at the tap cannot be recorded by the appliance. In
order to use the Automatic function correctly according to the fill quantity, it is there-
fore necessary to set the desired temperature on the appliance and only turn on the
hot water tap.
For each function per user profile, the last set start value is saved and can be activated
at any time.
Note: In Automatic mode, the operating functions are limited. When selecting a limited
function, an instruction window appears. Tap on “OK” to deactivate Automatic mode
and all functions are freely available again. Tap on “Cancel” to close the instruction win-
dow and Automatic mode remains active.
Duration: Under “Duration”, tap on or to set the desired time and then tap on
“START” to activate Automatic mode. The view changes to the main control where the
set time is displayed directly below the temperature display.
Tap on the time or turn on the hot water tap to start the function and the time starts
to count down as seconds. Tap on the time again to pause and restart the function at
any time. Turning off the tap does not pause the function. If hot water is already flow-
ing whilst the function is activated, it starts immediately.
To cancel the function, touch the time for three seconds.
When the time has elapsed, “00:00” flashes briefly. In addition, the flow quantity, if
it is being drawn, is reduced for around 10 seconds and then increased again. A short
acoustic signal is heard.
Fill-Up: Under “Fill-Up” tap o
n or to set the desired water quantity and then tap
on “START” to activate Automatic mode. The view changes to the main control where
the set quantity is displayed directly below the temperature display. Turning on the hot
water tap starts the function and the set fill quantity counts down in litre increments
according to the flow measurement.
Continued turning off and on of the tap pauses and restarts the function. If hot water
is already flowing whilst the function is activated, it starts immediately. To cancel the
function, touch the fill quantity for three seconds or turn off the water flow for a min-
ute.
Eco active: The outlet temperature for all applications and the water flow are
limited to an energy-efficient value. If the temperature is set higher via the
temperature setting, the symbol start to flash.
Maintenance: Tap the symbol to open a status message with additional informa-
tion.
Maximum temperature reached: The temperature cannot be increased any fur-
ther since the set temperature limit has been reached. The temperature limit
can be changed in the main menu under “Settings”.
Drawing mode
If heated water is drawn from a tap, the main control changes to drawing mode and,
depending on the set outlet temperature, changes the background colour from blue
for low temperatures to red for high temperatures. In this mode the scale ring displays
the actual power consumption of the appliance.

7
Instructions for User - DSX Touch - 809508 - September 2021 v1.00 Art.no: 9120-34395
Statistics
The statistics save the consumption and usage data for the appliance and display them
in graph format:
Water consumption
Power consumption
Total consumption costs
Wipe from right to the left to scroll the different periods. The consumptions are dis-
played consecutively in diagrams over a period from the last drawing of water, the
consumption today, the consumption yesterday, over the last seven days, the last four
weeks, the last twelve months and the last four years.
Note: The consumption data are not suitable for billing purposes.
3. How to use
Settings
This menu is used for the basic configuration on the appliance. Wipe to scroll through
the different menu items and tap on the values to change settings directly or go to dif-
ferent submenus.
Date / Time: The DSX Touch automatically receives its system time as soon as the
device is connected to a network with Internet access. Alternatively, you can set the
time manually and save it by tapping on “Save date and time”.
Note: If there is no internet connection the time will be lost in case of power failure.
Language: Select the menu language.
Currency: Select a currency symbol.
Temperature Unit: Defined as °C.
Temperature Limit: No function.
Operation Lock: Secure your settings with a four-digit PIN.
Note: The operation lock can only be deactivated with the correct PIN under
“Protected Sections” or under “Delete PIN”. If you should forget your PIN, please
contact after-sales Services.
When the fill quantity is reached, “0l” flashes briefly on the display and the appliance
stops the water flow by closing the motor valve. A long acoustic signal can also be
heard and an instruction message appears on the display. The motor valve stay closed
until the message is confirmed at the appliance or via app.
Turning off the tap is always necessary, the function must therefore not be used unsu-
pervised.
Before using the bath, make sure that the water temperature is what you want it to be.
Hint: The water amount of the last draw-off is stored in the “Statistics” menu. To
determine the necessary amount of water for your bathtub, fill it with warm water,
then select “Statistics” in the main menu and read out the value of this last drawing.
Enter this value in the automatic function “Fill-Up” to use it for the next bathtub filling.
Note: In the event of a power cut whilst the automatic is running according to the
fill quantity, the water flow is stopped by the motor valve. After power is restored
the valve remains closed a prompt appears on the display and an alarm signal can be
heard until the prompt is acknowledged by tapping on “OK”.

8
Instructions for User - DSX Touch - 809508 - September 2021 v1.00 Art.no: 9120-34395
Enter PIN: Numbers from 0 to 9 can be selected via the keypad. If you have selected
four digits, confirm by tapping on “OK”. The PIN must then be entered again and con-
firmed for security reasons.
If both entries match, you access the section “Protected Sections”.
Protected Sections: Select the areas for a PIN lock.
• Lock Settings: Automatically active as soon as a password has been generated.
Users can only access the settings menu with a PIN. Deactivating it deletes the cur-
rent PIN.
• + Lock Main Menu: Users can only access the main menu with a PIN
• + Lock Temperature: The outlet temperature is set to the current value and can only
be changed with a PIN. User profiles, applications and Eco mode can also only be
changed with a PIN.
Brightness: Reduce the display brightness e.g. to safe energy. The brightness can be
set separately for operation screen and standby mode.
• Operation 5-100%
• Standby 0-100% (0% = display OFF)
The setting of the standby mode will be activated after 1.5 minutes.
Sound: Activate / deactivate operating sounds.
Note: Alarm signals and instruction sounds can not be disabled.
Load Shedding (Expert Mode): No function.
Thermal treatment: No function.
Flow Limit: Setting of flow rate limitation.
Setting options:
“OFF” no flow rate limitation (motor valve deactivated)
“AUTO” automatic adjustment, i.e. flow rate is limited in a way so that the selected
outlet temperature is reached
“ECO” flow rate limitation to max. 8.0 l/min
e.g. “9.0” limitation to a freely selectable value between 4.5 and 25 l/min
Note: If the Eco function has been activated in the menu “Savings”, the flow is auto-
matically set to “ECO”. Changing the flow to a higher value than 8l/min deactivates
the Eco function
Factory Settings: All factory settings can be recalled:
• Restart Device: Set the temperature back to factory setting and restart the appli-
ance.
• Factory Reset: Deletes all entries made by the user inclusive statistics.
3. How to use

9
Instructions for User - DSX Touch - 809508 - September 2021 v1.00 Art.no: 9120-34395
3. How to use
Synchronize Statistics: Use this function to reload the statistical data.
Devices: All settings for operation with the app and for integrating the DSX-Touch into
a Wi-Fi network are made here. For more information, see chapter: “4. CLAGE app
Smart Control”.
Software Info: Information about the operating system, the imprint and licenses can
be viewed here. The “Expert Mode” can also be activated here. In the expert mode
you have access to sensitive system settings and functions.
Savings
Here, you can determine the parameters for the costs in the consumption statistics
and activate / deactivate the ECO mode. You can select a currency symbol under
“Settings”.
Electricity Tariff (€/kWh): Indicate the electricity price from your electricity company.
Water Tariff (€/m³): Indicate the water price from your water company.
ECO Settings: In Eco mode the outlet temperatures are limited to an energy-efficient
value
(handwash=35 °C, shower=38 °C, bath=42 °C,
hot water=48 °C).
Additionally the water flow is limited to 8 l/min.
User
Up to eight users can enter their names and select their own profile image. This
appears together with the first letters of the name in the main screen.
In the main control, every user can set up and save his own desired temperatures for
the different applications.
Tap the +symbol to add more profiles, use the pen to edit existing profiles and tap the
×symbol to delete the adjacent user profile.
Info
The current status and appliance data is listed here. By wiping you can scroll through
the different information values.
Power limit
If the full output of the instantaneous water heater DSX Touch does not suffice to heat
the tapped quantity of water, the control valve automatically reduces the flow rate so
that the set temperature is reached.

10
Instructions for User - DSX Touch - 809508 - September 2021 v1.00 Art.no: 9120-34395
• Plastic surfaces and fittings should only be wiped with a damp cloth. Do not use
abrasive or chlorine-based cleaning agents or solvents.
• For a good water supply, the outlet fittings (e.g. jet regulators and shower heads)
should be unscrewed and cleaned at regular intervals. Every three years, the electri-
cal and plumbing components should be inspected by an authorised professional in
order to ensure proper functioning and operational safety at all times.
Cleaning and maintenance
This instantaneous water heater features an automatic air bubble protection to prevent
it from inadvertently running dry. Nevertheless, the appliance must be vented before
using it for the first time. Each time the appliance is emptied (e.g. after work on the
plumbing system, if there is a risk of frost or following repair work), the appliance must
be re-vented before it is used again.
1. Disconnect the instantaneous water heater from the mains (e.g. via deactivating the
fuses).
2. Unscrew the jet regulator on the outlet fitting and open the cold water tap valve to
rinse out the water pipe and avoid contaminating the appliance or the jet regulator.
3. Open and close the hot water tap until no more air emerges from the pipe and all
air has been eliminated from the water heater.
4. Only then should you re-connect the power supply again (e.g. via activating the
fuses) to the instantaneous water heater and screw the jet regulator back in.
5. The appliance activates the heater after approx. 10seconds of continuous water
flow.
Venting after maintenance work
3. How to use
Set the exact temperature you need on the appliance and open the hot water tap.
Once you feel that the water is too hot, do not add any cold water and, instead, enter
a lower temperature on the appliance. If you were to add cold water, the water already
heated would cool down again and valuable energy would be wasted. Moreover, the
cold water added in the tap is not covered by the control range of the electronic cir-
cuitry, with the result that temperature constancy is no longer guaranteed.
How to save energy

11
Instructions for User - DSX Touch - 809508 - September 2021 v1.00 Art.no: 9120-34395
4. CLAGE app “Smart Control”
Initial operation
• Protect the appliance from unauthorised access by connecting it to an Internet-
connected IT infrastructure only if it is protected by a firewall.
• Protect the appliance against unauthorised access by using a secure Wi-Fi pass-
word. This should consist of letters, numbers and special characters and should not
be listed in the lexicon.
1. Make sure that the instantaneous water heater is supplied with voltage.
2. Install the control app on your tablet / smartphone. Search the Apple AppStore or
the Google Playstore for »CLAGE Smart Control« and install the app. Do not start
the control app yet.
3. Establish the Wi-Fi connection between your home network and the DSX Touch at
the appliance
. Enter “Devices” in settings menu, select the DSX Home Server, tab on
“Advanced” and select operation mode “Client” or “Accesspoint”.
Configuration as Client
1. All networks found in range are listed at “Network”. Tap your SSID to select your
home network. If the SSID of your home network is hidden, it must be temporarily
set to “visible” for the configuration.
2. Enter your Wi-Fi password and tab on “Apply”
3. The DSX Touch updates the Wi-Fi settings and tries to log in on the router using the
new access data. The tablet/ smartphone must be connected to the same network.
4. Return to the control app and start it. After the successful log-in on the home net-
work you have now access to your DSX Touch via the app.
5. In the Smart Control app you can check the successful installation by enter-
ing “Device” in settings menu, selecting the DSX Home Server and tapping on
“Connect...“. The following text should appear: “DSX Touch can be used.“
Note: An error message appears if it is not possible to log in with the entered access
data. Check the access data and repress “Apply”.
Note: A time delay of a few seconds is normal and dependent on the network infra-
structure and utilization.
Activate/ deactivate Wi-Fi
Go to the device configuration, select the DSX Touch Server and tap »Advanced«. By
tapping on the ON/OFF-button, you can enable / disable the WLAN.
Configuration as Accesspoint
If you want to use the DSX Touch as a stand-alone access point, please set up an indi-
vidual and secure password to protect it from unauthorised access:
1. Connect the tablet/ smartphone to the DSX Touch via Wi-Fi.
2. Select Wi-Fi in the settings menu of your tablet/ smartphone and type in the con-
necting data of your DSX Touch:
SSID = CLAGE-DSX... (see rating plate). The rating plate is located under the
removable faceplate at the bottom of the appliance.
Password = The password is a randomly generated code also printed on the
rating plate.
3. Check the control by temperature change via the app. Temperature changes on
smartphone / tablet must automatically update the display values at the instantane-
ous water heater and vice versa.
Note: If you have forgotten your password, please contact the factory customer ser-
vice.

12
Instructions for User - DSX Touch - 809508 - September 2021 v1.00 Art.no: 9120-34395
Software update
Updating the Smart Control app
We recommend using the latest software in order to ensure the impeccable and secure
operation of the CLAGE Home Server.
Any new control app version will be indicated in the app store.
• Updating iOS-devices: For updating your control app, select the “Updates“ tab in
the appstore and tap on the “Update“ button which is to the right of the control
app.
• Updating Android-OS-devices: For updating your control app, select the Smart
Control app in the Google Playstore and tap on the “Update“ button.
Updating the DSX Touch firmware
Note: Do not disconnect your DSX Touch from power supply during updates.
For an update the DSX Touch must be connected to a Wi-Fi network with internet
access.
The instantaneous water heaters is unavailable during the update for several minutes.
1. Go to the device configuration in the settings menu: (Main menu - Settings -
Device).
2. Select the DSX Touch which you want to update.
3. Select “Software”, then “Install update” and confirm the following message.
4. Wait for about 3-5 minutes until the control panel restarts and check the function
of the DSX Touch.
If an update is not possible even after multiple attempts, contact the after-sales ser-
vice.
Use
All functions described in chapter “3. How to use” can also be controlled via the Smart
Control app.
4. CLAGE app “Smart Control”

13
Instructions for User - DSX Touch - 809508 - September 2021 v1.00 Art.no: 9120-34395
This instantaneous water heater was manufactured conscientiously and checked sev-
eral times before delivery. Should malfunctions nevertheless occur, it is usually only
due to a bagatelle. First attempt to switch the house fuses off and on again in order to
reset the electronics. Next, try to remedy the problem with reference to the following
table. In doing so, you will avoid unnecessary expense of customer service assistance.
DSX Touch
Problem Cause Solution
Water stays cold, touch
display does not light
up
Master fuse tripped Renew or activate fuse
Safety pressure cut-out
tripped Contact customer service
Display shows
error symbol
The appliance has
detected an error.
Switch fuses off and on. If
symbol “wrench” is still indi-
cated, contact customer
service
Flow rate of hot
water too weak
Outlet fitting dirty or
calcified
Clean shower head, jet regula-
tor or sieves
Fine filter dirty or calci-
fied
Let clean fine filter by cus-
tomer service
Water flow is limited Deactivate Eco mode and flow
limit
Selected temperature
is not reached
Water flow rate too high (Re)activate motor-driven
valve in the menu “Flow Limit”
Cold water has been
added via the tap
Tap hot water only; set tem-
perature, check outlet tem-
perature
Touch display does not
respond correctly or
only sporadically
Display glass is wet Dry display by wiping it with a
soft cloth
App can’t find the DSX
Touch
Master fuse tripped Renew or activate fuse
Out of Wi-Fi range
Replace the tablet / smart-
phone near the access point
(router or DSX Touch)
Wi-Fi deactivated
(air plane mode)
Activate Wi-Fi at tab-
let / smartphone settings
Tablet / smartphone is
connected to another
Wi-Fi as the DSX Touch
Change to the same Wi-Fi as
the DSX Touch
Repairs must only be carried out by
authorised professionals.
If a fault in your appliance cannot be
rectified with the aid of this table, please
contact the service organisation of
your importer or the Central Customer
Service Department. Please have the
details of the typeplate at hand.
5. Trouble-shooting and service

14
Instructions for User - DSX Touch - 809508 - September 2021 v1.00 Art.no: 9120-34395
4
5
3
3
1
13
14
16
17
18
19
20
21
22
23
24
25
15
1. Overview
2
6
Installation instruction
7
9
10 11 12
8
Pos. Description
1 Bottom part
2 Safety thermal cut-out (STB)
3 DSX / DEX thermal sensor set 2.1
4 Non-return valve
5 Flow sensor
6 Heating element
7 Safety pressure cut-out (SDB)
8 Outlet pipe
9 Hot water connection
10 Screw-in nipples 1/2”
11 Grommet
12 Water splash protection sleeve
13 Wall bracket
14 DSX hood
15 DSX Touch connecting pipe
Pos. Description
16 PCB cover
17 Motor valve PCB
18 PCB
19 Motor valve
20 Connecting terminal
21 DSX Touch control panel incl.
panel support
22 Inlet pipe
23 Fine filter
24 Cold water connection
25 Frame
not shown:
26 Faceplate
27 Fittings kit
Parts in Bold Type are available as Spare Parts. Other parts are available on request
When ordering spare parts, please always specify the appliance model and serial number.

15
Instructions for User - DSX Touch - 809508 - September 2021 v1.00 Art.no: 9120-34395
Model DSX Touch 50 °C
Part no. 809508
Energy efficiency class A *)
Rated capacity / rated current 18 kW..27 kW (26 A..39 A)
Chosen capacity / current 18 kW / 26 A 21 kW / 30 A 24 kW / 35 A 27 kW / 39 A
Electrical connection 3~ / PE 380..415 V AC 3~ / PE 400 V AC
Min. required cable size 1) 4.0 mm24.0 mm26.0 mm26.0 mm2
Hot water (l/min) 2)
max. at ∆t = 28K
max. at ∆t = 38K
9.2
6.8
10.7
7.9
12.3
9.0
13.8
10.2
Rated volume 0.4 l
Rated pressure 1.0 MPa (10 bar)
Connecting type pressure-resistant / pressureless
Heating system Bare wire heating system IES®
@ 15 °C:
Required spec. water resistance
Spec. electrical conductivity
≥ 1100 cm
≤ 90 mS/m
Inlet temperature ≤ 50 °C
Switch on – max. flow rate 1.5 l/min – automatic 3)
Pressure loss 0.08 bar at 1.5 l/min 1.3 bar at 9.0 l/min
Temperature range 20 – 50 °C
Water connection G ½inch
Weight (when filled with water) 4.5 kg
Transmission and receiving frequency
range Wi-Fi 2.412 – 2.472 GHz (802.11b/g/n)
Transmission power Wi-Fi ≤ 100 mW
Radiation undirected
Transmission range 10meter incl. barrier
VDE class of protection I
Type of protection / safety IP25
*) The declaration complies with the EU regulation No812/2013.
1) The cross sectional area of the connection cable must be in accordance with the power rating of the appliance and the specific requirements of
AS/NZS 3000
2) Mixed water
3) Electronically controlled depending on the desired temperature and cold water temperature
2. Technical specifications
3. Environment and recycling
This product was manufactured climate neutrally according to Scope 1 + 2. We recom-
mend the purchase of 100% green electricity to make the operation climate neutral as
well.
Your product was manufactured from high-quality, reusable materials and compo-
nents. Please respect in case of discarding that electrical devices should be disposed
of separately from household waste at the end of their service life. Therefore, please
take this device to a municipal collection point that return used electronic devices to
the recycling system. Disposing it correctly will support environmental protection and
will prevent any potential negative effects on human beings and the environment that
could arise from inappropriate handling of these devices at the end of their service
life. Please contact your local authority for further details of your nearest designated
collection point or recycling site.
Business customers: If you wish to discard equipment, please contact your dealer or
supplier for further information.

16
Instructions for User - DSX Touch - 809508 - September 2021 v1.00 Art.no: 9120-34395
4. Dimensions
100
170
468 363
56
96
239
Dimensions in mm
The following regulations must be observed:
• e.g. VDE 0100
• EN 806
• Installation must comply with all statutory regulations, as well as those of the local
electricity and water supply companies.
• The rating plate and technical specifications
• Only intact and appropriate tools must be used
5. Installation
• Do not install the device in the immediate proximity of metal surfaces to allow a
reliable wireless connection and an optimal wireless range.
Installation site
• Appliance must only be installed in frost-free rooms. Never expose appliance to
frost.
• The Appliance must be wall mounted and has to be installed with water connectors
downward or alternative transversely with water connections left.
• The appliance complies with protection type IP25.
• To avoid thermal losses and dead legs, the distance between the instantane-
ous water heater and the furthest outlet should be kept as short as possible
(<6meters). In addition all hot water pipe work should be insulated in accordance
with AS/NZS 3500.
• For maintenance work, a shut-off valve should be installed in the supplyline. The
appliance must be accessible for maintenance work.
• The specific resistance of the water must be at least 1100 cm at 15 °C. The specific
resistance can be asked for with your water distribution company.
• The appliance delivers water not exceeding 50 °C in accordance with AS3498.
• This appliance must only be installed in accordance with the acceptable plumbing
configurations specified in these instructions. Failure to do so may result in condi-
tions where delivery temperature control is inadequate.

17
Instructions for User - DSX Touch - 809508 - September 2021 v1.00 Art.no: 9120-34395
Note: If you install this instantaneous water heater in exchange for a conventional
instantaneous water heater, there is generally no need to drill holes for the wall brack-
et, in this case step 2 would not be necessary.
Thoroughly rinse the water supply pipes before installation to remove soiling from the
pipes.
1. Using a 12mm hexagon socket screw key, screw the screw-in nipples into the wall
connections. The seals must be fully screwed into the thread. After tightening, the
double nipples must protrude by 12 – 14mm.
2. Hold the included mounting template on the wall and align it so that the holes in the
template fit over the double nipples. Mark the drill holes according to the template
and drill them using a 6mm drill. Insert the included dowels.
3. Pull down the faceplate and unscrew the main hood screw to open the appliance.
4. Loosen the knurled nut to remove the wall bracket and screw the wall bracket to
the wall. Offset tiling or uneven surfaces can be compensated by up to 30mm with
the aid of the spacers supplied. The spacers are fitted between the wall and the wall
bracket.
5. Installation
Installing the wall bracket
Note: Fasten the screw nuts with caution, to avoid damage to the valves or the piping
system.
• As shown in the illustration, screw the cold water connection piece with the union
nut and the ½inch seal onto the cold water connection.
• Screw the hot water connection piece with the union nut and the ½inch seal onto
the hot water connection.
Installing connection pieces
cold
warm

18
Instructions for User - DSX Touch - 809508 - September 2021 v1.00 Art.no: 9120-34395
• The electrical power supply cable may be connected in the upper part or is surface
mounted. Only in such case, first follow the steps one through three according to
the description “Electrical connection from above” in chapter “Electrical connec-
tion”.
1. Place the appliance on the heater bracket so that the threaded rod of the wall
bracket fits in the corresponding hole of the appliance. If necessary, slight cor-
rections are possible by carefully bending the threaded rod of the wall bracket.
However, it must be possible to screw on the water connection pipes of the appli-
ance without applying force.
2. Screw the plastic knurled nut onto the threaded rod of the wall bracket.
3. Screw the two ⅜inch union nuts of the appliance‘s water connection pipes, each
with the ⅜inch seal, onto the fittings.
5. Installation
Installing the appliance
(a)
closed
open
4. Open the water supply line to the unit and slowly open (position “open“) the shut-
off valve (a) in the cold water connection piece. Check all connections for leaks.
5. Next, open and close the hot water tapping valve several times until no more air
emerges from the line and all air has been eliminated from the instantaneous water
heater.

19
Instructions for User - DSX Touch - 809508 - September 2021 v1.00 Art.no: 9120-34395
6. Direct connection
Note: Fasten the screw nuts with caution, to avoid damage to the valves or the piping
system.
For direct connection, the two ½inch screw-in nipples and the ½inch seals must be
screwed into the ½inch union nuts of the hot-water and cold-water connectors. The
two ½inch caps of the side outlets of the hot-water and cold-water connectors must
be removed and screwed onto the open end of the screw-in nipples. The hot-water and
cold-water connectors must then be screwed into the 3/8inch union nut of the appli-
ance inlet and outlet pipe, together with the 3/8inch seals.
For direct connection, it may be advisable to mount the appliance at a distance as illus-
trated alongside, using the spacer sleeves supplied. The two fixing holes near the lower
pipe connections are also to be professionally fixed with 6mm dowels and screws.
The flared end of the pipes must be screwed into the ½inch side outlets of the hot-
water and cold-water connectors with ½inch union nuts and ½inch seals. The holes
required for the pipes must then be opened of the housing with the aid of a blunt
implement.
In case of direct connection please note: Put the strainer into the cold water connec-
tion!

20
Instructions for User - DSX Touch - 809508 - September 2021 v1.00 Art.no: 9120-34395
Only by a specialist!
Please observe:
• e.g. VDE 0100
• The installation must comply with current IEC and national local regulations or any
particular regulations, specified by the local electricity supply company
• The rating plate and technical specifications
• The appliance must be earthed!
7. Electrical connection
Wiring diagram
1. Electronic circuitry
2. Heating element
3. Safety pressure cut-out
4. Connecting terminal
5. Safety thermal cut-out
12
5
3
4
Structural prerequisites
• The cross sectional area of the connection cable must be in accordance with the
power rating of the appliance and the specific requirements of AS/NZS 3000.
• The appliance must be permanently connected to the electrical supply through an
isolation switch as per AS/NZS 3000.
• The electric wiring should not be damaged. After mounting, the wiring must not be
direct accessible.
• An all-pole disconnecting device (e.g. via fuses) with a contact opening width of at
least 3 mm per pole should be provided at the installation end.
• To protect the appliance, a fuse element with trigger characteristic C must be fitted
with a tripping current commensurate with the nominal current of the appliance.
A
Note: If necessary, the connecting terminal can be displaced to the upper part of the
appliance. If you want to do so, please follow the instructions in the next chapter.
Check that the power supply is switched off prior to electrical connection!
1. Dismantle approximately 6cm off the connecting cable above the wall outlet. With
the smaller opening ahead, slide the water splash protection sleeve over the con-
necting cable so that the sleeve is flush with the wall. This prevents any leaking
water from coming into contact with the electrical leads. It must not become dam-
aged! The protection sleeve must be used!
2. Open the control panel rightwards.
3. Strip the cables and plug them in the connecting terminals according to the wiring
diagram. The appliance must be earthed.
4. Pull the protective sleeve over the connecting cables until the sleeve fits perfectly
in the recess of the intermediate panel. Adjust the water splash protection sleeve as
illustrated and fix it with the sleeve fixing (A). Reinsert the control panel and lock it
on.
5. Place the hood on the appliance and screw in the fastening screw. After that you
can slide on the faceplate from the bottom up to the stop.
Electrical connection from below
Table of contents
Other clage Water System manuals

clage
clage Zip HydroTap G5 BC 20 User manual

clage
clage Zip HydroTap MINIBOIL User manual

clage
clage Zip HydroTap G5 BCS 60 User manual

clage
clage Zip HydroTap G5 BCS 20 User manual

clage
clage Zip HydroTap G5 CS 100 User manual

clage
clage Zip HydroTap G5 CS 100 User manual

clage
clage Zip HydroTap G4 C 175 User manual

clage
clage Zip HydroTap G4 BCS 100/75 User manual

clage
clage Zip HydroTap G4 CS 175 User manual

clage
clage Zip HydroTap G4 BCS 100/75 User manual